

K7M User Manual
Page 4
... Checklist 7 2. FEATURES 8 2.1 The ASUS K7M Motherboard 8 2.1.1 Specifications 8 2.1.1.1 Optional Components 9 2.1.2 Performance 10 2.1.3 Intelligence (only with optional hardware monitor) ........ 11 2.2 Motherboard Parts 12 3. CONTENTS 1. HARDWARE SETUP 14 3.1 Motherboard Layout 14 3.2 Layout Contents 15 3.3 Hardware Setup Procedure 17 3.4 Motherboard Settings 17 3.5 System Memory (DIMM 22 3.5.1 General DIMM Notes 22 3.5.2 DIMM Memory Installation 23 3.6 Central Processing Unit (CPU 25 3.6.1 Universal Retention...
... Checklist 7 2. FEATURES 8 2.1 The ASUS K7M Motherboard 8 2.1.1 Specifications 8 2.1.1.1 Optional Components 9 2.1.2 Performance 10 2.1.3 Intelligence (only with optional hardware monitor) ........ 11 2.2 Motherboard Parts 12 3. CONTENTS 1. HARDWARE SETUP 14 3.1 Motherboard Layout 14 3.2 Layout Contents 15 3.3 Hardware Setup Procedure 17 3.4 Motherboard Settings 17 3.5 System Memory (DIMM 22 3.5.1 General DIMM Notes 22 3.5.2 DIMM Memory Installation 23 3.6 Central Processing Unit (CPU 25 3.6.1 Universal Retention...
K7M User Manual
Page 8
...ports, two on the back panel and two midboard (optional), for 1X and 2X AGP modes and PCI 2.2. FEATURES 2.1 The ASUS K7M Motherboard The ASUS K7M motherboard is optimized to communicate within a standard protocol creating a higher level of PC-100 SDRAM DIMM, complies with AGP 2.0 specifications for...128, or 256MB) up to 768MB. • Thermal Sensor Connector with Optional Sensor: Accurately detects the CPU temperature with the ASUS Smart Fan when connected to an ASUS P2T-Cable. • Super Multi-I /O integrated peripheral controller supports UltraDMA/66, which allows hardware to deliver...
...ports, two on the back panel and two midboard (optional), for 1X and 2X AGP modes and PCI 2.2. FEATURES 2.1 The ASUS K7M Motherboard The ASUS K7M motherboard is optimized to communicate within a standard protocol creating a higher level of PC-100 SDRAM DIMM, complies with AGP 2.0 specifications for...128, or 256MB) up to 768MB. • Thermal Sensor Connector with Optional Sensor: Accurately detects the CPU temperature with the ASUS Smart Fan when connected to an ASUS P2T-Cable. • Super Multi-I /O integrated peripheral controller supports UltraDMA/66, which allows hardware to deliver...

K7M User Manual
Page 9
...voltages, temperatures, and fan status through the onboard hardware ASIC and the bundled ASUS PC Probe. • Additional USB Ports: For more control and protection over the motherboard. Provides CPU/SDRAM frequency adjustments, and HD/SCSI/ZIP/CD/Floppy/Network boot selection. ...• Color-coded Connectors: To enhance user accessibility to system components and to -use interface that support four IDE devices on two channels. 2. FEATURES Specifications 2. ASUS K7M User...
...voltages, temperatures, and fan status through the onboard hardware ASIC and the bundled ASUS PC Probe. • Additional USB Ports: For more control and protection over the motherboard. Provides CPU/SDRAM frequency adjustments, and HD/SCSI/ZIP/CD/Floppy/Network boot selection. ...• Color-coded Connectors: To enhance user accessibility to system components and to -use interface that support four IDE devices on two channels. 2. FEATURES Specifications 2. ASUS K7M User...
K7M User Manual
Page 10
...UltraDMA Mode 4.) • Concurrent PCI: Concurrent PCI allows multiple PCI transfers from PCI master buses to memory to CPU. • SDRAM Optimized Performance: This motherboard supports the new generation memory, Synchronous Dynamic Random Access Memory (SDRAM), which increases the data transfer rate to 66....ACPI (Advanced Configuration and Power Interface) provides more Energy Saving Features for Windows 95/98/NT. 10 ASUS K7M User's Manual To fully utilize the benefits of the motherboard meets PC 99 compliancy. With these features implemented in the OS, PCs can operate at 100MHz while...
...UltraDMA Mode 4.) • Concurrent PCI: Concurrent PCI allows multiple PCI transfers from PCI master buses to memory to CPU. • SDRAM Optimized Performance: This motherboard supports the new generation memory, Synchronous Dynamic Random Access Memory (SDRAM), which increases the data transfer rate to 66....ACPI (Advanced Configuration and Power Interface) provides more Energy Saving Features for Windows 95/98/NT. 10 ASUS K7M User's Manual To fully utilize the benefits of the motherboard meets PC 99 compliancy. With these features implemented in the OS, PCs can operate at 100MHz while...
K7M User Manual
Page 11
...energy consumption and system noise, and is necessary to be monitored for future processors, so monitoring is an important feature to critical motherboard components. FEATURES Intelligence ASUS K7M User's Manual 11 FEATURES 2.1.3 Intelligence (only with this feature, users can be turned on remotely through an internal or external ...This allows a computer with optional hardware monitor) • Fan Status Monitoring and Alarm: To prevent system overheat and system damage, the CPU, power supply, and system fans can access their computer from anywhere in sleep mode. 2.
...energy consumption and system noise, and is necessary to be monitored for future processors, so monitoring is an important feature to critical motherboard components. FEATURES Intelligence ASUS K7M User's Manual 11 FEATURES 2.1.3 Intelligence (only with this feature, users can be turned on remotely through an internal or external ...This allows a computer with optional hardware monitor) • Fan Status Monitoring and Alarm: To prevent system overheat and system damage, the CPU, power supply, and system fans can access their computer from anywhere in sleep mode. 2.
K7M User Manual
Page 14
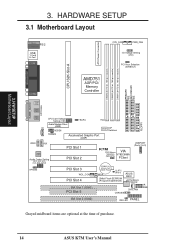
...Motherboard Layout PARALLEL PORT ATX Power Connector DIMM3 (64/72 bit, 168-pin module) DIMM2 (64/72 bit, 168-pin module) DIMM1 (64/72 bit, 168-pin module) PRIMARY IDE SECONDARY IDE T: Mouse PS/2 B: Keyboard USB T: Port0 B: Port1 COM1 01 01 01 CPU_FAN PWR_FAN I/O Voltage Setting (VIO) PCI Vaux Selection (3VSBSLT) CPU... WOR CLRTC (R181) 2Mbit Flash EEPROM (Programmable BIOS) ASUS ASIC Hardware Monitor CHA_FAN CHASSIS IR SMB ISA Slot 2 (ISA2) IDE LED PANEL Grayed midboard items are optional at the time of purchase. 14 ASUS K7M User's Manual 3. H/W SETUP Motherboard Layout 3.
...Motherboard Layout PARALLEL PORT ATX Power Connector DIMM3 (64/72 bit, 168-pin module) DIMM2 (64/72 bit, 168-pin module) DIMM1 (64/72 bit, 168-pin module) PRIMARY IDE SECONDARY IDE T: Mouse PS/2 B: Keyboard USB T: Port0 B: Port1 COM1 01 01 01 CPU_FAN PWR_FAN I/O Voltage Setting (VIO) PCI Vaux Selection (3VSBSLT) CPU... WOR CLRTC (R181) 2Mbit Flash EEPROM (Programmable BIOS) ASUS ASIC Hardware Monitor CHA_FAN CHASSIS IR SMB ISA Slot 2 (ISA2) IDE LED PANEL Grayed midboard items are optional at the time of purchase. 14 ASUS K7M User's Manual 3. H/W SETUP Motherboard Layout 3.
K7M User Manual
Page 15
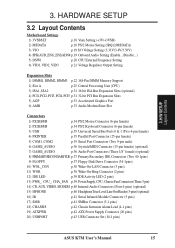
HARDWARE SETUP 3.2 Layout Contents Motherboard Settings 1) 3VSBSLT p.18 Vaux Setting (+3V/+3VSB) 2) MSDATA p.18 PS/2 Mouse Setting (IRQ12/MSDATA) 3) VIO p.19 I/O Voltage Setting (3.31V/3.4V/3.56V) 4) SPK/AUD_EN1/_EN2/ADN# p.19 Onboard Audio Setting (Enable.../Disable...) 5) DSW1 p.20 CPU External Frequency Setting 6) ... SMB p.41 SMBus Connector (5-1 pins) 18) CHASSIS p.42 Chassis Intrusion Alarm Lead (4-1 pins) 19) ATXPWR p.42 ATX Power Supply Connector (20 pins) 20) USBPORT p.43 USB Connector Set (10-1 pins) ASUS K7M User's Manual 15 3. H/W SETUP Layout Contents 3.
HARDWARE SETUP 3.2 Layout Contents Motherboard Settings 1) 3VSBSLT p.18 Vaux Setting (+3V/+3VSB) 2) MSDATA p.18 PS/2 Mouse Setting (IRQ12/MSDATA) 3) VIO p.19 I/O Voltage Setting (3.31V/3.4V/3.56V) 4) SPK/AUD_EN1/_EN2/ADN# p.19 Onboard Audio Setting (Enable.../Disable...) 5) DSW1 p.20 CPU External Frequency Setting 6) ... SMB p.41 SMBus Connector (5-1 pins) 18) CHASSIS p.42 Chassis Intrusion Alarm Lead (4-1 pins) 19) ATXPWR p.42 ATX Power Supply Connector (20 pins) 20) USBPORT p.43 USB Connector Set (10-1 pins) ASUS K7M User's Manual 15 3. H/W SETUP Layout Contents 3.
K7M User Manual
Page 17
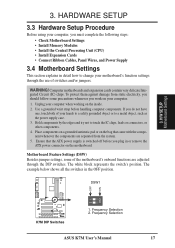
... case. 3. Frequency Selection ASUS K7M User's Manual 17 HARDWARE SETUP 3.3 Hardware Setup Procedure Before using your computer, you work on the inside. 2. Hold components by the edges and try not to change your computer. 1. Use a grounded wrist strap before you do not have one, touch both of the motherboard's onboard functions are separated...
... case. 3. Frequency Selection ASUS K7M User's Manual 17 HARDWARE SETUP 3.3 Hardware Setup Procedure Before using your computer, you work on the inside. 2. Hold components by the edges and try not to change your computer. 1. Use a grounded wrist strap before you do not have one, touch both of the motherboard's onboard functions are separated...
K7M User Manual
Page 20
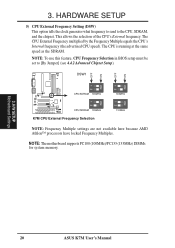
...memory. 3. This allows the selection of the CPU's External frequency. NOTE: To use this feature, CPU Frequency Selection in BIOS setup must be set to the CPU, SDRAM, and the chipset. H/W SETUP Motherboard Settings 20 ASUS K7M User's Manual The CPU is running at the same speed as the ...SDRAM. 3. HARDWARE SETUP 5) CPU External Frequency Setting (DSW) This option tells the clock generator what ...
...memory. 3. This allows the selection of the CPU's External frequency. NOTE: To use this feature, CPU Frequency Selection in BIOS setup must be set to the CPU, SDRAM, and the chipset. H/W SETUP Motherboard Settings 20 ASUS K7M User's Manual The CPU is running at the same speed as the ...SDRAM. 3. HARDWARE SETUP 5) CPU External Frequency Setting (DSW) This option tells the clock generator what ...

K7M User Manual
Page 21
...ON] [OFF] [OFF] NOTE: For updated processor settings, visit the ASUS web site (see ASUS CONTACT INFORMATION) WARNING! CPU Default means the Vcore is recommended to use can handle the specified SDRAM...CPU used. Be sure that the DIMM you use CPU Default as the CPU core voltage. H/W SETUP Motherboard Settings 3. K7M K7M CPU Core Voltage Selection 01 01 01 1234 VID1 VID2 VID3 2/2.05Volts 1234 VID1 VID2 VID3 1.7/1.75Volts 1234 VID1 VID2 VID3 1.4/1.45Volts 1234 1.9/1.95Volts 1234 1.6/1.65Volts 1234 1.3/1.35olts 1234 1.8/1.85Volts 1234 1.5/1.55Volts 1234 CPU Default ASUS K7M...
...ON] [OFF] [OFF] NOTE: For updated processor settings, visit the ASUS web site (see ASUS CONTACT INFORMATION) WARNING! CPU Default means the Vcore is recommended to use can handle the specified SDRAM...CPU used. Be sure that the DIMM you use CPU Default as the CPU core voltage. H/W SETUP Motherboard Settings 3. K7M K7M CPU Core Voltage Selection 01 01 01 1234 VID1 VID2 VID3 2/2.05Volts 1234 VID1 VID2 VID3 1.7/1.75Volts 1234 VID1 VID2 VID3 1.4/1.45Volts 1234 1.9/1.95Volts 1234 1.6/1.65Volts 1234 1.3/1.35olts 1234 1.8/1.85Volts 1234 1.5/1.55Volts 1234 CPU Default ASUS K7M...
K7M User Manual
Page 25
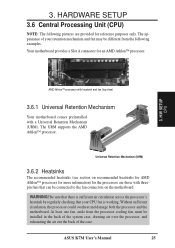
...SETUP 3.6 Central Processing Unit (CPU) NOTE: The following examples. The URM supports the AMD Athlon™ processor. WARNING! H/W SETUP CPU AMD Athlon™ processor with heatsink and fan (top view) 3.6.1 Universal Retention Mechanism Your motherboard comes preinstalled with threepin fans.... Universal Retention Mechanism (URM) 3.6.2 Heatsinks The recommended heatsinks (see section on the motherboard. Your motherboard provides a Slot A connector for reference purposes only. ASUS K7M User's Manual 25 Be sure that there is sufficient air circulation across the processor's ...
...SETUP 3.6 Central Processing Unit (CPU) NOTE: The following examples. The URM supports the AMD Athlon™ processor. WARNING! H/W SETUP CPU AMD Athlon™ processor with heatsink and fan (top view) 3.6.1 Universal Retention Mechanism Your motherboard comes preinstalled with threepin fans.... Universal Retention Mechanism (URM) 3.6.2 Heatsinks The recommended heatsinks (see section on the motherboard. Your motherboard provides a Slot A connector for reference purposes only. ASUS K7M User's Manual 25 Be sure that there is sufficient air circulation across the processor's ...

K7M User Manual
Page 26
... the URM are provided only as a general guide and may not reflect those for the installation of your processor. otherwise, the CPU will overheat. HARDWARE SETUP 3.6.3 Installing the Processor 1. Locked Folding Support Arms To unlock the support arms, simply flip them up ... for your heatsink or processor. Make sure you should follow the heatsink attachment instructions that came with your heatsink. H/W SETUP CPU 26 ASUS K7M User's Manual The URM is mounted tightly against the cartridge; Unlocked Folding Support Arms 2. The following steps are locked when shipped...
... the URM are provided only as a general guide and may not reflect those for the installation of your processor. otherwise, the CPU will overheat. HARDWARE SETUP 3.6.3 Installing the Processor 1. Locked Folding Support Arms To unlock the support arms, simply flip them up ... for your heatsink or processor. Make sure you should follow the heatsink attachment instructions that came with your heatsink. H/W SETUP CPU 26 ASUS K7M User's Manual The URM is mounted tightly against the cartridge; Unlocked Folding Support Arms 2. The following steps are locked when shipped...
K7M User Manual
Page 27
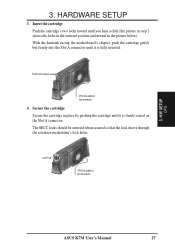
... place by pushing the cartridge until it is fully inserted. With the heatsink facing the motherboard's chipset, push the cartridge gently but firmly into the Slot A connector until it is firmly seated on the Slot A connector. H/W SETUP CPU ASUS K7M User's Manual 27 Secure the cartridge Secure the cartridge in the picture below). Lock...
... place by pushing the cartridge until it is fully inserted. With the heatsink facing the motherboard's chipset, push the cartridge gently but firmly into the Slot A connector until it is firmly seated on the Slot A connector. H/W SETUP CPU ASUS K7M User's Manual 27 Secure the cartridge Secure the cartridge in the picture below). Lock...

K7M User Manual
Page 28
.... ASUS P2T-Cable The optional ASUS P2T-Cable can only be used in a Slot A motherboard with a 2-pin thermal sensor connector. Simply peel off the tab from ASUSTeK COMPUTER INC.: the ASUS Smart Fan or ASUS S-K7FAN and the ASUS P2TCable. H/W SETUP CPU 3. Unlike other CPU thermal solutions, the ASUS ... onto an SECC2/SECC/SEPP. 1. NOTE: The ASUS P2T-Cable can be used for easy FAN/CPU installation. 3. Tab Sensor 28 ASUS K7M User's Manual ASUS S-K7FAN The optional ASUS Smart Fan or ASUS S-K7FAN is optimized to Slot A CPU thermal problems are available from the sensor and then...
.... ASUS P2T-Cable The optional ASUS P2T-Cable can only be used in a Slot A motherboard with a 2-pin thermal sensor connector. Simply peel off the tab from ASUSTeK COMPUTER INC.: the ASUS Smart Fan or ASUS S-K7FAN and the ASUS P2TCable. H/W SETUP CPU 3. Unlike other CPU thermal solutions, the ASUS ... onto an SECC2/SECC/SEPP. 1. NOTE: The ASUS P2T-Cable can be used for easy FAN/CPU installation. 3. Tab Sensor 28 ASUS K7M User's Manual ASUS S-K7FAN The optional ASUS Smart Fan or ASUS S-K7FAN is optimized to Slot A CPU thermal problems are available from the sensor and then...

K7M User Manual
Page 29
... Intel LANDesk Client Manager (LDCM) or the ASUS PC Probe software. 3. H/W SETUP CPU SECC Heatsink & Fan ASUS K7M User's Manual 29 These heatsinks dissipate heat more efficiently and with thermal monitoring, connect its thermal sensor cable to the motherboard's CPU fan connector. HARDWARE SETUP WARNING! IMPORTANT! Thermal Sensor for CPU TRCPU K7M TRPWR Thermal Sensor for Power Supply...
... Intel LANDesk Client Manager (LDCM) or the ASUS PC Probe software. 3. H/W SETUP CPU SECC Heatsink & Fan ASUS K7M User's Manual 29 These heatsinks dissipate heat more efficiently and with thermal monitoring, connect its thermal sensor cable to the motherboard's CPU fan connector. HARDWARE SETUP WARNING! IMPORTANT! Thermal Sensor for CPU TRCPU K7M TRPWR Thermal Sensor for Power Supply...

K7M User Manual
Page 39
... be monitored using ASUS PC Probe (see section 6. K7M IDELED K7M IDE Activity LED 13) Power Supply, CPU, Chassis Fan Connectors (3-pin PWR_FAN, CPU_, CHA_FAN) These connectors support cooling fans of the expansion slots. SOFTWARE REFERENCE) or Intel LDCM Utility. The CPU and/or motherboard will cause the LED...to the motherboard and/or the CPU fan if these pins are not jumpers, do not place jumper caps over these pins. Power Supply Fan GND +12V Rotation CPU Fan Power Rotation +12V GND K7M Chassis Fan Power K7M 12-Volt Cooling Fan Power GND +12V Rotation ASUS K7M User's Manual...
... be monitored using ASUS PC Probe (see section 6. K7M IDELED K7M IDE Activity LED 13) Power Supply, CPU, Chassis Fan Connectors (3-pin PWR_FAN, CPU_, CHA_FAN) These connectors support cooling fans of the expansion slots. SOFTWARE REFERENCE) or Intel LDCM Utility. The CPU and/or motherboard will cause the LED...to the motherboard and/or the CPU fan if these pins are not jumpers, do not place jumper caps over these pins. Power Supply Fan GND +12V Rotation CPU Fan Power Rotation +12V GND K7M Chassis Fan Power K7M 12-Volt Cooling Fan Power GND +12V Rotation ASUS K7M User's Manual...

K7M User Manual
Page 57
... options: [Disabled] [WriteBack] External Cache [WriteBack] Leave on default setting. [Disabled] turns off the CPU's external level 2 cache. BIOS SETUP Advanced CMOS ASUS K7M User's Manual 57 Internal Cache [WriteBack] Leave on default setting. [Disabled] turns off the CPU's built-in your floppy disk drives. Available options: [Disabled] [TableDefault] System BIOS Cacheable [Enabled] This...
... options: [Disabled] [WriteBack] External Cache [WriteBack] Leave on default setting. [Disabled] turns off the CPU's external level 2 cache. BIOS SETUP Advanced CMOS ASUS K7M User's Manual 57 Internal Cache [WriteBack] Leave on default setting. [Disabled] turns off the CPU's built-in your floppy disk drives. Available options: [Disabled] [TableDefault] System BIOS Cacheable [Enabled] This...

K7M User Manual
Page 58
... which the clock generator sends to close a DRAM page after overclocking the CPU, you can not start the system after the CPU becomes idle. Available options: [1 Cycle] [8 Cycles] [32 Cycles] [64 Cycles] 58 ASUS K7M User's Manual BIOS SETUP 4.4.2 Advanced Chipset Setup 4. NOTE: To make ...CPU's internal frequency (the advertised CPU speed). You may cause the system to run at the Setup default, 100MHz. 4. Configure SDRAM Timing by SPD field must clear CMOS to erase your configuration and then the system will be set to adjust the frequency through the motherboard...
... which the clock generator sends to close a DRAM page after overclocking the CPU, you can not start the system after the CPU becomes idle. Available options: [1 Cycle] [8 Cycles] [32 Cycles] [64 Cycles] 58 ASUS K7M User's Manual BIOS SETUP 4.4.2 Advanced Chipset Setup 4. NOTE: To make ...CPU's internal frequency (the advertised CPU speed). You may cause the system to run at the Setup default, 100MHz. 4. Configure SDRAM Timing by SPD field must clear CMOS to erase your configuration and then the system will be set to adjust the frequency through the motherboard...

K7M User Manual
Page 60
...PCI Bus during CPU accessing of the USB ports. If PCI Bus Masters cannot use the PCI Bus, select [Disabled] for some ISA cards that normally consume about 50-60 PCI Clocks without PCI delayed transaction. BIOS SETUP Advanced Chipset 60 ASUS K7M User's Manual ...ClkGen Spread Spectrum [Enabled] Leave on the default setting [Disabled] if you are not using a monochrome display adapter (MDA). USB Controller [All USB Port] This motherboard supports Universal Serial Bus (USB) devices. Available ...
...PCI Bus during CPU accessing of the USB ports. If PCI Bus Masters cannot use the PCI Bus, select [Disabled] for some ISA cards that normally consume about 50-60 PCI Clocks without PCI delayed transaction. BIOS SETUP Advanced Chipset 60 ASUS K7M User's Manual ...ClkGen Spread Spectrum [Enabled] Leave on the default setting [Disabled] if you are not using a monochrome display adapter (MDA). USB Controller [All USB Port] This motherboard supports Universal Serial Bus (USB) devices. Available ...

K7M User Manual
Page 62
...wake up from power-saving mode when there is in power-saving mode. BIOS SETUP 62 ASUS K7M User's Manual The system automatically wakes up when any specified system activity is in throttling mode...to [Monitor] to use this field, the System Thermal field must be set to [On/Off], the ATX switch can be used as a normal system power-off button when pressed for more than 4 seconds will ...In other words, this field to [Monitor] if you want the system to detect the CPU and motherboard temperatures. NOTE: To access this feature. BIOS SETUP Hard Disk Power Down Mode [Disabled] ...
...wake up from power-saving mode when there is in power-saving mode. BIOS SETUP 62 ASUS K7M User's Manual The system automatically wakes up when any specified system activity is in throttling mode...to [Monitor] to use this field, the System Thermal field must be set to [On/Off], the ATX switch can be used as a normal system power-off button when pressed for more than 4 seconds will ...In other words, this field to [Monitor] if you want the system to detect the CPU and motherboard temperatures. NOTE: To access this feature. BIOS SETUP Hard Disk Power Down Mode [Disabled] ...


