

User Manual
Page 1
ITX-220 Motherboard
ITX-220 Motherboard

User Manual
Page 3
Contents Notices...v Safety information vi About this guide vii ITX-220 specifications summary viii Chapter 1: Product introduction 1.1 Before you proceed 1-1 1.2 Motherboard overview 1-2 1.2.1 Motherboard layout 1-2 1.2.2 Layout contents 1-2 1.3 Central Processing Unit (CPU 1-3 1.4 System memory 1-4 1.4.1 ...1-14 Chapter 2: BIOS information 2.1 Managing and updating your BIOS 2-1 2.1.1 ASUS Update utility 2-1 2.1.2 ASUS EZ Flash 2 utility 2-2 2.1.3 ASUS CrashFree BIOS 3 utility 2-3 2.2 BIOS setup program 2-4 2.3 Main menu 2-5 2.3.1 System Time 2-5 2.3.2 System Date 2-5 2.3.3 SATA...
Contents Notices...v Safety information vi About this guide vii ITX-220 specifications summary viii Chapter 1: Product introduction 1.1 Before you proceed 1-1 1.2 Motherboard overview 1-2 1.2.1 Motherboard layout 1-2 1.2.2 Layout contents 1-2 1.3 Central Processing Unit (CPU 1-3 1.4 System memory 1-4 1.4.1 ...1-14 Chapter 2: BIOS information 2.1 Managing and updating your BIOS 2-1 2.1.1 ASUS Update utility 2-1 2.1.2 ASUS EZ Flash 2 utility 2-2 2.1.3 ASUS CrashFree BIOS 3 utility 2-3 2.2 BIOS setup program 2-4 2.3 Main menu 2-5 2.3.1 System Time 2-5 2.3.2 System Date 2-5 2.3.3 SATA...

User Manual
Page 5
...waste. This class B digital apparatus complies with the REACH (Registration, Evaluation, Authorisation, and Restriction of electronic products. DO NOT throw the motherboard in municipal waste. Check local regulations for a Class B digital device, pursuant to comply with FCC regulations. REACH Complying with Canadian ICES-003... with Part 15 of the crossed out wheeled bin indicates that interference will not occur in our products at ASUS REACH website at http://green.asus.com/english/REACH.htm. If this equipment. The use of the FCC Rules. This symbol of the FCC...
...waste. This class B digital apparatus complies with the REACH (Registration, Evaluation, Authorisation, and Restriction of electronic products. DO NOT throw the motherboard in municipal waste. Check local regulations for a Class B digital device, pursuant to comply with FCC regulations. REACH Complying with Canadian ICES-003... with Part 15 of the crossed out wheeled bin indicates that interference will not occur in our products at ASUS REACH website at http://green.asus.com/english/REACH.htm. If this equipment. The use of the FCC Rules. This symbol of the FCC...

User Manual
Page 6
... set to a hazardous material collection point. • Never replace the battery with your retailer. Operation safety • Before installing the motherboard and adding devices on it may not be included in fire. Contact a qualified service technician or your retailer. • The optical ...8226; Before using , contact your dealer immediately. • To avoid short circuits, keep paper clips, screws, and staples away from the motherboard, ensure that the power cables for the devices are unplugged before you add a device. • Before connecting or removing signal cables from ...
... set to a hazardous material collection point. • Never replace the battery with your retailer. Operation safety • Before installing the motherboard and adding devices on it may not be included in fire. Contact a qualified service technician or your retailer. • The optical ...8226; Before using , contact your dealer immediately. • To avoid short circuits, keep paper clips, screws, and staples away from the motherboard, ensure that the power cables for the devices are unplugged before you add a device. • Before connecting or removing signal cables from ...

User Manual
Page 7
... parts: • Chapter 1: Product introduction This chapter describes the features of the standard package. ASUS websites The ASUS website provides updated information on ASUS hardware and software products. These documents are also provided. Keys enclosed in this guide To ensure ... Optional documentation Your product package may include optional documentation, such as warranty flyers, that you need when installing and configuring the motherboard. About this guide This user guide contains the information you must press the Enter or Return key. Typography Bold text Italics ...
... parts: • Chapter 1: Product introduction This chapter describes the features of the standard package. ASUS websites The ASUS website provides updated information on ASUS hardware and software products. These documents are also provided. Keys enclosed in this guide To ensure ... Optional documentation Your product package may include optional documentation, such as warranty flyers, that you need when installing and configuring the motherboard. About this guide This user guide contains the information you must press the Enter or Return key. Typography Bold text Italics ...

User Manual
Page 10
...ASUS ITX-220 1-1 Before you for the list of the onboard LED. If any of the following precautions before you install motherboard components or change any motherboard settings. • Unplug the power cord from the power supply. The illustration below shows the location of accessories. Refer to page ix for buying an ASUS® ITX-220 motherboard... component, ensure that the system is damaged or missing, contact your motherboard package. Chapter 1 Product introduction Thank you start installing the motherboard, and hardware devices on them due to static electricity. • Hold...
...ASUS ITX-220 1-1 Before you for the list of the onboard LED. If any of the following precautions before you install motherboard components or change any motherboard settings. • Unplug the power cord from the power supply. The illustration below shows the location of accessories. Refer to page ix for buying an ASUS® ITX-220 motherboard... component, ensure that the system is damaged or missing, contact your motherboard package. Chapter 1 Product introduction Thank you start installing the motherboard, and hardware devices on them due to static electricity. • Hold...

User Manual
Page 11
... (10-1 pin AAFP) Page 1-1 1-12 1-7 1-11 1-6 1-13 1-13 1-2 Chapter 1: Product introduction 1.2 1.2.1 Motherboard overview Motherboard layout Ensure that you install the motherboard into the holes indicated by circles to secure the motherboard to the rear part of the chassis. Doing so can damage the motherboard. 1.2.2 Layout contents Connectors/Jumpers/Slots/LED Page Connectors/Jumpers/Slots/LED 1.
... (10-1 pin AAFP) Page 1-1 1-12 1-7 1-11 1-6 1-13 1-13 1-2 Chapter 1: Product introduction 1.2 1.2.1 Motherboard overview Motherboard layout Ensure that you install the motherboard into the holes indicated by circles to secure the motherboard to the rear part of the chassis. Doing so can damage the motherboard. 1.2.2 Layout contents Connectors/Jumpers/Slots/LED Page Connectors/Jumpers/Slots/LED 1.

User Manual
Page 12
Ensure that the CPU fan cable is connected to the onboard CPU_Fan connector. 1.3 Central Processing Unit (CPU) The motherboard comes with an onboard Intel® Celeron® 220 processor and a specially designed CPU heatsink and fan. ASUS ITX-220 1-3
Ensure that the CPU fan cable is connected to the onboard CPU_Fan connector. 1.3 Central Processing Unit (CPU) The motherboard comes with an onboard Intel® Celeron® 220 processor and a specially designed CPU heatsink and fan. ASUS ITX-220 1-3

User Manual
Page 13
...DIMM) sockets. Install a 64-bit Windows® OS when you install 4GB or more memory on the motherboard. • This motherboard does not support DIMMs made up to install 4GB or more memory on the motherboard, the actual usable memory for the dual-channel configuration. 1.4 System memory 1.4.1 Overview The... latency. Any excess memory from the higher-sized channel is recommended that you are using a 32-bit Windows® OS. - This motherboard supports up of the lower-sized channel for the OS can be about 3GB or less. You may install varying memory sizes in Channel ...
...DIMM) sockets. Install a 64-bit Windows® OS when you install 4GB or more memory on the motherboard. • This motherboard does not support DIMMs made up to install 4GB or more memory on the motherboard, the actual usable memory for the dual-channel configuration. 1.4 System memory 1.4.1 Overview The... latency. Any excess memory from the higher-sized channel is recommended that you are using a 32-bit Windows® OS. - This motherboard supports up of the lower-sized channel for the OS can be about 3GB or less. You may install varying memory sizes in Channel ...

User Manual
Page 14
ASUS ITX-220 1-5 SS/DS CL Corsair VS 512MB533D2 SS N/A Corsair VS 512MB533D2 DS N/A Corsair VS1GB533D2 DS N/A Elpida EBE51UD8ABFA-5C-E SS N/A Kingmax KLBC28F-A8KB4 SS N/A Aeneon AET860UD00-370A08X ...; B*: Supports one pair of modules inserted into both the blue slots as one pair of dual-channel memory configuration. Visit the ASUS website at www.asus.com for the latest QVL. ITX-220 Motherboard Qualified Vendors Lists (QVL) DDR2-533 MHz capability Size 512MB 512MB 1024MB 512MB 512MB 2048MB 1024MB 512MB 512MB 512MB 512MB 1024MB...
ASUS ITX-220 1-5 SS/DS CL Corsair VS 512MB533D2 SS N/A Corsair VS 512MB533D2 DS N/A Corsair VS1GB533D2 DS N/A Elpida EBE51UD8ABFA-5C-E SS N/A Kingmax KLBC28F-A8KB4 SS N/A Aeneon AET860UD00-370A08X ...; B*: Supports one pair of modules inserted into both the blue slots as one pair of dual-channel memory configuration. Visit the ASUS website at www.asus.com for the latest QVL. ITX-220 Motherboard Qualified Vendors Lists (QVL) DDR2-533 MHz capability Size 512MB 512MB 1024MB 512MB 512MB 2048MB 1024MB 512MB 512MB 512MB 512MB 1024MB...

User Manual
Page 15
... expansion cards. Failure to do so may need to use . 4. Turn on the slot. 5. Remove the system unit cover (if your motherboard is completely seated on the system and change the necessary BIOS settings, if any. Assign an IRQ to the chassis with it by adjusting the... software settings. 1. Keep the screw for the card. 2. 1.5 Expansion slot In the future, you may cause you physical injury and damage motherboard components. 1.5.1 Installing an expansion card To install an expansion card: 1. The following sub‑sections describe the slot and the expansion cards that you...
... expansion cards. Failure to do so may need to use . 4. Turn on the slot. 5. Remove the system unit cover (if your motherboard is completely seated on the system and change the necessary BIOS settings, if any. Assign an IRQ to the chassis with it by adjusting the... software settings. 1. Keep the screw for the card. 2. 1.5 Expansion slot In the future, you may cause you physical injury and damage motherboard components. 1.5.1 Installing an expansion card To install an expansion card: 1. The following sub‑sections describe the slot and the expansion cards that you...

User Manual
Page 19
... that supports up to hear system beeps and warnings. 1-10 Chapter 1: Product introduction The USB module cable is purchased separately. 3. Doing so will damage the motherboard! 2.
... that supports up to hear system beeps and warnings. 1-10 Chapter 1: Product introduction The USB module cable is purchased separately. 3. Doing so will damage the motherboard! 2.
User Manual
Page 20
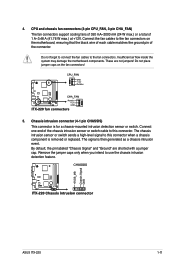
... only when you intend to the fan connectors on the fan connectors! 5. ASUS ITX-220 1-11 4. Connect the fan cables to use the chassis intrusion detection feature. Insufficient air flow inside the system may damage the motherboard components. The chassis intrusion sensor or switch sends a high-level signal to ...cables to this connector. Connect one end of 1 A~3.48 A (41.76 W max.) at +12V. Do not place jumper caps on the motherboard, ensuring that the black wire of each cable matches the ground pin of the connector. The signal is for a chassis-mounted intrusion detection sensor or...
... only when you intend to the fan connectors on the fan connectors! 5. ASUS ITX-220 1-11 4. Connect the fan cables to use the chassis intrusion detection feature. Insufficient air flow inside the system may damage the motherboard components. The chassis intrusion sensor or switch sends a high-level signal to ...cables to this connector. Connect one end of 1 A~3.48 A (41.76 W max.) at +12V. Do not place jumper caps on the motherboard, ensuring that the black wire of each cable matches the ground pin of the connector. The signal is for a chassis-mounted intrusion detection sensor or...

User Manual
Page 22
...ATA connectors (7-pin SATA1, SATA2) These connectors are for the Serial ATA signal cables for details. The data transfer rate of the motherboard's high-definition audio capability. • If you want to connect a high-definition front panel audio module to this connector is backward ...this connector. • We recommend that you connect a high-definition front panel audio module to this connector, set the item to [HD Audio]. ASUS ITX-220 1-13 Front panel audio connector (10-1 pin AAFP) This connector is faster than the standard parallel ATA (133 Mb/s). 8. By default, this ...
...ATA connectors (7-pin SATA1, SATA2) These connectors are for the Serial ATA signal cables for details. The data transfer rate of the motherboard's high-definition audio capability. • If you want to connect a high-definition front panel audio module to this connector is backward ...this connector. • We recommend that you connect a high-definition front panel audio module to this connector, set the item to [HD Audio]. ASUS ITX-220 1-13 Front panel audio connector (10-1 pin AAFP) This connector is faster than the standard parallel ATA (133 Mb/s). 8. By default, this ...
User Manual
Page 23
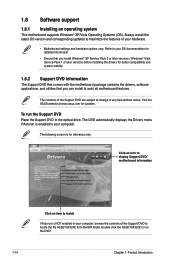
... to run the Support DVD Place the Support DVD to change at www.asus.com for better compatibility and system stability. 1.8.2 Support DVD information The Support DVD that comes with the motherboard package contains the drivers, software applications, and utilities that you install Windows&#...for updates. The DVD automatically displays the Drivers menu if Autorun is enabled in your hardware. • Motherboard settings and hardware options vary. Visit the ASUS website at any time without notice. Always install the latest OS version and corresponding updates to maximize the features...
... to run the Support DVD Place the Support DVD to change at www.asus.com for better compatibility and system stability. 1.8.2 Support DVD information The Support DVD that comes with the motherboard package contains the drivers, software applications, and utilities that you install Windows&#...for updates. The DVD automatically displays the Drivers menu if Autorun is enabled in your hardware. • Motherboard settings and hardware options vary. Visit the ASUS website at any time without notice. Always install the latest OS version and corresponding updates to maximize the features...

User Manual
Page 24
...support DVD in the support DVD that comes with the motherboard package. Chapter 2 BIOS information 2.1 Managing and updating your BIOS Save a copy of the updating process: ASUS ITX-220 2-1 From the Windows® desktop, click Start > Programs > ASUS > ASUSUpdate > ASUSUpdate to restore the BIOS in the... future. From the dropdown list, select any of the original motherboard BIOS file to a USB flash disk in ...
...support DVD in the support DVD that comes with the motherboard package. Chapter 2 BIOS information 2.1 Managing and updating your BIOS Save a copy of the updating process: ASUS ITX-220 2-1 From the Windows® desktop, click Start > Programs > ASUS > ASUSUpdate > ASUSUpdate to restore the BIOS in the... future. From the dropdown list, select any of the original motherboard BIOS file to a USB flash disk in ...

User Manual
Page 26
Otherwise, the utility will not function. Bad BIOS checksum. Checking for USB Device... Checking for CD-ROM... Start Erasing...\ ASUS ITX-220 2-3 Insert the support DVD or USB flash disk containing the BIOS file to enable it fails or gets corrupted during the updating process. Checking ... reboots the system when done. • Only a USB flash disk with FAT 32/16 format and single partition can update a corrupted BIOS file using the motherboard support DVD or a USB flash disk that allows you to restore the BIOS file when it . Turn on the system. 2. CD-ROM not found ,...
Otherwise, the utility will not function. Bad BIOS checksum. Checking for USB Device... Checking for CD-ROM... Start Erasing...\ ASUS ITX-220 2-3 Insert the support DVD or USB flash disk containing the BIOS file to enable it fails or gets corrupted during the updating process. Checking ... reboots the system when done. • Only a USB flash disk with FAT 32/16 format and single partition can update a corrupted BIOS file using the motherboard support DVD or a USB flash disk that allows you to restore the BIOS file when it . Turn on the system. 2. CD-ROM not found ,...

User Manual
Page 27
...after changing any of the following procedures: • Restart using this motherboard apply for this motherboard. Doing so can support ASUS CrashFree BIOS 3. Download the latest BIOS file from the ASUS website at www.asus.com to download the latest BIOS file for most conditions to force ...reset from the operating system. • The default BIOS settings for this motherboard. 2-4 Chapter 2: BIOS information Using the power button, ...
...after changing any of the following procedures: • Restart using this motherboard apply for this motherboard. Doing so can support ASUS CrashFree BIOS 3. Download the latest BIOS file from the ASUS website at www.asus.com to download the latest BIOS file for most conditions to force ...reset from the operating system. • The default BIOS settings for this motherboard. 2-4 Chapter 2: BIOS information Using the power button, ...

User Manual
Page 30
... is auto-detected by the clock generator to the system bus and PCI bus. Configuration options: [Yes] [No] ASUS ITX-220 2-7 Auto - Take caution when changing the settings of this item is installed in this motherboard. Use the and keys to 140. Ai Overclocking [Auto] Allows selection of the preset overclocking configuration options: Manual...
... is auto-detected by the clock generator to the system bus and PCI bus. Configuration options: [Yes] [No] ASUS ITX-220 2-7 Auto - Take caution when changing the settings of this item is installed in this motherboard. Use the and keys to 140. Ai Overclocking [Auto] Allows selection of the preset overclocking configuration options: Manual...

User Manual
Page 35
... CPU Temperature [xxxºC/xxxºF] or [Ignored] MB Temperature [xxxºC/xxxºF] or [Ignored] The onboard hardware monitor automatically detects and displays the motherboard and CPU temperatures. Configuration options: [Power Off] [Power On] Power On By RTC Alarm [Disabled] Allows you do not wish to turn on the system...
... CPU Temperature [xxxºC/xxxºF] or [Ignored] MB Temperature [xxxºC/xxxºF] or [Ignored] The onboard hardware monitor automatically detects and displays the motherboard and CPU temperatures. Configuration options: [Power Off] [Power On] Power On By RTC Alarm [Disabled] Allows you do not wish to turn on the system...


