
H87M-PLUS User's Manual
Page 12
Actual product specifications may vary with different models. xii Package contents Check your motherboard package for the following items H87M-PLUS User Manual ASUS H87M-PLUS motherboard User manual Support DVD 2 x Serial ATA 6.0 Gb/s cables 1 x ASUS I/O shield • If any of the above items is damaged or missing, contact your retailer. • The illustrations above are for reference only.
Actual product specifications may vary with different models. xii Package contents Check your motherboard package for the following items H87M-PLUS User Manual ASUS H87M-PLUS motherboard User manual Support DVD 2 x Serial ATA 6.0 Gb/s cables 1 x ASUS I/O shield • If any of the above items is damaged or missing, contact your retailer. • The illustrations above are for reference only.

H87M-PLUS User's Manual
Page 15
...Product Introduction Product introduction 1.1 Special features 1 1.1.1 Product highlights LGA1150 socket for caching function. It utilizes the serial point-to www.asus.com or this user manual for the Memory QVL (Qualified Vendors List) Intel® Smart Response Technology Intel® Smart Response ...Smart Response Technology. *** The SSD is a single-chipset that provides twice the performance and speed of individual CPUs. Chapter 1 ASUS H87M-PLUS 1-1 It combines SSD performance and hard drive capacity, operating up to ten times faster transfer rate than a hard-drive-only ...
...Product Introduction Product introduction 1.1 Special features 1 1.1.1 Product highlights LGA1150 socket for caching function. It utilizes the serial point-to www.asus.com or this user manual for the Memory QVL (Qualified Vendors List) Intel® Smart Response Technology Intel® Smart Response ...Smart Response Technology. *** The SSD is a single-chipset that provides twice the performance and speed of individual CPUs. Chapter 1 ASUS H87M-PLUS 1-1 It combines SSD performance and hard drive capacity, operating up to ten times faster transfer rate than a hard-drive-only ...
H87M-PLUS User's Manual
Page 17
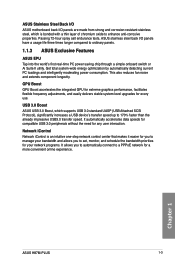
... layer of chromium oxide to enhance anti-corrosive properties. Chapter 1 ASUS H87M-PLUS 1-3 ASUS Stainless Steel Back I/O ASUS motherboard back I /O panels have a usage life three times longer compared to ordinary panels. 1.1.3 ASUS Exclusive Features ASUS EPU Tap into the world's first real-time PC power saving ...you to automatically connect to 170% faster than the already impressive USB3.0 transfer speed. Passing 72-hour spray salt endurance tests, ASUS stainless steel back I /O panels are made from strong and corrosion-resistant stainless steel, which supports USB 3.0 standard UASP (USB...
... layer of chromium oxide to enhance anti-corrosive properties. Chapter 1 ASUS H87M-PLUS 1-3 ASUS Stainless Steel Back I/O ASUS motherboard back I /O panels have a usage life three times longer compared to ordinary panels. 1.1.3 ASUS Exclusive Features ASUS EPU Tap into the world's first real-time PC power saving ...you to automatically connect to 170% faster than the already impressive USB3.0 transfer speed. Passing 72-hour spray salt endurance tests, ASUS stainless steel back I /O panels are made from strong and corrosion-resistant stainless steel, which supports USB 3.0 standard UASP (USB...

H87M-PLUS User's Manual
Page 19
.... 1.2 Motherboard overview 1.2.1 Before you install or remove any component, place it on a grounded antistatic pad or in regards to the motherboard, peripherals, or components. ASUS Q-Design ASUS Q-Design enhances your DIY experience. Supporting HDCP copy protection such as the power supply case, to avoid damaging them . • Whenever you with the highest... speed up and simplify the DIY process. 1.1.6 Other special features HDMI Support High Definition Multimedia Surface (HDMI) is in line with difficult POST situations. Chapter 1 ASUS H87M-PLUS 1-5
.... 1.2 Motherboard overview 1.2.1 Before you install or remove any component, place it on a grounded antistatic pad or in regards to the motherboard, peripherals, or components. ASUS Q-Design ASUS Q-Design enhances your DIY experience. Supporting HDCP copy protection such as the power supply case, to avoid damaging them . • Whenever you with the highest... speed up and simplify the DIY process. 1.1.6 Other special features HDMI Support High Definition Multimedia Surface (HDMI) is in line with difficult POST situations. Chapter 1 ASUS H87M-PLUS 1-5
H87M-PLUS User's Manual
Page 21
... (7-pin SATA6G_1-6) 12. Digital audio connector (4-1 pin SPDIF_OUT) Page 1-19 1-20 1-8 1-9 1-20 1-14 1-17 1-15 1-16 1-17 1-16 1-13 1-21 1-18 1-15 1-19 1-18 Chapter 1 ASUS H87M-PLUS 1-7 LGA1150 CPU socket 4. button 7. USB 3.0 connector (20-1 pin USB3_12) 11. Front panel audio connector (10-1 pin AAFP) 17. Clear RTC RAM (3-pin CLRTC) 13. ATX...
... (7-pin SATA6G_1-6) 12. Digital audio connector (4-1 pin SPDIF_OUT) Page 1-19 1-20 1-8 1-9 1-20 1-14 1-17 1-15 1-16 1-17 1-16 1-13 1-21 1-18 1-15 1-19 1-18 Chapter 1 ASUS H87M-PLUS 1-7 LGA1150 CPU socket 4. button 7. USB 3.0 connector (20-1 pin USB3_12) 11. Front panel audio connector (10-1 pin AAFP) 17. Clear RTC RAM (3-pin CLRTC) 13. ATX...

H87M-PLUS User's Manual
Page 23
A DDR3 module is notched differently from a DDR or DDR2 module. H87M-PLUS H87M-PLUS 240-pin DDR3 DIMM sockets Recommended memory configurations Chapter 1 ASUS H87M-PLUS 1-9 DO NOT install a DDR or DDR2 memory module to the DDR3 slot. 1.2.4 System memory The motherboard comes with four Double Data Rate 3 (DDR3) Dual Inline Memory Modules (DIMM) slots.
A DDR3 module is notched differently from a DDR or DDR2 module. H87M-PLUS H87M-PLUS 240-pin DDR3 DIMM sockets Recommended memory configurations Chapter 1 ASUS H87M-PLUS 1-9 DO NOT install a DDR or DDR2 memory module to the DDR3 slot. 1.2.4 System memory The motherboard comes with four Double Data Rate 3 (DDR3) Dual Inline Memory Modules (DIMM) slots.
H87M-PLUS User's Manual
Page 25
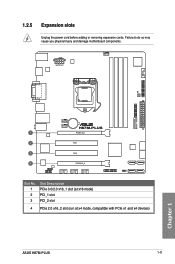
Failure to do so may cause you physical injury and damage motherboard components. 1.2.5 Expansion slots Unplug the power cord before adding or removing expansion cards. EATX12V H87M-PLUS PCIEX16_1 PCI1 PCI2 PCIEX16_2 Slot No. 1 2 3 Slot Description PCIe 3.0/2.0 x16_1 slot (at x16 mode) PCI_1 slot PCI_2 slot 4 PCIe 2.0 x16_2 slot (run at x4 mode, compatible with PCIe x1 and x4 devices) ASUS H87M-PLUS 1-11 Chapter 1
Failure to do so may cause you physical injury and damage motherboard components. 1.2.5 Expansion slots Unplug the power cord before adding or removing expansion cards. EATX12V H87M-PLUS PCIEX16_1 PCI1 PCI2 PCIEX16_2 Slot No. 1 2 3 Slot Description PCIe 3.0/2.0 x16_1 slot (at x16 mode) PCI_1 slot PCI_2 slot 4 PCIe 2.0 x16_2 slot (run at x4 mode, compatible with PCIe x1 and x4 devices) ASUS H87M-PLUS 1-11 Chapter 1
H87M-PLUS User's Manual
Page 27
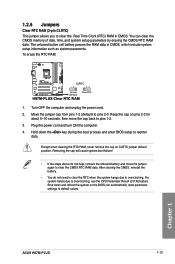
To erase the RTC RAM: H87M-PLUS CLRTC 2 23 Normal (Default) Clear RTC H87M-PLUS Clear RTC RAM 1. For system failure due to pins 2-3. Shut down the key during the boot process and enter BIOS setup to reenter data. Move .... Except when clearing the RTC RAM, never remove the cap on pins 2-3 for about 5~10 seconds, then move the jumper again to default values. Chapter 1 ASUS H87M-PLUS 1-13 Plug the power cord and turn ON the computer. 4. 1.2.6 Jumpers Clear RTC RAM (3-pin CLRTC) This jumper allows you to clear the Real Time...
To erase the RTC RAM: H87M-PLUS CLRTC 2 23 Normal (Default) Clear RTC H87M-PLUS Clear RTC RAM 1. For system failure due to pins 2-3. Shut down the key during the boot process and enter BIOS setup to reenter data. Move .... Except when clearing the RTC RAM, never remove the cap on pins 2-3 for about 5~10 seconds, then move the jumper again to default values. Chapter 1 ASUS H87M-PLUS 1-13 Plug the power cord and turn ON the computer. 4. 1.2.6 Jumpers Clear RTC RAM (3-pin CLRTC) This jumper allows you to clear the Real Time...

H87M-PLUS User's Manual
Page 29
... OFF Standby Power Powered Off H87M-PLUS Onboard LED 2. If an error is found , the LED next to locate the root problem within a second. DRAM LED DRAM LED checks the DRAM in ... an intuitional way to the error device will continue lighting until the problem is ON, in sleep mode, or in soft-off mode. H87M-PLUS DRAM LED H87M-PLUS DRAM LED Chapter 1 ASUS H87M-PLUS 1-15 Standby Power LED The motherboard comes with a standby power LED that lights up to indicate that you should shut down the...
... OFF Standby Power Powered Off H87M-PLUS Onboard LED 2. If an error is found , the LED next to locate the root problem within a second. DRAM LED DRAM LED checks the DRAM in ... an intuitional way to the error device will continue lighting until the problem is ON, in sleep mode, or in soft-off mode. H87M-PLUS DRAM LED H87M-PLUS DRAM LED Chapter 1 ASUS H87M-PLUS 1-15 Standby Power LED The motherboard comes with a standby power LED that lights up to indicate that you should shut down the...
H87M-PLUS User's Manual
Page 31
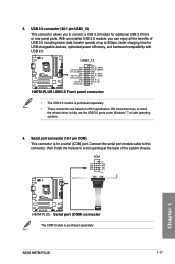
ASUS H87M-PLUS 1-17 3. Connect the serial port module cable to this connector, then install the module to a slot opening at the back of up to 5Gbps, faster ... to fully use the USB 3.0 ports under Windows® 7 or later operating systems. 4. COM CTS DSR DTR RXD RI RTS GND TXD DCD PIN 1 Chapter 1 H87M-PLUS H87M-PLUS Serial port (COM) connector The COM module is purchased separately. • These connectors are based on xHCI specification. Serial port connector (10-1 pin COM) This...
ASUS H87M-PLUS 1-17 3. Connect the serial port module cable to this connector, then install the module to a slot opening at the back of up to 5Gbps, faster ... to fully use the USB 3.0 ports under Windows® 7 or later operating systems. 4. COM CTS DSR DTR RXD RI RTS GND TXD DCD PIN 1 Chapter 1 H87M-PLUS H87M-PLUS Serial port (COM) connector The COM module is purchased separately. • These connectors are based on xHCI specification. Serial port connector (10-1 pin COM) This...

H87M-PLUS User's Manual
Page 33
... high-definition front panel audio module to this connector, set the Front Panel Type item in the BIOS setup to the fan connectors. ASUS H87M-PLUS 1-19 These are not jumpers! AGND NC SENSE1_RETUR SENSE2_RETUR AGND NC NC NC Chapter 1 AAFP PIN 1 MIC2 MICPWR Line out_R NC ...Line out_L PORT1 L PORT1 R PORT2 R SENSE_SEND PORT2 L H87M-PLUS HD-audio-compliant Legacy AC'97 pin definition compliant definition H87M-PLUS Front panel audio connector • We recommend that supports either HD Audio or legacy AC`97 audio standard. 7....
... high-definition front panel audio module to this connector, set the Front Panel Type item in the BIOS setup to the fan connectors. ASUS H87M-PLUS 1-19 These are not jumpers! AGND NC SENSE1_RETUR SENSE2_RETUR AGND NC NC NC Chapter 1 AAFP PIN 1 MIC2 MICPWR Line out_R NC ...Line out_L PORT1 L PORT1 R PORT2 R SENSE_SEND PORT2 L H87M-PLUS HD-audio-compliant Legacy AC'97 pin definition compliant definition H87M-PLUS Front panel audio connector • We recommend that supports either HD Audio or legacy AC`97 audio standard. 7....

H87M-PLUS User's Manual
Page 35
...speaker. Pressing the power button turns the system on or puts the system in sleep or soft-off the system power. Chapter 1 ASUS H87M-PLUS 1-21 System panel connector (20-8 pin PANEL) This connector supports several chassis-mounted functions. The speaker allows you turn on the ...operating system settings. PWR Ground Reset Ground PIN 1 H87M-PLUS HDD_LED PWR_SW RESET * Requires an ATX power supply H87M-PLUS System panel connector • System power LED (2-pin PWR_LED) This 2-pin connector is for the system power ...
...speaker. Pressing the power button turns the system on or puts the system in sleep or soft-off the system power. Chapter 1 ASUS H87M-PLUS 1-21 System panel connector (20-8 pin PANEL) This connector supports several chassis-mounted functions. The speaker allows you turn on the ...operating system settings. PWR Ground Reset Ground PIN 1 H87M-PLUS HDD_LED PWR_SW RESET * Requires an ATX power supply H87M-PLUS System panel connector • System power LED (2-pin PWR_LED) This 2-pin connector is for the system power ...

H87M-PLUS User's Manual
Page 37
The motherboard layout may vary with models, but the installation steps are the same for reference only. Chapter 2 ASUS H87M-PLUS 2-1 Place the motherboard into the chassis, ensuring that its rear I/O ports are aligned to the chassis rear I /O panel. Install the ASUS I/O shield to the chassis' rear I /O panel. 2. Chapter 2: Basic installation Basic installation 2.1 Building your PC system 2 2.1.1 Motherboard installation The diagrams in this section are for all models. 1.
The motherboard layout may vary with models, but the installation steps are the same for reference only. Chapter 2 ASUS H87M-PLUS 2-1 Place the motherboard into the chassis, ensuring that its rear I/O ports are aligned to the chassis rear I /O panel. Install the ASUS I/O shield to the chassis' rear I /O panel. 2. Chapter 2: Basic installation Basic installation 2.1 Building your PC system 2 2.1.1 Motherboard installation The diagrams in this section are for all models. 1.

H87M-PLUS User's Manual
Page 39
DO NOT install a CPU designed for LGA1150 socket only. Chapter 2 ASUS H87M-PLUS 2-3 2.1.2 CPU installation Ensure that you install the correct CPU designed for LGA1155 and LGA1156 socket on the LGA1150 socket.
DO NOT install a CPU designed for LGA1150 socket only. Chapter 2 ASUS H87M-PLUS 2-3 2.1.2 CPU installation Ensure that you install the correct CPU designed for LGA1155 and LGA1156 socket on the LGA1150 socket.

H87M-PLUS User's Manual
Page 41
To uninstall the CPU heatsink and fan assembly Chapter 2 ASUS H87M-PLUS 2-5
To uninstall the CPU heatsink and fan assembly Chapter 2 ASUS H87M-PLUS 2-5

H87M-PLUS User's Manual
Page 43
2.1.5 ATX Power connection OR ASUS H87M-PLUS 2-7 Chapter 2
2.1.5 ATX Power connection OR ASUS H87M-PLUS 2-7 Chapter 2
H87M-PLUS User's Manual
Page 45
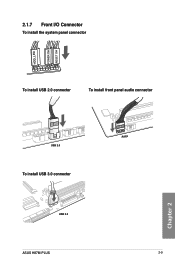
2.1.7 Front I/O Connector To install the system panel connector HDD_LED To install USB 2.0 connector To install front panel audio connector USB 2.0 To install USB 3.0 connector USB 3.0 ASUS H87M-PLUS AAFP 2-9 Chapter 2
2.1.7 Front I/O Connector To install the system panel connector HDD_LED To install USB 2.0 connector To install front panel audio connector USB 2.0 To install USB 3.0 connector USB 3.0 ASUS H87M-PLUS AAFP 2-9 Chapter 2

H87M-PLUS User's Manual
Page 47
.../2 keyboard / mouse combo 5. port 2. Video Graphics Adapter (VGA) port 6. 3. Audio I /O connection Rear panel connectors 1. HDMI port: 300 MHz ASUS H87M-PLUS 2-11 Chapter 2 2.2 Motherboard rear and audio connections 2.2.1 Rear I /O ports** 8. Intel USB 3.0 ports 3-6, support ASUS USB 3.0 Boost DVI port HDMI port USB 2.0 ports 7 and 8 * and **: Refer to the tables on the next page for...
.../2 keyboard / mouse combo 5. port 2. Video Graphics Adapter (VGA) port 6. 3. Audio I /O connection Rear panel connectors 1. HDMI port: 300 MHz ASUS H87M-PLUS 2-11 Chapter 2 2.2 Motherboard rear and audio connections 2.2.1 Rear I /O ports** 8. Intel USB 3.0 ports 3-6, support ASUS USB 3.0 Boost DVI port HDMI port USB 2.0 ports 7 and 8 * and **: Refer to the tables on the next page for...

H87M-PLUS User's Manual
Page 49
2.2.2 Audio I/O connections Audio I/O ports Connect to Headphone and Mic Connect to Stereo Speakers Connect to 2.1 channel Speakers Chapter 2 ASUS H87M-PLUS 2-13
2.2.2 Audio I/O connections Audio I/O ports Connect to Headphone and Mic Connect to Stereo Speakers Connect to 2.1 channel Speakers Chapter 2 ASUS H87M-PLUS 2-13
H87M-PLUS User's Manual
Page 51
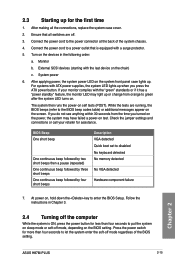
... last device on self tests (POST). At power on, hold down the key to the power connector at the back of the BIOS setting. Chapter 2 ASUS H87M-PLUS 2-15 BIOS Beep One short beep One continuous beep followed by two short beeps then a pause (repeated) One continuous beep followed by three short beeps...
... last device on self tests (POST). At power on, hold down the key to the power connector at the back of the BIOS setting. Chapter 2 ASUS H87M-PLUS 2-15 BIOS Beep One short beep One continuous beep followed by two short beeps then a pause (repeated) One continuous beep followed by three short beeps...


