H87M-E User's Manual
Page 4
... • Before using the product, ensure all cables are correctly connected and the power cables are not damaged. Do not place the product in your local power company. • If the power supply is organized This guide contains the following parts: • Chapter 1: Product introduction ...qualified service technician or your retailer. If possible, disconnect all power cables are also provided. These devices could interrupt the grounding circuit. • Ensure that all power cables from the motherboard, ensure that your power supply is set to fix it supports. If you need when ...
... • Before using the product, ensure all cables are correctly connected and the power cables are not damaged. Do not place the product in your local power company. • If the power supply is organized This guide contains the following parts: • Chapter 1: Product introduction ...qualified service technician or your retailer. If possible, disconnect all power cables are also provided. These devices could interrupt the grounding circuit. • Ensure that all power cables from the motherboard, ensure that your power supply is set to fix it supports. If you need when ...

H87M-E User's Manual
Page 9
... or in the correct orientation. ASUS H87M-E 1-1 The edge with external ports goes to the rear part of the chassis as indicated in the image. 1.2.2 Screw holes Place six screws into the holes indicated by the edges to ensure that the ATX power supply is switched off or the power cord is detached from the...
... or in the correct orientation. ASUS H87M-E 1-1 The edge with external ports goes to the rear part of the chassis as indicated in the image. 1.2.2 Screw holes Place six screws into the holes indicated by the edges to ensure that the ATX power supply is switched off or the power cord is detached from the...
H87M-E User's Manual
Page 16
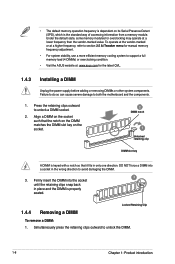
...vendor-marked or at a higher frequency, refer to section 2.5 Ai Tweaker menu for the latest QVL. 1.4.3 Installing a DIMM Unplug the power supply before adding or removing DIMMs or other system components. Align a DIMM on the socket such that the notch on the DIMM matches the ...module. Locked Retaining Clip 1.4.4 Removing a DIMM To remove a DIMM: 1. Under the default state, some memory modules for overclocking may operate at : www.asus.com for manual memory frequency adjustment. • For system stability, use a more efficient memory cooling system to support a full memory load (4 DIMMs) ...
...vendor-marked or at a higher frequency, refer to section 2.5 Ai Tweaker menu for the latest QVL. 1.4.3 Installing a DIMM Unplug the power supply before adding or removing DIMMs or other system components. Align a DIMM on the socket such that the notch on the DIMM matches the ...module. Locked Retaining Clip 1.4.4 Removing a DIMM To remove a DIMM: 1. Under the default state, some memory modules for overclocking may operate at : www.asus.com for manual memory frequency adjustment. • For system stability, use a more efficient memory cooling system to support a full memory load (4 DIMMs) ...

H87M-E User's Manual
Page 19
...Keyboard and USB device wake-up (KB_USBPWB) Set this jumper to +5V to clear the CMOS RTC RAM data. ASUS H87M-E 1-11 otherwise, the system would not power up feature requires a power supply that can provide 500mA on CLRTC jumper default position. After clearing the CMOS, reinstall the battery. • You ...cap on the +5VSB lead for each USB port; For system failure due to CPU, DRAM in slow refresh, power supply in sleep mode. KB_USBPWB 12 23 H87M-E +5V +5VSB (Default) H87M-E Keyboard and USB device wake up • The USB device wake-up . • The total current consumed must...
...Keyboard and USB device wake-up (KB_USBPWB) Set this jumper to +5V to clear the CMOS RTC RAM data. ASUS H87M-E 1-11 otherwise, the system would not power up feature requires a power supply that can provide 500mA on CLRTC jumper default position. After clearing the CMOS, reinstall the battery. • You ...cap on the +5VSB lead for each USB port; For system failure due to CPU, DRAM in slow refresh, power supply in sleep mode. KB_USBPWB 12 23 H87M-E +5V +5VSB (Default) H87M-E Keyboard and USB device wake up • The USB device wake-up . • The total current consumed must...

H87M-E User's Manual
Page 20
...LED LAN port 1-12 Chapter 1: Product introduction When you set this jumper to a Local Area Network (LAN) through a network hub. H87M-E USBPWF 12 23 +5V +5VSB (Default) H87M-E USB device wake up feature. This 15-pin port is for a VGA monitor or other VGA-compatible devices. 3. This port allows Gigabit... This port is for a PS/2 mouse. 2. USB device wake-up (USBPWF) This jumper allows you can supply at least 1A on the USB mouse. LAN (RJ-45) port. This feature requires an ATX power supply that can wake up the computer by pressing a key on the USB keyboard or by clicking on...
...LED LAN port 1-12 Chapter 1: Product introduction When you set this jumper to a Local Area Network (LAN) through a network hub. H87M-E USBPWF 12 23 +5V +5VSB (Default) H87M-E USB device wake up feature. This 15-pin port is for a VGA monitor or other VGA-compatible devices. 3. This port allows Gigabit... This port is for a PS/2 mouse. 2. USB device wake-up (USBPWF) This jumper allows you can supply at least 1A on the USB mouse. LAN (RJ-45) port. This feature requires an ATX power supply that can wake up the computer by pressing a key on the USB keyboard or by clicking on...

H87M-E User's Manual
Page 22
...-us for your system, refer to the Recommended Power Supply Wattage Calculator at the back of 350W. • DO NOT forget to a slot opening at http://support.asus. EATX12V EATXPWR +12V DC +12V DC +12V DC +12V DC H87M-E GND GND GND GND +3 Volts +12 Volts...configured system, we recommend that you use a power supply unit (PSU) that you use a PSU with higher power output when configuring a system with ATX 12V Specification 2.0 (or later version) and provides a minimum power of the system chassis. +5V SPDIFOUT GND H87M-E SPDIF_OUT H87M-E Digital audio connector The S/PDIF module is ...
...-us for your system, refer to the Recommended Power Supply Wattage Calculator at the back of 350W. • DO NOT forget to a slot opening at http://support.asus. EATX12V EATXPWR +12V DC +12V DC +12V DC +12V DC H87M-E GND GND GND GND +3 Volts +12 Volts...configured system, we recommend that you use a power supply unit (PSU) that you use a PSU with higher power output when configuring a system with ATX 12V Specification 2.0 (or later version) and provides a minimum power of the system chassis. +5V SPDIFOUT GND H87M-E SPDIF_OUT H87M-E Digital audio connector The S/PDIF module is ...

H87M-E User's Manual
Page 58
... to enable or disable the serial port (COM).Configuration options: [Enabled] [Disabled] Change Settings [IO=3F8h; Configuration options: [IO=3F8h; This feature requires an ATX power supply that provides at least 1A on the system. Realtek PXE OPROM [Disabled] This item appears only when you set the Serial Port to [Enabled] and... you set the previous item to [Enabled] and allows you to select the Serial Port base address. IRQ=3] [IO=3E8h; This feature requires an ATX power supply that provides at least 1A on state, whatever the system state was before the AC...
... to enable or disable the serial port (COM).Configuration options: [Enabled] [Disabled] Change Settings [IO=3F8h; Configuration options: [IO=3F8h; This feature requires an ATX power supply that provides at least 1A on the system. Realtek PXE OPROM [Disabled] This item appears only when you set the Serial Port to [Enabled] and... you set the previous item to [Enabled] and allows you to select the Serial Port base address. IRQ=3] [IO=3E8h; This feature requires an ATX power supply that provides at least 1A on state, whatever the system state was before the AC...


