
User Guide
Page 3
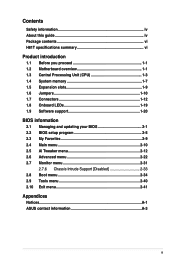
... information iv About this guide iv Package contents vi H81T specifications summary vi Product introduction 1.1 Before you proceed 1-1 1.2 Motherboard overview 1-1 1.3 Central Processing Unit (CPU 1-3 1.4 System memory 1-7 1.5 Expansion slots 1-9 1.6 Jumpers 1-10 1.7 Connectors 1-12 1.8 Onboard LEDs 1-19 1.9 Software support 1-20 BIOS information 2.1 Managing and updating your BIOS 2-1 2.2 BIOS setup program 2-5 2.3 My Favorites 2-9 2.4 Main menu 2-10 2.5 Ai...
... information iv About this guide iv Package contents vi H81T specifications summary vi Product introduction 1.1 Before you proceed 1-1 1.2 Motherboard overview 1-1 1.3 Central Processing Unit (CPU 1-3 1.4 System memory 1-7 1.5 Expansion slots 1-9 1.6 Jumpers 1-10 1.7 Connectors 1-12 1.8 Onboard LEDs 1-19 1.9 Software support 1-20 BIOS information 2.1 Managing and updating your BIOS 2-1 2.2 BIOS setup program 2-5 2.3 My Favorites 2-9 2.4 Main menu 2-10 2.5 Ai...

User Guide
Page 4
...not sure about the voltage of the switches, jumpers, and connectors on the motherboard. • Chapter 2: BIOS information This chapter discusses changing system settings through the BIOS Setup menus. It includes descriptions of the electrical outlet you encounter technical problems with the package. •...and the power cables are unplugged. • Seek professional assistance before using an adapter or extension cord. Detailed descriptions fo the BIOS parameters are connected. How this guide This user guide contains the information you add a device. • Before connecting or ...
...not sure about the voltage of the switches, jumpers, and connectors on the motherboard. • Chapter 2: BIOS information This chapter discusses changing system settings through the BIOS Setup menus. It includes descriptions of the electrical outlet you encounter technical problems with the package. •...and the power cables are unplugged. • Seek professional assistance before using an adapter or extension cord. Detailed descriptions fo the BIOS parameters are connected. How this guide This user guide contains the information you add a device. • Before connecting or ...

User Guide
Page 7
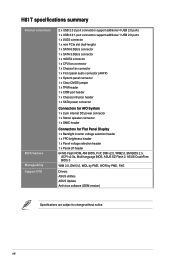
... ESD protection ASUS Quiet Thermal Solution: - ASUS EZ Flash 2 - ASUS MyLogo 2™ ASUS Exclusive Features - Short circuit damage prevention - H81T specifications summary Storage LAN Audio USB ASUS unique features Rear panel I port 1 x HDMI port 1 x LAN (RJ-45) port 1 x eSATA 3.0Gb/s port 2 x USB 3.0 ports 2 x USB 2.0 ports 2 x Audio jacks (continued on the next page) vii ASUS CrashFree BIOS 3 - ASUS USB 3.0 Boost...
... ESD protection ASUS Quiet Thermal Solution: - ASUS EZ Flash 2 - ASUS MyLogo 2™ ASUS Exclusive Features - Short circuit damage prevention - H81T specifications summary Storage LAN Audio USB ASUS unique features Rear panel I port 1 x HDMI port 1 x LAN (RJ-45) port 1 x eSATA 3.0Gb/s port 2 x USB 3.0 ports 2 x USB 2.0 ports 2 x Audio jacks (continued on the next page) vii ASUS CrashFree BIOS 3 - ASUS USB 3.0 Boost...
User Guide
Page 8
viii H81T specifications summary Internal connectors BIOS features Manageability Support DVD 2 x USB 2.0 2-port connectors support additional 4 USB 2.0 ports 1 x USB 2.0 1-port connectors support additional 1 USB 2.0 ports 1 x LVDS connector 1 x mini ...voltage selection header 1 x Panel off header 64 Mb Flash ROM, AMI BIOS, PnP, DMI v2.0, WfM2.0, SM BIOS 2.5, ACPI v2.0a, Multi-language BIOS, ASUS EZ Flash 2, ASUS CrashFree BIOS 3 WfM 2.0, DMI 2.0, WOL by PME, WOR by PME, PXE Drivers ASUS utilities ASUS Update Anti-virus software (OEM version) Specifications are subject to change without...
viii H81T specifications summary Internal connectors BIOS features Manageability Support DVD 2 x USB 2.0 2-port connectors support additional 4 USB 2.0 ports 1 x USB 2.0 1-port connectors support additional 1 USB 2.0 ports 1 x LVDS connector 1 x mini ...voltage selection header 1 x Panel off header 64 Mb Flash ROM, AMI BIOS, PnP, DMI v2.0, WfM2.0, SM BIOS 2.5, ACPI v2.0a, Multi-language BIOS, ASUS EZ Flash 2, ASUS CrashFree BIOS 3 WfM 2.0, DMI 2.0, WOL by PME, WOR by PME, PXE Drivers ASUS utilities ASUS Update Anti-virus software (OEM version) Specifications are subject to change without...
User Guide
Page 10
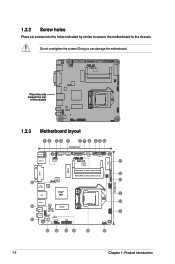
... 1.2.3 Motherboard layout 12 34 5 67 8 17cm(6.7in) 2 9 10 DVI-I USB11 MSATA DC_PWR ATX19V1 USB3_12 SATA6G_1 SATA3G_1 SATA_PWRCON COM CPU_FAN F_PANEL PANEL_SW CHA_FAN H81T Super I/O 23 HDMI _ESATA3G1 64Mb BIOS BATT_CON ASM 1442K Intel® LAN H81 DDR3 DIMM_A1 (64bit, 204-pin module) DDR3 DIMM_B1 (64bit, 204-pin module) 22 USB34 LINE_OUT Realtek...
... 1.2.3 Motherboard layout 12 34 5 67 8 17cm(6.7in) 2 9 10 DVI-I USB11 MSATA DC_PWR ATX19V1 USB3_12 SATA6G_1 SATA3G_1 SATA_PWRCON COM CPU_FAN F_PANEL PANEL_SW CHA_FAN H81T Super I/O 23 HDMI _ESATA3G1 64Mb BIOS BATT_CON ASM 1442K Intel® LAN H81 DDR3 DIMM_A1 (64bit, 204-pin module) DDR3 DIMM_B1 (64bit, 204-pin module) 22 USB34 LINE_OUT Realtek...

User Guide
Page 17
...before adding or removing expansion cards. Failure to do not need to use . 4. Keep the screw for the expansion card. Turn on BIOS setup. 2. Install the software drivers for later use . Align the card connector with the slot and press firmly until the card is already... installing the expansion card, configure it and make the necessary hardware settings for information on the system and change the necessary BIOS settings, if any. ASUS H81T 1-9 The following sub‑sections describe the slots and the expansion cards that supports half-sized mPCIe module. Before installing ...
...before adding or removing expansion cards. Failure to do not need to use . 4. Keep the screw for the expansion card. Turn on BIOS setup. 2. Install the software drivers for later use . Align the card connector with the slot and press firmly until the card is already... installing the expansion card, configure it and make the necessary hardware settings for information on the system and change the necessary BIOS settings, if any. ASUS H81T 1-9 The following sub‑sections describe the slots and the expansion cards that supports half-sized mPCIe module. Before installing ...

User Guide
Page 18
The onboard button cell battery powers the RAM data in CMOS. H81T CLRTC 12 23 Normal (Default) Clear RTC H81T Clear RTC RAM To erase the RTC RAM: 1. Hold down and reboot the system, then the BIOS automatically resets parameter settings to reenter data. Turn OFF the computer and ...CPU Parameter Recall (C.P.R.) feature. Plug the power cord and turn ON the computer. 4. Shut down the key during the boot process and enter BIOS setup to default values. 1-10 Chapter 1: Product introduction For system failure due to pins 2-3. You can clear the CMOS memory of date,...
The onboard button cell battery powers the RAM data in CMOS. H81T CLRTC 12 23 Normal (Default) Clear RTC H81T Clear RTC RAM To erase the RTC RAM: 1. Hold down and reboot the system, then the BIOS automatically resets parameter settings to reenter data. Turn OFF the computer and ...CPU Parameter Recall (C.P.R.) feature. Plug the power cord and turn ON the computer. 4. Shut down the key during the boot process and enter BIOS setup to default values. 1-10 Chapter 1: Product introduction For system failure due to pins 2-3. You can clear the CMOS memory of date,...
User Guide
Page 22
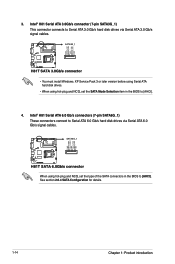
...disk drives. • When using hot-plug and NCQ, set the SATA Mode Selection item in the BIOS to Serial ATA 6.0 Gb/s hard disk drives via Serial ATA 3.0 Gb/s signal cables. SATA6G_1 H81T H81T SATA 6.0Gb/s connector When using hot-plug and NCQ, set the type of the SATA connectors in... the BIOS to Serial ATA 3.0 Gb/s hard disk drives via Serial ATA 6.0 Gb/s signal cables. SATA3G_1 H81T H81T SATA 3.0Gb/s connector • You must install Windows. Intel® H81 Serial ATA 3.0Gb/s connector (7-pin ...
...disk drives. • When using hot-plug and NCQ, set the SATA Mode Selection item in the BIOS to Serial ATA 6.0 Gb/s hard disk drives via Serial ATA 3.0 Gb/s signal cables. SATA6G_1 H81T H81T SATA 6.0Gb/s connector When using hot-plug and NCQ, set the type of the SATA connectors in... the BIOS to Serial ATA 3.0 Gb/s hard disk drives via Serial ATA 6.0 Gb/s signal cables. SATA3G_1 H81T H81T SATA 3.0Gb/s connector • You must install Windows. Intel® H81 Serial ATA 3.0Gb/s connector (7-pin ...

User Guide
Page 29
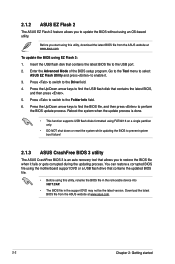
... future. To launch EZ Update, click EZ Update on the AI Suite 3 main menu bar. ASUS H81T 2-1 Copy the original motherboard BIOS using the ASUS Update utility. 2.1.1 EZ Update EZ Update is a utility that allows you to update the BIOS EZ Update requires an Internet connection either through a network or an ISP (Internet Service Provider...
... future. To launch EZ Update, click EZ Update on the AI Suite 3 main menu bar. ASUS H81T 2-1 Copy the original motherboard BIOS using the ASUS Update utility. 2.1.1 EZ Update EZ Update is a utility that allows you to update the BIOS EZ Update requires an Internet connection either through a network or an ISP (Internet Service Provider...
User Guide
Page 30
...16 on a single partition only. • DO NOT shut down or reset the system while updating the BIOS to prevent system boot failure! 2.1.3 ASUS CrashFree BIOS 3 utility The ASUS CrashFree BIOS 3 is done. • This function supports USB flash disks formatted using an OS‑based utility. ...Before you start using this utility, rename the BIOS file in the removable device into H81T.CAP. • The BIOS file in the ...
...16 on a single partition only. • DO NOT shut down or reset the system while updating the BIOS to prevent system boot failure! 2.1.3 ASUS CrashFree BIOS 3 utility The ASUS CrashFree BIOS 3 is done. • This function supports USB flash disks formatted using an OS‑based utility. ...Before you start using this utility, rename the BIOS file in the removable device into H81T.CAP. • The BIOS file in the ...

User Guide
Page 31
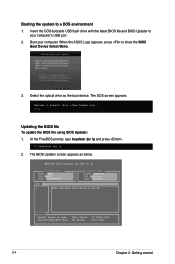
... not save them on the USB flash drive. The system requires you press to update BIOS in NTFS format. 3. Doing so can cause system boot failure! 2.1.4 ASUS BIOS Updater The ASUS BIOS Updater allows you can use as shown. This utility also allows you to copy the current... BIOS file. Before updating BIOS 1. NTFS is not supported under DOS environment. Download the latest BIOS file and BIOS Updater from the ASUS website at http://support.asus.com and save the BIOS file and BIOS Updater to a hard disk drive or USB flash drive in a DOS environment. ASUS H81T 2-3 Recovering the BIOS...
... not save them on the USB flash drive. The system requires you press to update BIOS in NTFS format. 3. Doing so can cause system boot failure! 2.1.4 ASUS BIOS Updater The ASUS BIOS Updater allows you can use as shown. This utility also allows you to copy the current... BIOS file. Before updating BIOS 1. NTFS is not supported under DOS environment. Download the latest BIOS file and BIOS Updater from the ASUS website at http://support.asus.com and save the BIOS file and BIOS Updater to a hard disk drive or USB flash drive in a DOS environment. ASUS H81T 2-3 Recovering the BIOS...
User Guide
Page 32
...'s USB port. 2. Updating the BIOS file To update the BIOS file using BIOS Updater: 1. Booting the system to show the BIOS Boot Device Select Menu. 3. Insert the DOS-bootable USB flash drive with the latest BIOS file and BIOS Updater to your computer. When the ASUS Logo appears, press to a DOS... environment 1. Select the optical drive as below. The DOS screen appears. The BIOS Updater screen appears as the boot device. At the FreeDOS prompt, type bupdater /pc /g and press . 2. ASUSTek BIOS Updater for DOS V1.30 H81T 0209 03/20/2013 H81T....
...'s USB port. 2. Updating the BIOS file To update the BIOS file using BIOS Updater: 1. Booting the system to show the BIOS Boot Device Select Menu. 3. Insert the DOS-bootable USB flash drive with the latest BIOS file and BIOS Updater to your computer. When the ASUS Logo appears, press to a DOS... environment 1. Select the optical drive as below. The DOS screen appears. The BIOS Updater screen appears as the boot device. At the FreeDOS prompt, type bupdater /pc /g and press . 2. ASUSTek BIOS Updater for DOS V1.30 H81T 0209 03/20/2013 H81T....
User Guide
Page 33
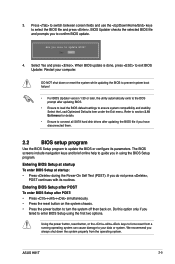
... and stability. Do this option only if you do not press , POST continues with its parameters. ASUS H81T 2-5 Press to switch between screen fields and use the keys to exit BIOS Updater. Entering BIOS Setup at startup To enter BIOS Setup at startup: • Press during the Power-On Self Test (POST). Select the Load...
... and stability. Do this option only if you do not press , POST continues with its parameters. ASUS H81T 2-5 Press to switch between screen fields and use the keys to exit BIOS Updater. Entering BIOS Setup at startup To enter BIOS Setup at startup: • Press during the Power-On Self Test (POST). Select the Load...
User Guide
Page 34
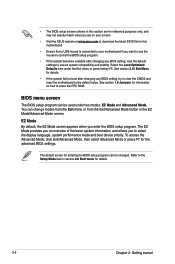
... Mode, click Exit/Advanced Mode, then select Advanced Mode or press F7 for information on your screen. • Visit the ASUS website at www.asus.com to download the latest BIOS file for this motherboard. • Ensure that a USB mouse is connected to your motherboard if you want to use the ...mouse to control the BIOS setup program. • If the system becomes unstable after changing any BIOS setting, load the default settings to ...
... Mode, click Exit/Advanced Mode, then select Advanced Mode or press F7 for information on your screen. • Visit the ASUS website at www.asus.com to download the latest BIOS file for this motherboard. • Ensure that a USB mouse is connected to your motherboard if you want to use the ...mouse to control the BIOS setup program. • If the system becomes unstable after changing any BIOS setting, load the default settings to ...

User Guide
Page 35
...boot device is installed to the following sections for experienced end-users to configure the BIOS settings. Refer to the system. To access the EZ Mode, click Exit, then select ASUS EZ Mode or press F7. Displays the CPU/motherboard temperature, CPU voltage output, ... Selects the Advanced mode functions Normal mode ASUS Optimal mode Selects the boot device priority Displays the Power saving Advanced mode mode menus Displays SATA Information Loads optimized default Displays the system properties of the Advanced Mode. ASUS H81T 2-7 Advanced Mode The Advanced Mode provides ...
...boot device is installed to the following sections for experienced end-users to configure the BIOS settings. Refer to the system. To access the EZ Mode, click Exit, then select ASUS EZ Mode or press F7. Displays the CPU/motherboard temperature, CPU voltage output, ... Selects the Advanced mode functions Normal mode ASUS Optimal mode Selects the boot device priority Displays the Power saving Advanced mode mode menus Displays SATA Information Loads optimized default Displays the system properties of the Advanced Mode. ASUS H81T 2-7 Advanced Mode The Advanced Mode provides ...
User Guide
Page 37
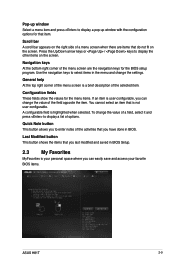
...-configurable, you can change the value of options. A configurable field is your personal space where you can easily save and access your favorite BIOS items. ASUS H81T 2-9 Navigation keys At the bottom right corner of a menu screen when there are the navigation keys for the... BIOS setup program. Last Modified button This button shows the items that you last modified and saved in BIOS. You cannot select an item that item. General help At the top right...
...-configurable, you can change the value of options. A configurable field is your personal space where you can easily save and access your favorite BIOS items. ASUS H81T 2-9 Navigation keys At the bottom right corner of a menu screen when there are the navigation keys for the... BIOS setup program. Last Modified button This button shows the items that you last modified and saved in BIOS. You cannot select an item that item. General help At the top right...
User Guide
Page 38
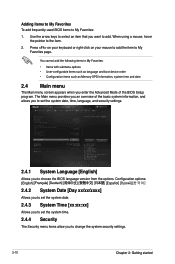
... pointer to My Favorites page. Use the arrow keys to select an item that you to choose the BIOS language version from the options. The Main menu provides you an overview of the BIOS Setup program. You cannot add the following items to My Favorites: • Items with submenu options • User... system date, time, language, and security settings. 2.4.1 System Language [English] Allows you want to My Favorites: 1. Adding items to My Favorites To add frequently-used BIOS items to add.
... pointer to My Favorites page. Use the arrow keys to select an item that you to choose the BIOS language version from the options. The Main menu provides you an overview of the BIOS Setup program. You cannot add the following items to My Favorites: • Items with submenu options • User... system date, time, language, and security settings. 2.4.1 System Language [English] Allows you want to My Favorites: 1. Adding items to My Favorites To add frequently-used BIOS items to add.
User Guide
Page 39
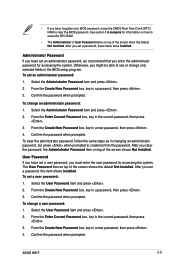
... follow the same steps as in changing an administrator password, but press when prompted to see or change only selected fields in the BIOS setup program. To set a password, this item shows Installed. Select the Administrator Password item and press . 2. Select the User Password...that you enter the administrator password for information on top of the screen shows the default Not Installed. To change a user password: 1. ASUS H81T 2-11 See section 1.6 Jumpers for accessing the system. After you set a user password: 1. From the Enter Current Password box, key...
... follow the same steps as in changing an administrator password, but press when prompted to see or change only selected fields in the BIOS setup program. To set a password, this item shows Installed. Select the Administrator Password item and press . 2. Select the User Password...that you enter the administrator password for information on top of the screen shows the default Not Installed. To change a user password: 1. ASUS H81T 2-11 See section 1.6 Jumpers for accessing the system. After you set a user password: 1. From the Enter Current Password box, key...
User Guide
Page 50
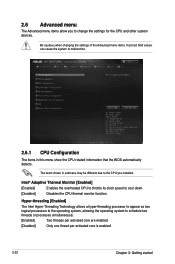
...] Only one thread per activated core is enabled. 2-22 Chapter 2: Getting started The items shown in this menu show the CPU-related information that the BIOS automatically detects. 2.6 Advanced menu The Advanced menu items allow you installed. Be cautious when changing the settings of the Advanced menu items. Incorrect field values...
...] Only one thread per activated core is enabled. 2-22 Chapter 2: Getting started The items shown in this menu show the CPU-related information that the BIOS automatically detects. 2.6 Advanced menu The Advanced menu items allow you installed. Be cautious when changing the settings of the Advanced menu items. Incorrect field values...
User Guide
Page 53
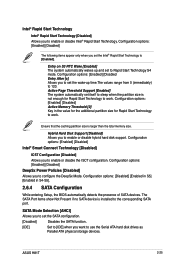
... when you to Rapid Start Technology S4 mode. Configuration options: [Enabled] [Disabled] Active Memory Threshold [0] Key in S4-S5]. 2.6.4 SATA Configuration While entering Setup, the BIOS automatically detects the presence of SATA devices. Hybrid Hard Disk Support [Disabled] Allows you set to enable or disable hybrid hard disk support. Configuration options... wake-up and set the Intel® Rapid Start Technology to the corresponding SATA port. Ensure that the caching partition size is installed to [Enabled]. ASUS H81T 2-25
... when you to Rapid Start Technology S4 mode. Configuration options: [Enabled] [Disabled] Active Memory Threshold [0] Key in S4-S5]. 2.6.4 SATA Configuration While entering Setup, the BIOS automatically detects the presence of SATA devices. Hybrid Hard Disk Support [Disabled] Allows you set to enable or disable hybrid hard disk support. Configuration options... wake-up and set the Intel® Rapid Start Technology to the corresponding SATA port. Ensure that the caching partition size is installed to [Enabled]. ASUS H81T 2-25


