
H81I-PLUS User's Manual
Page 6
...will update the memory QVL once the DIMMs are available in the front panel to www.asus.com for the following items. Motherboard Cables Accessories Application DVD Documentation ASUS H81I-PLUS motherboard 2 x Serial ATA 6.0 Gb/s cables 1 x I/O Shield Support DVD User ...Guide If any of DDR3 1600MHz. resolution 1920x1200@60Hz * Max. H81I-PLUS specifications summary CPU Chipset Memory Graphics Expansion slots Storage...
...will update the memory QVL once the DIMMs are available in the front panel to www.asus.com for the following items. Motherboard Cables Accessories Application DVD Documentation ASUS H81I-PLUS motherboard 2 x Serial ATA 6.0 Gb/s cables 1 x I/O Shield Support DVD User ...Guide If any of DDR3 1600MHz. resolution 1920x1200@60Hz * Max. H81I-PLUS specifications summary CPU Chipset Memory Graphics Expansion slots Storage...
H81I-PLUS User's Manual
Page 9
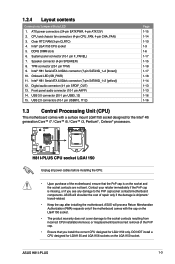
... to ensure that the ATX power supply is switched off or the power cord is detached from the power supply. Do not overtighten the screws! ASUS H81I-PLUS 1-1 Doing so can cause you physical injury and damage motherboard components. 1.2.1 Placement direction When installing the motherboard, ensure that you place it into it on...
... to ensure that the ATX power supply is switched off or the power cord is detached from the power supply. Do not overtighten the screws! ASUS H81I-PLUS 1-1 Doing so can cause you physical injury and damage motherboard components. 1.2.1 Placement direction When installing the motherboard, ensure that you place it into it on...
H81I-PLUS User's Manual
Page 11
...is shipment/ transit-related. • Keep the cap after installing the motherboard. ASUS H81I-PLUS 1-3 System panel connector (10-1 pin F_PANEL) 7. Front panel audio connector (10-1 pin AAFP) 14. H81I-PLUS H81I-PLUS CPU socket LGA1150 Unplug all power cables before installing the CPU. • Upon... i7 / Core™ i5 / Core™ i3, Pentium® , Celeron® processors. Speaker connector (4-pin SPEAKER) 8. ASUS will process Return Merchandise Authorization (RMA) requests only if the motherboard comes with a surface mount LGA1150 socket designed for LGA1155 and LGA1156 ...
...is shipment/ transit-related. • Keep the cap after installing the motherboard. ASUS H81I-PLUS 1-3 System panel connector (10-1 pin F_PANEL) 7. Front panel audio connector (10-1 pin AAFP) 14. H81I-PLUS H81I-PLUS CPU socket LGA1150 Unplug all power cables before installing the CPU. • Upon... i7 / Core™ i5 / Core™ i3, Pentium® , Celeron® processors. Speaker connector (4-pin SPEAKER) 8. ASUS will process Return Merchandise Authorization (RMA) requests only if the motherboard comes with a surface mount LGA1150 socket designed for LGA1155 and LGA1156 ...

H81I-PLUS User's Manual
Page 13
1.3.2 CPU heatsink and fan assembly installation Apply the Thermal Interface Material to the CPU heatsink and CPU before you install the heatsink and fan if necessary. To install the CPU heatsink and fan assembly 1 A B 2 B A 3 4 ASUS H81I-PLUS 1-5
1.3.2 CPU heatsink and fan assembly installation Apply the Thermal Interface Material to the CPU heatsink and CPU before you install the heatsink and fan if necessary. To install the CPU heatsink and fan assembly 1 A B 2 B A 3 4 ASUS H81I-PLUS 1-5
H81I-PLUS User's Manual
Page 15
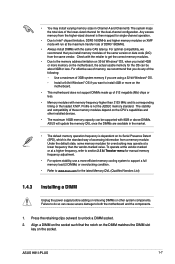
...16GB memory capacity can be supported with the same CAS latency. Profile is then mapped for single-channel operation. • Due to www.asus.com for the OS can be about 3GB or less. Use a maximum of these memory modules depend on its corresponding timing or the loaded... the same version or date code (D/C) from the higher-sized channel is not the JEDEC memory standard. Any excess memory from the same vendor. ASUS H81I-PLUS 1-7 • You may operate at a higher frequency, refer to section 2.5 Ai Tweaker menu for the dual-channel configuration. The stability and...
...16GB memory capacity can be supported with the same CAS latency. Profile is then mapped for single-channel operation. • Due to www.asus.com for the OS can be about 3GB or less. Use a maximum of these memory modules depend on its corresponding timing or the loaded... the same version or date code (D/C) from the higher-sized channel is not the JEDEC memory standard. Any excess memory from the same vendor. ASUS H81I-PLUS 1-7 • You may operate at a higher frequency, refer to section 2.5 Ai Tweaker menu for the dual-channel configuration. The stability and...
H81I-PLUS User's Manual
Page 17
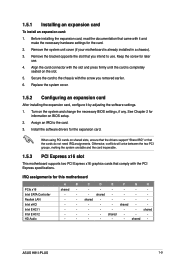
... on the slot. 5. Turn on shared slots, ensure that the drivers support "Share IRQ" or that came with the screw you intend to the card. 3. ASUS H81I-PLUS 1-9 When using PCI cards on the system and change the necessary BIOS settings, if any. See Chapter 2 for later use . shared - - - - - - - - - shared - Align the card...
... on the slot. 5. Turn on shared slots, ensure that the drivers support "Share IRQ" or that came with the screw you intend to the card. 3. ASUS H81I-PLUS 1-9 When using PCI cards on the system and change the necessary BIOS settings, if any. See Chapter 2 for later use . shared - - - - - - - - - shared - Align the card...

H81I-PLUS User's Manual
Page 19
.../2 Keyboard/Mouse combo port. This port allows Gigabit connection to the table below for a VGA monitor or other audio sources. 5. Line In port (light blue). ASUS H81I-PLUS 1-11 Microphone port (pink). This port is for the LAN port LED indications. In 4.1-channel, 5.1-channel, and 7.1-channel configurations, the function of this port becomes...
.../2 Keyboard/Mouse combo port. This port allows Gigabit connection to the table below for a VGA monitor or other audio sources. 5. Line In port (light blue). ASUS H81I-PLUS 1-11 Microphone port (pink). This port is for the LAN port LED indications. In 4.1-channel, 5.1-channel, and 7.1-channel configurations, the function of this port becomes...
H81I-PLUS User's Manual
Page 21
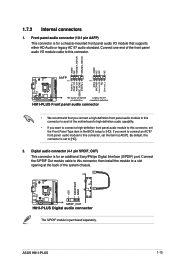
... (S/PDIF) port. By default, this connector, set the item to [HD]. 2. Connect the S/PDIF Out module cable to this connector. ASUS H81I-PLUS 1-13 AGND NC SENSE1_RETUR SENSE2_RETUR AGND NC NC NC AAFP PIN 1 PIN 1 MIC2 MICPWR Line out_R NC Line out_L PORT1 L PORT1 R PORT2 ...R SENSE_SEND PORT2 L H81I-PLUS HD-audio-compliant Legacy AC'97 pin definition compliant definition H81I-PLUS Front panel audio connector • We recommend that supports either HD Audio or legacy AC`97 audio standard. Front...
... (S/PDIF) port. By default, this connector, set the item to [HD]. 2. Connect the S/PDIF Out module cable to this connector. ASUS H81I-PLUS 1-13 AGND NC SENSE1_RETUR SENSE2_RETUR AGND NC NC NC AAFP PIN 1 PIN 1 MIC2 MICPWR Line out_R NC Line out_L PORT1 L PORT1 R PORT2 ...R SENSE_SEND PORT2 L H81I-PLUS HD-audio-compliant Legacy AC'97 pin definition compliant definition H81I-PLUS Front panel audio connector • We recommend that supports either HD Audio or legacy AC`97 audio standard. Front...
H81I-PLUS User's Manual
Page 23
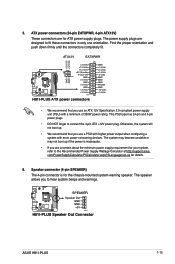
... Volts GND +3 Volts +3 Volts PIN 1 H81I-PLUS ATX power connectors GND +5 Volts +5 Volts +5 Volts -5 Volts GND GND GND PSON# GND -12 Volts +3 Volts • We recommend that you to the Recommended Power Supply Wattage Calculator at http://support.asus. This PSU type has 24-pin and 4-...not boot up . • We recommend that you are for details. 6. SPEAKER Speaker Out GND GND +5V PIN 1 H81I-PLUS Speaker Out Connector H81I-PLUS ASUS H81I-PLUS 1-15 5. ATX power connectors (24-pin EATXPWR, 4-pin ATX12V) These connectors are uncertain about the minimum power supply requirement for...
... Volts GND +3 Volts +3 Volts PIN 1 H81I-PLUS ATX power connectors GND +5 Volts +5 Volts +5 Volts -5 Volts GND GND GND PSON# GND -12 Volts +3 Volts • We recommend that you to the Recommended Power Supply Wattage Calculator at http://support.asus. This PSU type has 24-pin and 4-...not boot up . • We recommend that you are for details. 6. SPEAKER Speaker Out GND GND +5V PIN 1 H81I-PLUS Speaker Out Connector H81I-PLUS ASUS H81I-PLUS 1-15 5. ATX power connectors (24-pin EATXPWR, 4-pin ATX12V) These connectors are uncertain about the minimum power supply requirement for...

H81I-PLUS User's Manual
Page 25
...Connect the chassis power LED cable to this connector. H81I-PLUS SATA3G_1 GND RSATA_TXP1 RSATA_TXN1 GND RSATA_RXN1 RSATA_RXP1 GND SATA3G_2 GND RSATA_TXP2 RSATA_TXN2 GND RSATA_RXN2 RSATA_RXP2 GND H81I-PLUS SATA 3.0Gb/s connectors ASUS H81I-PLUS 1-17 Connect the HDD Activity LED cable to ...this connector. F_PANEL GND PWR PLEDPLED+ (NC) Reset Ground HDD_LEDHDD_LED+ PIN 1 H81I-PLUS System panel connector • System power ...
...Connect the chassis power LED cable to this connector. H81I-PLUS SATA3G_1 GND RSATA_TXP1 RSATA_TXN1 GND RSATA_RXN1 RSATA_RXP1 GND SATA3G_2 GND RSATA_TXP2 RSATA_TXN2 GND RSATA_RXN2 RSATA_RXP2 GND H81I-PLUS SATA 3.0Gb/s connectors ASUS H81I-PLUS 1-17 Connect the HDD Activity LED cable to ...this connector. F_PANEL GND PWR PLEDPLED+ (NC) Reset Ground HDD_LEDHDD_LED+ PIN 1 H81I-PLUS System panel connector • System power ...
H81I-PLUS User's Manual
Page 27
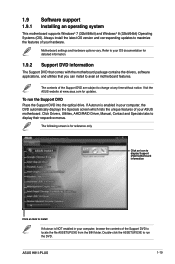
... lists the unique features of the Support DVD to install If Autorun is enabled in your computer, browse the contents of your ASUS motherboard. Click an icon to display Support DVD/motherboard information Click an item to locate the file ASSETUP.EXE from the BIN ... corresponding updates to maximize the features of the Support DVD are subject to run the Support DVD Place the Support DVD into the optical drive. ASUS H81I-PLUS 1-19 1.9 Software support 1.9.1 Installing an operating system This motherboard supports Windows® 7 (32bit/64bit) and Windows® 8 (32bit/64bit) Operating ...
... lists the unique features of the Support DVD to install If Autorun is enabled in your computer, browse the contents of your ASUS motherboard. Click an icon to display Support DVD/motherboard information Click an item to locate the file ASSETUP.EXE from the BIN ... corresponding updates to maximize the features of the Support DVD are subject to run the Support DVD Place the Support DVD into the optical drive. ASUS H81I-PLUS 1-19 1.9 Software support 1.9.1 Installing an operating system This motherboard supports Windows® 7 (32bit/64bit) and Windows® 8 (32bit/64bit) Operating ...
H81I-PLUS User's Manual
Page 29
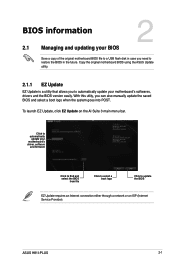
Copy the original motherboard BIOS using the ASUS Update utility. 2.1.1 EZ Update EZ Update is a utility that allows you can also manually update the saved BIOS and select a boot logo when the system ..., software and firmware C:\Users\test\Downloads\H81I-PLUS-ASUS-02... Model Name: H81I-PLUS Version:0203 Release Date: 05/28/2013 File: H81I-PLUS-ASUS-0205.CAP Model Name: H81I-PLUS Version:0205 Release Date: 06/18/2013 Click to find and select the BIOS from file Click to select a boot logo Click to restore the BIOS in the future. ASUS H81I-PLUS 2-1
Copy the original motherboard BIOS using the ASUS Update utility. 2.1.1 EZ Update EZ Update is a utility that allows you can also manually update the saved BIOS and select a boot logo when the system ..., software and firmware C:\Users\test\Downloads\H81I-PLUS-ASUS-02... Model Name: H81I-PLUS Version:0203 Release Date: 05/28/2013 File: H81I-PLUS-ASUS-0205.CAP Model Name: H81I-PLUS Version:0205 Release Date: 06/18/2013 Click to find and select the BIOS from file Click to select a boot logo Click to restore the BIOS in the future. ASUS H81I-PLUS 2-1
H81I-PLUS User's Manual
Page 31
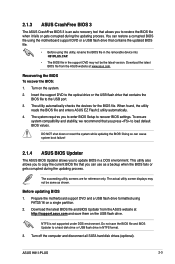
...or the USB flash drive that you press to the USB port. 3. When found, the utility reads the BIOS file and enters ASUS EZ Flash 2 utility automatically. 4. To ensure system compatibility and stability, we recommend that contains the BIOS file to load default BIOS ...The BIOS file in the support DVD may not be the latest version. 2.1.3 ASUS CrashFree BIOS 3 The ASUS CrashFree BIOS 3 is not supported under DOS environment. The system requires you to recover BIOS settings. ASUS H81I-PLUS 2-3 Prepare the motherboard support DVD and a USB flash drive formatted using the ...
...or the USB flash drive that you press to the USB port. 3. When found, the utility reads the BIOS file and enters ASUS EZ Flash 2 utility automatically. 4. To ensure system compatibility and stability, we recommend that contains the BIOS file to load default BIOS ...The BIOS file in the support DVD may not be the latest version. 2.1.3 ASUS CrashFree BIOS 3 The ASUS CrashFree BIOS 3 is not supported under DOS environment. The system requires you to recover BIOS settings. ASUS H81I-PLUS 2-3 Prepare the motherboard support DVD and a USB flash drive formatted using the ...
H81I-PLUS User's Manual
Page 33
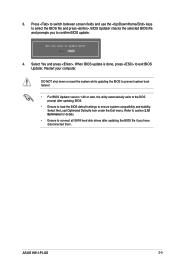
... BIOS file and prompts you have disconnected them. Restart your computer. Select the Load Optimized Defaults item under the Exit menu. Select Yes and press . ASUS H81I-PLUS 2-5 DO NOT shut down or reset the system while updating the BIOS to prevent system boot failure! • For BIOS Updater version 1.30 or later...
... BIOS file and prompts you have disconnected them. Restart your computer. Select the Load Optimized Defaults item under the Exit menu. Select Yes and press . ASUS H81I-PLUS 2-5 DO NOT shut down or reset the system while updating the BIOS to prevent system boot failure! • For BIOS Updater version 1.30 or later...
H81I-PLUS User's Manual
Page 35
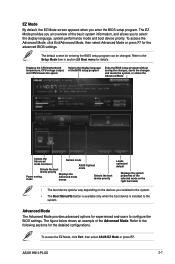
... saving the changes, saves the changes and resets the system, or enters the Advanced Mode Selects the Advanced Normal mode mode functions ASUS Optimal Selects the boot mode device priority Power saving mode Displays the Advanced mode menus Selects the boot device priority Loads optimized default ... selected mode on the right hand side • The boot device options vary depending on the devices you enter the BIOS setup program. ASUS H81I-PLUS 2-7 To access the Advanced Mode, click Exit/Advanced Mode, then select Advanced Mode or press F7 for entering the BIOS setup program can...
... saving the changes, saves the changes and resets the system, or enters the Advanced Mode Selects the Advanced Normal mode mode functions ASUS Optimal Selects the boot mode device priority Power saving mode Displays the Advanced mode menus Selects the boot device priority Loads optimized default ... selected mode on the right hand side • The boot device options vary depending on the devices you enter the BIOS setup program. ASUS H81I-PLUS 2-7 To access the Advanced Mode, click Exit/Advanced Mode, then select Advanced Mode or press F7 for entering the BIOS setup program can...

H81I-PLUS User's Manual
Page 37
For the navigation key, it and press to display a pop-up window with the configuration options for the BIOS setup program. ASUS H81I-PLUS 2-9 Pop-up window Select a menu item and press to display a list of the activities that you delete the default shortcuts, they will appear on your ...
For the navigation key, it and press to display a pop-up window with the configuration options for the BIOS setup program. ASUS H81I-PLUS 2-9 Pop-up window Select a menu item and press to display a list of the activities that you delete the default shortcuts, they will appear on your ...

H81I-PLUS User's Manual
Page 39
... the system security settings. • If you have forgotten your BIOS password, erase the CMOS Real Time Clock (RTC) RAM to clear the BIOS password. ASUS H81I-PLUS 2-11 The Main menu provides you an overview of the basic system information, and allows you to set the system date, time, language, and security...
... the system security settings. • If you have forgotten your BIOS password, erase the CMOS Real Time Clock (RTC) RAM to clear the BIOS password. ASUS H81I-PLUS 2-11 The Main menu provides you an overview of the basic system information, and allows you to set the system date, time, language, and security...
H81I-PLUS User's Manual
Page 41
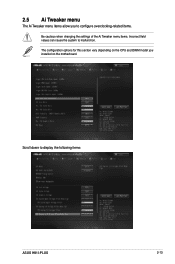
Scroll down to malfunction. The configuration options for this section vary depending on the CPU and DIMM model you to configure overclocking-related items. Be cautious when changing the settings of the Ai Tweaker menu items. Incorrect field values can cause the system to display the following items: ASUS H81I-PLUS 2-13 2.5 Ai Tweaker menu The Ai Tweaker menu items allow you installed on the motherboard.
Scroll down to malfunction. The configuration options for this section vary depending on the CPU and DIMM model you to configure overclocking-related items. Be cautious when changing the settings of the Ai Tweaker menu items. Incorrect field values can cause the system to display the following items: ASUS H81I-PLUS 2-13 2.5 Ai Tweaker menu The Ai Tweaker menu items allow you installed on the motherboard.
H81I-PLUS User's Manual
Page 43
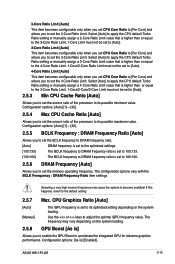
... Limit. The configuration options vary with the BCLK Frenquency : DRAM Frequency Ratio item settings. Use the or keys to adjust the optimal iGPU frequency value. ASUS H81I-PLUS 2-15 Select [Auto] to apply the CPU default Turbo Ratio setting or manually assign a 3-Core Ratio Limit value that is higher than or equal to...
... Limit. The configuration options vary with the BCLK Frenquency : DRAM Frequency Ratio item settings. Use the or keys to adjust the optimal iGPU frequency value. ASUS H81I-PLUS 2-15 Select [Auto] to apply the CPU default Turbo Ratio setting or manually assign a 3-Core Ratio Limit value that is higher than or equal to...
H81I-PLUS User's Manual
Page 47
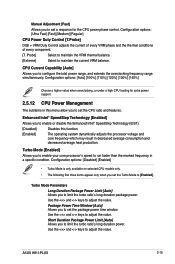
... the CPU power phase control. Turbo Mode Parameters Long Duration Package Power Limit [Auto] Allows you to limit the turbo ratio's long duration package power. ASUS H81I-PLUS 2-19 Use the and keys to run faster than the marked frequency in decreased average consumption and decreased average heat production. Configuration options: [Ultra Fast...
... the CPU power phase control. Turbo Mode Parameters Long Duration Package Power Limit [Auto] Allows you to limit the turbo ratio's long duration package power. ASUS H81I-PLUS 2-19 Use the and keys to run faster than the marked frequency in decreased average consumption and decreased average heat production. Configuration options: [Ultra Fast...


