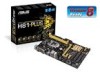

H81-PLUS User's Manual
Page 4
Operation safety • Before installing the motherboard and adding components, carefully read all the manuals that all power cables are connected. These devices could interrupt the grounding circuit. • Ensure that the power cables for the ...technology it supports. Contact a qualified service technician or your area. If you add a device. • Before connecting or removing signal cables from the motherboard, ensure that came with the product, contact a qualified service technician or your dealer immediately. • To avoid short circuits, keep paper clips, screws,...
Operation safety • Before installing the motherboard and adding components, carefully read all the manuals that all power cables are connected. These devices could interrupt the grounding circuit. • Ensure that the power cables for the ...technology it supports. Contact a qualified service technician or your area. If you add a device. • Before connecting or removing signal cables from the motherboard, ensure that came with the product, contact a qualified service technician or your dealer immediately. • To avoid short circuits, keep paper clips, screws,...
H81-PLUS User's Manual
Page 16
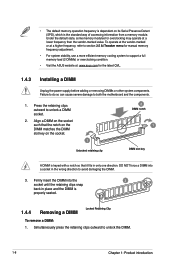
... Failure to do so can cause severe damage to support a full memory load (2 DIMMs) or overclocking condition. • Visit the ASUS website at: www.asus.com for overclocking may operate at a lower frequency than the vendor-marked value. Align a DIMM on the socket such that the notch...at the vendor-marked or at a higher frequency, refer to section 2.5 Ai Tweaker menu for manual memory frequency adjustment. • For system stability, use a more efficient memory cooling system to both the motherboard and the components. 1. DO NOT force a DIMM into the 3 socket until the retaining clips ...
... Failure to do so can cause severe damage to support a full memory load (2 DIMMs) or overclocking condition. • Visit the ASUS website at: www.asus.com for overclocking may operate at a lower frequency than the vendor-marked value. Align a DIMM on the socket such that the notch...at the vendor-marked or at a higher frequency, refer to section 2.5 Ai Tweaker menu for manual memory frequency adjustment. • For system stability, use a more efficient memory cooling system to both the motherboard and the components. 1. DO NOT force a DIMM into the 3 socket until the retaining clips ...

H81-PLUS User's Manual
Page 27
.../64bit) and Windows® 8 (32bit/64bit) Operating Systems (OS). Visit the ASUS website at www.asus.com for detailed information. 1.9.2 Support DVD information The Support DVD that comes with the motherboard package contains the drivers, software applications, and utilities that you can install to change... Manual, Contact and Specials tabs to run the Support DVD Place the Support DVD into the optical drive. To run the DVD. The following screen is NOT enabled in your computer, browse the contents of your OS documentation for updates. ASUS H81-PLUS 1-19 Refer to your ASUS motherboard...
.../64bit) and Windows® 8 (32bit/64bit) Operating Systems (OS). Visit the ASUS website at www.asus.com for detailed information. 1.9.2 Support DVD information The Support DVD that comes with the motherboard package contains the drivers, software applications, and utilities that you can install to change... Manual, Contact and Specials tabs to run the Support DVD Place the Support DVD into the optical drive. To run the DVD. The following screen is NOT enabled in your computer, browse the contents of your OS documentation for updates. ASUS H81-PLUS 1-19 Refer to your ASUS motherboard...

H81-PLUS User's Manual
Page 28
...\test\Downloads\H81-PLUS-ASUS-02... BIOS information 2.1 Managing and updating your BIOS 2 Save a copy of the original motherboard BIOS file to a USB flash disk in the future. Click to find and select the BIOS from file Click to select a boot logo Click to restore the BIOS in case you can also manually update the...
...\test\Downloads\H81-PLUS-ASUS-02... BIOS information 2.1 Managing and updating your BIOS 2 Save a copy of the original motherboard BIOS file to a USB flash disk in the future. Click to find and select the BIOS from file Click to select a boot logo Click to restore the BIOS in case you can also manually update the...

H81-PLUS User's Manual
Page 56
...] Enables the function. [Disabled] Disables this function. 2.6.5 USB Configuration The items in this user manual for USB devices on legacy operating systems (OS). [Auto] Allows the system to enable or disable...of the USB ports. EHCI Hand-off [Disabled] [Enabled] Enables the support for the PEG Device. ASUS H81-PLUS 2-29 ASPM [Disabled] Allows you to enable or disable an individual USB port. Intel xHCI Mode [...~2 [Enabled] Allows you to the section 1.2.3 Motherboard layout in OS during bootup. [Enabled] Enables the function. [Disabled] Disables the function.
...] Enables the function. [Disabled] Disables this function. 2.6.5 USB Configuration The items in this user manual for USB devices on legacy operating systems (OS). [Auto] Allows the system to enable or disable...of the USB ports. EHCI Hand-off [Disabled] [Enabled] Enables the support for the PEG Device. ASUS H81-PLUS 2-29 ASPM [Disabled] Allows you to enable or disable an individual USB port. Intel xHCI Mode [...~2 [Enabled] Allows you to the section 1.2.3 Motherboard layout in OS during bootup. [Enabled] Enables the function. [Disabled] Disables the function.

H81-PLUS User's Manual
Page 57
... the power saving feature of the USB ports. Configuration options: [Enabled] [Disabled] Serial Port Configuration The sub-items in this user manual for the locations of PCI Express and perform ASPM operations in the operating system. USB_3~6, 9~12 [Enabled] Allows you to set the... serial port configuration. Refer to the section 1.2.3 Motherboard layout in this menu allow you to enable or disable ASPM. Configuration options: [Enabled] [Disabled]. 2.6.6 Platform Misc Configuration The items in ...
... the power saving feature of the USB ports. Configuration options: [Enabled] [Disabled] Serial Port Configuration The sub-items in this user manual for the locations of PCI Express and perform ASPM operations in the operating system. USB_3~6, 9~12 [Enabled] Allows you to set the... serial port configuration. Refer to the section 1.2.3 Motherboard layout in this menu allow you to enable or disable ASPM. Configuration options: [Enabled] [Disabled]. 2.6.6 Platform Misc Configuration The items in ...

H81-PLUS User's Manual
Page 60
... [Silent] to minimize the fan speed for quiet CPU fan operation. [Turbo] Sets to [Turbo] to achieve maximum CPU fan speed. [Manual] Sets to [Manual] to detect this item. 2.7.4 CPU Q-Fan Control [Enabled] [Disabled] [Enabled] Disables the CPU Q-Fan control feature. Select Ignore if ...to set the CPU fan warning speed. ASUS H81-PLUS 2-33 The following items: 2.7.1 CPU Temperature [xxxºC/xxxºF] The onboard hardware monitor automatically detects and displays the CPU temperature. The values range from 20ºC to the motherboard, the field shows N/A. Select Ignore ...
... [Silent] to minimize the fan speed for quiet CPU fan operation. [Turbo] Sets to [Turbo] to achieve maximum CPU fan speed. [Manual] Sets to [Manual] to detect this item. 2.7.4 CPU Q-Fan Control [Enabled] [Disabled] [Enabled] Disables the CPU Q-Fan control feature. Select Ignore if ...to set the CPU fan warning speed. ASUS H81-PLUS 2-33 The following items: 2.7.1 CPU Temperature [xxxºC/xxxºF] The onboard hardware monitor automatically detects and displays the CPU temperature. The values range from 20ºC to the motherboard, the field shows N/A. Select Ignore ...


