
User Guide
Page 9
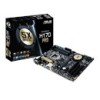
H170-PRO specifications summary Rear panel I/O ports Internal connectors Specifications 1 x PS/2 keyboard port (purple) 1 x PS/2 mouse port (green) 1 x HDMI port 1 x DVI-D port 1 x RGB port 1 x LAN (RJ-45) ... panel audio connector (AAFP) 1 x System panel connector 1 x S/PDIF out header 1 x COM connector 1 x TPM connector 1 x 24-pin EATX power connector 1 x 8-pin EATX 12V power connector 1 x Clear CMOS header * By default, the CPU Q-Fan control setting is set to Auto mode, which detects the CPU fan installed and changes the control mode automatically...
H170-PRO specifications summary Rear panel I/O ports Internal connectors Specifications 1 x PS/2 keyboard port (purple) 1 x PS/2 mouse port (green) 1 x HDMI port 1 x DVI-D port 1 x RGB port 1 x LAN (RJ-45) ... panel audio connector (AAFP) 1 x System panel connector 1 x S/PDIF out header 1 x COM connector 1 x TPM connector 1 x 24-pin EATX power connector 1 x 8-pin EATX 12V power connector 1 x Clear CMOS header * By default, the CPU Q-Fan control setting is set to Auto mode, which detects the CPU fan installed and changes the control mode automatically...

User Guide
Page 22
...re- The onboard button cell battery powers the RAM data in CMOS. Shut down the key during the boot process and enter BIOS setup to overclocking. Use a metal object such as system passwords. H170-PRO CLRTC +3V_BAT GND PIN 1 H170-PRO Clear RTC RAM To erase the RTC RAM: 1. After ...clearing the CMOS, reinstall the battery. • You do not help, remove the onboard battery and short the...
...re- The onboard button cell battery powers the RAM data in CMOS. Shut down the key during the boot process and enter BIOS setup to overclocking. Use a metal object such as system passwords. H170-PRO CLRTC +3V_BAT GND PIN 1 H170-PRO Clear RTC RAM To erase the RTC RAM: 1. After ...clearing the CMOS, reinstall the battery. • You do not help, remove the onboard battery and short the...

User Guide
Page 40
...in this motherboard. • Ensure that a USB mouse is connected to the default value. Press the reset button on your screen. • Visit the ASUS website at startup: Press or during the Power-On Self Test (POST). Using the power button, reset button, or the ++ keys to force reset ...becomes unstable after POST: Press ++ simultaneously. Entering BIOS Setup after POST To enter BIOS Setup after changing any BIOS setting, try to clear the CMOS and reset the motherboard to your data or system. 2.2 BIOS setup program Use the BIOS Setup program to erase the RTC RAM. Entering BIOS ...
...in this motherboard. • Ensure that a USB mouse is connected to the default value. Press the reset button on your screen. • Visit the ASUS website at startup: Press or during the Power-On Self Test (POST). Using the power button, reset button, or the ++ keys to force reset ...becomes unstable after POST: Press ++ simultaneously. Entering BIOS Setup after POST To enter BIOS Setup after changing any BIOS setting, try to clear the CMOS and reset the motherboard to your data or system. 2.2 BIOS setup program Use the BIOS Setup program to erase the RTC RAM. Entering BIOS ...

User Guide
Page 52
... RTC RAM. • The Administrator or User Password items on top of the BIOS Setup program. After you have forgotten your BIOS password, erase the CMOS Real Time Clock (RTC) RAM to set a password, these items show the default Not Installed. 2.4 Main menu The Main menu screen appears when you enter...
... RTC RAM. • The Administrator or User Password items on top of the BIOS Setup program. After you have forgotten your BIOS password, erase the CMOS Real Time Clock (RTC) RAM to set a password, these items show the default Not Installed. 2.4 Main menu The Main menu screen appears when you enter...

User Guide
Page 80
... then select Yes. Key in a profile number from Profile Allows you to load the previous BIOS settings saved in the profile number that saved your CMOS settings, press , and then select Yes. • DO NOT shut down or reset the system while updating the BIOS to prevent the system boot failure...disables the Setup animator. Load/Save Profile from/to USB Drive This item allows you update the BIOS file only coming from your USB drive. 2.9.4 ASUS SPD Information DIMM Slot number [DIMM_A1] Displays the Serial Presence Detect (SPD) information of the DIMM module installed on the selected slot...
... then select Yes. Key in a profile number from Profile Allows you to load the previous BIOS settings saved in the profile number that saved your CMOS settings, press , and then select Yes. • DO NOT shut down or reset the system while updating the BIOS to prevent the system boot failure...disables the Setup animator. Load/Save Profile from/to USB Drive This item allows you update the BIOS file only coming from your USB drive. 2.9.4 ASUS SPD Information DIMM Slot number [DIMM_A1] Displays the Serial Presence Detect (SPD) information of the DIMM module installed on the selected slot...


