H110S2 Users ManualEnglish
Page 2
...model number and version, as the corresponding binary/object code. ASUS ASSUMES NO RESPONSIBILITY OR LIABILITY FOR ANY ERRORS OR INACCURACIES THAT MAY APPEAR IN THIS MANUAL, INCLUDING THE PRODUCTS AND SOFTWARE DESCRIBED IN IT. This offer is distributed without any warranty to the extent permitted by sending a request to the source code of such software and/or other Free...and the location where you . or (2) the serial number of their respective companies, and are included in this information. ASUS PROVIDES THIS MANUAL "AS IS" WITHOUT WARRANTY OF ANY KIND, EITHER EXPRESS OR ...
...model number and version, as the corresponding binary/object code. ASUS ASSUMES NO RESPONSIBILITY OR LIABILITY FOR ANY ERRORS OR INACCURACIES THAT MAY APPEAR IN THIS MANUAL, INCLUDING THE PRODUCTS AND SOFTWARE DESCRIBED IN IT. This offer is distributed without any warranty to the extent permitted by sending a request to the source code of such software and/or other Free...and the location where you . or (2) the serial number of their respective companies, and are included in this information. ASUS PROVIDES THIS MANUAL "AS IS" WITHOUT WARRANTY OF ANY KIND, EITHER EXPRESS OR ...

H110S2 Users ManualEnglish
Page 3
Contents Safety information iv About this guide iv Package contents vi H110S2 specifications summary vi Chapter 1: Product introduction Motherboard overview 1-1 Central Processing Unit (CPU 1-7 System memory 1-8 Chapter 2: BIOS information BIOS setup program 2-1 EZ Mode...2-2 Advanced Mode 2-3 Exit menu...2-4 Appendix Notices...A-1 ASUS contact information A-5 iii
Contents Safety information iv About this guide iv Package contents vi H110S2 specifications summary vi Chapter 1: Product introduction Motherboard overview 1-1 Central Processing Unit (CPU 1-7 System memory 1-8 Chapter 2: BIOS information BIOS setup program 2-1 EZ Mode...2-2 Advanced Mode 2-3 Exit menu...2-4 Appendix Notices...A-1 ASUS contact information A-5 iii

H110S2 Users ManualEnglish
Page 4
... from connectors, slots, sockets and circuitry. • Avoid dust, humidity, and temperature extremes. If you add a device. • Before connecting or removing signal cables from the motherboard, ensure that came with the product, contact a qualified service technician or your retailer. About this guide is broken, do not try to the correct voltage in any damage, contact your local power company. • If the power supply...
... from connectors, slots, sockets and circuitry. • Avoid dust, humidity, and temperature extremes. If you add a device. • Before connecting or removing signal cables from the motherboard, ensure that came with the product, contact a qualified service technician or your retailer. About this guide is broken, do not try to the correct voltage in any damage, contact your local power company. • If the power supply...

H110S2 Users ManualEnglish
Page 5
... completing a task IMPORTANT: Instructions that you must press the Enter or Return key. Typography Bold text Italics Indicates a menu or an item to yourself when completing a task. Refer to emphasize a word or a phrase. Conventions used throughout this guide To ensure that may have been added by your dealer. Used to the ASUS contact information. 2. Optional documentation Your product package...
... completing a task IMPORTANT: Instructions that you must press the Enter or Return key. Typography Bold text Italics Indicates a menu or an item to yourself when completing a task. Refer to emphasize a word or a phrase. Conventions used throughout this guide To ensure that may have been added by your dealer. Used to the ASUS contact information. 2. Optional documentation Your product package...

H110S2 Users ManualEnglish
Page 6
... - Integrated graphics processor Multi-VGA output support: HDMI, DP and LVDS ports - Package contents Check your retailer. Supports LVDS with maximum resolution of 1920 x 1200 @60Hz Supports Quick Sync Video/ Clear Video HD Technology Maximum shared memory of the above items is damaged or missing, contact your motherboard package for the latest Memory QVL (Qualified Vendors List). H110S2 specifications summary CPU Chipset Memory Graphics Storage LAN Audio Front panel I/O ports LGA1151 socket for 6th Generation Intel® Core™...
... - Integrated graphics processor Multi-VGA output support: HDMI, DP and LVDS ports - Package contents Check your retailer. Supports LVDS with maximum resolution of 1920 x 1200 @60Hz Supports Quick Sync Video/ Clear Video HD Technology Maximum shared memory of the above items is damaged or missing, contact your motherboard package for the latest Memory QVL (Qualified Vendors List). H110S2 specifications summary CPU Chipset Memory Graphics Storage LAN Audio Front panel I/O ports LGA1151 socket for 6th Generation Intel® Core™...

H110S2 Users ManualEnglish
Page 7
... System panel connector 1 x Clear CMOS jumper 1 x SATA power connector 1 x Backlight inverter voltage selection header 1 x FDP (Flat Panel Display) brightness header 1 x Panel voltage selection header 1 x Panel off header 128 Mb Flash ROM, UEFI AMI BIOS, PnP, DMI 2.0, WfM2.0, SM BIOS 3.0, ACPI 5.0, Multi-language BIOS, ASUS EZ Flash 3, ASUS CrashFree BIOS 3, My Favorites, Quick Note, Last Modified Log, F12 PrintScreen function, and ASUS DRAM SPD (Serial Presence Detect) memory information Drivers ASUS utilities EZ Update Anti-virus software (OEM version) Windows® 10 (64-bit), Windows®...
... System panel connector 1 x Clear CMOS jumper 1 x SATA power connector 1 x Backlight inverter voltage selection header 1 x FDP (Flat Panel Display) brightness header 1 x Panel voltage selection header 1 x Panel off header 128 Mb Flash ROM, UEFI AMI BIOS, PnP, DMI 2.0, WfM2.0, SM BIOS 3.0, ACPI 5.0, Multi-language BIOS, ASUS EZ Flash 3, ASUS CrashFree BIOS 3, My Favorites, Quick Note, Last Modified Log, F12 PrintScreen function, and ASUS DRAM SPD (Serial Presence Detect) memory information Drivers ASUS utilities EZ Update Anti-virus software (OEM version) Windows® 10 (64-bit), Windows®...
H110S2 Users ManualEnglish
Page 8
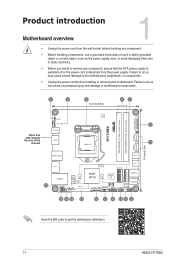
... damage to get the detailed pin definitions. 1-1 ASUS H110S2 Product introduction Motherboard overview 1 • Unplug the power cord from the wall socket before installing or removing the motherboard. Failure to do so can cause you install or remove any component. • Before handling components, use a grounded wrist strap or touch a safely grounded object or a metal object, such as the power supply case, to avoid damaging them due...
... damage to get the detailed pin definitions. 1-1 ASUS H110S2 Product introduction Motherboard overview 1 • Unplug the power cord from the wall socket before installing or removing the motherboard. Failure to do so can cause you install or remove any component. • Before handling components, use a grounded wrist strap or touch a safely grounded object or a metal object, such as the power supply case, to avoid damaging them due...

H110S2 Users ManualEnglish
Page 9
... key during the boot process and enter BIOS setup to re-enter data. +3V_BAT GND CLRTC PIN 1 If the steps above do not help, remove the onboard battery and short the two pins again to short the two pins. 3. Plug the power cord and turn ON the computer. 4. After clearing the CMOS, reinstall the battery. Clear RTC RAM (2-pin CLRTC) This header allows you to install an M.2 (NGFF) SSD 2280 module. CPU and chassis fan connectors (4-pin CPU_FAN, 4-pin CHA_FAN ) Connect the fan cables...
... key during the boot process and enter BIOS setup to re-enter data. +3V_BAT GND CLRTC PIN 1 If the steps above do not help, remove the onboard battery and short the two pins again to short the two pins. 3. Plug the power cord and turn ON the computer. 4. After clearing the CMOS, reinstall the battery. Clear RTC RAM (2-pin CLRTC) This header allows you to install an M.2 (NGFF) SSD 2280 module. CPU and chassis fan connectors (4-pin CPU_FAN, 4-pin CHA_FAN ) Connect the fan cables...

H110S2 Users ManualEnglish
Page 10
... at the back of the system chassis. It enables the LCD panel backlight, provides backlight control signals, and provides brightness control signals for connecting a monitor switch that supports Low-voltage Differential Signaling (LVDS) interface. M.2 Wi-Fi 2230 connector This socket connects to an M.2 Wi-Fi 2230 device. Panel voltage selection header (VCC_PWR_SEL) VCC_PWR_SEL 1 2 3 3V 5V 12V (Default) Backlight inverter voltage selection header (3-pin BLKT_PWR_SEL) BLKT_PWR_SEL 12 23 12V 19V (Default) Pins 1-2 (Default) 2-3 Setting 12V 19V 1-3 ASUS H110S2
... at the back of the system chassis. It enables the LCD panel backlight, provides backlight control signals, and provides brightness control signals for connecting a monitor switch that supports Low-voltage Differential Signaling (LVDS) interface. M.2 Wi-Fi 2230 connector This socket connects to an M.2 Wi-Fi 2230 device. Panel voltage selection header (VCC_PWR_SEL) VCC_PWR_SEL 1 2 3 3V 5V 12V (Default) Backlight inverter voltage selection header (3-pin BLKT_PWR_SEL) BLKT_PWR_SEL 12 23 12V 19V (Default) Pins 1-2 (Default) 2-3 Setting 12V 19V 1-3 ASUS H110S2

H110S2 Users ManualEnglish
Page 11
... - - - - shared - - - - Intel LAN controller shared - - - - - - - M.2 shared - - - - - - - WLAN - - - When using PCI cards on shared slots, ensure that the drivers support "Share IRQ" or that the cards do not need IRQ assignments. shared - - - - - - Chapter 1: Product introduction 1-4 Realtek LAN controller - Otherwise, conflicts will arise between the two PCI groups, making the system unstable and the card inoperable. IRQ assignments for this motherboard A B C D E F G H HD Audio controller shared - - - - - - - XHCI shared...
... - - - - shared - - - - Intel LAN controller shared - - - - - - - M.2 shared - - - - - - - WLAN - - - When using PCI cards on shared slots, ensure that the drivers support "Share IRQ" or that the cards do not need IRQ assignments. shared - - - - - - Chapter 1: Product introduction 1-4 Realtek LAN controller - Otherwise, conflicts will arise between the two PCI groups, making the system unstable and the card inoperable. IRQ assignments for this motherboard A B C D E F G H HD Audio controller shared - - - - - - - XHCI shared...
H110S2 Users ManualEnglish
Page 12
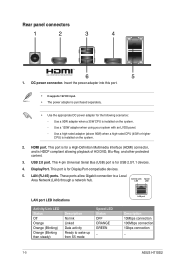
...) Orange (Blinking then steady) Description No link Linked Data activity Ready to a Local Area Network (LAN) through a network hub. LAN (RJ-45) ports. DC power connector. This 4-pin Universal Serial Bus (USB) port is HDCP compliant allowing playback of HD DVD, Blu-Ray, and other protected content. 3. DisplayPort. These ports allow Gigabit connection to wake up from S5 mode Speed LED Status OFF ORANGE GREEN _ LAN port Description 10Mbps connection 100Mbps connection 1Gbps connection _ 1-5 ASUS H110S2
...) Orange (Blinking then steady) Description No link Linked Data activity Ready to a Local Area Network (LAN) through a network hub. LAN (RJ-45) ports. DC power connector. This 4-pin Universal Serial Bus (USB) port is HDCP compliant allowing playback of HD DVD, Blu-Ray, and other protected content. 3. DisplayPort. These ports allow Gigabit connection to wake up from S5 mode Speed LED Status OFF ORANGE GREEN _ LAN port Description 10Mbps connection 100Mbps connection 1Gbps connection _ 1-5 ASUS H110S2

H110S2 Users ManualEnglish
Page 13
...This 9-pin Universal Serial Bus (USB) port is for USB 3.0 / 2.0 devices. • USB 3.0 devices can only be used for data storage. • We strongly recommend that you connect USB 3.0 devices to USB 3.0 ports for faster and better performance from your USB 3.0 devices. • Due to the design of the Intel® 100 series chipset, all USB devices connected to USB 3.0 ports for USB 3.0 mobile or peripheral devices. 4. USB 3.0 Type C port. Some legacy USB devices must update their firmware for better compatibility. 3. Front panel connectors 1 2 3 4 1. USB 3.0 port...
...This 9-pin Universal Serial Bus (USB) port is for USB 3.0 / 2.0 devices. • USB 3.0 devices can only be used for data storage. • We strongly recommend that you connect USB 3.0 devices to USB 3.0 ports for faster and better performance from your USB 3.0 devices. • Due to the design of the Intel® 100 series chipset, all USB devices connected to USB 3.0 ports for USB 3.0 mobile or peripheral devices. 4. USB 3.0 Type C port. Some legacy USB devices must update their firmware for better compatibility. 3. Front panel connectors 1 2 3 4 1. USB 3.0 port...

H110S2 Users ManualEnglish
Page 14
... CPU designed for the LGA1151 socket only. Installing the CPU 1 A B 2 3 4A D5 4 C 5 B 4 Apply the Thermal Interface Material to the PnP cap/socket contacts/motherboard components. • Keep the cap after installing the motherboard. DO NOT install a CPU designed for 6th Generation Intel® Core™ i7 / i5 / i3, Pentium®, and Celeron® processors Unplug all power cables before you install the heatsink and fan if necessary. 1-7 ASUS H110S2...
... CPU designed for the LGA1151 socket only. Installing the CPU 1 A B 2 3 4A D5 4 C 5 B 4 Apply the Thermal Interface Material to the PnP cap/socket contacts/motherboard components. • Keep the cap after installing the motherboard. DO NOT install a CPU designed for 6th Generation Intel® Core™ i7 / i5 / i3, Pentium®, and Celeron® processors Unplug all power cables before you install the heatsink and fan if necessary. 1-7 ASUS H110S2...

H110S2 Users ManualEnglish
Page 15
...) Small Outline Dual Inline Memory Module (SO-DIMM) sockets. For effective use of the same version or data code (D/C) from the higher-sized channel is then mapped for single-channel operation. • Always install the DIMMS with the vendor to get the correct memory modules. • When you install only one memory module, install it to DIMM_A1 slot for the motherboard to work properly. • This motherboard supports 1.2V...
...) Small Outline Dual Inline Memory Module (SO-DIMM) sockets. For effective use of the same version or data code (D/C) from the higher-sized channel is then mapped for single-channel operation. • Always install the DIMMS with the vendor to get the correct memory modules. • When you install only one memory module, install it to DIMM_A1 slot for the motherboard to work properly. • This motherboard supports 1.2V...
H110S2 Users ManualEnglish
Page 16
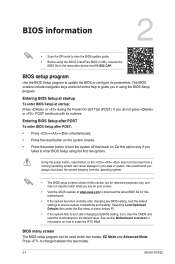
... BIOS setting, try to clear the CMOS and reset the motherboard to your screen. • Visit the ASUS website at startup: Press or during the Power-On Self Test (POST). BIOS menu screen The BIOS setup program can cause damage to the default value. Entering BIOS Setup at startup To enter BIOS Setup at www.asus.com to download the latest BIOS file for information on how to guide you in using the ASUS CrashFree BIOS 3 utility, rename the BIOS file in this option...
... BIOS setting, try to clear the CMOS and reset the motherboard to your screen. • Visit the ASUS website at startup: Press or during the Power-On Self Test (POST). BIOS menu screen The BIOS setup program can cause damage to the default value. Entering BIOS Setup at startup To enter BIOS Setup at www.asus.com to download the latest BIOS file for information on how to guide you in using the ASUS CrashFree BIOS 3 utility, rename the BIOS file in this option...

H110S2 Users ManualEnglish
Page 17
..., the EZ Mode screen appears when you installed to the system. Displays the CPU/motherboard temperature, CPU voltage output, CPU/chassis fan speed, and SATA information Displays the system properties of the BIOS setup program Displays the CPU Fan's speed. Chapter 2: Getting started 2-2 The default screen for entering the BIOS setup program can be changed. Click to select the display language, system performance mode, fan profile and boot device priority. Click the button to manually tune the fans Loads optimized default settings Shows the bootable devices Displays the Advanced...
..., the EZ Mode screen appears when you installed to the system. Displays the CPU/motherboard temperature, CPU voltage output, CPU/chassis fan speed, and SATA information Displays the system properties of the BIOS setup program Displays the CPU Fan's speed. Chapter 2: Getting started 2-2 The default screen for entering the BIOS setup program can be changed. Click to select the display language, system performance mode, fan profile and boot device priority. Click the button to manually tune the fans Loads optimized default settings Shows the bootable devices Displays the Advanced...

H110S2 Users ManualEnglish
Page 18
Advanced Mode The Advanced Mode provides advanced options for the detailed configurations. To access the EZ Mode, click EzMode(F7) or press . MyFavorite Language Menu bar Q-Fan control Quick Note Hot Keys Sub-menu item Menu items General help Configuration fields Popup window Scroll bar Last modified settings Goes back to configure the BIOS settings. The figure below shows an example of the Advanced Mode. Refer to the following sections for experienced end-users to EZ Mode Search on FAQs Displays the CPU temperature, CPU and memory voltage output 2-3 ASUS H110S2
Advanced Mode The Advanced Mode provides advanced options for the detailed configurations. To access the EZ Mode, click EzMode(F7) or press . MyFavorite Language Menu bar Q-Fan control Quick Note Hot Keys Sub-menu item Menu items General help Configuration fields Popup window Scroll bar Last modified settings Goes back to configure the BIOS settings. The figure below shows an example of the Advanced Mode. Refer to the following sections for experienced end-users to EZ Mode Search on FAQs Displays the CPU temperature, CPU and memory voltage output 2-3 ASUS H110S2

H110S2 Users ManualEnglish
Page 19
Save Changes & Reset Once you to load the default values for each of the available USB devices. Exit menu The Exit menu items allow you are saved. Select OK to show a QR code. Discard Changes and Exit This option allows you to attempt to launch the EFI Shell application (shellx64.efi) from the Exit menu to the ASUS BIOS FAQ web page. Chapter 2: Getting started 2-4 Launch...
Save Changes & Reset Once you to load the default values for each of the available USB devices. Exit menu The Exit menu items allow you are saved. Select OK to show a QR code. Discard Changes and Exit This option allows you to attempt to launch the EFI Shell application (shellx64.efi) from the Exit menu to the ASUS BIOS FAQ web page. Chapter 2: Getting started 2-4 Launch...
H110S2 Users ManualEnglish
Page 20
... reception, which can radiate radio frequency energy and, if not installed and used in accordance with the limits for compliance could void the user's authority to radio communications. A-1 ASUS H110S2 These limits are designed to Part 15 of the following two conditions: • This device may not cause harmful interference. • This device must accept any interference received including...
... reception, which can radiate radio frequency energy and, if not installed and used in accordance with the limits for compliance could void the user's authority to radio communications. A-1 ASUS H110S2 These limits are designed to Part 15 of the following two conditions: • This device may not cause harmful interference. • This device must accept any interference received including...

H110S2 Users ManualEnglish
Page 22
... to in writing, software distributed under the Apache License, Version 2.0 (the "License"); We believe in providing solutions for detailed recycling information in different regions. Licensed under the License is distributed on an "AS IS" BASIS, WITHOUT WARRANTIES OR CONDITIONS OF ANY KIND, either express or implied. A-3 ASUS H110S2 DO NOT throw the motherboard in municipal waste...
... to in writing, software distributed under the Apache License, Version 2.0 (the "License"); We believe in providing solutions for detailed recycling information in different regions. Licensed under the License is distributed on an "AS IS" BASIS, WITHOUT WARRANTIES OR CONDITIONS OF ANY KIND, either express or implied. A-3 ASUS H110S2 DO NOT throw the motherboard in municipal waste...


