
User Guide
Page 2
... same license as required under the Lesser General Public License Version ("LGPL") and/or other additional data, you to the source code of alteration is eager to infringe. SPECIFICATIONS AND INFORMATION CONTAINED IN THIS MANUAL ARE FURNISHED FOR INFORMATIONAL USE ONLY, AND ARE SUBJECT TO CHANGE AT ANY TIME WITHOUT NOTICE, AND SHOULD NOT BE CONSTRUED...
... same license as required under the Lesser General Public License Version ("LGPL") and/or other additional data, you to the source code of alteration is eager to infringe. SPECIFICATIONS AND INFORMATION CONTAINED IN THIS MANUAL ARE FURNISHED FOR INFORMATIONAL USE ONLY, AND ARE SUBJECT TO CHANGE AT ANY TIME WITHOUT NOTICE, AND SHOULD NOT BE CONSTRUED...

User Guide
Page 8
H110M-C specifications summary Internal connectors BIOS features Manageability Support DVD OS support Form factor 1 x USB 2.0/1.1 connector supports additional 2 USB 2.0/1.1 ports 1 x USB 3.0 connector supports additional 2 USB 3.0 port 4 x SATA 6.0 Gb/s connectors 1 x 14-1 pin TPM connector 1 x COM connector 1 x Parallel connector 1 x CPU fan connector (4-pin) 1 x Chassis Fan connectors (4-pin) 1 x Front panel audio connector (AAFP) 1 x 24-pin EATX power connector 1 x 4-pin ATX 12V power connector 1 x System panel connector 1 x Speaker connector 1 x Clear CMOS header (2-pin) 1 x Chassis ...
H110M-C specifications summary Internal connectors BIOS features Manageability Support DVD OS support Form factor 1 x USB 2.0/1.1 connector supports additional 2 USB 2.0/1.1 ports 1 x USB 3.0 connector supports additional 2 USB 3.0 port 4 x SATA 6.0 Gb/s connectors 1 x 14-1 pin TPM connector 1 x COM connector 1 x Parallel connector 1 x CPU fan connector (4-pin) 1 x Chassis Fan connectors (4-pin) 1 x Front panel audio connector (AAFP) 1 x 24-pin EATX power connector 1 x 4-pin ATX 12V power connector 1 x System panel connector 1 x Speaker connector 1 x Clear CMOS header (2-pin) 1 x Chassis ...
User Guide
Page 15
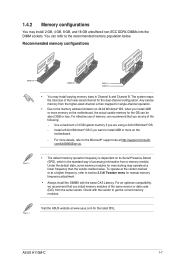
... value. Visit the ASUS website at http://support.microsoft. Check with the same CAS Latency. com/kb/929605/en-us. • The default memory operation frequency is dependent on 32-bit Windows® OS, when you install memory modules of the same version or data code (D/C) from a memory module. You can be about 3GB or less. For effective use of accessing information from the...
... value. Visit the ASUS website at http://support.microsoft. Check with the same CAS Latency. com/kb/929605/en-us. • The default memory operation frequency is dependent on 32-bit Windows® OS, when you install memory modules of the same version or data code (D/C) from a memory module. You can be about 3GB or less. For effective use of accessing information from the...
User Guide
Page 17
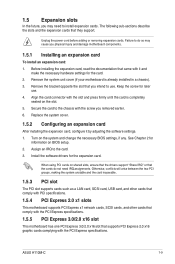
... removed earlier. 6. When using PCI cards on BIOS setup. 2. Remove the system unit cover (if your motherboard is completely seated on the system and change the necessary BIOS settings, if any. Otherwise, conflicts will arise between the two PCI groups, making the system unstable and the card inoperable. 1.5.3 PCI slot The PCI slot supports cards such as a LAN card, SCSI card, USB card, and other cards that comply with PCI specifications. 1.5.4 PCI Express 2.0 x1 slots This motherboard supports PCI Express x1 network cards, SCSI cards, and other cards...
... removed earlier. 6. When using PCI cards on BIOS setup. 2. Remove the system unit cover (if your motherboard is completely seated on the system and change the necessary BIOS settings, if any. Otherwise, conflicts will arise between the two PCI groups, making the system unstable and the card inoperable. 1.5.3 PCI slot The PCI slot supports cards such as a LAN card, SCSI card, USB card, and other cards that comply with PCI specifications. 1.5.4 PCI Express 2.0 x1 slots This motherboard supports PCI Express x1 network cards, SCSI cards, and other cards...
User Guide
Page 18
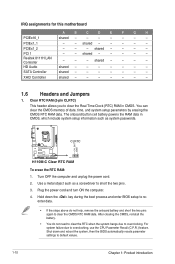
... power cord. 2. Plug the power cord and turn ON the computer. 4. shared - - - - XHCI Controller shared - - - - - - - 1.6 Headers and Jumpers 1. The onboard button cell battery powers the RAM data in CMOS. For system failure due to short the two pins. 3. PCIEx1_2 - - - Realtek 8111H LAN Controller - - - You can clear the CMOS memory of date, time, and system setup parameters by erasing the CMOS RTC RAM data. Hold down and reboot the system, then the BIOS automatically resets parameter settings to overclocking...
... power cord. 2. Plug the power cord and turn ON the computer. 4. shared - - - - XHCI Controller shared - - - - - - - 1.6 Headers and Jumpers 1. The onboard button cell battery powers the RAM data in CMOS. For system failure due to short the two pins. 3. PCIEx1_2 - - - Realtek 8111H LAN Controller - - - You can clear the CMOS memory of date, time, and system setup parameters by erasing the CMOS RTC RAM data. Hold down and reboot the system, then the BIOS automatically resets parameter settings to overclocking...

User Guide
Page 21
... port connector ASUS H110M-C 1-13 These are not jumpers! Do not place jumper caps on the motherboard, ensuring that the black wire of each cable matches the ground pin of maximum 1A (12 W) fan power. LPT connector (26-1 pin LPT) The LPT (Line Printing Terminal) connector supports devices such as IEEE 1284, which is the parallel port interface on IBM PC-compatible computers. The CPU_FAN connector supports a CPU fan of the connector CPU_FAN CHA_FAN H110M-C H110M-C Fan connectors...
... port connector ASUS H110M-C 1-13 These are not jumpers! Do not place jumper caps on the motherboard, ensuring that the black wire of each cable matches the ground pin of maximum 1A (12 W) fan power. LPT connector (26-1 pin LPT) The LPT (Line Printing Terminal) connector supports devices such as IEEE 1284, which is the parallel port interface on IBM PC-compatible computers. The CPU_FAN connector supports a CPU fan of the connector CPU_FAN CHA_FAN H110M-C H110M-C Fan connectors...
User Guide
Page 27
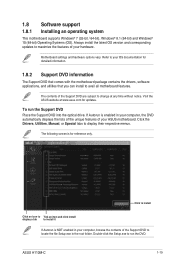
... Setup.exe to avail all motherboard features. If Autorun is NOT enabled in the root folder. The following screen is for updates. Click the Drivers, Utilities, Manual, or Special tabs to change at www.asus.com for reference only. ASUS H110M-C 1-19 Always install the latest OS version and corresponding updates to maximize the features of the Support DVD are subject to display their respective menus. Motherboard settings and hardware options...
... Setup.exe to avail all motherboard features. If Autorun is NOT enabled in the root folder. The following screen is for updates. Click the Drivers, Utilities, Manual, or Special tabs to change at www.asus.com for reference only. ASUS H110M-C 1-19 Always install the latest OS version and corresponding updates to maximize the features of the Support DVD are subject to display their respective menus. Motherboard settings and hardware options...
User Guide
Page 28
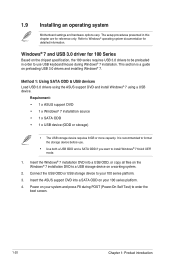
.... Insert the ASUS support DVD into a USB ODD, or copy all files on your 100 series platform. 4. This section is recommended to format the storage device before use USB keyboard/mouse during Windows® 7 installation. 1.9 Installing an operating system Motherboard settings and hardware options vary. Windows® 7 and USB 3.0 driver for reference only. Method 1: Using SATA ODD & USB devices Load USB 3.0 drivers using the ASUS support DVD and install Windows® 7 using a USB device. Power on the Windows® 7 installation DVD to install Windows® 7 64-bit UEFI mode. 1.
.... Insert the ASUS support DVD into a USB ODD, or copy all files on your 100 series platform. 4. This section is recommended to format the storage device before use USB keyboard/mouse during Windows® 7 installation. 1.9 Installing an operating system Motherboard settings and hardware options vary. Windows® 7 and USB 3.0 driver for reference only. Method 1: Using SATA ODD & USB devices Load USB 3.0 drivers using the ASUS support DVD and install Windows® 7 using a USB device. Power on the Windows® 7 installation DVD to install Windows® 7 64-bit UEFI mode. 1.
User Guide
Page 30
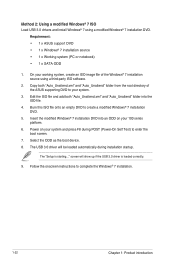
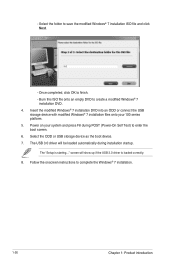
...image file of the ASUS supporting DVD to enter the boot screen. 7. Follow the onscreen instructions to create a modified Windows® 7 installation DVD. 5. Method 2: Using a modified Windows® 7 ISO Load USB 3.0 drivers and install Windows® 7 using a third-party ISO software. 2. screen will be loaded automatically during POST (Power-On Self Test) to your system and press F8 during installation startup. Requirement: • 1 x ASUS support DVD • 1 x Windows® 7 installation source • 1 x Working system (PC or notebook) • 1 x SATA ODD 1. The "Setup...
...image file of the ASUS supporting DVD to enter the boot screen. 7. Follow the onscreen instructions to create a modified Windows® 7 installation DVD. 5. Method 2: Using a modified Windows® 7 ISO Load USB 3.0 drivers and install Windows® 7 using a third-party ISO software. 2. screen will be loaded automatically during POST (Power-On Self Test) to your system and press F8 during installation startup. Requirement: • 1 x ASUS support DVD • 1 x Windows® 7 installation source • 1 x Working system (PC or notebook) • 1 x SATA ODD 1. The "Setup...
User Guide
Page 31
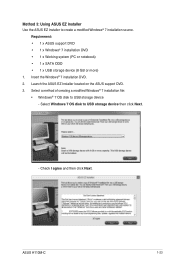
...® 7 installation file: • Windows® 7 OS disk to USB storage device then click Next. - ASUS H110M-C 1-23 Select Windows 7 OS disk to USB storage device - Launch the ASUS EZ Installer located on the ASUS support DVD. 3. Check I agree and then click Next. Requirement: • 1 x ASUS support DVD • 1 x Windows® 7 installation DVD • 1 x Working system (PC or notebook) • 1 x SATA ODD • 1 x USB storage device (8 GB or more) 1. Insert the Windows® 7 installation DVD. 2. Method 3: Using ASUS EZ Installer Use the ASUS EZ Installer to...
...® 7 installation file: • Windows® 7 OS disk to USB storage device then click Next. - ASUS H110M-C 1-23 Select Windows 7 OS disk to USB storage device - Launch the ASUS EZ Installer located on the ASUS support DVD. 3. Check I agree and then click Next. Requirement: • 1 x ASUS support DVD • 1 x Windows® 7 installation DVD • 1 x Working system (PC or notebook) • 1 x SATA ODD • 1 x USB storage device (8 GB or more) 1. Insert the Windows® 7 installation DVD. 2. Method 3: Using ASUS EZ Installer Use the ASUS EZ Installer to...
User Guide
Page 34
... ODD or USB storage device as the boot device. 7. Follow the onscreen instructions to save the modified Windows® 7 installation ISO file and click Next. - Insert the modified Windows® 7 installation DVD into an ODD or connect the USB storage device with modified Windows® 7 installation files onto your system and press F8 during installation startup. The USB 3.0 driver will show up if the USB 3.0 driver is starting..." screen will be loaded automatically during POST (Power-On Self Test...
... ODD or USB storage device as the boot device. 7. Follow the onscreen instructions to save the modified Windows® 7 installation ISO file and click Next. - Insert the modified Windows® 7 installation DVD into an ODD or connect the USB storage device with modified Windows® 7 installation files onto your system and press F8 during installation startup. The USB 3.0 driver will show up if the USB 3.0 driver is starting..." screen will be loaded automatically during POST (Power-On Self Test...
User Guide
Page 35
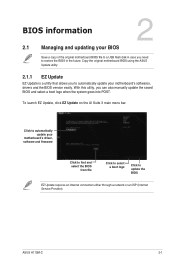
... automatically update your BIOS Save a copy of the original motherboard BIOS file to a USB flash disk in case you can also manually update the saved BIOS and select a boot logo when the system goes into POST. To launch EZ Update, click EZ Update on the AI Suite 3 main menu bar. ASUS H110M-C 2-1 Copy the original motherboard BIOS using the ASUS Update utility. 2.1.1 EZ Update EZ Update is a utility that allows you to update the BIOS EZ Update requires an Internet connection either through a network...
... automatically update your BIOS Save a copy of the original motherboard BIOS file to a USB flash disk in case you can also manually update the saved BIOS and select a boot logo when the system goes into POST. To launch EZ Update, click EZ Update on the AI Suite 3 main menu bar. ASUS H110M-C 2-1 Copy the original motherboard BIOS using the ASUS Update utility. 2.1.1 EZ Update EZ Update is a utility that allows you to update the BIOS EZ Update requires an Internet connection either through a network...
User Guide
Page 37
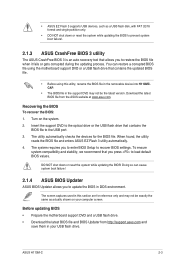
... boot failure!. 2.1.3 ASUS CrashFree BIOS 3 utility The ASUS CrashFree BIOS 3 is an auto recovery tool that allows you to enter BIOS Setup to restore the BIOS file when it fails or gets corrupted during the updating process. Insert the support DVD to the optical drive or the USB flash drive that you to the USB port. 3. When found, the utility reads the BIOS file and enters ASUS EZ Flash 3 utility automatically. 4. Before updating BIOS • Prepare the motherboard support DVD and a USB flash drive. • Download the latest BIOS file and BIOS Updater...
... boot failure!. 2.1.3 ASUS CrashFree BIOS 3 utility The ASUS CrashFree BIOS 3 is an auto recovery tool that allows you to enter BIOS Setup to restore the BIOS file when it fails or gets corrupted during the updating process. Insert the support DVD to the optical drive or the USB flash drive that you to the USB port. 3. When found, the utility reads the BIOS file and enters ASUS EZ Flash 3 utility automatically. 4. Before updating BIOS • Prepare the motherboard support DVD and a USB flash drive. • Download the latest BIOS file and BIOS Updater...
User Guide
Page 38
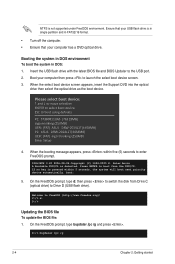
... press . On the FreeDOS prompt, type d: then press to switch the disk from the DVD/CD. When the booting message appears, press within 5 seconds, the system will boot next priority device automatically. Press ENTER to boot from Drive C (optical drive) to enter FreeDOS prompt. Boot your computer has a DVD optical drive. Insert the USB flash drive with the latest BIOS file and BIOS Updater to launch the select boot device screen. 3. ISOLINUX 3.20 2006-08...
... press . On the FreeDOS prompt, type d: then press to switch the disk from the DVD/CD. When the booting message appears, press within 5 seconds, the system will boot next priority device automatically. Press ENTER to boot from Drive C (optical drive) to enter FreeDOS prompt. Boot your computer has a DVD optical drive. Insert the USB flash drive with the latest BIOS file and BIOS Updater to launch the select boot device screen. 3. ISOLINUX 3.20 2006-08...
User Guide
Page 56
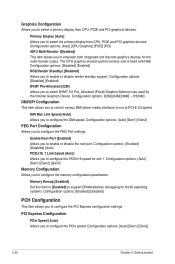
... options: [Enabled] [Disabled] PCH Configuration This item allows you to configure the PEG Port settings. Configuration options: [Auto] [CPU Graphics] [PCIE] [PCI] iGPU Multi-Monitor [Disabled] This item allows you to enable or disable render standby support. Configuration options: [Disabled] [Enabled] RC6(Render Standby) [Disabled] Allows you to empower both integrated and discrete graphics devices for slot 1. Configuration options: [Auto] [Gen1] [Gen2] [Gen3] Memory Configuration Allows you to select DVMT 5.0 Pre_Allocated (Fixed) Graphics Memory size used by the Internal Graphics...
... options: [Enabled] [Disabled] PCH Configuration This item allows you to configure the PEG Port settings. Configuration options: [Auto] [CPU Graphics] [PCIE] [PCI] iGPU Multi-Monitor [Disabled] This item allows you to enable or disable render standby support. Configuration options: [Disabled] [Enabled] RC6(Render Standby) [Disabled] Allows you to empower both integrated and discrete graphics devices for slot 1. Configuration options: [Auto] [Gen1] [Gen2] [Gen3] Memory Configuration Allows you to select DVMT 5.0 Pre_Allocated (Fixed) Graphics Memory size used by the Internal Graphics...
User Guide
Page 57
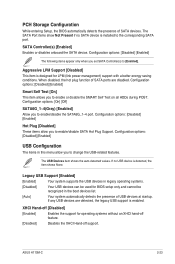
... USB device is installed to change the USB-related features. SATA Controller(s) [Enabled] Enables or disables onboard the SATA device. ASUS H110M-C 2-23 When disabled, the hot plug function of SATA ports are detected, the legacy USB support is designed for LPM (link power management) support with a better energy saving conditions. If any USB devices are disabled. Configuration options: [Disabled] [Enabled] USB Configuration The items in the boot devices list. [Auto] Your system automatically detects the presence of SATA devices. Legacy USB Support [Enabled] [Enabled...
... USB device is installed to change the USB-related features. SATA Controller(s) [Enabled] Enables or disables onboard the SATA device. ASUS H110M-C 2-23 When disabled, the hot plug function of SATA ports are detected, the legacy USB support is designed for LPM (link power management) support with a better energy saving conditions. If any USB devices are disabled. Configuration options: [Disabled] [Enabled] USB Configuration The items in the boot devices list. [Auto] Your system automatically detects the presence of SATA devices. Legacy USB Support [Enabled] [Enabled...
User Guide
Page 58
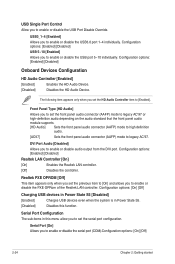
... front panel audio connector (AAFP) mode to legacy AC'97 or high-definition audio depending on the audio standard that the front panel audio module supports. [HD Audio] Sets the front panel audio connector (AAFP) mode to high definition audio. [AC97] Sets the front panel audio connector (AAFP) mode to enable or disable the PXE OPRom of the Realtek LAN controller. Front Panel Type [HD Audio] Allows you to set the HD Audio Controller item to enable or disable the serial port (COM).Configuration options: [On] [Off] 2-24 Chapter 2: Getting started Configuration options: [Enabled] [Disabled...
... front panel audio connector (AAFP) mode to legacy AC'97 or high-definition audio depending on the audio standard that the front panel audio module supports. [HD Audio] Sets the front panel audio connector (AAFP) mode to high definition audio. [AC97] Sets the front panel audio connector (AAFP) mode to enable or disable the PXE OPRom of the Realtek LAN controller. Front Panel Type [HD Audio] Allows you to set the HD Audio Controller item to enable or disable the serial port (COM).Configuration options: [On] [Off] 2-24 Chapter 2: Getting started Configuration options: [Enabled] [Disabled...
User Guide
Page 60
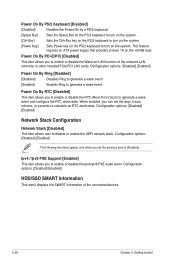
... Clock) to generate a wake event and configure the RTC alarm date. This feature requires an ATX power supply that provides at least 1A on the system. Ipv4 / Ipv6 PXE Support [Enabled] This item allows you can set the previous item to [Enabled]. Configuration options: [Disabled] [Enabled] HDD/SSD SMART Information This menu displays the SMART information of the onboard LAN controller or other installed PCIe/PCI LAN cards. When enabled, you to enable or disable the Ipv4/Ipv6 PXE wake event. Power...
... Clock) to generate a wake event and configure the RTC alarm date. This feature requires an ATX power supply that provides at least 1A on the system. Ipv4 / Ipv6 PXE Support [Enabled] This item allows you can set the previous item to [Enabled]. Configuration options: [Disabled] [Enabled] HDD/SSD SMART Information This menu displays the SMART information of the onboard LAN controller or other installed PCIe/PCI LAN cards. When enabled, you to enable or disable the Ipv4/Ipv6 PXE wake event. Power...
User Guide
Page 65
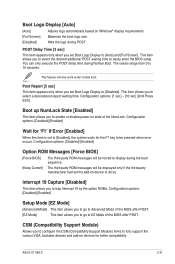
... time. Configuration options: [Disabled] [Enabled] Option ROM Messages [Force BIOS] [Force BIOS] The third-party ROM messages will be pressed when error occurs. Boot up NumLock State [Enabled] This item allows you to select the desired additional POST waiting time to enable or disable power-on Windows® display requirements. [Full Screen] Maximize the boot logo size. [Disabled] Hide the logo during Normal Boot. This item allows you to easily enter the BIOS setup. ASUS H110M-C 2-31 Post Report...
... time. Configuration options: [Disabled] [Enabled] Option ROM Messages [Force BIOS] [Force BIOS] The third-party ROM messages will be pressed when error occurs. Boot up NumLock State [Enabled] This item allows you to select the desired additional POST waiting time to enable or disable power-on Windows® display requirements. [Full Screen] Maximize the boot logo size. [Disabled] Hide the logo during Normal Boot. This item allows you to easily enter the BIOS setup. ASUS H110M-C 2-31 Post Report...
User Guide
Page 66
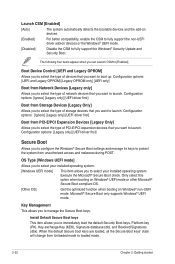
... select the type of network devices that you want to launch. Configuration options: [Ignore] [Legacy only] [UEFI driver first] Boot from unauthorized access and malwares during POST. Execute the Microsoft® Secure Boot check. Microsoft® Secure Boot only supports Windows® UEFI mode. Configuration options: [Legacy only] [UEFI driver first] Secure Boot Allows you to manage the Secure Boot keys. Configuration options: [Ignore] [Legacy only] [UEFI driver first] Boot from Unloaded mode to loaded mode. 2-32 Chapter 2: Getting started OS Type [Windows UEFI mode] Allows...
... select the type of network devices that you want to launch. Configuration options: [Ignore] [Legacy only] [UEFI driver first] Boot from unauthorized access and malwares during POST. Execute the Microsoft® Secure Boot check. Microsoft® Secure Boot only supports Windows® UEFI mode. Configuration options: [Legacy only] [UEFI driver first] Secure Boot Allows you to manage the Secure Boot keys. Configuration options: [Ignore] [Legacy only] [UEFI driver first] Boot from Unloaded mode to loaded mode. 2-32 Chapter 2: Getting started OS Type [Windows UEFI mode] Allows...


