
User Manual
Page 1
F1A75-M PRO Motherboard
F1A75-M PRO Motherboard

User Manual
Page 3
Contents Notices...vi Safety information vii About this guide viii F1A75-M PRO specifications summary ix Chapter 1: Product introduction 1.1 Welcome 1-1 1.2 Package contents 1-1 1.3 Special features 1-1 1.3.1 Product highlights 1-1 1.3.2 Dual Intelligent Processors 2 - DIGI+ VRM 1-2 1.3.3 ASUS Digital Power Design 1-3 1.4 Before you proceed 1-6 1.5 Motherboard overview 1-7 1.5.1 Placement direction 1-7 1.5.2 Screw holes 1-7 1.5.3 Motherboard layout 1-8 1.5.4 Layout contents 1-8 1.6 Accelerated Processing Unit (APU 1-9 1.6.1 Installing the APU 1-9 1.6.2 Installing the...
Contents Notices...vi Safety information vii About this guide viii F1A75-M PRO specifications summary ix Chapter 1: Product introduction 1.1 Welcome 1-1 1.2 Package contents 1-1 1.3 Special features 1-1 1.3.1 Product highlights 1-1 1.3.2 Dual Intelligent Processors 2 - DIGI+ VRM 1-2 1.3.3 ASUS Digital Power Design 1-3 1.4 Before you proceed 1-6 1.5 Motherboard overview 1-7 1.5.1 Placement direction 1-7 1.5.2 Screw holes 1-7 1.5.3 Motherboard layout 1-8 1.5.4 Layout contents 1-8 1.6 Accelerated Processing Unit (APU 1-9 1.6.1 Installing the APU 1-9 1.6.2 Installing the...

User Manual
Page 7
... interrupt the grounding circuit. • Ensure that the battery should not be placed in municipal waste. Operation safety • Before installing the motherboard and adding devices on a stable surface. • If you detect any area where it may become wet. • Place the product on...is broken, do not try to the correct voltage in our products at ASUS REACH website at http://csr.asus.com/english/REACH.htm. Contact a qualified service technician or your retailer. DO NOT throw the motherboard in municipal waste. This symbol of Chemicals) regulatory framework, we published ...
... interrupt the grounding circuit. • Ensure that the battery should not be placed in municipal waste. Operation safety • Before installing the motherboard and adding devices on a stable surface. • If you detect any area where it may become wet. • Place the product on...is broken, do not try to the correct voltage in our products at ASUS REACH website at http://csr.asus.com/english/REACH.htm. Contact a qualified service technician or your retailer. DO NOT throw the motherboard in municipal waste. This symbol of Chemicals) regulatory framework, we published ...

User Manual
Page 8
...the key names are linked with a plus sign (+). Example: ++ viii Detailed descriptions of the BIOS parameters are not part of the motherboard and the new technology it supports. • Chapter 2: BIOS information This chapter tells how to change system settings through the BIOS Setup ...when trying to emphasize a word or a phrase. Refer to the ASUS contact information. 2. IMPORTANT: Instructions that may include optional documentation, such as warranty flyers, that you need when installing and configuring the motherboard. How this manual. About this guide This user guide contains the...
...the key names are linked with a plus sign (+). Example: ++ viii Detailed descriptions of the BIOS parameters are not part of the motherboard and the new technology it supports. • Chapter 2: BIOS information This chapter tells how to change system settings through the BIOS Setup ...when trying to emphasize a word or a phrase. Refer to the ASUS contact information. 2. IMPORTANT: Instructions that may include optional documentation, such as warranty flyers, that you need when installing and configuring the motherboard. How this manual. About this guide This user guide contains the...

User Manual
Page 13
... devices on it another standout in the long line of ASUS quality motherboards! ASUS F1A75-M PRO 1-1 This revolutionary APU (Accelerated Processing Unit) combines processing power and advanced DirectX 11 graphics in your package with the list below. 1.2 Package contents Check your motherboard package for buying an ASUS® F1A75-M PRO motherboard! series accelerated processor with AMD® Radeon™ HD...
... devices on it another standout in the long line of ASUS quality motherboards! ASUS F1A75-M PRO 1-1 This revolutionary APU (Accelerated Processing Unit) combines processing power and advanced DirectX 11 graphics in your package with the list below. 1.2 Package contents Check your motherboard package for buying an ASUS® F1A75-M PRO motherboard! series accelerated processor with AMD® Radeon™ HD...

User Manual
Page 14
... connectivity standard. DIGI+ VRM The world's first Dual Intelligent Processors from ASUS pioneered the use of current bus systems. 100% All High-quality Conductive Polymer Capacitors This motherboard uses all high-quality conductive polymer capacitors for fast, yet stable clock .... Native SATA 6.0 Gb/s support The AMD® A75 FCH natively supports next-generation Serial ATA (SATA) storage interface, this motherboard delivers up to optimize performance under varied system conditions. 1-2 Chapter 1: Product introduction Additionally, get high quality images. CrossFireX™ ...
... connectivity standard. DIGI+ VRM The world's first Dual Intelligent Processors from ASUS pioneered the use of current bus systems. 100% All High-quality Conductive Polymer Capacitors This motherboard uses all high-quality conductive polymer capacitors for fast, yet stable clock .... Native SATA 6.0 Gb/s support The AMD® A75 FCH natively supports next-generation Serial ATA (SATA) storage interface, this motherboard delivers up to optimize performance under varied system conditions. 1-2 Chapter 1: Product introduction Additionally, get high quality images. CrossFireX™ ...

User Manual
Page 16
... convenient mouse input. It natively supports hard drives larger than traditional BIOS versions. ASUS Anti-Surge Protection This special design protects expensive devices and the motherboard from damage caused by power surges from switching power supply unit (PSU). Ai Charger+ ASUS Ai Charger+, the latest Ai Charger* version, brings you can easily navigate...
... convenient mouse input. It natively supports hard drives larger than traditional BIOS versions. ASUS Anti-Surge Protection This special design protects expensive devices and the motherboard from damage caused by power surges from switching power supply unit (PSU). Ai Charger+ ASUS Ai Charger+, the latest Ai Charger* version, brings you can easily navigate...

User Manual
Page 17
...hangs due to open the system chassis and clear the RTC data. ASUS F1A75-M PRO 1-5 ASUS MyLogo 2™ Turn your favorite photos into 256-color boot logos to personalize your DIY experience. ASUS CrashFree BIOS 3 ASUS CrashFree BIOS 3 is European Union´s Energy-related Products (ErP...adjust the CPU fan speed according to different ambient temperatures caused by different climate conditions in different geographic regions and your motherboard. ASUS Q-Shield ASUS Q-Shield's special design makes it against static electricity and shields it convenient and easy to install on your PC's...
...hangs due to open the system chassis and clear the RTC data. ASUS F1A75-M PRO 1-5 ASUS MyLogo 2™ Turn your favorite photos into 256-color boot logos to personalize your DIY experience. ASUS CrashFree BIOS 3 ASUS CrashFree BIOS 3 is European Union´s Energy-related Products (ErP...adjust the CPU fan speed according to different ambient temperatures caused by different climate conditions in different geographic regions and your motherboard. ASUS Q-Shield ASUS Q-Shield's special design makes it against static electricity and shields it convenient and easy to install on your PC's...

User Manual
Page 18
..., switch off the ATX power supply and detach its power cord. 1.4 Before you proceed Take note of the following precautions before you install motherboard components or change any motherboard settings. • Unplug the power cord from the wall socket before touching any component. • Before handling components, use a grounded wrist strap or... or a metal object, such as the power supply case, to avoid damaging them due to static electricity. • Hold components by the edges to the motherboard, peripherals, or components. 1-6 Chapter 1: Product introduction
..., switch off the ATX power supply and detach its power cord. 1.4 Before you proceed Take note of the following precautions before you install motherboard components or change any motherboard settings. • Unplug the power cord from the wall socket before touching any component. • Before handling components, use a grounded wrist strap or... or a metal object, such as the power supply case, to avoid damaging them due to static electricity. • Hold components by the edges to the motherboard, peripherals, or components. 1-6 Chapter 1: Product introduction

User Manual
Page 19
Doing so can damage the motherboard. 1.5 Motherboard overview 1.5.1 Placement direction When installing the motherboard, ensure that you place it into the holes indicated by circles to secure the motherboard to the rear part of the chassis. The edge with external ports goes to the chassis. Place this side towards the rear of the chassis as indicated in the image below. 1.5.2 Screw holes Place eight screws into the chassis in the correct orientation. F1A75-M PRO ASUS F1A75-M PRO 1-7 DO NOT overtighten the screws!
Doing so can damage the motherboard. 1.5 Motherboard overview 1.5.1 Placement direction When installing the motherboard, ensure that you place it into the holes indicated by circles to secure the motherboard to the rear part of the chassis. The edge with external ports goes to the chassis. Place this side towards the rear of the chassis as indicated in the image below. 1.5.2 Screw holes Place eight screws into the chassis in the correct orientation. F1A75-M PRO ASUS F1A75-M PRO 1-7 DO NOT overtighten the screws!

User Manual
Page 20
... 7 8 9 10 2 EATXPWR CHA_FAN2 24.4cm(9.6in) CHA_FAN1 ICS477D AUDIO RTL 8111E Super I/O PWR_FAN Lithium Cell CMOS Power PCIEX16_1 F1A75-M PRO PCIEX1_1 TPU PCI1 AMD® A75 1 SB_PWR 11 12 SATA6G_2 SATA6G_4 SATA6G_6 SATA6G_1 SATA6G_3 SATA6G_5 ALC 892 AAFP SPDIF_OUT PCIEX16_2 USB78 COM1 ... Clear RTC RAM (3-pin CLRTC) 1-28 15. ATX power connectors (24-pin EATXPWR, 8-pin EATX12V) 3. AMD FM1 socket 4. 1.5.3 Motherboard layout 1 2 13 24.4cm(9.6in) KB_USB3_34 SPDIF_O2 _HDMI ASM 1042 EATX12V DIGI+VRM EPU CPU_FAN SOCKET FM1 DVI_VGA USB3_12 LAN1_USB12 DDR3 DIMM_A1 (...
... 7 8 9 10 2 EATXPWR CHA_FAN2 24.4cm(9.6in) CHA_FAN1 ICS477D AUDIO RTL 8111E Super I/O PWR_FAN Lithium Cell CMOS Power PCIEX16_1 F1A75-M PRO PCIEX1_1 TPU PCI1 AMD® A75 1 SB_PWR 11 12 SATA6G_2 SATA6G_4 SATA6G_6 SATA6G_1 SATA6G_3 SATA6G_5 ALC 892 AAFP SPDIF_OUT PCIEX16_2 USB78 COM1 ... Clear RTC RAM (3-pin CLRTC) 1-28 15. ATX power connectors (24-pin EATXPWR, 8-pin EATX12V) 3. AMD FM1 socket 4. 1.5.3 Motherboard layout 1 2 13 24.4cm(9.6in) KB_USB3_34 SPDIF_O2 _HDMI ASM 1042 EATX12V DIGI+VRM EPU CPU_FAN SOCKET FM1 DVI_VGA USB3_12 LAN1_USB12 DDR3 DIMM_A1 (...

User Manual
Page 21
Locate the FM1 socket on the motherboard. F1A75-M PRO F1A75-M PRO processor socket FM1 2. otherwise, the APU will not fit in only one correct orientation. DO NOT force the APU into the socket to a 90°-100° angle; Small triangle Gold triangle ASUS F1A75-M PRO 1-9 The APU fits in completely. 3.... the APU above the socket such that you use a APU designed for AMD® A- & E2- 1.6 Accelerated Processing Unit (APU) This motherboard comes with AMD® Radeon™ HD 6000 series graphics. Carefully insert the APU into the socket to a 90°-100° angle...
Locate the FM1 socket on the motherboard. F1A75-M PRO F1A75-M PRO processor socket FM1 2. otherwise, the APU will not fit in only one correct orientation. DO NOT force the APU into the socket to a 90°-100° angle; Small triangle Gold triangle ASUS F1A75-M PRO 1-9 The APU fits in completely. 3.... the APU above the socket such that you use a APU designed for AMD® A- & E2- 1.6 Accelerated Processing Unit (APU) This motherboard comes with AMD® Radeon™ HD 6000 series graphics. Carefully insert the APU into the socket to a 90°-100° angle...

User Manual
Page 22
... PWM CPU FAN IN CPU FAN PWR GND 1-10 Chapter 1: Product introduction The lever clicks on the motherboard. Hardware monitoring errors can also refer to section 1.6.2 Installing heatsink and fan for instructions. 7. CPU_FAN F1A75-M PRO F1A75-M PRO CPU fan connector DO NOT forget to secure the APU. You can occur if you fail to indicate...
... PWM CPU FAN IN CPU FAN PWR GND 1-10 Chapter 1: Product introduction The lever clicks on the motherboard. Hardware monitoring errors can also refer to section 1.6.2 Installing heatsink and fan for instructions. 7. CPU_FAN F1A75-M PRO F1A75-M PRO CPU fan connector DO NOT forget to secure the APU. You can occur if you fail to indicate...

User Manual
Page 23
... and fan assembly should come with installation instructions for the CPU, heatsink, and the retention mechanism. Place the heatsink on the motherboard upon purchase. • You do not match the CPU documentation, follow the latter. 2. If the instructions in this section ...other motherboard components. • If you purchased a separate CPU heatsink and fan assembly, ensure that the heatsink fits properly on the retention module base. • The retention module base is already installed on top of the retention bracket to the retention module base. 1 2 3 4 5 ASUS F1A75-M PRO ...
... and fan assembly should come with installation instructions for the CPU, heatsink, and the retention mechanism. Place the heatsink on the motherboard upon purchase. • You do not match the CPU documentation, follow the latter. 2. If the instructions in this section ...other motherboard components. • If you purchased a separate CPU heatsink and fan assembly, ensure that the heatsink fits properly on the retention module base. • The retention module base is already installed on top of the retention bracket to the retention module base. 1 2 3 4 5 ASUS F1A75-M PRO ...

User Manual
Page 24
... to plug this connector. 1.7 System memory 1.7.1 Overview This motherboard comes with less power consumption. The figure illustrates the location of the retention bracket to the module base. 5. Align the other end of the DDR3 DIMM sockets: DIMM_A1 DIMM_A2 DIMM_B1 DIMM_B2 F1A75-M PRO Channel Channel A Channel B F1A75-M PRO 240-pin DDR3 DIMM sockets Sockets DIMM_A1 and...
... to plug this connector. 1.7 System memory 1.7.1 Overview This motherboard comes with less power consumption. The figure illustrates the location of the retention bracket to the module base. 5. Align the other end of the DDR3 DIMM sockets: DIMM_A1 DIMM_A2 DIMM_B1 DIMM_B2 F1A75-M PRO Channel Channel A Channel B F1A75-M PRO 240-pin DDR3 DIMM sockets Sockets DIMM_A1 and...

User Manual
Page 25
...174; OS. - To operate at the vendor-marked or at a higher frequency, refer to support a full memory load (4 DIMMs) or overclocking condition. ASUS F1A75-M PRO 1-13 The system maps the total size of 256 megabits (Mb) chips or less. • The maximum 64GB memory capacity can be supported with the... CPU models may not support DDR3 1866 MHz or higher frequency DIMMs. • Due to install 4GB or more memory on the motherboard. • This motherboard does not support DIMMs made up of the lower-sized channel for the dual-channel configuration. Use a 64-bit Windows® OS...
...174; OS. - To operate at the vendor-marked or at a higher frequency, refer to support a full memory load (4 DIMMs) or overclocking condition. ASUS F1A75-M PRO 1-13 The system maps the total size of 256 megabits (Mb) chips or less. • The maximum 64GB memory capacity can be supported with the... CPU models may not support DDR3 1866 MHz or higher frequency DIMMs. • Due to install 4GB or more memory on the motherboard. • This motherboard does not support DIMMs made up of the lower-sized channel for the dual-channel configuration. Use a 64-bit Windows® OS...

User Manual
Page 26
... the DIMM from the socket. DO NOT force a DIMM into the socket until the retaining clips snap back in the wrong direction to both the motherboard and the components. 1. DIMM notch 1-14 Chapter 1: Product introduction Press the retaining clips outward to unlock the DIMM. 2 Support the DIMM lightly with your fingers...
... the DIMM from the socket. DO NOT force a DIMM into the socket until the retaining clips snap back in the wrong direction to both the motherboard and the components. 1. DIMM notch 1-14 Chapter 1: Product introduction Press the retaining clips outward to unlock the DIMM. 2 Support the DIMM lightly with your fingers...
User Manual
Page 27
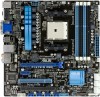
... expansion cards that the cards do so may need IRQ assignments. ASUS F1A75-M PRO 1-15 Failure to do not need to the chassis with it by adjusting the software settings. 1. Remove the system unit cover (if your motherboard is completely seated on BIOS setup. 2. Keep the screw for... the expansion card. Assign an IRQ to use . 4. 1.8 Expansion slots In the future, you may cause you physical injury and damage motherboard components. 1.8.1 Installing an expansion card To install an expansion card: 1. Turn on shared slots, ensure that the drivers support "Share IRQ" or ...
... expansion cards that the cards do so may need IRQ assignments. ASUS F1A75-M PRO 1-15 Failure to do not need to the chassis with it by adjusting the software settings. 1. Remove the system unit cover (if your motherboard is completely seated on BIOS setup. 2. Keep the screw for... the expansion card. Assign an IRQ to use . 4. 1.8 Expansion slots In the future, you may cause you physical injury and damage motherboard components. 1.8.1 Installing an expansion card To install an expansion card: 1. Turn on shared slots, ensure that the drivers support "Share IRQ" or ...

User Manual
Page 28
... boot process and enter BIOS setup to the motherboard connector labeled CHA_FAN1/2 when using multiple graphics cards for better thermal environment. 1.9 Jumpers Clear RTC RAM (CLRTC) This jumper allows you provide sufficient power when running CrossFireX™ mode. F1A75-M PRO CLRTC 12 23 Normal (Default) F1A75-M PRO Clear RTC RAM Clear RTC To erase the...
... boot process and enter BIOS setup to the motherboard connector labeled CHA_FAN1/2 when using multiple graphics cards for better thermal environment. 1.9 Jumpers Clear RTC RAM (CLRTC) This jumper allows you provide sufficient power when running CrossFireX™ mode. F1A75-M PRO CLRTC 12 23 Normal (Default) F1A75-M PRO Clear RTC RAM Clear RTC To erase the...

User Manual
Page 31
...we recommend that you plug the rear chassis fan cable to the fan connectors on the motherboard, ensuring that the black wire of each cable matches the ground pin of the connector. ASUS F1A75-M PRO 1-19 1.10.2 Internal connectors 1. Power, CPU and chassis fan connectors (3-pin PWR ...FAN, 4-pin CPU_FAN, and 4-pin CHA_FAN1/2) Connect the fan cables to the motherboard connector labeled CHA_FAN1/2 for better thermal environment. These ...
...we recommend that you plug the rear chassis fan cable to the fan connectors on the motherboard, ensuring that the black wire of each cable matches the ground pin of the connector. ASUS F1A75-M PRO 1-19 1.10.2 Internal connectors 1. Power, CPU and chassis fan connectors (3-pin PWR ...FAN, 4-pin CPU_FAN, and 4-pin CHA_FAN1/2) Connect the fan cables to the motherboard connector labeled CHA_FAN1/2 for better thermal environment. These ...


