User Manual
Page 3
......4-3 Utilities menu...4-3 Contact...4-3 Other information 4-3 System Recovery...4-4 Using Recovery Partition 4-4 Using the Support DVD 4-5 Boot Booster...4-6 Appendix Declarations and Safety Statements A-2 Federal Communications Commission Statement A-2 FCC Radio Frequency (RF) Exposure Caution Statement A-3 Declaration of Conformity(R&TTE directive 1999/5/EC A-4 CE Marking...A-4 IC Radiation Exposure Statement for Canada A-5 Wireless Operation Channel for Different Domains A-6 France Restricted Wireless Frequency Bands A-6 UL Safety Notices...A-7 REACH Notice...A-8 Power...
......4-3 Utilities menu...4-3 Contact...4-3 Other information 4-3 System Recovery...4-4 Using Recovery Partition 4-4 Using the Support DVD 4-5 Boot Booster...4-6 Appendix Declarations and Safety Statements A-2 Federal Communications Commission Statement A-2 FCC Radio Frequency (RF) Exposure Caution Statement A-3 Declaration of Conformity(R&TTE directive 1999/5/EC A-4 CE Marking...A-4 IC Radiation Exposure Statement for Canada A-5 Wireless Operation Channel for Different Domains A-6 France Restricted Wireless Frequency Bands A-6 UL Safety Notices...A-7 REACH Notice...A-8 Power...
User Manual
Page 4
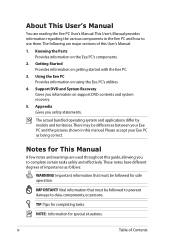
... warnings are used throughout this guide, allowing you safety statements. NOTE: Information for completing tasks. Knowing the Parts Provides information on using the Eee PC's utilities. 4. Notes for safe operation. IMPORTANT! Using the Eee PC Provides information on the Eee PC's components. 2. The actual bundled operating system and applications differ by models and territories. Appendix Gives you to use them.The following are reading the Eee PC User's Manual.This User's Manual provides...
... warnings are used throughout this guide, allowing you safety statements. NOTE: Information for completing tasks. Knowing the Parts Provides information on using the Eee PC's utilities. 4. Notes for safe operation. IMPORTANT! Using the Eee PC Provides information on the Eee PC's components. 2. The actual bundled operating system and applications differ by models and territories. Appendix Gives you to use them.The following are reading the Eee PC User's Manual.This User's Manual provides...
User Manual
Page 5
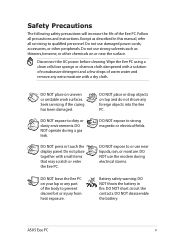
... the battery in this manual, refer all precautions and instructions. DO NOT expose to or use damaged power cords, accessories, or other chemicals on uneven or unstable work surfaces. Except as thinners, benzene, or other peripherals. Do not use near the surface. Disconnect the AC power before cleaning. DO NOT press or touch the display panel. DO NOT disassemble the battery. Wipe the Eee PC using...
... the battery in this manual, refer all precautions and instructions. DO NOT expose to or use damaged power cords, accessories, or other chemicals on uneven or unstable work surfaces. Except as thinners, benzene, or other peripherals. Do not use near the surface. Disconnect the AC power before cleaning. DO NOT press or touch the display panel. DO NOT disassemble the battery. Wipe the Eee PC using...
User Manual
Page 11
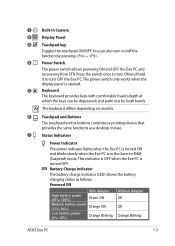
... for both hands. Battery Charge Indicator The battery charge indicator (LED) shows the battery charging status as a desktop mouse. 7 Status Indicators Power Indicator The power indicator lights when the Eee PC is turned ON and blinks slowly when the Eee PC is in Camera 2 Display Panel 3 Touchpad key Toggles the touchpad ON/OFF. The keyboard differs depending on /off the function by pressing + . 4 Power Switch The power switch allows powering ON and OFF the Eee PC and recovering from STR. The power switch only works when the display panel is turned OFF. 1 Built-in...
... for both hands. Battery Charge Indicator The battery charge indicator (LED) shows the battery charging status as a desktop mouse. 7 Status Indicators Power Indicator The power indicator lights when the Eee PC is turned ON and blinks slowly when the Eee PC is in Camera 2 Display Panel 3 Touchpad key Toggles the touchpad ON/OFF. The keyboard differs depending on /off the function by pressing + . 4 Power Switch The power switch allows powering ON and OFF the Eee PC and recovering from STR. The power switch only works when the display panel is turned OFF. 1 Built-in...
User Manual
Page 13
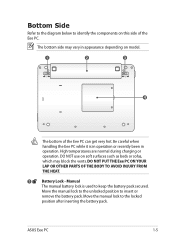
... unlocked position to the locked position after inserting the battery pack. ASUS Eee PC 1-5 DO NOT use on this side of the Eee PC can get very hot. High temperatures are normal during charging or operation. Manual The manual battery lock is in operation or recently been in appearance depending on model. 1 2 3 1 2 4 The bottom of the Eee PC. The bottom side may block the vents. Move the manual lock to insert or remove...
... unlocked position to the locked position after inserting the battery pack. ASUS Eee PC 1-5 DO NOT use on this side of the Eee PC can get very hot. High temperatures are normal during charging or operation. Manual The manual battery lock is in operation or recently been in appearance depending on model. 1 2 3 1 2 4 The bottom of the Eee PC. The bottom side may block the vents. Move the manual lock to insert or remove...
User Manual
Page 15
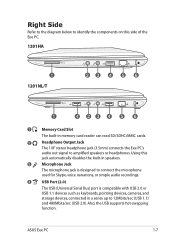
Using this side of the Eee PC. 1201HA 1 1201NL/T 23 4 5 6 1 4 23 4 5 6 1 Memory Card Slot The built-in memory card reader can read SD/SDHC/MMC cards. 2 Headphone Output Jack The 1/8" stereo headphone jack (3.5mm) connects the Eee PC's audio out signal to amplified speakers or headphones. HDMI 3 Microphone Jack uTh1seedmfoicrrSo2kpyhpoen,evojaiccek nisadr4reastiigonnes,dotrosicmonpnlee3acut dthioe r5mecicorrodpinhgosn.e 4 USB Port (2.0) The USB (Universal Serial Bus) port is compatible with USB 2.0 or USB 1.1 devices such as keyboards, pointing devices, cameras, and ...
Using this side of the Eee PC. 1201HA 1 1201NL/T 23 4 5 6 1 4 23 4 5 6 1 Memory Card Slot The built-in memory card reader can read SD/SDHC/MMC cards. 2 Headphone Output Jack The 1/8" stereo headphone jack (3.5mm) connects the Eee PC's audio out signal to amplified speakers or headphones. HDMI 3 Microphone Jack uTh1seedmfoicrrSo2kpyhpoen,evojaiccek nisadr4reastiigonnes,dotrosicmonpnlee3acut dthioe r5mecicorrodpinhgosn.e 4 USB Port (2.0) The USB (Universal Serial Bus) port is compatible with USB 2.0 or USB 1.1 devices such as keyboards, pointing devices, cameras, and ...
User Manual
Page 19
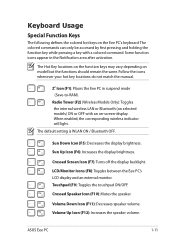
... area after activation. Sun Down Icon (F5): Decreases the display brightness. Touchpad (F9): Toggles the touchpad ON/OFF. Volume Down Icon (F11): Decreases speaker volume. The Hot Key locations on the function keys may vary depending on the Eee PC's keyboard. Follow the icons whenever your hot key locations do not match the manual. The default setting is WLAN ON / Bluetooth OFF. Radio Tower (F2) (Wireless Models Only):Toggles the internal wireless LAN or Bluetooth (on -screen-display. LCD/Monitor Icons (F8...
... area after activation. Sun Down Icon (F5): Decreases the display brightness. Touchpad (F9): Toggles the touchpad ON/OFF. Volume Down Icon (F11): Decreases speaker volume. The Hot Key locations on the function keys may vary depending on the Eee PC's keyboard. Follow the icons whenever your hot key locations do not match the manual. The default setting is WLAN ON / Bluetooth OFF. Radio Tower (F2) (Wireless Models Only):Toggles the internal wireless LAN or Bluetooth (on -screen-display. LCD/Monitor Icons (F8...
User Manual
Page 24
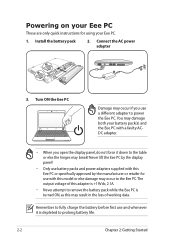
... Eee PC by the display panel! • Only use battery packs and power adapters supplied with this Eee PC or specifically approved by the manufacturer or retailer for using your battery pack(s) and the Eee PC with this may result in the loss of this adapter is +19Vdc, 2.1A. • Never attempt to remove the battery pack while the Eee PC is depleted to the Eee PC. Powering on your Eee PC These are only quick instructions...
... Eee PC by the display panel! • Only use battery packs and power adapters supplied with this Eee PC or specifically approved by the manufacturer or retailer for using your battery pack(s) and the Eee PC with this may result in the loss of this adapter is +19Vdc, 2.1A. • Never attempt to remove the battery pack while the Eee PC is depleted to the Eee PC. Powering on your Eee PC These are only quick instructions...
User Manual
Page 43
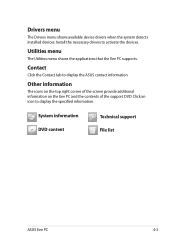
Drivers menu The Drivers menu shows available device drivers when the system detects installed devices. Other information The icons on the top right corner of the screen provide additional information on the Eee PC and the contents of the support DVD. Click an icon to activate the devices. Utilities menu The Utilities menu shows the applications that the Eee PC supports. System information DVD content Technical support File list ASUS Eee PC 4-3 Install the necessary drivers to display the specified information. Contact...
Drivers menu The Drivers menu shows available device drivers when the system detects installed devices. Other information The icons on the top right corner of the screen provide additional information on the Eee PC and the contents of the support DVD. Click an icon to activate the devices. Utilities menu The Utilities menu shows the applications that the Eee PC supports. System information DVD content Technical support File list ASUS Eee PC 4-3 Install the necessary drivers to display the specified information. Contact...
User Manual
Page 44
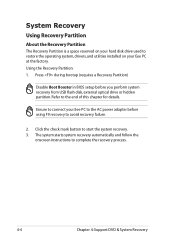
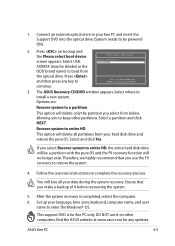
... to connect your Eee PC to the AC power adapter before you perform system recovery from USB flash disk, external optical drive or hidden partition. System Recovery Using Recovery Partition About the Recovery Partition The Recovery Partition is a space reserved on your hard disk drive used to avoid recovery failure. 2. Press during bootup (requires a Recovery Partition) Disable Boot Booster in BIOS setup before using F9 recovery to restore the operating system, drivers, and utilities installed on your Eee PC at the factory. Using the Recovery Partition: 1. Click the check mark button...
... to connect your Eee PC to the AC power adapter before you perform system recovery from USB flash disk, external optical drive or hidden partition. System Recovery Using Recovery Partition About the Recovery Partition The Recovery Partition is a space reserved on your hard disk drive used to avoid recovery failure. 2. Press during bootup (requires a Recovery Partition) Disable Boot Booster in BIOS setup before using F9 recovery to restore the operating system, drivers, and utilities installed on your Eee PC at the factory. Using the Recovery Partition: 1. Click the check mark button...
User Manual
Page 45
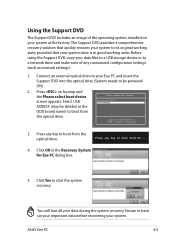
... good working state, provided that your Eee PC and insert the Support DVD into the optical drive (System needs to start the system recovery. Connect an external optical drive to select boot device 3. Ensure to boot from CD... 4. ASUS Eee PC 4-5 Select USB: XXXXXX (may be powered ON). 2. Press any customized configuration settings (such as the Please select boot device: HDD:PM-ST9160310AS USB:XXXXXXXX ODD brand name) to back up your important data before recovering your...
... good working state, provided that your Eee PC and insert the Support DVD into the optical drive (System needs to start the system recovery. Connect an external optical drive to select boot device 3. Ensure to boot from CD... 4. ASUS Eee PC 4-5 Select USB: XXXXXX (may be powered ON). 2. Press any customized configuration settings (such as the Please select boot device: HDD:PM-ST9160310AS USB:XXXXXXXX ODD brand name) to back up your important data before recovering your...
User Manual
Page 46
... the POST screen. Main BIOS SETUP UTILITY Advanced Security Boot Exit Boot Device Priority Boot Settings Configuration OnBoard LAN Boot ROM [Enabled] Boot Booster [Disabled] Specifies the Boot Device Priority sequence. Remember to enable Boot Booster after you set the CD-ROM drive as the first boot device. ←→ Select Screen ↑↓ Select Item Enter Go to enter the BIOS setup. 2. Start the system and press on bootup. A virtual floppy disk drive (Floppy Drive B: ) may appear when you complete hardware change any Eee PC components or...
... the POST screen. Main BIOS SETUP UTILITY Advanced Security Boot Exit Boot Device Priority Boot Settings Configuration OnBoard LAN Boot ROM [Enabled] Boot Booster [Disabled] Specifies the Boot Device Priority sequence. Remember to enable Boot Booster after you set the CD-ROM drive as the first boot device. ←→ Select Screen ↑↓ Select Item Enter Go to enter the BIOS setup. 2. Start the system and press on bootup. A virtual floppy disk drive (Floppy Drive B: ) may appear when you complete hardware change any Eee PC components or...
User Manual
Page 4
... degrees of this manual. Important information that must be followed for completing tasks. TIP: Tips for safe operation. Knowing the Parts Provides information on getting started with the Eee PC. 3. Getting Started Provides information on the Eee PC's components. 2. Please accept your Eee PC and the pictures shown in the Eee PC and how to use them.The following are used throughout this guide, allowing you to...
... degrees of this manual. Important information that must be followed for completing tasks. TIP: Tips for safe operation. Knowing the Parts Provides information on getting started with the Eee PC. 3. Getting Started Provides information on the Eee PC's components. 2. Please accept your Eee PC and the pictures shown in the Eee PC and how to use them.The following are used throughout this guide, allowing you to...

User Manual
Page 11
... mouse. 7 Status Indicators Power Indicator The power indicator lights when the Eee PC is turned ON and blinks slowly when the Eee PC is opened. 5 Keyboard The keyboard provides keys with comfortable travel (depth at which the keys can also turn OFF the Eee PC. The keyboard differs depending on /off the function by pressing + . 4 Power Switch The power switch allows powering ON and OFF the Eee PC and recovering from STR. 1 Built-in the Save-to turn on models. 6 Touchpad and Buttons The touchpad and...
... mouse. 7 Status Indicators Power Indicator The power indicator lights when the Eee PC is turned ON and blinks slowly when the Eee PC is opened. 5 Keyboard The keyboard provides keys with comfortable travel (depth at which the keys can also turn OFF the Eee PC. The keyboard differs depending on /off the function by pressing + . 4 Power Switch The power switch allows powering ON and OFF the Eee PC and recovering from STR. 1 Built-in the Save-to turn on models. 6 Touchpad and Buttons The touchpad and...

User Manual
Page 19
...-RAM). Radio Tower (F2) (Wireless Models Only):Toggles the internal wireless LAN or Bluetooth (on -screen-display. LCD/Monitor Icons (F8): Toggles between the Eee PC's LCD display and an external monitor. Follow the icons whenever your hot key locations do not match the manual. Sun Up Icon (F6): Increases the display brightness. Crossed Speaker Icon (F10): Mutes the speaker. The Hot Key locations on the function keys may vary depending on the Eee PC's keyboard. The default setting is WLAN ON / Bluetooth OFF. ASUS Eee PC...
...-RAM). Radio Tower (F2) (Wireless Models Only):Toggles the internal wireless LAN or Bluetooth (on -screen-display. LCD/Monitor Icons (F8): Toggles between the Eee PC's LCD display and an external monitor. Follow the icons whenever your hot key locations do not match the manual. Sun Up Icon (F6): Increases the display brightness. Crossed Speaker Icon (F10): Mutes the speaker. The Hot Key locations on the function keys may vary depending on the Eee PC's keyboard. The default setting is WLAN ON / Bluetooth OFF. ASUS Eee PC...

User Manual
Page 24
... the Eee PC. Turn ON the Eee PC Damage may occur if you open the display panel, do not force it is depleted to power the Eee PC. Never lift the Eee PC by the display panel! • Only use battery packs and power adapters supplied with this may break! The output voltage of working data. Connect the AC power adapter 3 2 1 2 1 3 110V-220V 3. Remember to fully charge the battery before first use a different adapter to prolong battery life...
... the Eee PC. Turn ON the Eee PC Damage may occur if you open the display panel, do not force it is depleted to power the Eee PC. Never lift the Eee PC by the display panel! • Only use battery packs and power adapters supplied with this may break! The output voltage of working data. Connect the AC power adapter 3 2 1 2 1 3 110V-220V 3. Remember to fully charge the battery before first use a different adapter to prolong battery life...

User Manual
Page 47
... of the screen provide additional information on the Eee PC and the contents of the support DVD. Click an icon to activate the devices. System information DVD content Technical support File list ASUS Eee PC 4-3 Install the necessary drivers to display the specified information. Utilities menu The Utilities menu shows the applications that the Eee PC supports. Contact Click the Contact tab to display the ASUS contact information. Drivers menu The Drivers menu shows available device drivers when the system detects installed devices.
... of the screen provide additional information on the Eee PC and the contents of the support DVD. Click an icon to activate the devices. System information DVD content Technical support File list ASUS Eee PC 4-3 Install the necessary drivers to display the specified information. Utilities menu The Utilities menu shows the applications that the Eee PC supports. Contact Click the Contact tab to display the ASUS contact information. Drivers menu The Drivers menu shows available device drivers when the system detects installed devices.

User Manual
Page 48
... manually install the drivers and utilities you restore your Eee PC to the pure operating system, no drivers and utilities are installed. Using Recovery Partition (F9 Recovery) About the Recovery Partition The Recovery Partition is a space reserved on your hard disk drive used to restore the operating system, drivers, and utilities installed on your Eee PC. 4-4 Chapter 4: Support DVD & System Recovery System Recovery Disable Boot Booster in the Recovery System dialog box to start the system recovery. 3. Refer to the end of any customized configuration settings (such as network settings...
... manually install the drivers and utilities you restore your Eee PC to the pure operating system, no drivers and utilities are installed. Using Recovery Partition (F9 Recovery) About the Recovery Partition The Recovery Partition is a space reserved on your hard disk drive used to restore the operating system, drivers, and utilities installed on your Eee PC. 4-4 Chapter 4: Support DVD & System Recovery System Recovery Disable Boot Booster in the Recovery System dialog box to start the system recovery. 3. Refer to the end of any customized configuration settings (such as network settings...
User Manual
Page 49
... to enter the Windows® OS. Set up your Eee PC and insert the Support DVD into the optical drive (System needs to complete the recovery process. ASUS Eee PC 4-5 Press and then press any updates. Recover system to select boot device continue. 3. Connect an external optical drive to your language, time zone, keyboard, computer name, and user name to install a new system. You will delete only the partition you select from below, allowing you use...
... to enter the Windows® OS. Set up your Eee PC and insert the Support DVD into the optical drive (System needs to complete the recovery process. ASUS Eee PC 4-5 Press and then press any updates. Recover system to select boot device continue. 3. Connect an external optical drive to your language, time zone, keyboard, computer name, and user name to install a new system. You will delete only the partition you select from below, allowing you use...
User Manual
Page 50
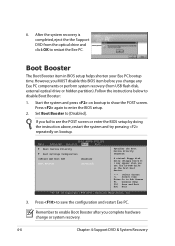
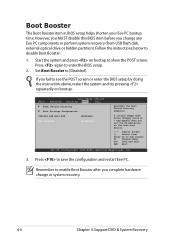
... system recovery. 4-6 Chapter 4: Support DVD & System Recovery Remember to enable Boot Booster after you set the CD-ROM drive as the first boot device. ←→ Select Screen ↑↓ Select Item Enter Go to show the POST screen. Main BIOS SETUP UTILITY Advanced Security Boot Exit Boot Device Priority Boot Settings Configuration OnBoard LAN Boot ROM [Enabled] Boot Booster [Disabled] Specifies the Boot Device Priority sequence. Start the system and press on bootup. Set Boot Booster to disable Boot Booster: 1. Boot Booster The Boot Booster item in BIOS setup...
... system recovery. 4-6 Chapter 4: Support DVD & System Recovery Remember to enable Boot Booster after you set the CD-ROM drive as the first boot device. ←→ Select Screen ↑↓ Select Item Enter Go to show the POST screen. Main BIOS SETUP UTILITY Advanced Security Boot Exit Boot Device Priority Boot Settings Configuration OnBoard LAN Boot ROM [Enabled] Boot Booster [Disabled] Specifies the Boot Device Priority sequence. Start the system and press on bootup. Set Boot Booster to disable Boot Booster: 1. Boot Booster The Boot Booster item in BIOS setup...


