
User's Manual for English Edition
Page 2
... ERROR IN THIS MANUAL OR PRODUCT. SPECIFICATIONS AND INFORMATION CONTAINED IN THIS MANUAL ARE FURNISHED FOR INFORMATIONAL USE ONLY, AND ARE SUBJECT TO CHANGE AT ANY TIME WITHOUT NOTICE, AND SHOULD NOT BE CONSTRUED AS A COMMITMENT BY ASUS. In each product. This limit also applies to infringe. SERVICE AND SUPPORT Visit our multi-language web site at http://support.asus.com ASUS...
... ERROR IN THIS MANUAL OR PRODUCT. SPECIFICATIONS AND INFORMATION CONTAINED IN THIS MANUAL ARE FURNISHED FOR INFORMATIONAL USE ONLY, AND ARE SUBJECT TO CHANGE AT ANY TIME WITHOUT NOTICE, AND SHOULD NOT BE CONSTRUED AS A COMMITMENT BY ASUS. In each product. This limit also applies to infringe. SERVICE AND SUPPORT Visit our multi-language web site at http://support.asus.com ASUS...
User's Manual for English Edition
Page 3
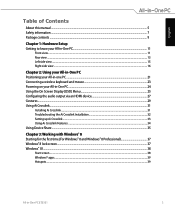
... Connecting a wireless keyboard and mouse 23 Powering on your All-in-One PC...24 Using the On Screen Display (OSD) Menu...25 Configuring the audio output via an HDMI device 27 Gestures...29 Using Ai Crosslink...31 Installing Ai Crosslink...31 Troubleshooting the Ai Crosslink Installation 32 Setting up Ai Crosslink ...33 Using Ai Crosslink Features ...34 Using Device Share...35 Chapter 3: Working with Windows® 8 Starting for the first time (For Windows® 8 and Windows...
... Connecting a wireless keyboard and mouse 23 Powering on your All-in-One PC...24 Using the On Screen Display (OSD) Menu...25 Configuring the audio output via an HDMI device 27 Gestures...29 Using Ai Crosslink...31 Installing Ai Crosslink...31 Troubleshooting the Ai Crosslink Installation 32 Setting up Ai Crosslink ...33 Using Ai Crosslink Features ...34 Using Device Share...35 Chapter 3: Working with Windows® 8 Starting for the first time (For Windows® 8 and Windows...
User's Manual for English Edition
Page 4
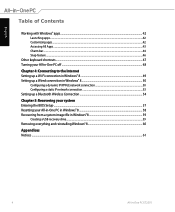
... Chapter 4: Connecting to the Internet Setting up a Wi-Fi connection in Windows® 8 49 Setting up a Wired connection in Windows® 8 50 Configuring a dynamic IP/PPPoE network connection 50 Configuring a static IP network connection...53 Setting up a Bluetooth Wireless Connection 54 Chapter 5: Recovering your system Entering the BIOS Setup...57 Resetting your All-in-One PC in Windows® 8 58 Recovering from a system image file in Windows® 8 59 Creating a USB recovery drive...59 Removing everything and reinstalling Windows®...
... Chapter 4: Connecting to the Internet Setting up a Wi-Fi connection in Windows® 8 49 Setting up a Wired connection in Windows® 8 50 Configuring a dynamic IP/PPPoE network connection 50 Configuring a static IP network connection...53 Setting up a Bluetooth Wireless Connection 54 Chapter 5: Recovering your system Entering the BIOS Setup...57 Resetting your All-in-One PC in Windows® 8 58 Recovering from a system image file in Windows® 8 59 Creating a USB recovery drive...59 Removing everything and reinstalling Windows®...
User's Manual for English Edition
Page 7
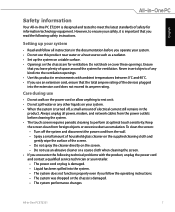
... ventilation openings. • Use this product near water or a heat source such as a radiator. • Set up your system • Read and follow the operating instructions. • The system was dropped or the chassis is turned off the system and disconnect the power cord from the wall. • Spray a small amount of household glass cleaner on the supplied...
... ventilation openings. • Use this product near water or a heat source such as a radiator. • Set up your system • Read and follow the operating instructions. • The system was dropped or the chassis is turned off the system and disconnect the power cord from the wall. • Spray a small amount of household glass cleaner on the supplied...

User's Manual for English Edition
Page 14
... PC subwoofer for connection to DC power for use with an HDMI input port, such as an LCD monitor or projector. WARNING! Subwoofer jack This jack is used to connect to an ASUS All-in -One PC ET2301 English HDMI Output Port Connect this port with devices equipped with this jack. LAN port This eight-pin RJ-45 LAN port supports a standard Ethernet cable for producing powerful bass (low frequency sounds) when playing multimedia...
... PC subwoofer for connection to DC power for use with an HDMI input port, such as an LCD monitor or projector. WARNING! Subwoofer jack This jack is used to connect to an ASUS All-in -One PC ET2301 English HDMI Output Port Connect this port with devices equipped with this jack. LAN port This eight-pin RJ-45 LAN port supports a standard Ethernet cable for producing powerful bass (low frequency sounds) when playing multimedia...

User's Manual for English Edition
Page 15
... port supports the AI Charger II feature, allowing you to Desktop>AI Suite II>AI Charger II then select Enable. All-in -One PC, go to quickly charge compatible devices. Menu lock Press this button to switch the display signal source from PC to HDMI Input. USB 3.0 port This USB (Universal Serial Bus) port provides a transfer rate of up to 5Gbit/s and is designed to connect...
... port supports the AI Charger II feature, allowing you to Desktop>AI Suite II>AI Charger II then select Enable. All-in -One PC, go to quickly charge compatible devices. Menu lock Press this button to switch the display signal source from PC to HDMI Input. USB 3.0 port This USB (Universal Serial Bus) port provides a transfer rate of up to 5Gbit/s and is designed to connect...

User's Manual for English Edition
Page 16
... supports MS, MS-Pro, MMC, SD, SDXC, and SDHC formats. IMPORTANT! ThunderBolt Ports Use a Thunderbolt adapter to a DisplayPort, VGA, DVI, or HDMI external display* and experience high-resolution display features via Intel® Thunderbolt™ technology. Right side view ET2301INTH English 6-in-1 Memory card reader This All-in-One PC has a single built-in memory card reader slot that are keyed so that the Thunderbolt-certified device for Windows...
... supports MS, MS-Pro, MMC, SD, SDXC, and SDHC formats. IMPORTANT! ThunderBolt Ports Use a Thunderbolt adapter to a DisplayPort, VGA, DVI, or HDMI external display* and experience high-resolution display features via Intel® Thunderbolt™ technology. Right side view ET2301INTH English 6-in-1 Memory card reader This All-in-One PC has a single built-in memory card reader slot that are keyed so that the Thunderbolt-certified device for Windows...
User's Manual for English Edition
Page 17
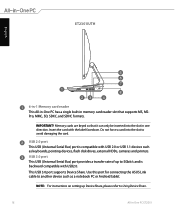
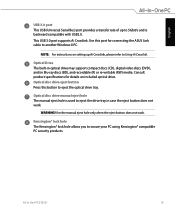
... connecting the ASUS Link cable to another Windows® 8 PC. Consult product specifications for connecting the ASUS Link cable to another device such as keyboards, pointing devices, flash disk drives, external HDDs, cameras and printers. Optical disc drive eject button Press this port for details on setting up to 5Gbit/s and is used to 5Gbit/s and is compatible with USB 2.0 or USB 1.1 devices such as a notebook PC or Android tablet. All-in optical drive may support compact discs (CD), digital video discs (DVD...
... connecting the ASUS Link cable to another Windows® 8 PC. Consult product specifications for connecting the ASUS Link cable to another device such as keyboards, pointing devices, flash disk drives, external HDDs, cameras and printers. Optical disc drive eject button Press this port for details on setting up to 5Gbit/s and is used to 5Gbit/s and is compatible with USB 2.0 or USB 1.1 devices such as a notebook PC or Android tablet. All-in optical drive may support compact discs (CD), digital video discs (DVD...
User's Manual for English Edition
Page 18
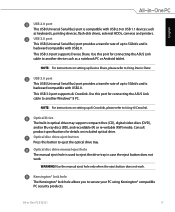
... slot in memory card reader slot that supports MS, MSPro, MMC, SD, SDXC, and SDHC formats. This USB 3.0 port supports Device Share. Use this port for connecting the ASUS Link cable to avoid damaging the card. Memory cards are keyed so that it can only be inserted into the slot to another device such as keyboards, pointing devices, flash disk drives, external HDDs, cameras and printers. USB 2.0 port This USB (Universal Serial Bus) port is backward compatible with the label facedown. ET2301IUTH English 6-in-1 Memory card reader...
... slot in memory card reader slot that supports MS, MSPro, MMC, SD, SDXC, and SDHC formats. This USB 3.0 port supports Device Share. Use this port for connecting the ASUS Link cable to avoid damaging the card. Memory cards are keyed so that it can only be inserted into the slot to another device such as keyboards, pointing devices, flash disk drives, external HDDs, cameras and printers. USB 2.0 port This USB (Universal Serial Bus) port is backward compatible with the label facedown. ET2301IUTH English 6-in-1 Memory card reader...
User's Manual for English Edition
Page 19
... products. NOTE: For instructions on included optical drive. Optical disc drive eject button Press this port for details on setting up to 5Gbit/s and is used to eject the drive tray in case the eject button does not work . All-in optical drive may support compact discs (CD), digital video discs (DVD), and/or Blu-ray discs (BD), and recordable (R) or re-writable (RW) media. WARNING! English USB 3.0 port This USB (Universal Serial Bus) port provides a transfer rate...
... products. NOTE: For instructions on included optical drive. Optical disc drive eject button Press this port for details on setting up to 5Gbit/s and is used to eject the drive tray in case the eject button does not work . All-in optical drive may support compact discs (CD), digital video discs (DVD), and/or Blu-ray discs (BD), and recordable (R) or re-writable (RW) media. WARNING! English USB 3.0 port This USB (Universal Serial Bus) port provides a transfer rate...

User's Manual for English Edition
Page 24
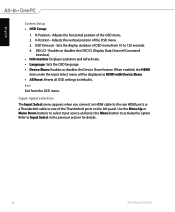
Doing so may damage the AC-DC adapter. NOTE: For details on the system. WARNING! English Powering on your All-in-One PC Connect the supplied AC adapter to the DC IN jack on the rear panel ( ) and then press the Power button on the right panel ( ) of the All-in-One PC to the section Turning off your All-in-One PC in Working with Windows® 8. 24 All-in -One PC, refer to power on turning off your All-in -One PC ET2301 DO NOT connect the AC power cord to an AC outlet prior to connecting the DC plug to the system.
Doing so may damage the AC-DC adapter. NOTE: For details on the system. WARNING! English Powering on your All-in-One PC Connect the supplied AC adapter to the DC IN jack on the rear panel ( ) and then press the Power button on the right panel ( ) of the All-in-One PC to the section Turning off your All-in-One PC in Working with Windows® 8. 24 All-in -One PC, refer to power on turning off your All-in -One PC ET2301 DO NOT connect the AC power cord to an AC outlet prior to connecting the DC plug to the system.

User's Manual for English Edition
Page 25
... Menu Down keys on the front panel. Cool, Normal, Warm, and User mode. Panel Off Press this button to the rear HDMI input port. Image • Sharpness: This setting can be adjusted using values between 0 to 100. • Aspect Control: Select the aspect ratio to know your All-in -One PC as a standard desktop LCD monitor. To activate the selected function, press the Menu button again. Connect an HDMI cable to switch...
... Menu Down keys on the front panel. Cool, Normal, Warm, and User mode. Panel Off Press this button to the rear HDMI input port. Image • Sharpness: This setting can be adjusted using values between 0 to 100. • Aspect Control: Select the aspect ratio to know your All-in -One PC as a standard desktop LCD monitor. To activate the selected function, press the Menu button again. Connect an HDMI cable to switch...
User's Manual for English Edition
Page 26
... Reset: Resets all OSD settings to Input Select in the previous section for details. 26 All-in-One PC ET2301 English System Setup • OSD Setup: 1. Adjusts the horizontal position of the Thunderbolt ports on the left panel. Input signal selection The Input Select menu appears when you connect an HDMI cable to the rear HDMI ports or a Thunderbolt cable to activate the option. H-Position - Use the Menu...
... Reset: Resets all OSD settings to Input Select in the previous section for details. 26 All-in-One PC ET2301 English System Setup • OSD Setup: 1. Adjusts the horizontal position of the Thunderbolt ports on the left panel. Input signal selection The Input Select menu appears when you connect an HDMI cable to the rear HDMI ports or a Thunderbolt cable to activate the option. H-Position - Use the Menu...
User's Manual for English Edition
Page 27
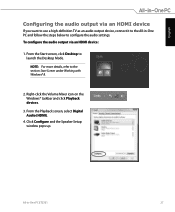
... HDMI device If you want to use a high-definition TV as an audio output device, connect it to configure the audio settings. All-in -One PC and follow the steps below to the All-in -One PC ET2301 27 NOTE: For more details, refer to launch the Desktop Mode. From the Start screen, click Desktop to the section Start Screen under Working with Windows® 8. 2. Click Configure and the Speaker Setup window...
... HDMI device If you want to use a high-definition TV as an audio output device, connect it to configure the audio settings. All-in -One PC and follow the steps below to the All-in -One PC ET2301 27 NOTE: For more details, refer to launch the Desktop Mode. From the Start screen, click Desktop to the section Start Screen under Working with Windows® 8. 2. Click Configure and the Speaker Setup window...
User's Manual for English Edition
Page 35
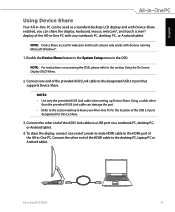
... used as a standard desktop LCD display and with Device Share enabled, you can damage the port. • Refer to the section Getting to know your All-in-One PC for the location of the USB 3.0 port designated for webcams and touch screens only works with devices running Microsoft Windows®. 1. NOTES: • Use only the provided ASUS Link cable when setting up Device Share. Connect the other end of the HDMI cable...
... used as a standard desktop LCD display and with Device Share enabled, you can damage the port. • Refer to the section Getting to know your All-in-One PC for the location of the USB 3.0 port designated for webcams and touch screens only works with devices running Microsoft Windows®. 1. NOTES: • Use only the provided ASUS Link cable when setting up Device Share. Connect the other end of the HDMI cable...
User's Manual for English Edition
Page 36
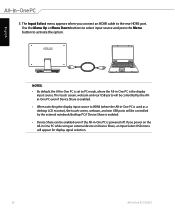
If you connect an HDMI cable to HDMI (where the All-in-One PC is used as a desktop LCD monitor), the touch screen, webcam, and rear USB ports will appear for display signal selection. 36 All-in-One PC ET2301 The touch screen, webcam and rear USB ports will be controlled by the external notebook/desktop PC if Device Share is enabled. • Device Share can be enabled even if the All-in -One...
If you connect an HDMI cable to HDMI (where the All-in-One PC is used as a desktop LCD monitor), the touch screen, webcam, and rear USB ports will appear for display signal selection. 36 All-in-One PC ET2301 The touch screen, webcam and rear USB ports will be controlled by the external notebook/desktop PC if Device Share is enabled. • Device Share can be enabled even if the All-in -One...
User's Manual for English Edition
Page 50
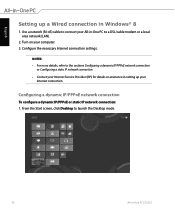
... Start screen, click Desktop to a DSL/cable modem or a local area network (LAN). 2. English Setting up your Internet connection. Use a network (RJ-45) cable to connect your All-in-One PC to launch the Desktop mode. 50 All-in Windows® 8 1. NOTES: • For more details, refer to the sections Configuring a dynamic IP/PPPoE network connection or Configuring a static IP network connection. • Contact your computer. 3. Configure the necessary Internet connection settings. Configuring a dynamic IP/PPPoE network connection To configure...
... Start screen, click Desktop to a DSL/cable modem or a local area network (LAN). 2. English Setting up your Internet connection. Use a network (RJ-45) cable to connect your All-in-One PC to launch the Desktop mode. 50 All-in Windows® 8 1. NOTES: • For more details, refer to the sections Configuring a dynamic IP/PPPoE network connection or Configuring a static IP network connection. • Contact your computer. 3. Configure the necessary Internet connection settings. Configuring a dynamic IP/PPPoE network connection To configure...
User's Manual for English Edition
Page 57
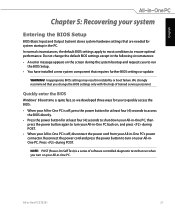
...'s power connector. Reconnect the power cord and press the power button to ensure optimal performance. Do not change the BIOS settings only with the help of software controlled diagnostic tests that run the BIOS Setup. • You have installed a new system component that you to access the BIOS directly. • Press the power button for system startup in the PC. All-in instability or boot failure. We strongly recommend that requires further BIOS settings or update. NOTE...
...'s power connector. Reconnect the power cord and press the power button to ensure optimal performance. Do not change the BIOS settings only with the help of software controlled diagnostic tests that run the BIOS Setup. • You have installed a new system component that you to access the BIOS directly. • Press the power button for system startup in the PC. All-in instability or boot failure. We strongly recommend that requires further BIOS settings or update. NOTE...

User's Manual for English Edition
Page 58
... power button to turn on , launch the Windows® 8 Charm bar then go to Settings > Change PC settings > General. From the General pane, scroll down to its factory default settings. Tap or click Next. 6. Select Reset your All-in-One PC: 1. Back up all your data before using this option. Press during bootup. 3. IMPORTANT! If your All-in-One PC is installed. 7. From the screen...
... power button to turn on , launch the Windows® 8 Charm bar then go to Settings > Change PC settings > General. From the General pane, scroll down to its factory default settings. Tap or click Next. 6. Select Reset your All-in-One PC: 1. Back up all your data before using this option. Press during bootup. 3. IMPORTANT! If your All-in-One PC is installed. 7. From the screen...

User's Manual for English Edition
Page 60
... Windows® 8 Restoring your data before using the Remove everything and reinstall Windows option. IMPORTANT! Back up all your PC to view the Remove everything and reinstall option in -One PC ET2301 Scroll down to its original factory settings can be done using this option, click Get Started. 4. Follow the onscreen instructions to complete. 1. Wait for a while for the process to use this option. Click Settings > Change PC Settings...
... Windows® 8 Restoring your data before using the Remove everything and reinstall Windows option. IMPORTANT! Back up all your PC to view the Remove everything and reinstall option in -One PC ET2301 Scroll down to its original factory settings can be done using this option, click Get Started. 4. Follow the onscreen instructions to complete. 1. Wait for a while for the process to use this option. Click Settings > Change PC Settings...


