
ASUS AIO Win10 manual for English
Page 2
Follow the onscreen instructions to guide you start your apps and preferred settings. NOTE: The screenshots in this manual are for a few minutes until the setup screen appears. 2. Press the power button on your ASUS All-in-One PC. 3. From the setup screen, pick your region and a language to install your ASUS All-in-One PC for the first time: 1. Carefully read the License Terms...
Follow the onscreen instructions to guide you start your apps and preferred settings. NOTE: The screenshots in this manual are for a few minutes until the setup screen appears. 2. Press the power button on your ASUS All-in-One PC. 3. From the setup screen, pick your region and a language to install your ASUS All-in-One PC for the first time: 1. Carefully read the License Terms...
ASUS AIO Win10 manual for English
Page 17
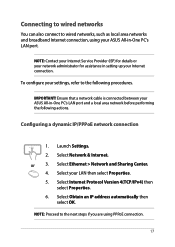
Ensure that a network cable is connected between your ASUS All-in-One PC's LAN port. Configuring a dynamic IP/PPPoE network connection 1. Select Ethernet > Network and Sharing Center. 4. Select Network & Internet. Select Internet Protocol Version 4(TCP/IPv4) then select Properties. 6. or 3. Select Obtain an IP address automatically then select OK. Connecting to wired networks You can also connect to wired networks, such as local area networks and broadband Internet connection, using PPPoE connection. 17 NOTE: Proceed to the...
Ensure that a network cable is connected between your ASUS All-in-One PC's LAN port. Configuring a dynamic IP/PPPoE network connection 1. Select Ethernet > Network and Sharing Center. 4. Select Network & Internet. Select Internet Protocol Version 4(TCP/IPv4) then select Properties. 6. or 3. Select Obtain an IP address automatically then select OK. Connecting to wired networks You can also connect to wired networks, such as local area networks and broadband Internet connection, using PPPoE connection. 17 NOTE: Proceed to the...

ASUS AIO Win10 manual for English
Page 21
...; An error message appears on the screen during the system bootup and requests you to turn on your ASUS All-in-One PC then press or during POST. Do not change the BIOS settings only with the help of software controlled diagnostic tests that run the BIOS Setup. • You have installed a new system component that requires further BIOS settings or update. WARNING! NOTE: POST (Power-On Self-Test) is off...
...; An error message appears on the screen during the system bootup and requests you to turn on your ASUS All-in-One PC then press or during POST. Do not change the BIOS settings only with the help of software controlled diagnostic tests that run the BIOS Setup. • You have installed a new system component that requires further BIOS settings or update. WARNING! NOTE: POST (Power-On Self-Test) is off...

ASUS AIO Win10 manual for English
Page 22
... system Using recovery options on your ASUS All-in-One PC. • Note down important customized settings such as network settings, user names, and passwords to avoid data loss. • Ensure that your ASUS All-in-One PC is plugged in -One PC allows you to restore the system to its original state or simply refresh its settings to its default settings and delete other installed...
... system Using recovery options on your ASUS All-in-One PC. • Note down important customized settings such as network settings, user names, and passwords to avoid data loss. • Ensure that your ASUS All-in-One PC is plugged in -One PC allows you to restore the system to its original state or simply refresh its settings to its default settings and delete other installed...

ASUS AIO Win10 manual for English
Page 23
... you . • Advanced startup - Use this option if this option allows you to go back to access and use any of the available recovery options for you want to an earlier build. Using Troubleshoot to enable any of these advanced recovery options: System Restore, System Image Recovery, Startup Repair, Command Prompt, UEFI Firmware Settings, and Startup Settings. Using a USB drive, network connection or Windows recovery DVD to an earlier build - Using this build is not working for your ASUS All-in -One PC...
... you . • Advanced startup - Use this option if this option allows you to go back to access and use any of the available recovery options for you want to an earlier build. Using Troubleshoot to enable any of these advanced recovery options: System Restore, System Image Recovery, Startup Repair, Command Prompt, UEFI Firmware Settings, and Startup Settings. Using a USB drive, network connection or Windows recovery DVD to an earlier build - Using this build is not working for your ASUS All-in -One PC...

ET223ET203 Series users manual
Page 2
...under this Warranty Statement, up to the listed contract price of each such instance, regardless of the basis on ASUS' part or other actual and direct damages resulted from omission or failure of performing legal duties under this Warranty ...ERRORS OR INACCURACIES THAT MAY APPEAR IN THIS MANUAL, INCLUDING THE PRODUCTS AND SOFTWARE DESCRIBED IN IT. SERVICE AND SUPPORT Visit our multi-language web site at http://support.asus.com 2 ASUS All-in this manual may or may not be registered trademarks or copyrights of ASUSTeK COMPUTER INC. ("ASUS"). This limit also applies to the owners...
...under this Warranty Statement, up to the listed contract price of each such instance, regardless of the basis on ASUS' part or other actual and direct damages resulted from omission or failure of performing legal duties under this Warranty ...ERRORS OR INACCURACIES THAT MAY APPEAR IN THIS MANUAL, INCLUDING THE PRODUCTS AND SOFTWARE DESCRIBED IN IT. SERVICE AND SUPPORT Visit our multi-language web site at http://support.asus.com 2 ASUS All-in this manual may or may not be registered trademarks or copyrights of ASUSTeK COMPUTER INC. ("ASUS"). This limit also applies to the owners...

ET223ET203 Series users manual
Page 3
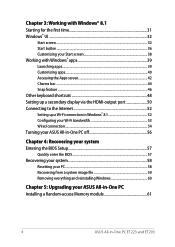
... 1: Hardware Setup Getting to know your ASUS All-in-One PC 13 Front view...13 Rear view...15 Side view...18 Chapter 2: Using your ASUS All-in-One PC Assembling the base 21 Positioning your ASUS All-in-One PC 22 Connecting a wired keyboard and mouse 23 Connecting a wireless keyboard and mouse (optional 24 Powering on your ASUS All-in-One PC 25 Using the touch screen (optional 26 Using touch screen panel gestures...
... 1: Hardware Setup Getting to know your ASUS All-in-One PC 13 Front view...13 Rear view...15 Side view...18 Chapter 2: Using your ASUS All-in-One PC Assembling the base 21 Positioning your ASUS All-in-One PC 22 Connecting a wired keyboard and mouse 23 Connecting a wireless keyboard and mouse (optional 24 Powering on your ASUS All-in-One PC 25 Using the touch screen (optional 26 Using touch screen panel gestures...
ET223ET203 Series users manual
Page 4
......32 Start screen...32 Start button...36 Customizing your Start screen 38 Working with Windows® apps 39 Launching apps...39 Customizing apps...40 Accessing the Apps screen 42 Charms bar...44 Snap feature...46 Other keyboard shortcuts 48 Setting up a secondary display via the HDMI-output port 50 Connecting to the Internet 52 Setting up a Wi-Fi connection in Windows® 8.1 52 Configuring your Wi-Fi bandwidth 53 Wired connection...54 Turning your ASUS...
......32 Start screen...32 Start button...36 Customizing your Start screen 38 Working with Windows® apps 39 Launching apps...39 Customizing apps...40 Accessing the Apps screen 42 Charms bar...44 Snap feature...46 Other keyboard shortcuts 48 Setting up a secondary display via the HDMI-output port 50 Connecting to the Internet 52 Setting up a Wi-Fi connection in Windows® 8.1 52 Configuring your Wi-Fi bandwidth 53 Wired connection...54 Turning your ASUS...

ET223ET203 Series users manual
Page 9
... devices plugged into the ventilation openings. • Use this product near water or a heated source such as a radiator. • Set up your system. • Do not use this product in environments with ambient temperatures between 0˚C and 40˚C. • If you operate your system • Read and follow all power, modem, and network cables from the power outlets before you use...
... devices plugged into the ventilation openings. • Use this product near water or a heated source such as a radiator. • Set up your system. • Do not use this product in environments with ambient temperatures between 0˚C and 40˚C. • If you operate your system • Read and follow all power, modem, and network cables from the power outlets before you use...
ET223ET203 Series users manual
Page 14
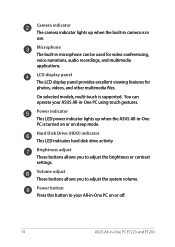
... display panel The LCD display panel provides excellent viewing features for video conferencing, voice narrations, audio recordings, and multimedia applications. On selected models, multi-touch is in use. Power indicator This LED power indicator lights up when the built-in camera is supported. Microphone The built-in microphone can operate your All-in-One PC on sleep mode. Hard Disk Drive (HDD) indicator This LED indicates hard disk drive activity. Power button Press this button to your ASUS...
... display panel The LCD display panel provides excellent viewing features for video conferencing, voice narrations, audio recordings, and multimedia applications. On selected models, multi-touch is in use. Power indicator This LED power indicator lights up when the built-in camera is supported. Microphone The built-in microphone can operate your All-in-One PC on sleep mode. Hard Disk Drive (HDD) indicator This LED indicates hard disk drive activity. Power button Press this button to your ASUS...
ET223ET203 Series users manual
Page 16
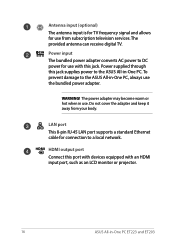
WARNING! Do not cover the adapter and keep it away from subscription television services. LAN port This 8-pin RJ-45 LAN port supports a standard Ethernet cable for connection to the ASUS All-in -One PC. To prevent damage to a local network. HDMI output port Connect this port with devices equipped with this jack supplies power to DC power for use from your body. The power adapter may become warm or hot when in -One PC ET223...
WARNING! Do not cover the adapter and keep it away from subscription television services. LAN port This 8-pin RJ-45 LAN port supports a standard Ethernet cable for connection to the ASUS All-in -One PC. To prevent damage to a local network. HDMI output port Connect this port with devices equipped with this jack supplies power to DC power for use from your body. The power adapter may become warm or hot when in -One PC ET223...

ET223ET203 Series users manual
Page 17
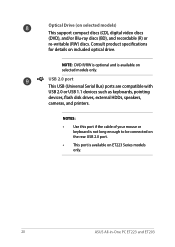
...! ASUS All-in -One PC. IMPORTANT! For more information on ET203 Series models only. USB 2.0 ports These USB (Universal Serial Bus) ports are available on how to add or upgrade the RAM module, refer to USB 3.0 devices such as keyboards, pointing devices, flash disk drives, external HDDs, speakers, cameras, and printers. The two (2) USB 2.0 ports are compatible with USB 2.0 or USB 1.1 devices such as a mouse, printer, scanner, camera, and others. USB 3.0 ports These Universal Serial Bus 3.0 (USB 3.0) ports connect to the Installing a Random-access Memory module...
...! ASUS All-in -One PC. IMPORTANT! For more information on ET203 Series models only. USB 2.0 ports These USB (Universal Serial Bus) ports are available on how to add or upgrade the RAM module, refer to USB 3.0 devices such as keyboards, pointing devices, flash disk drives, external HDDs, speakers, cameras, and printers. The two (2) USB 2.0 ports are compatible with USB 2.0 or USB 1.1 devices such as a mouse, printer, scanner, camera, and others. USB 3.0 ports These Universal Serial Bus 3.0 (USB 3.0) ports connect to the Installing a Random-access Memory module...

ET223ET203 Series users manual
Page 19
... amplified speakers or headphones. Use the manual eject hole only when the electronic eject button does not work . Optical Disk Drive electronic eject button Press this button to connect your media player or by right-clicking the optical drive icon in -One PC ET223 and ET203 19 AI Charger II LED indicator This LED lights up when the AI Charger II port is used to eject the drive tray in case...
... amplified speakers or headphones. Use the manual eject hole only when the electronic eject button does not work . Optical Disk Drive electronic eject button Press this button to connect your media player or by right-clicking the optical drive icon in -One PC ET223 and ET203 19 AI Charger II LED indicator This LED lights up when the AI Charger II port is used to eject the drive tray in case...
ET223ET203 Series users manual
Page 20
... cable of your mouse or keyboard is not long enough to be connected on the rear USB 2.0 port. • This port is available on ET223 Series models only. 20 ASUS All-in-One PC ET223 and ET203 NOTE: DVD R/RW is optional and is available on selected models only. USB 2.0 port This USB (Universal Serial Bus) ports are compatible with USB 2.0 or USB 1.1 devices such as keyboards, pointing devices, flash disk drives, external HDDs, speakers, cameras, and printers. Consult product specifications...
... cable of your mouse or keyboard is not long enough to be connected on the rear USB 2.0 port. • This port is available on ET223 Series models only. 20 ASUS All-in-One PC ET223 and ET203 NOTE: DVD R/RW is optional and is available on selected models only. USB 2.0 port This USB (Universal Serial Bus) ports are compatible with USB 2.0 or USB 1.1 devices such as keyboards, pointing devices, flash disk drives, external HDDs, speakers, cameras, and printers. Consult product specifications...

ET223ET203 Series users manual
Page 25
WARNING! Doing so may damage the AC-DC adapter. NOTE: For details on the system. Powering on your ASUS All-in-One PC Connect the supplied AC adapter to the DC IN jack on the rear panel ( 1, 2, and 3 ) and then press the Power button on the front panel (4) of the ASUS All-in-One PC to the section Turning your ASUS All-in-One PC off your ASUS All-in-One PC, refer to power on turning off in Working with Windows® 8.1. ASUS All-in-One PC ET223 and ET203 25 DO NOT connect the AC power cord to an AC outlet prior to connecting the DC plug to the system.
WARNING! Doing so may damage the AC-DC adapter. NOTE: For details on the system. Powering on your ASUS All-in-One PC Connect the supplied AC adapter to the DC IN jack on the rear panel ( 1, 2, and 3 ) and then press the Power button on the front panel (4) of the ASUS All-in-One PC to the section Turning your ASUS All-in-One PC off your ASUS All-in-One PC, refer to power on turning off in Working with Windows® 8.1. ASUS All-in-One PC ET223 and ET203 25 DO NOT connect the AC power cord to an AC outlet prior to connecting the DC plug to the system.

ET223ET203 Series users manual
Page 50
... device, connect it to the Home Theater ASUS All-in -One PC ET223 and ET203 Right-click the Volume Mixer icon on the Windows® taskbar and click Playback devices. 3. From the Playback screen, select Digital Audio (HDMI). 4. Click Configure and the Speaker Setup window pops up a secondary display via an HDMI device: 1. NOTE: For more details, refer to the section Start screen under Using Windows® 8.1. 2. From the Start screen...
... device, connect it to the Home Theater ASUS All-in -One PC ET223 and ET203 Right-click the Volume Mixer icon on the Windows® taskbar and click Playback devices. 3. From the Playback screen, select Digital Audio (HDMI). 4. Click Configure and the Speaker Setup window pops up a secondary display via an HDMI device: 1. NOTE: For more details, refer to the section Start screen under Using Windows® 8.1. 2. From the Start screen...

ET223ET203 Series users manual
Page 54
... the Open Network and Sharing Center screen, click Change Adapter settings. 4. From the Windows® taskbar, right-click the network icon and click Open Network and Sharing Center. 3. Wired connection 1. Configuring a dynamic IP/PPPoE network connection To configure a dynamic IP/PPPoE or static IP network connection: 1. NOTES: • For more details, refer to connect your LAN and select Properties. 5. From the Start screen, click Desktop to a DSL/cable modem or a local area network (LAN). 2. Turn on your ASUS All-in...
... the Open Network and Sharing Center screen, click Change Adapter settings. 4. From the Windows® taskbar, right-click the network icon and click Open Network and Sharing Center. 3. Wired connection 1. Configuring a dynamic IP/PPPoE network connection To configure a dynamic IP/PPPoE or static IP network connection: 1. NOTES: • For more details, refer to connect your LAN and select Properties. 5. From the Start screen, click Desktop to a DSL/cable modem or a local area network (LAN). 2. Turn on your ASUS All-in...
ET223ET203 Series users manual
Page 57
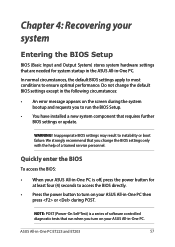
... to access the BIOS directly. • Press the power button to run the BIOS Setup. • You have installed a new system component that requires further BIOS settings or update. We strongly recommend that run when you to turn on the screen during POST. Do not change the BIOS settings only with the help of software controlled diagnostic tests that you change the default BIOS settings except in the following circumstances: • An error message appears on your ASUS...
... to access the BIOS directly. • Press the power button to run the BIOS Setup. • You have installed a new system component that requires further BIOS settings or update. We strongly recommend that run when you to turn on the screen during POST. Do not change the BIOS settings only with the help of software controlled diagnostic tests that you change the default BIOS settings except in the following circumstances: • An error message appears on your ASUS...

ET223ET203 Series users manual
Page 58
To reset your PC to its factory default settings. Press during bootup. Click Reset. 58 ASUS All-in Chapter 3. 2. IMPORTANT! From the screen, click Troubleshoot. 3. Click Next. 5. Select Just remove my files. 7. IMPORTANT! Recovering your system Resetting your PC The Reset your PC option restores your PC: 1. Select Reset your data before using this option. Select Only the drive where the Windows is installed. 6. To go through POST, follow any of the ways described in the section Quickly enter the BIOS in -One PC ET223 and ET203 Back up all your PC. 4.
To reset your PC to its factory default settings. Press during bootup. Click Reset. 58 ASUS All-in Chapter 3. 2. IMPORTANT! From the screen, click Troubleshoot. 3. Click Next. 5. Select Just remove my files. 7. IMPORTANT! Recovering your system Resetting your PC The Reset your PC option restores your PC: 1. Select Reset your data before using this option. Select Only the drive where the Windows is installed. 6. To go through POST, follow any of the ways described in the section Quickly enter the BIOS in -One PC ET223 and ET203 Back up all your PC. 4.

ET223ET203 Series users manual
Page 60
Removing everything and reinstalling Windows Restoring your data before using the Remove everything and reinstall Windows option. Refer to the steps below to complete the reinstallation and reset process. 60 ASUS All-in PC Settings. Launch the Charms bar. 2. Under this option. Back up all your PC to its original factory settings can be done using this option. IMPORTANT! Click Settings > Change PC Settings > General. 3. NOTE: This process may...
Removing everything and reinstalling Windows Restoring your data before using the Remove everything and reinstall Windows option. Refer to the steps below to complete the reinstallation and reset process. 60 ASUS All-in PC Settings. Launch the Charms bar. 2. Under this option. Back up all your PC to its original factory settings can be done using this option. IMPORTANT! Click Settings > Change PC Settings > General. 3. NOTE: This process may...


