
User's Manual for English Edition
Page 2
... part of this manual are correct and up to date. Products and corporate names mentioned in any form or by any language in this manual may or may be registered trademarks or copyrights of their respective owners. Every effort has been made to make changes without the express written permission of this manual, including the products and software...
... part of this manual are correct and up to date. Products and corporate names mentioned in any form or by any language in this manual may or may be registered trademarks or copyrights of their respective owners. Every effort has been made to make changes without the express written permission of this manual, including the products and software...

User's Manual for English Edition
Page 3
... 7 France Restricted Wireless Frequency Bands 8 REACH...9 Global Environmental Regulation Compliance and Declaration 10 ASUS Recycling/Takeback Services 10 UL Safety Precaution...10 ENERGY STAR complied product 11 Notes for this manual...11 Safety information...12 Setting up your system...12 Care during use...12 Sound Pressure Warning...13 TV Tuner (on selected models 13 Adapter...13 DC Fan Warning...13...
... 7 France Restricted Wireless Frequency Bands 8 REACH...9 Global Environmental Regulation Compliance and Declaration 10 ASUS Recycling/Takeback Services 10 UL Safety Precaution...10 ENERGY STAR complied product 11 Notes for this manual...11 Safety information...12 Setting up your system...12 Care during use...12 Sound Pressure Warning...13 TV Tuner (on selected models 13 Adapter...13 DC Fan Warning...13...
User's Manual for English Edition
Page 4
... wireless keyboard and mouse 32 Powering on the system...33 Powering off...33 Calibrating the screen...34 Configuring a wireless connection 35 Configuring a wired connection 36 Using a static IP...36 Using a dynamic IP (PPPoE 38 Configuring the audio output...41 Speaker configurations...41 Connecting to speakers...41 Recovering your system 42 Using the Recovery Partition...42 Recovering the OS to the Factory Default Partition (F9 Recovery 42 Backing up the Factory Default Environment Data to a USB Drive (F9 Backup) 42 Using the USB storage device (USB Restore...
... wireless keyboard and mouse 32 Powering on the system...33 Powering off...33 Calibrating the screen...34 Configuring a wireless connection 35 Configuring a wired connection 36 Using a static IP...36 Using a dynamic IP (PPPoE 38 Configuring the audio output...41 Speaker configurations...41 Connecting to speakers...41 Recovering your system 42 Using the Recovery Partition...42 Recovering the OS to the Factory Default Partition (F9 Recovery 42 Backing up the Factory Default Environment Data to a USB Drive (F9 Backup) 42 Using the USB storage device (USB Restore...

User's Manual for English Edition
Page 5
... device complies with Part 15 of the FCC Rules.These limits are designed to provide reasonable protection against harmful interference in a residential installation.This equipment generates, uses and can be determined by turning the equipment off and on a circuit different from all persons and must not be co-located or operating in conjunction with antenna installation instructions and transmitter operating...
... device complies with Part 15 of the FCC Rules.These limits are designed to provide reasonable protection against harmful interference in a residential installation.This equipment generates, uses and can be determined by turning the equipment off and on a circuit different from all persons and must not be co-located or operating in conjunction with antenna installation instructions and transmitter operating...

User's Manual for English Edition
Page 11
... mouse or press any key on power management and its benefits to complete a task. Actual product specifications and software screen images may vary with the ENERGY STAR standard, and the power management feature is a joint program of the following symbols used throughout this manual. energystar.gov for detail information on the keyboard. Notes for special situations. NOTE: Additional information for this manual are automatically set...
... mouse or press any key on power management and its benefits to complete a task. Actual product specifications and software screen images may vary with the ENERGY STAR standard, and the power management feature is a joint program of the following symbols used throughout this manual. energystar.gov for detail information on the keyboard. Notes for special situations. NOTE: Additional information for this manual are automatically set...

User's Manual for English Edition
Page 12
...-one PC ET2012 Series Care during use • Do not walk on the screen. • Do not use an abrasive cleaner or a coarse cloth when cleaning the screen. • If you encounter the following technical problems with the product, unplug the power cord and contact a qualified service technician or your system • Read and follow the operating instructions. • The system...
...-one PC ET2012 Series Care during use • Do not walk on the screen. • Do not use an abrasive cleaner or a coarse cloth when cleaning the screen. • If you encounter the following technical problems with the product, unplug the power cord and contact a qualified service technician or your system • Read and follow the operating instructions. • The system...

User's Manual for English Edition
Page 13
... to call the CATV systems installer's attention to the unit and easily accessible. Ensure to settings other than the center position may cause DANGER. Adapter information (varies with the purchased model) a. English Sound Pressure Warning Excessive sound pressure from the moving part that the Coaxial cable shield be near to Section 820-93 of the volume control as well as practical.
... to call the CATV systems installer's attention to the unit and easily accessible. Ensure to settings other than the center position may cause DANGER. Adapter information (varies with the purchased model) a. English Sound Pressure Warning Excessive sound pressure from the moving part that the Coaxial cable shield be near to Section 820-93 of the volume control as well as practical.
User's Manual for English Edition
Page 16
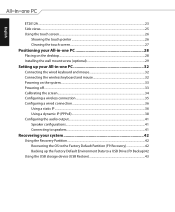
... the menu. Hard Disk Drive LED Indicates hard disk drive activity. Press this button to switch the display signal source. When switched to HDMI input, the All-in-one PC ET2012 Series Power Switch The power switch allows you to start video chats online. MODE Button Press to enter/select the icon (function) highlighted while the OSD is enabled. LCD Display (Touch-enabled function on selected models) The IR Receiver receives Infrared (IR) signals from the remote control. 16...
... the menu. Hard Disk Drive LED Indicates hard disk drive activity. Press this button to switch the display signal source. When switched to HDMI input, the All-in-one PC ET2012 Series Power Switch The power switch allows you to start video chats online. MODE Button Press to enter/select the icon (function) highlighted while the OSD is enabled. LCD Display (Touch-enabled function on selected models) The IR Receiver receives Infrared (IR) signals from the remote control. 16...

User's Manual for English Edition
Page 18
... allows you to start video chats online. LCD Display (Touch-enabled function on selected models) The IR Receiver receives Infrared (IR) signals from the remote control. 18 All-in-one PC ET2012 Series Hard Disk Drive LED Indicates hard disk drive activity. Brightness Down Button Decreases the display brightness. Digital Microphone (Built-in) The built-in digital microphone can be used for video conferencing, voice narrations, audio recordings, and multimedia...
... allows you to start video chats online. LCD Display (Touch-enabled function on selected models) The IR Receiver receives Infrared (IR) signals from the remote control. 18 All-in-one PC ET2012 Series Hard Disk Drive LED Indicates hard disk drive activity. Brightness Down Button Decreases the display brightness. Digital Microphone (Built-in) The built-in digital microphone can be used for video conferencing, voice narrations, audio recordings, and multimedia...

User's Manual for English Edition
Page 20
... Series Display (Monitor) Output The 15-pin D-sub monitor port supports a standard VGA-compatible device such as keyboards, mouse devices, cameras, and hard disk drives. LAN port The eight-pin RJ-45 LAN port supports a standard Ethernet cable for connection to the PC, always use the supplied power adapter. To prevent damage to a local network. Do not cover the adapter and keep it away from subscription television services.The provided antenna can receive digital TV or FM radio. 20 All-in use. HDMI input port 6 7 8 HDMI...
... Series Display (Monitor) Output The 15-pin D-sub monitor port supports a standard VGA-compatible device such as keyboards, mouse devices, cameras, and hard disk drives. LAN port The eight-pin RJ-45 LAN port supports a standard Ethernet cable for connection to the PC, always use the supplied power adapter. To prevent damage to a local network. Do not cover the adapter and keep it away from subscription television services.The provided antenna can receive digital TV or FM radio. 20 All-in use. HDMI input port 6 7 8 HDMI...

User's Manual for English Edition
Page 22
.... Do not cover the adapter and keep it away from your body. 4 5 USB port The Universal Serial Bus (USB) port is compatible with this jack supplies power to allow viewing on selected model) This 9-pin serial port (COM1) is for serial devices. 22 All-in use. Display (Monitor) Output 6 7 The 15-pin D-sub monitor port supports a standard VGA-compatible device such as keyboards, mouse devices, cameras, and hard disk drives. LAN port The eight-pin RJ-45 LAN port supports a standard Ethernet cable for use the supplied power adapter. The power adapter may become...
.... Do not cover the adapter and keep it away from your body. 4 5 USB port The Universal Serial Bus (USB) port is compatible with this jack supplies power to allow viewing on selected model) This 9-pin serial port (COM1) is for serial devices. 22 All-in use. Display (Monitor) Output 6 7 The 15-pin D-sub monitor port supports a standard VGA-compatible device such as keyboards, mouse devices, cameras, and hard disk drives. LAN port The eight-pin RJ-45 LAN port supports a standard Ethernet cable for use the supplied power adapter. The power adapter may become...

User's Manual for English Edition
Page 24
...-pin D-sub monitor port supports a standard VGA-compatible device such as keyboards, mouse devices, cameras, and hard disk drives. Do not cover the adapter and keep it away from subscription television services.The provided antenna can receive digital TV or FM radio. 24 All-in use with USB devices such as a monitor or projector to the PC. Power supplied through this jack. To prevent damage to DC power for connection to a local network. English 3 Power...
...-pin D-sub monitor port supports a standard VGA-compatible device such as keyboards, mouse devices, cameras, and hard disk drives. Do not cover the adapter and keep it away from subscription television services.The provided antenna can receive digital TV or FM radio. 24 All-in use with USB devices such as a monitor or projector to the PC. Power supplied through this jack. To prevent damage to DC power for connection to a local network. English 3 Power...

User's Manual for English Edition
Page 25
... disables the 6 built-in speakers. 6 Optical Drive The built-in -one PC has a built-in memory card reader that supports MMC/SD/SDHC cards used in devices like digital cameras, MP3 players, mobile phones, and PDAs. 2 USB 2.0 port/USB 3.0 port (on selected model) 1 2 The Universal Serial Bus (USB) port is compatible with USB devices such as keyboards, mouse devices, 3 cameras, and hard disk drives. 4 5 3 HDMI input port HDMI (High-Definition Multimedia Interface) is an uncompressed all-digital audio/ video interface between any audio/video...
... disables the 6 built-in speakers. 6 Optical Drive The built-in -one PC has a built-in memory card reader that supports MMC/SD/SDHC cards used in devices like digital cameras, MP3 players, mobile phones, and PDAs. 2 USB 2.0 port/USB 3.0 port (on selected model) 1 2 The Universal Serial Bus (USB) port is compatible with USB devices such as keyboards, mouse devices, 3 cameras, and hard disk drives. 4 5 3 HDMI input port HDMI (High-Definition Multimedia Interface) is an uncompressed all-digital audio/ video interface between any audio/video...

User's Manual for English Edition
Page 27
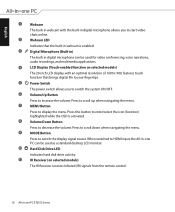
... the screen: • Turn off the system and disconnect the power cord from foreign objects or excessive dust accumulation. Click the Touch tab on the screen. • Do not use an abrasive cleaner or a coarse cloth when cleaning the screen. Click Change touch input settings. 3. Click OK to achieve the best touch sensitivity. All-in-one PC ET2012 Series...
... the screen: • Turn off the system and disconnect the power cord from foreign objects or excessive dust accumulation. Click the Touch tab on the screen. • Do not use an abrasive cleaner or a coarse cloth when cleaning the screen. Click Change touch input settings. 3. Click OK to achieve the best touch sensitivity. All-in-one PC ET2012 Series...

User's Manual for English Edition
Page 32
... can begin using the wireless keyboard and mouse. Actual appearances and specifications (wired or wireless) of the keyboard and mouse may vary with territories. 32 All-in -one PC ET2012 Series The illustrations above are for reference only. Install batteries to the USB port on the left side ( 2 ) if the keyboard and mouse cable is not long enough.� 2 1 Connecting the wireless keyboard and mouse 1. Insert the wireless keyboard/mouse receiver to the wireless keyboard and mouse. 2.
... can begin using the wireless keyboard and mouse. Actual appearances and specifications (wired or wireless) of the keyboard and mouse may vary with territories. 32 All-in -one PC ET2012 Series The illustrations above are for reference only. Install batteries to the USB port on the left side ( 2 ) if the keyboard and mouse cable is not long enough.� 2 1 Connecting the wireless keyboard and mouse 1. Insert the wireless keyboard/mouse receiver to the wireless keyboard and mouse. 2.

User's Manual for English Edition
Page 33
... to connecting the DC plug to turn on the system. 2 3 1 WARNING! All-in-one PC ET2012 Series 33 To bring the system back to the OS, press the Power switch again, click the mouse, touch the display, or press any key on the front panel. Doing so may damage the AC-DC adapter. 4 Powering off • To put the system into suspend mode...
... to connecting the DC plug to turn on the system. 2 3 1 WARNING! All-in-one PC ET2012 Series 33 To bring the system back to the OS, press the Power switch again, click the mouse, touch the display, or press any key on the front panel. Doing so may damage the AC-DC adapter. 4 Powering off • To put the system into suspend mode...
User's Manual for English Edition
Page 34
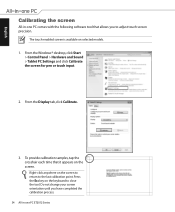
From the Windows® desktop, click Start > Control Panel > Hardware and Sound > Tablet PC Settings and click Calibrate the screen for pen or touch input. 2. From the Display tab, click Calibrate. 3. Right-click anywhere on the keyboard to close the tool. Press the Esc key on the screen to return to adjust touch screen precision. The touch-enabled screen is available on the screen. To provide calibration samples...
From the Windows® desktop, click Start > Control Panel > Hardware and Sound > Tablet PC Settings and click Calibrate the screen for pen or touch input. 2. From the Display tab, click Calibrate. 3. Right-click anywhere on the keyboard to close the tool. Press the Esc key on the screen to return to adjust touch screen precision. The touch-enabled screen is available on the screen. To provide calibration samples...

User's Manual for English Edition
Page 41
... panel and their functions. Speaker configurations Set up the system using stereo speakers. A multi-channel audio speaker has a left-right front and left -right, two channel speaker system. Connecting to speakers Refer to stereo speakers or headphones. Set up the system with the following speaker configurations: Name Speaker system 2-channel (stereo) Left speaker and right speaker. English Configuring the audio output All-in -one PC supports different types of audio configurations. Audio jack Headphones/2-channel Audio...
... panel and their functions. Speaker configurations Set up the system using stereo speakers. A multi-channel audio speaker has a left-right front and left -right, two channel speaker system. Connecting to speakers Refer to stereo speakers or headphones. Set up the system with the following speaker configurations: Name Speaker system 2-channel (stereo) Left speaker and right speaker. English Configuring the audio output All-in -one PC supports different types of audio configurations. Audio jack Headphones/2-channel Audio...

User's Manual for English Edition
Page 42
... to start backup. Click Next. 6. Click Recover to the Default Partition and click Next. 5. When the recovery is already a partition with your PC model. 4. If there is completed successfully, click Reboot to a USB Drive (F9 Backup) 1. The factory default partition will be displayed. Data on the default partition will be cleared. Backing up the Factory Default Environment Data to restart the system. When backing up the factory default environment is connected...
... to start backup. Click Next. 6. Click Recover to the Default Partition and click Next. 5. When the recovery is already a partition with your PC model. 4. If there is completed successfully, click Reboot to a USB Drive (F9 Backup) 1. The factory default partition will be displayed. Data on the default partition will be cleared. Backing up the Factory Default Environment Data to restart the system. When backing up the factory default environment is connected...
User's Manual for English Edition
Page 43
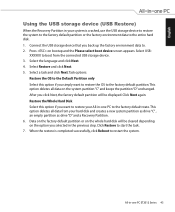
... entire hard disk. 1. English Using the USB storage device (USB Restore) When the Recovery Partition in your system is completed successfully, click Reboot to restart the system. Press on the option you want to restore the OS to the factory default partition.This option deletes all data from the connected USB storage device. 3. Data on the factory default partition or on the whole hard disk will be cleared depending on bootup and the Please select boot device screen...
... entire hard disk. 1. English Using the USB storage device (USB Restore) When the Recovery Partition in your system is completed successfully, click Reboot to restart the system. Press on the option you want to restore the OS to the factory default partition.This option deletes all data from the connected USB storage device. 3. Data on the factory default partition or on the whole hard disk will be cleared depending on bootup and the Please select boot device screen...


