User Manual
Page 16
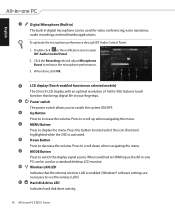
... tab and adjust Microphone Boost to display the menu. MENU Button Press to enhance the microphone performance. 3. Power switch The power switch allows you to HDMI input, the All-in-one PC ET2011 Series When switched to switch the system ON/OFF. English 3 Digital Microphone (Built-in) The built-in digital...
... tab and adjust Microphone Boost to display the menu. MENU Button Press to enhance the microphone performance. 3. Power switch The power switch allows you to HDMI input, the All-in-one PC ET2011 Series When switched to switch the system ON/OFF. English 3 Digital Microphone (Built-in) The built-in digital...

User Manual
Page 19
Rear view Refer to the following diagram to be removed from a fixed object. Kensington® Lock port The Kensington® lock port allows the computer to identify the components on this side of the system. All-in-one PC ET2011 Series 19 These security products usually include a metal cable and lock that prevent the computer to position the system upright. English HDMI ANT/CABLE 2 1 3 4 56 7 1 2 Stand Allows you to be secured using Kensington® compatible security products.
Rear view Refer to the following diagram to be removed from a fixed object. Kensington® Lock port The Kensington® lock port allows the computer to identify the components on this side of the system. All-in-one PC ET2011 Series 19 These security products usually include a metal cable and lock that prevent the computer to position the system upright. English HDMI ANT/CABLE 2 1 3 4 56 7 1 2 Stand Allows you to be secured using Kensington® compatible security products.
User Manual
Page 20
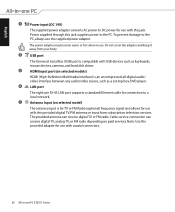
Power supplied through this jack. Do not cover the adapter and keep it away from subscription television services. HDMI input port (on paid services. Antenna Input (on selected model) The antenna input is for TV or FM Radio (optional) frequency signal and ...or hot when in -one PC ET2011 Series The provided antenna can receive digital TV, analog TV, or FM radio depending on selected models) 6 7 HDMI (High-Definition Multimedia Interface) is an uncompressed all-digital audio/ video interface between any audio/video source, such as keyboards, mouse devices, cameras, and ...
Power supplied through this jack. Do not cover the adapter and keep it away from subscription television services. HDMI input port (on paid services. Antenna Input (on selected model) The antenna input is for TV or FM Radio (optional) frequency signal and ...or hot when in -one PC ET2011 Series The provided antenna can receive digital TV, analog TV, or FM radio depending on selected models) 6 7 HDMI (High-Definition Multimedia Interface) is an uncompressed all-digital audio/ video interface between any audio/video source, such as keyboards, mouse devices, cameras, and ...

User Manual
Page 29
Follow the direction to remove the stand from the All-in-one PC. All-in -one PC. 4. Adjust the stand to release the stand lock from the All-in -one PC ET2011 Series 29 English HDMI ANT/CABLE 2. Follow the direction to the flat position. 3.
Follow the direction to remove the stand from the All-in-one PC. All-in -one PC. 4. Adjust the stand to release the stand lock from the All-in -one PC ET2011 Series 29 English HDMI ANT/CABLE 2. Follow the direction to the flat position. 3.

User Manual
Page 30
Secure the wall mount pad to the rear panel with the four screws, noting the correct orientation. 30 All-in the panel holes. English 5. HDMI ANT/CABLE 6. Take out the two rubber items in -one PC ET2011 Series HDMI ANT/CABLE
Secure the wall mount pad to the rear panel with the four screws, noting the correct orientation. 30 All-in the panel holes. English 5. HDMI ANT/CABLE 6. Take out the two rubber items in -one PC ET2011 Series HDMI ANT/CABLE

User Manual
Page 31
... and the wall. All-in this illustration is for reference only. • The wall mount kit and screws are purchased separately. 100 mm 75 mm HDMI ANT/CABLE 8. Firmly install your wall mount kit package.
... and the wall. All-in this illustration is for reference only. • The wall mount kit and screws are purchased separately. 100 mm 75 mm HDMI ANT/CABLE 8. Firmly install your wall mount kit package.

User Manual
Page 32
... Insert the wireless keyboard/mouse receiver to the USB port on the left side ( 2 ) if the keyboard and mouse cable is not long enough.� 1 HDMI ANT/CABLE 2 Connecting the wireless keyboard and mouse 1. Actual appearances and specifications (wired or wireless) of the keyboard and mouse may vary with territories. 32...;c�t the keyboard and mouse to the wireless keyboard and mouse. 2. English Setting up your All-in -one PC. 3. You can begin using the wireless HDMI ANT/CABLE keyboard and mouse. The illustrations above are for reference only.
... Insert the wireless keyboard/mouse receiver to the USB port on the left side ( 2 ) if the keyboard and mouse cable is not long enough.� 1 HDMI ANT/CABLE 2 Connecting the wireless keyboard and mouse 1. Actual appearances and specifications (wired or wireless) of the keyboard and mouse may vary with territories. 32...;c�t the keyboard and mouse to the wireless keyboard and mouse. 2. English Setting up your All-in -one PC. 3. You can begin using the wireless HDMI ANT/CABLE keyboard and mouse. The illustrations above are for reference only.

User Manual
Page 33
... and hold the Power switch for five seconds. All-in-one PC ET2011 Series 33 To bring the system back to turn on the system. 3 1 2 HDMI ANT/CABLE WARNING! Doing so may damage the AC-DC adapter. 4 Powering off • To power off the LCD display, press the Fn + F7 key...
... and hold the Power switch for five seconds. All-in-one PC ET2011 Series 33 To bring the system back to turn on the system. 3 1 2 HDMI ANT/CABLE WARNING! Doing so may damage the AC-DC adapter. 4 Powering off • To power off the LCD display, press the Fn + F7 key...


