
User Manual
Page 8
... you power up the system and install drivers and utilities from the Support DVD. viii How this guide Audience This guide provides general information about ASUS Essentio ES5100/ ES5100-P Desktop PC and instructions on the front and rear panels. 2. The chapter lists the system features, including introduction on how to use the Support DVD...
... you power up the system and install drivers and utilities from the Support DVD. viii How this guide Audience This guide provides general information about ASUS Essentio ES5100/ ES5100-P Desktop PC and instructions on the front and rear panels. 2. The chapter lists the system features, including introduction on how to use the Support DVD...
User Manual
Page 10
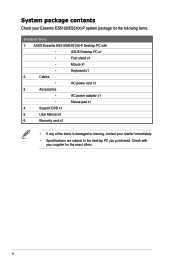
... for the following items. Standard items 1. Check with • ASUS Desktop PC x1 • Foot stand x1 • Mouse x1 • Keyboard x1 2. Cables • AC power cord x1 3. Accessories • AC power adapter x1 • Mouse pad x1 4. User Manual x1 6. ASUS Essentio ES5100/ES5100-P Desktop PC with your retailer immediately. • Specifications are...
... for the following items. Standard items 1. Check with • ASUS Desktop PC x1 • Foot stand x1 • Mouse x1 • Keyboard x1 2. Cables • AC power cord x1 3. Accessories • AC power adapter x1 • Mouse pad x1 4. User Manual x1 6. ASUS Essentio ES5100/ES5100-P Desktop PC with your retailer immediately. • Specifications are...
User Manual
Page 12
Chapter summary 1 1.1 Front panel 1-1 1.2 Rear panel 1-2 1.3 Placement options 1-4 1.4 Connecting to the keyboard and the mouse 1-5 1.5 Connecting to other peripheral devices 1-5 ASUS Essentio ES5100/ES5100-P
Chapter summary 1 1.1 Front panel 1-1 1.2 Rear panel 1-2 1.3 Placement options 1-4 1.4 Connecting to the keyboard and the mouse 1-5 1.5 Connecting to other peripheral devices 1-5 ASUS Essentio ES5100/ES5100-P
User Manual
Page 13
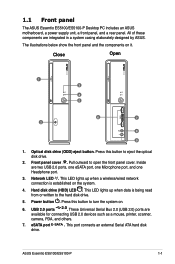
...Pull outward to eject the optical disk drive. 2. Press this button to the hard disk drive. 5. Hard disk drive (HDD) LED . ASUS Essentio ES5100/ES5100-P 1-1 Optical disk drive (ODD) eject button. Inside are two USB 2.0 ports, one eSATA port, one Microphone port, and one Headphone ...7 2 8 9 1. eSATA port E-SATA . The illustrations below show the front panel and the components on it. 1.1 Front panel The ASUS Essentio ES5100/ES5100-P Desktop PC includes an ASUS motherboard, a power supply unit, a front panel, and a rear panel. Front panel cover . USB 2.0 ports 2.0.
...Pull outward to eject the optical disk drive. 2. Press this button to the hard disk drive. 5. Hard disk drive (HDD) LED . ASUS Essentio ES5100/ES5100-P 1-1 Optical disk drive (ODD) eject button. Inside are two USB 2.0 ports, one eSATA port, one Microphone port, and one Headphone ...7 2 8 9 1. eSATA port E-SATA . The illustrations below show the front panel and the components on it. 1.1 Front panel The ASUS Essentio ES5100/ES5100-P Desktop PC includes an ASUS motherboard, a power supply unit, a front panel, and a rear panel. Front panel cover . USB 2.0 ports 2.0.
User Manual
Page 15
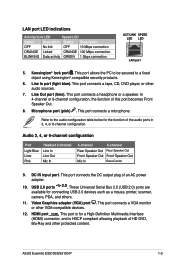
..., scanner, camera, PDA, and others. 11. Line In port (light blue). Line Out port (lime). This port connects a headphone or a speaker. DC IN input port. ASUS Essentio ES5100/ES5100-P 1-3
..., scanner, camera, PDA, and others. 11. Line In port (light blue). Line Out port (lime). This port connects a headphone or a speaker. DC IN input port. ASUS Essentio ES5100/ES5100-P 1-3
User Manual
Page 17
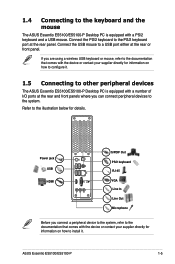
1.4 Connecting to the keyboard and the mouse The ASUS Essentio ES5100/ES5100-P Desktop PC is equipped with a number of I/O ports at the rear and front panels where you can connect peripheral devices to the system. ... your supplier directly for information on how to install it . 1.5 Connecting to other peripheral devices The ASUS Essentio ES5100/ES5100-P Desktop PC is equipped with the device or contact your supplier directly for details. ASUS Essentio ES5100/ES5100-P 1-5 Connect the USB mouse to the illustration below for information on how to the documentation that comes...
1.4 Connecting to the keyboard and the mouse The ASUS Essentio ES5100/ES5100-P Desktop PC is equipped with a number of I/O ports at the rear and front panels where you can connect peripheral devices to the system. ... your supplier directly for information on how to install it . 1.5 Connecting to other peripheral devices The ASUS Essentio ES5100/ES5100-P Desktop PC is equipped with the device or contact your supplier directly for details. ASUS Essentio ES5100/ES5100-P 1-5 Connect the USB mouse to the illustration below for information on how to the documentation that comes...
User Manual
Page 20
Chapter summary 2 2.1 Installing an operating system 2-1 2.2 Powering your system 2-1 2.3 Support DVD information 2-2 2.4 ASUS AI Manager 2-8 2.5 Loading the initial OS default settings 2-15 2.6 Recovery CD (optional 2-15 ASUS Essentio ES5100/ES5100-P
Chapter summary 2 2.1 Installing an operating system 2-1 2.2 Powering your system 2-1 2.3 Support DVD information 2-2 2.4 ASUS AI Manager 2-8 2.5 Loading the initial OS default settings 2-15 2.6 Recovery CD (optional 2-15 ASUS Essentio ES5100/ES5100-P
User Manual
Page 21
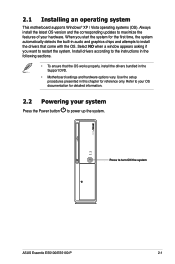
... system automatically detects the built-in audio and graphics chips and attempts to power up the system. When you want to turn ON the system ASUS Essentio ES5100/ES5100-P 2-1 Refer to your OS documentation for reference only. Install drivers according to maximize the features of your system Press the Power button to install the...
... system automatically detects the built-in audio and graphics chips and attempts to power up the system. When you want to turn ON the system ASUS Essentio ES5100/ES5100-P 2-1 Refer to your OS documentation for reference only. Install drivers according to maximize the features of your system Press the Power button to install the...
User Manual
Page 23
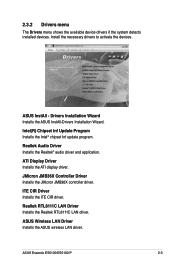
.... Realtek RTL8111C LAN Driver Installs the Realtek RTL8111C LAN driver. ASUS Essentio ES5100/ES5100-P 2-3 Intel(R) Chipset Inf Update Program Installs the Intel® chipset Inf update program. JMicron JMB36X Controller Driver Installs the JMicron JMB36X controller driver. ITE CIR Driver Installs the ITE CIR driver. ASUS InstAll - Install the necessary drivers to activate the devices...
.... Realtek RTL8111C LAN Driver Installs the Realtek RTL8111C LAN driver. ASUS Essentio ES5100/ES5100-P 2-3 Intel(R) Chipset Inf Update Program Installs the Intel® chipset Inf update program. JMicron JMB36X Controller Driver Installs the JMicron JMB36X controller driver. ITE CIR Driver Installs the ITE CIR driver. ASUS InstAll - Install the necessary drivers to activate the devices...
User Manual
Page 25
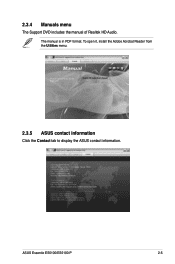
2.3.4 Manuals menu The Support DVD includes the manual of Realtek HD Audio. ASUS Essentio ES5100/ES5100-P 2-5 The manual is in PDF format. To open it, install the Adobe Acrobat Reader from the Utilities menu. 2.3.5 ASUS contact information Click the Contact tab to display the ASUS contact information.
2.3.4 Manuals menu The Support DVD includes the manual of Realtek HD Audio. ASUS Essentio ES5100/ES5100-P 2-5 The manual is in PDF format. To open it, install the Adobe Acrobat Reader from the Utilities menu. 2.3.5 ASUS contact information Click the Contact tab to display the ASUS contact information.
User Manual
Page 27
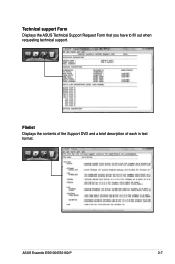
ASUS Essentio ES5100/ES5100-P 2-7 Filelist Displays the contents of the Support DVD and a brief description of each in text format. Technical support Form Displays the ASUS Technical Support Request Form that you have to fill out when requesting technical support.
ASUS Essentio ES5100/ES5100-P 2-7 Filelist Displays the contents of the Support DVD and a brief description of each in text format. Technical support Form Displays the ASUS Technical Support Request Form that you have to fill out when requesting technical support.
User Manual
Page 29
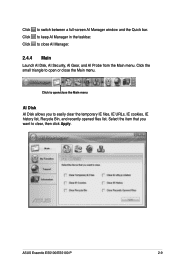
Click the small triangle to easily clear the temporary IE files, IE URLs, IE cookies, IE history list, Recycle Bin, and recently opened files list. Select the item that you to open /close the Main menu. ASUS Essentio ES5100/ES5100-P 2-9 Click to open or close the Main menu AI Disk AI Disk allows you want to close AI Manager. 2.4.4 Main Launch AI Disk, AI Security, AI Gear, and AI Probe from the Main menu. Click to keep AI Manager in the taskbar. Click to switch between a full-screen AI Manager window and the Quick bar. Click to clear, then click Apply.
Click the small triangle to easily clear the temporary IE files, IE URLs, IE cookies, IE history list, Recycle Bin, and recently opened files list. Select the item that you to open /close the Main menu. ASUS Essentio ES5100/ES5100-P 2-9 Click to open or close the Main menu AI Disk AI Disk allows you want to close AI Manager. 2.4.4 Main Launch AI Disk, AI Security, AI Gear, and AI Probe from the Main menu. Click to keep AI Manager in the taskbar. Click to switch between a full-screen AI Manager window and the Quick bar. Click to clear, then click Apply.
User Manual
Page 31
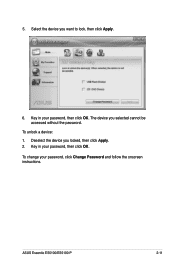
ASUS Essentio ES5100/ES5100-P 2-11 To unlock a device: 1. Select the device you selected cannot be accessed without the password. The device you want to lock, then click Apply. 6. Key in your password, then click OK. Deselect the device you locked, then click Apply. 2. Key in your password, then click OK. To change your password, click Change Password and follow the onscreen instructions. 5.
ASUS Essentio ES5100/ES5100-P 2-11 To unlock a device: 1. Select the device you selected cannot be accessed without the password. The device you want to lock, then click Apply. 6. Key in your password, then click OK. Deselect the device you locked, then click Apply. 2. Key in your password, then click OK. To change your password, click Change Password and follow the onscreen instructions. 5.
User Manual
Page 33
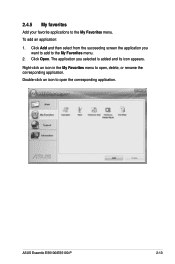
Click Add and then select from the succeeding screen the application you selected is added and its icon appears. The application you want to add to open the corresponding application. ASUS Essentio ES5100/ES5100-P 2-13 Right-click an icon in the My Favorites menu to the My Favorites menu. 2. 2.4.5 My favorites Add your favorite applications to open , delete, or rename the corresponding application. Click Open. Double-click an icon to the My Favorites menu. To add an application: 1.
Click Add and then select from the succeeding screen the application you selected is added and its icon appears. The application you want to add to open the corresponding application. ASUS Essentio ES5100/ES5100-P 2-13 Right-click an icon in the My Favorites menu to the My Favorites menu. 2. 2.4.5 My favorites Add your favorite applications to open , delete, or rename the corresponding application. Click Open. Double-click an icon to the My Favorites menu. To add an application: 1.
User Manual
Page 35
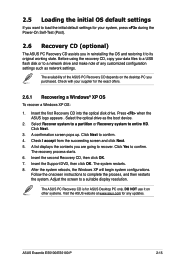
... XP OS To recover a Windows XP OS: 1. Select the optical drive as network settings. Follow the onscreen instructions to recover. ASUS Essentio ES5100/ES5100-P 2-15 Press when the ASUS logo appears . Click Next. 3. A list displays the contents you purchased. Before using the recovery CD, copy your data files to..., then click OK. After the system reboots, the Windows XP will begin system configurations. Adjust the screen to confirm. The ASUS PC Recovery CD is for any customized configuration settings such as the boot device. 2. Insert the first Recovery CD into the ...
... XP OS To recover a Windows XP OS: 1. Select the optical drive as network settings. Follow the onscreen instructions to recover. ASUS Essentio ES5100/ES5100-P 2-15 Press when the ASUS logo appears . Click Next. 3. A list displays the contents you purchased. Before using the recovery CD, copy your data files to..., then click OK. After the system reboots, the Windows XP will begin system configurations. Adjust the screen to confirm. The ASUS PC Recovery CD is for any customized configuration settings such as the boot device. 2. Insert the first Recovery CD into the ...


