
User Manual
Page 2
... accuracy of this manual are correct and up to make changes without the express written permission of their respective owners. Products and corporate names mentioned in this manual, including the products and software described in any form or by any means, except documentation kept by the purchaser for identification purposes only. No part of this manual may or...
... accuracy of this manual are correct and up to make changes without the express written permission of their respective owners. Products and corporate names mentioned in this manual, including the products and software described in any form or by any means, except documentation kept by the purchaser for identification purposes only. No part of this manual may or...
User Manual
Page 3
... remote control (on selected models 22 Positioning your EeeBox PC 25 Installing the stand 25 Installing your EeeBox PC to a monitor 26 Setting up your EeeBox PC 27 Connecting to a display 27 Connecting to USB devices 27 Connecting to a network device 28 Turning on the system 29 Using your EeeBox PC 30 Configuring wireless connection 30 Configuring wired connection 31 Bluetooth wireless connection (on selected models 35 Configuring audio output via an HDMI device 37 ASUS Easy Update 39 TotalMedia Center 40 Main menu...
... remote control (on selected models 22 Positioning your EeeBox PC 25 Installing the stand 25 Installing your EeeBox PC to a monitor 26 Setting up your EeeBox PC 27 Connecting to a display 27 Connecting to USB devices 27 Connecting to a network device 28 Turning on the system 29 Using your EeeBox PC 30 Configuring wireless connection 30 Configuring wired connection 31 Bluetooth wireless connection (on selected models 35 Configuring audio output via an HDMI device 37 ASUS Easy Update 39 TotalMedia Center 40 Main menu...

User Manual
Page 5
... radiate radio frequency energy and, if not installed and used in a particular installation. CAUTION: Any changes or modifications not expressly approved by one or more of the FCC Rules. However, there is connected. • Consult the dealer or an experienced radio/TV technician for a Class B digital device, pursuant to operate the equipment. English Notices Federal Communications Commission...
... radiate radio frequency energy and, if not installed and used in a particular installation. CAUTION: Any changes or modifications not expressly approved by one or more of the FCC Rules. However, there is connected. • Consult the dealer or an experienced radio/TV technician for a Class B digital device, pursuant to operate the equipment. English Notices Federal Communications Commission...
User Manual
Page 10
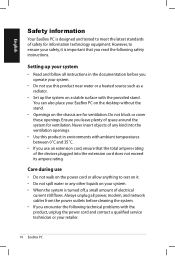
... not block or cover these openings. Always unplug all instructions in environments with the provided stand. Care during use an extension cord, ensure that you operate your system • Read and follow all power, modem, and network cables from the power outlets before you read the following technical problems with the product, unplug the power cord and contact a qualified service technician or your...
... not block or cover these openings. Always unplug all instructions in environments with the provided stand. Care during use an extension cord, ensure that you operate your system • Read and follow all power, modem, and network cables from the power outlets before you read the following technical problems with the product, unplug the power cord and contact a qualified service technician or your...
User Manual
Page 11
.... Check local technical support services for battery replacement. Replace only with the same or equivalent type recommended by users DO NOT throw the EeeBox PC in municipal waste. DO NOT throw the battery in municipal waste.This symbol of explosion if battery is damaged. • The system performance changes. Check local technical support services for product recycling. English • The power cord or plug is damaged...
.... Check local technical support services for battery replacement. Replace only with the same or equivalent type recommended by users DO NOT throw the EeeBox PC in municipal waste. DO NOT throw the battery in municipal waste.This symbol of explosion if battery is damaged. • The system performance changes. Check local technical support services for product recycling. English • The power cord or plug is damaged...
User Manual
Page 16
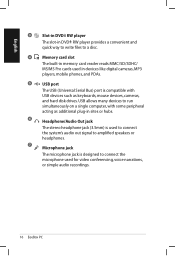
... as keyboards, mouse devices, cameras, and hard disk drives. English 3 Slot-in DVD+- RW player provides a convenient and quick way to write files to a disc. 4 Memory card slot The built-in memory card reader reads MMC/SD/SDHC/ MS/MS Pro cards used in devices like digital cameras, MP3 players, mobile phones, and PDAs. 5 USB port The USB (Universal Serial Bus) port is designed to connect the microphone used to connect the system's audio out signal to run...
... as keyboards, mouse devices, cameras, and hard disk drives. English 3 Slot-in DVD+- RW player provides a convenient and quick way to write files to a disc. 4 Memory card slot The built-in memory card reader reads MMC/SD/SDHC/ MS/MS Pro cards used in devices like digital cameras, MP3 players, mobile phones, and PDAs. 5 USB port The USB (Universal Serial Bus) port is designed to connect the microphone used to connect the system's audio out signal to run...
User Manual
Page 17
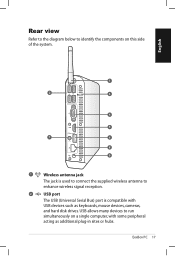
USB allows many devices to run simultaneously on this side of the system. English ANT. 1 2 3 4 HDMI 5 E-SATA 7 6 8 9 HDMI E-SATA 1 Wireless antenna jack The jack is used to connect the supplied wireless antenna to enhance wireless signal reception. 2 USB port The USB (Universal Serial Bus) port is compatible with some peripheral acting as keyboards, mouse devices, cameras, and hard disk drives. Rear view Refer to the diagram below to identify the components on a single computer, with USB devices such as additional plug-in sites or hubs. EeeBox PC 17
USB allows many devices to run simultaneously on this side of the system. English ANT. 1 2 3 4 HDMI 5 E-SATA 7 6 8 9 HDMI E-SATA 1 Wireless antenna jack The jack is used to connect the supplied wireless antenna to enhance wireless signal reception. 2 USB port The USB (Universal Serial Bus) port is compatible with some peripheral acting as keyboards, mouse devices, cameras, and hard disk drives. Rear view Refer to the diagram below to identify the components on a single computer, with USB devices such as additional plug-in sites or hubs. EeeBox PC 17
User Manual
Page 18
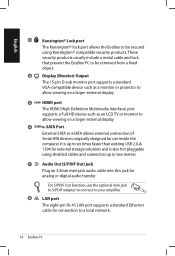
... VGA-compatible device such as a monitor or projector to allow viewing on a larger external display. 5 HDMI port The HDMI (High Definition Multimedia Interface) port supports a Full-HD device such as an LCD TV or monitor to allow viewing on a larger external display. 6 E-SATA e-SATA Port External SATA or eSATA allows external connection of Serial-ATA devices originally designed for use the optional mini jack to S/PDIF adapter to connect to your amplifier. 8 LAN port The eight-pin RJ-45 LAN port supports a standard Ethernet cable...
... VGA-compatible device such as a monitor or projector to allow viewing on a larger external display. 5 HDMI port The HDMI (High Definition Multimedia Interface) port supports a Full-HD device such as an LCD TV or monitor to allow viewing on a larger external display. 6 E-SATA e-SATA Port External SATA or eSATA allows external connection of Serial-ATA devices originally designed for use the optional mini jack to S/PDIF adapter to connect to your amplifier. 8 LAN port The eight-pin RJ-45 LAN port supports a standard Ethernet cable...
User Manual
Page 19
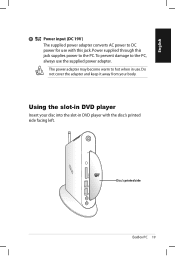
Power supplied through this jack. Do not cover the adapter and keep it away from your disc into the slot-in use. The power adapter may become warm to hot when in DVD player with this jack supplies power to the PC. Disc's printed side EeeBox PC 19 Using the slot-in DVD player Insert your body. English 9 Power input (DC 19V) The supplied power adapter converts AC power to DC power for use with the disc's printed side facing left. To prevent damage to the PC, always use the supplied power adapter.
Power supplied through this jack. Do not cover the adapter and keep it away from your disc into the slot-in use. The power adapter may become warm to hot when in DVD player with this jack supplies power to the PC. Disc's printed side EeeBox PC 19 Using the slot-in DVD player Insert your body. English 9 Power input (DC 19V) The supplied power adapter converts AC power to DC power for use with the disc's printed side facing left. To prevent damage to the PC, always use the supplied power adapter.
User Manual
Page 21
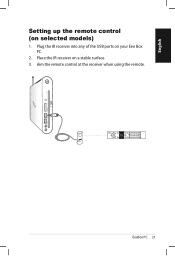
English Setting up the remote control (on your Eee Box PC. 2. Plug the IR receiver into any of the USB ports on selected models) 1. Place the IR receiver on a stable surface. 3. Aim the remote control at the receiver when using the remote. EeeBox PC 21
English Setting up the remote control (on your Eee Box PC. 2. Plug the IR receiver into any of the USB ports on selected models) 1. Place the IR receiver on a stable surface. 3. Aim the remote control at the receiver when using the remote. EeeBox PC 21
User Manual
Page 27
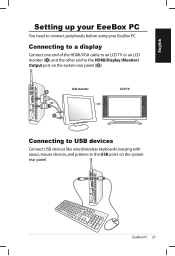
Connecting to a display Connect one end of the HDMI/VGA cable to an LCD TV or an LCD monitor ( 1 ) and the other end to connect peripherals before using your EeeBox PC You need to the HDMI/Display (Monitor) Output port on the system rear panel. English Setting up your EeeBox PC. LCD TV Connecting to USB devices Connect USB devices like wired/wireless keyboards (varying with areas), mouse devices, and printers to the USB ports on the system rear panel ( 2 ). 2 -or- 1 LCD monitor -or- EeeBox PC 27
Connecting to a display Connect one end of the HDMI/VGA cable to an LCD TV or an LCD monitor ( 1 ) and the other end to connect peripherals before using your EeeBox PC You need to the HDMI/Display (Monitor) Output port on the system rear panel. English Setting up your EeeBox PC. LCD TV Connecting to USB devices Connect USB devices like wired/wireless keyboards (varying with areas), mouse devices, and printers to the USB ports on the system rear panel ( 2 ). 2 -or- 1 LCD monitor -or- EeeBox PC 27
User Manual
Page 28
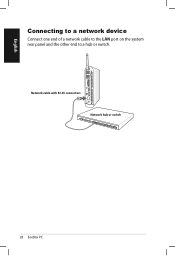
Network cable with RJ-45 connectors Network hub or switch 28 EeeBox PC English Connecting to a network device Connect one end of a network cable to the LAN port on the system rear panel and the other end to a hub or switch.
Network cable with RJ-45 connectors Network hub or switch 28 EeeBox PC English Connecting to a network device Connect one end of a network cable to the LAN port on the system rear panel and the other end to a hub or switch.
User Manual
Page 29
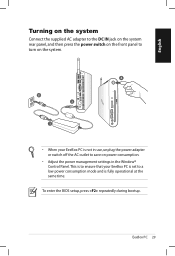
EeeBox PC 29 English Turning on the system Connect the supplied AC adapter to the DC IN jack on the system rear panel, and then press the power switch on the front panel to turn on the system. 4 2 3 1 • When your EeeBox PC is set to a low power consumption mode and is not in the Window® Control Panel. To enter the BIOS setup, press repeatedly during bootup. This is to save on power consumption. • Adjust the power management settings in use, unplug the power adapter or switch off the AC outlet to ensure that your EeeBox PC is fully operational at the same time.
EeeBox PC 29 English Turning on the system Connect the supplied AC adapter to the DC IN jack on the system rear panel, and then press the power switch on the front panel to turn on the system. 4 2 3 1 • When your EeeBox PC is set to a low power consumption mode and is not in the Window® Control Panel. To enter the BIOS setup, press repeatedly during bootup. This is to save on power consumption. • Adjust the power management settings in use, unplug the power adapter or switch off the AC outlet to ensure that your EeeBox PC is fully operational at the same time.

User Manual
Page 31
EeeBox PC 31 Click Change adapter settings in the Windows® Notification area and select Open Network and Sharing Center. 2. Right-click Local Area Connection and select Properties. English Configuring wired connection To establish a wired network, follow the instructions below: Using a dynamic IP / PPPoE network connection: 1. Click the network icon with a yellow warning triangle in the left blue pane. 3.
EeeBox PC 31 Click Change adapter settings in the Windows® Notification area and select Open Network and Sharing Center. 2. Right-click Local Area Connection and select Properties. English Configuring wired connection To establish a wired network, follow the instructions below: Using a dynamic IP / PPPoE network connection: 1. Click the network icon with a yellow warning triangle in the left blue pane. 3.
User Manual
Page 35
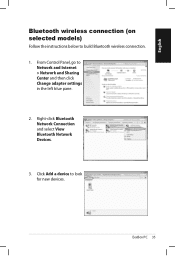
EeeBox PC 35 English Bluetooth wireless connection (on selected models) Follow the instructions below to look for new devices. Right-click Bluetooth Network Connection and select View Bluetooth Network Devices. 3. Click Add a device to build Bluetooth wireless connection. 1. From Control Panel, go to Network and Internet > Network and Sharing Center and then click Change adapter settings in the left blue pane. 2.
EeeBox PC 35 English Bluetooth wireless connection (on selected models) Follow the instructions below to look for new devices. Right-click Bluetooth Network Connection and select View Bluetooth Network Devices. 3. Click Add a device to build Bluetooth wireless connection. 1. From Control Panel, go to Network and Internet > Network and Sharing Center and then click Change adapter settings in the left blue pane. 2.
User Manual
Page 37
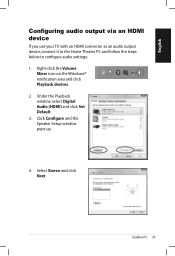
Click Configure and the Speaker Setup window pops up. 4. Right-click the Volume Mixer icon on the Windows® notification area and click Playback devices. 2. EeeBox PC 37 Select Stereo and click Next. English Configuring audio output via an HDMI device If you use your TV with an HDMI connector as an audio output device, connect it to the Home Theater PC and follow the steps below to configure audio settings: 1. Under the Playback window, select Digital Audio (HDMI) and click Set Default. 3.
Click Configure and the Speaker Setup window pops up. 4. Right-click the Volume Mixer icon on the Windows® notification area and click Playback devices. 2. EeeBox PC 37 Select Stereo and click Next. English Configuring audio output via an HDMI device If you use your TV with an HDMI connector as an audio output device, connect it to the Home Theater PC and follow the steps below to configure audio settings: 1. Under the Playback window, select Digital Audio (HDMI) and click Set Default. 3.
User Manual
Page 41
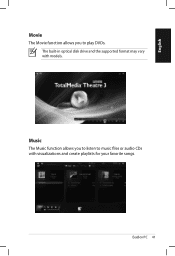
English Movie The Movie function allows you to listen to play DVDs. EeeBox PC 41 The built-in optical disk drive and the supported format may vary with visualizations and create playlists for your favorite songs. Music The Music function allows you to music files or audio CDs with models.
English Movie The Movie function allows you to listen to play DVDs. EeeBox PC 41 The built-in optical disk drive and the supported format may vary with visualizations and create playlists for your favorite songs. Music The Music function allows you to music files or audio CDs with models.
User Manual
Page 43
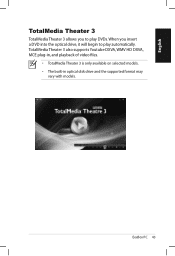
When you to play DVDs. EeeBox PC 43 TotalMedia Theater 3 also supports Youtube DXVA, WMV HD DXVA, MCE plug-in, and playback of video files. • TotalMedia Theater 3 is only available on selected models. • The built-in optical disk drive and the supported format may vary with models. English TotalMedia Theater 3 TotalMedia Theater 3 allows you insert a DVD into the optical drive, it will begin to play automatically.
When you to play DVDs. EeeBox PC 43 TotalMedia Theater 3 also supports Youtube DXVA, WMV HD DXVA, MCE plug-in, and playback of video files. • TotalMedia Theater 3 is only available on selected models. • The built-in optical disk drive and the supported format may vary with models. English TotalMedia Theater 3 TotalMedia Theater 3 allows you insert a DVD into the optical drive, it will begin to play automatically.
User Manual
Page 44
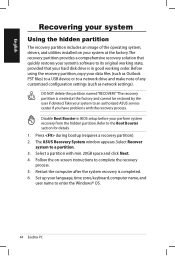
... recovery is in BIOS setup before your perform system recovery from the hidden partition. The ASUS Recovery System window appears. English Recovering your system Using the hidden partition The recovery partition includes an image of any customized configuration settings (such as network settings). Before using the recovery partition, copy your data files (such as Outlook PST files) to a USB device or to a network drive and make note of the operating system, drivers, and utilities installed on -screen instructions to its original working...
... recovery is in BIOS setup before your perform system recovery from the hidden partition. The ASUS Recovery System window appears. English Recovering your system Using the hidden partition The recovery partition includes an image of any customized configuration settings (such as network settings). Before using the recovery partition, copy your data files (such as Outlook PST files) to a USB device or to a network drive and make note of the operating system, drivers, and utilities installed on -screen instructions to its original working...
User Manual
Page 45
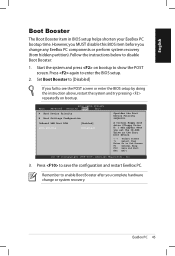
... change or system recovery. Remember to enable Boot Booster after you fail to see the POST screen or enter the BIOS setup by doing the instruction above, restart the system and try pressing repeatedly on bootup to disable Boot Booster: 1. Press again to save the configuration and restart EeeBox PC. Follow the instructions below to show the POST screen. Main BIOS SETUP UTILITY Advanced Security Boot Exit Boot Device Priority Boot Settings Configuration...
... change or system recovery. Remember to enable Boot Booster after you fail to see the POST screen or enter the BIOS setup by doing the instruction above, restart the system and try pressing repeatedly on bootup to disable Boot Booster: 1. Press again to save the configuration and restart EeeBox PC. Follow the instructions below to show the POST screen. Main BIOS SETUP UTILITY Advanced Security Boot Exit Boot Device Priority Boot Settings Configuration...


