
User Guide
Page 3
... disk drive 2-4 2.5 Installing a CPU 2-6 2.6 Installing a DIMM 2-9 2.7 Replacing the top cover 2-10 2.8 Connecting cables 2-11 2.8.1 Power adapter and cable 2-11 2.8.2 Radio antenna 2-12 2.8.3 Audio/Video cable 2-12 2.8.4 Video out cable 2-12 2.8.5 HDTV cable 2-13 2.8.6 Audio out cable 2-13 2.9 Connecting external devices 2-14 Chapter 3: Starting up 3.1 Installing an operating system 3-2 3.2 Powering up 3-2 ASUS DiGiMatrix iii
... disk drive 2-4 2.5 Installing a CPU 2-6 2.6 Installing a DIMM 2-9 2.7 Replacing the top cover 2-10 2.8 Connecting cables 2-11 2.8.1 Power adapter and cable 2-11 2.8.2 Radio antenna 2-12 2.8.3 Audio/Video cable 2-12 2.8.4 Video out cable 2-12 2.8.5 HDTV cable 2-13 2.8.6 Audio out cable 2-13 2.9 Connecting external devices 2-14 Chapter 3: Starting up 3.1 Installing an operating system 3-2 3.2 Powering up 3-2 ASUS DiGiMatrix iii

User Guide
Page 5
A-7 A.3 Optical drive technical specifications A-9 A.4 Wireless LAN adapter channels A-10 ASUS DiGiMatrix v Table of contents 4.4 Central Processing Unit (CPU 4-6 4.5 System memory 4-7 4.6 Jumper 4-8 4.7 Connectors 4-9 Chapter 5: BIOS information 5.1 Managing and updating your BIOS ...the top cover A-3 A.1.3 Installing a hard disk drive A-3 A.1.4 Connecting the Subsystem to DiGiMatrix A-4 A.2 DiGiMatrix remote controller A-5 A.2.1 Specifications A-5 A.2.2 Remote control layout A-5 A.2.3 Remote control functions in Audio DJ A-6 A.2.4 Remote control functions in Home Theater ...
A-7 A.3 Optical drive technical specifications A-9 A.4 Wireless LAN adapter channels A-10 ASUS DiGiMatrix v Table of contents 4.4 Central Processing Unit (CPU 4-6 4.5 System memory 4-7 4.6 Jumper 4-8 4.7 Connectors 4-9 Chapter 5: BIOS information 5.1 Managing and updating your BIOS ...the top cover A-3 A.1.3 Installing a hard disk drive A-3 A.1.4 Connecting the Subsystem to DiGiMatrix A-4 A.2 DiGiMatrix remote controller A-5 A.2.1 Specifications A-5 A.2.2 Remote control layout A-5 A.2.3 Remote control functions in Audio DJ A-6 A.2.4 Remote control functions in Home Theater ...
User Guide
Page 13
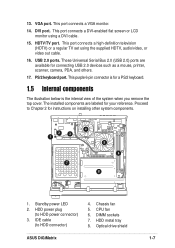
...LED panel displays the audio medium (HD/CD/FM), radio frequency, player status ( / ), real time clock, track number and time, and CPU temperature. The Audio DJ feature allows you to turn the system on the remote controller. 8. See page 3-19 for details. 5. PLAY/PAUSE ... 6. In Radio mode, sets the Audio DJ in Audio DJ mode. 9. See page 1-8 for details. This sensor receives signals from the DiGiMatrix remote controller. ASUS DiGiMatrix 1-3 4. System power button. In Audio DJ mode, press the system volume dial to turn on your hard disk drive, or tune into an...
...LED panel displays the audio medium (HD/CD/FM), radio frequency, player status ( / ), real time clock, track number and time, and CPU temperature. The Audio DJ feature allows you to turn the system on the remote controller. 8. See page 3-19 for details. 5. PLAY/PAUSE ... 6. In Radio mode, sets the Audio DJ in Audio DJ mode. 9. See page 1-8 for details. This sensor receives signals from the DiGiMatrix remote controller. ASUS DiGiMatrix 1-3 4. System power button. In Audio DJ mode, press the system volume dial to turn on your hard disk drive, or tune into an...
User Guide
Page 17
... video out cable. 16. IDE cable (to HDD power connector) 3. CPU fan 6. VGA port. HDTV/TV port. Proceed to Chapter 2 for connecting USB 2.0 devices such as a mouse, printer, scanner, camera, PDA, and others. 17. DVI port. 13. This port connects a VGA monitor. 14. PS/2 keyboard port. DIMM sockets 7. Optical drive shield ASUS DiGiMatrix 1-7
... video out cable. 16. IDE cable (to HDD power connector) 3. CPU fan 6. VGA port. HDTV/TV port. Proceed to Chapter 2 for connecting USB 2.0 devices such as a mouse, printer, scanner, camera, PDA, and others. 17. DVI port. 13. This port connects a VGA monitor. 14. PS/2 keyboard port. DIMM sockets 7. Optical drive shield ASUS DiGiMatrix 1-7

User Guide
Page 18
... to page 3-21 on the system mode. 00 HD CD FM 00:00 - The LED panel displays the system time in 24-hour format when DiGiMatrix is in soft-off or stand-by mode, S3 (Suspend-to-RAM), or S4 (Suspend-to HD mode. The LED panel displays the... CPU temperature in degree Celsius when DiGiMatrix is in Windows® mode. CPU Temperature - Enter the BIOS setup or the DiGiMatrix operating system to preset a radio station. 1-8 Chapter 1: System Introduction Audio DJ The LED panel displays the...
... to page 3-21 on the system mode. 00 HD CD FM 00:00 - The LED panel displays the system time in 24-hour format when DiGiMatrix is in soft-off or stand-by mode, S3 (Suspend-to-RAM), or S4 (Suspend-to HD mode. The LED panel displays the... CPU temperature in degree Celsius when DiGiMatrix is in Windows® mode. CPU Temperature - Enter the BIOS setup or the DiGiMatrix operating system to preset a radio station. 1-8 Chapter 1: System Introduction Audio DJ The LED panel displays the...
User Guide
Page 20
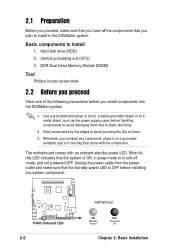
...electricity. 2. Basic components to a metal object, such as the power supply case, before you install components into the DiGiMatrix system. 1. Whenever you uninstall any system component. Hard disk drive (HDD) 2. When lit, this LED indicates ...that the system is OFF before installing any component, place it on them due to install in the DiGiMatrix system. P4SQ P4SQ Onboard LED 2-2 SBPWRLED ON Standby Power OFF Powered Off Chapter 2: Basic Installation 2.1 Preparation Before... or touch a safely grounded object or to install 1. Central processing unit (CPU) 3.
...electricity. 2. Basic components to a metal object, such as the power supply case, before you install components into the DiGiMatrix system. 1. Whenever you uninstall any system component. Hard disk drive (HDD) 2. When lit, this LED indicates ...that the system is OFF before installing any component, place it on them due to install in the DiGiMatrix system. P4SQ P4SQ Onboard LED 2-2 SBPWRLED ON Standby Power OFF Powered Off Chapter 2: Basic Installation 2.1 Preparation Before... or touch a safely grounded object or to install 1. Central processing unit (CPU) 3.
User Guide
Page 24
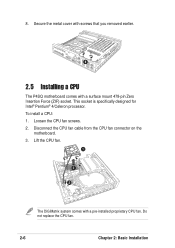
Loosen the CPU fan screws. 2. Lift the CPU fan. 1 3 2 The DiGiMatrix system comes with a surface mount 478-pin Zero Insertion Force (ZIF) socket. 8. Do not replace the CPU fan. 2-6 Chapter 2: Basic Installation This socket is specifically designed for Intel® Pentium® 4/Celeron processor. Disconnect the CPU fan cable from the CPU fan connector on the motherboard. 3. To install a CPU: 1. Secure the metal cover with screws that you removed earlier. 8 2.5 Installing a CPU The P4SQ motherboard comes with a pre-installed proprietary CPU fan.
Loosen the CPU fan screws. 2. Lift the CPU fan. 1 3 2 The DiGiMatrix system comes with a surface mount 478-pin Zero Insertion Force (ZIF) socket. 8. Do not replace the CPU fan. 2-6 Chapter 2: Basic Installation This socket is specifically designed for Intel® Pentium® 4/Celeron processor. Disconnect the CPU fan cable from the CPU fan connector on the motherboard. 3. To install a CPU: 1. Secure the metal cover with screws that you removed earlier. 8 2.5 Installing a CPU The P4SQ motherboard comes with a pre-installed proprietary CPU fan.
User Guide
Page 25
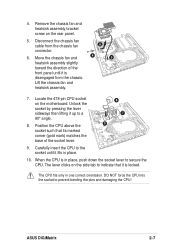
... corner (gold mark) matches the base of the socket lever. 8 7 9 9. Position the CPU above the socket such that it is in one correct orientation. ASUS DiGiMatrix 2-7 Remove the chassis fan and heatsink assembly bracket screw on the motherboard. When the CPU is disengaged from the chassis fan 6 connector. 4 6. The lever clicks on the side...
... corner (gold mark) matches the base of the socket lever. 8 7 9 9. Position the CPU above the socket such that it is in one correct orientation. ASUS DiGiMatrix 2-7 Remove the chassis fan and heatsink assembly bracket screw on the motherboard. When the CPU is disengaged from the chassis fan 6 connector. 4 6. The lever clicks on the side...
User Guide
Page 26
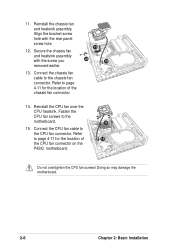
... earlier. 11 12 13 13. Connect the chassis fan cable to the motherboard. 14 15. Fasten the CPU fan screws to the chassis fan connector. Do not overtighten the CPU fan screws! Refer to page 4-11 for the location of the chassis fan connector. 14. Refer to ...the CPU fan connector. Reinstall the CPU fan over the CPU heatsink. Reinstall the chassis fan and heatsink assembly. Doing so may damage the motherboard. 2-8 Chapter 2: Basic Installation Connect the CPU fan cable to page 4-11 for the location of 15 ...
... earlier. 11 12 13 13. Connect the chassis fan cable to the motherboard. 14 15. Fasten the CPU fan screws to the chassis fan connector. Do not overtighten the CPU fan screws! Refer to page 4-11 for the location of the chassis fan connector. 14. Refer to ...the CPU fan connector. Reinstall the CPU fan over the CPU heatsink. Reinstall the chassis fan and heatsink assembly. Doing so may damage the motherboard. 2-8 Chapter 2: Basic Installation Connect the CPU fan cable to page 4-11 for the location of 15 ...
User Guide
Page 37
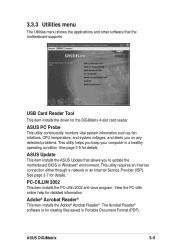
...files saved in Windows® environment, This utility requires an Internet connection either through a network or an Internet Service Provider (ISP). ASUS DiGiMatrix 3-5 See page 3-9 for detailed information. 3.3.3 Utilities menu The Utilities menu shows the applications and other software that allows you keep... Reader®. USB Card Reader Tool This item installs the driver for details. ASUS PC Probe This utility continuously monitors vital system information such as fan rotations, CPU temperature, and system voltages, and alerts you on any detected problems. This utility...
...files saved in Windows® environment, This utility requires an Internet connection either through a network or an Internet Service Provider (ISP). ASUS DiGiMatrix 3-5 See page 3-9 for detailed information. 3.3.3 Utilities menu The Utilities menu shows the applications and other software that allows you keep... Reader®. USB Card Reader Tool This item installs the driver for details. ASUS PC Probe This utility continuously monitors vital system information such as fan rotations, CPU temperature, and system voltages, and alerts you on any detected problems. This utility...
User Guide
Page 41
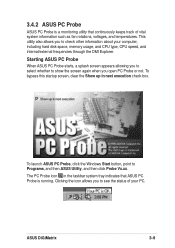
...vital system information such as fan rotations, voltages, and temperatures. 3.4.2 ASUS PC Probe ASUS PC Probe is running. Clicking the icon allows you to Programs, and then ASUS Utility, and then click Probe Vx.xx. ASUS DiGiMatrix 3-9 To bypass this startup screen, clear the Show up in the... taskbar system tray indicates that ASUS PC Probe is a monitoring utility that continuously keeps track of your computer, including hard disk space, memory usage, and CPU type, CPU speed, and internal/external...
...vital system information such as fan rotations, voltages, and temperatures. 3.4.2 ASUS PC Probe ASUS PC Probe is running. Clicking the icon allows you to Programs, and then ASUS Utility, and then click Probe Vx.xx. ASUS DiGiMatrix 3-9 To bypass this startup screen, clear the Show up in the... taskbar system tray indicates that ASUS PC Probe is a monitoring utility that continuously keeps track of your computer, including hard disk space, memory usage, and CPU type, CPU speed, and internal/external...
User Guide
Page 44
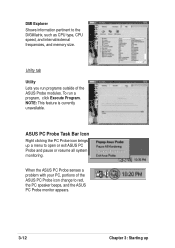
NOTE: This feature is currently unavailable. To run programs outside of the ASUS PC Probe icon change to open or exit ASUS PC Probe and pause or resume all system monitoring. ASUS PC Probe Task Bar Icon Right clicking the PC Probe icon brings up a menu to red, the ... and the ASUS PC Probe monitor appears. 3-12 Chapter 3: Starting up Utility tab Utility Lets you run a program, click Execute Program. When the ASUS PC Probe senses a problem with your PC, portions of the ASUS Probe modules. DMI Explorer Shows information pertinent to the DiGiMatrix, such as CPU type, CPU speed, and...
NOTE: This feature is currently unavailable. To run programs outside of the ASUS PC Probe icon change to open or exit ASUS PC Probe and pause or resume all system monitoring. ASUS PC Probe Task Bar Icon Right clicking the PC Probe icon brings up a menu to red, the ... and the ASUS PC Probe monitor appears. 3-12 Chapter 3: Starting up Utility tab Utility Lets you run a program, click Execute Program. When the ASUS PC Probe senses a problem with your PC, portions of the ASUS Probe modules. DMI Explorer Shows information pertinent to the DiGiMatrix, such as CPU type, CPU speed, and...
User Guide
Page 107
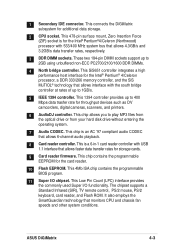
...a 6-in-1 card reader controller with the south bridge controller at rates of up to 400 Mbps data trasfer rate for additional data storage. 2 CPU socket. The chipset supports a Standard Infrared (SIR), TV remote control, PS/2 mouse, PS/2 keyboard, card reader, and Flash ROM. It...® technology that allows interface with USB 1.1 interface that allows 4.3GB/s and 3.2GB/s data transfer rates, respectively. 3 DDR DIMM sockets. ASUS DiGiMatrix 4-3 1 Secondary IDE connector. This chip is for the Intel® Pentium®4/Celeron (Northwood) processor with 533/400 MHz system bus that ...
...a 6-in-1 card reader controller with the south bridge controller at rates of up to 400 Mbps data trasfer rate for additional data storage. 2 CPU socket. The chipset supports a Standard Infrared (SIR), TV remote control, PS/2 mouse, PS/2 keyboard, card reader, and Flash ROM. It...® technology that allows interface with USB 1.1 interface that allows 4.3GB/s and 3.2GB/s data transfer rates, respectively. 3 DDR DIMM sockets. ASUS DiGiMatrix 4-3 1 Secondary IDE connector. This chip is for the Intel® Pentium®4/Celeron (Northwood) processor with 533/400 MHz system bus that ...
User Guide
Page 110
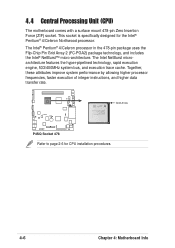
Gold Arrow P4SQ P4SQ Socket 478 Refer to page 2-6 for the Intel® Pentium® 4/Celeron Northwood processor. This socket is specifically designed for CPU installation procedures. 4-6 Chapter 4: Motherboard Info The Intel® Pentium® 4/Celeron processor in the 478-pin package uses the Flip-Chip Pin Grid ... Intel NetBurst microarchitecture features the hyper-pipelined technology, rapid execution engine, 533/400MHz system bus, and execution trace cache. 4.4 Central Processing Unit (CPU) The motherboard comes with a surface mount 478-pin Zero Insertion Force (ZIF) socket.
Gold Arrow P4SQ P4SQ Socket 478 Refer to page 2-6 for the Intel® Pentium® 4/Celeron Northwood processor. This socket is specifically designed for CPU installation procedures. 4-6 Chapter 4: Motherboard Info The Intel® Pentium® 4/Celeron processor in the 478-pin package uses the Flip-Chip Pin Grid ... Intel NetBurst microarchitecture features the hyper-pipelined technology, rapid execution engine, 533/400MHz system bus, and execution trace cache. 4.4 Central Processing Unit (CPU) The motherboard comes with a surface mount 478-pin Zero Insertion Force (ZIF) socket.

User Guide
Page 115
... air flow to receive stereo audio input from sound sources such as a CD-ROM, TV tuner, or MPEG card. Lack of 1A (12W) at +12V. CPU and chassis fan connectors (3-pin CPU_FAN, CHA_FAN) Two fan connectors support cooling fans of 350mA (4.2 Watts) or a total of sufficient air flow within the system... you to go across the onboard heat sinks. Right Audio Channel Ground Ground Left Audio Channel P4SQ P4SQ Internal Audio Connectors CD(Black) AUX(White) ASUS DiGiMatrix 4-11
... air flow to receive stereo audio input from sound sources such as a CD-ROM, TV tuner, or MPEG card. Lack of 1A (12W) at +12V. CPU and chassis fan connectors (3-pin CPU_FAN, CHA_FAN) Two fan connectors support cooling fans of 350mA (4.2 Watts) or a total of sufficient air flow within the system... you to go across the onboard heat sinks. Right Audio Channel Ground Ground Left Audio Channel P4SQ P4SQ Internal Audio Connectors CD(Black) AUX(White) ASUS DiGiMatrix 4-11

User Guide
Page 132
... system bootup. Memory Frequency [Auto] This field determines whether the memory clock frequency is non-configurable when you select the CPU internal frequency. The options that appear in synchronous or asynchronous mode with respect to supply the processor with the required data.... When set to be in the popup menu vary according to the CPU/PCI Frequency (MHz). Configuration options: [Enabled] [Disabled] 5-14 Chapter 5: BIOS Information Configuration options: [Auto] [3:4] [3:5] BIOS Update [Enabled...
... system bootup. Memory Frequency [Auto] This field determines whether the memory clock frequency is non-configurable when you select the CPU internal frequency. The options that appear in synchronous or asynchronous mode with respect to supply the processor with the required data.... When set to be in the popup menu vary according to the CPU/PCI Frequency (MHz). Configuration options: [Enabled] [Disabled] 5-14 Chapter 5: BIOS Information Configuration options: [Auto] [3:4] [3:5] BIOS Update [Enabled...

User Guide
Page 142
... Function [Enabled] Chassis Q-Fan Function [Enabled] This item allows you to enable or disable the ASUS Q-Fan feature that smartly adjusts the CPU/chassis fan speed for more efficient system operation. VCORE Voltage, +3.3V Voltage, +5V Voltage, +12V Voltage The onboard hardware monitor automatically detects the voltage output ...
... Function [Enabled] Chassis Q-Fan Function [Enabled] This item allows you to enable or disable the ASUS Q-Fan feature that smartly adjusts the CPU/chassis fan speed for more efficient system operation. VCORE Voltage, +3.3V Voltage, +5V Voltage, +12V Voltage The onboard hardware monitor automatically detects the voltage output ...


