Users Manual for English Edition
Page 2
... because of a default on which you for which ASUS, its reseller. In each product. SPECIFICATIONS AND INFORMATION CONTAINED IN THIS MANUAL ARE FURNISHED FOR INFORMATIONAL USE ONLY, AND ARE SUBJECT TO CHANGE AT ANY TIME ...SERVICE AND SUPPORT Visit our multi-language web site at http://support.asus.com 2 Notebook PC E-Manual Products and corporate names appearing in any form or by any language in this Warranty Statement. ASUS ASSUMES NO RESPONSIBILITY OR LIABILITY FOR ANY ERRORS OR INACCURACIES THAT MAY APPEAR IN THIS MANUAL, INCLUDING THE PRODUCTS AND SOFTWARE DESCRIBED IN IT. ASUS...
... because of a default on which you for which ASUS, its reseller. In each product. SPECIFICATIONS AND INFORMATION CONTAINED IN THIS MANUAL ARE FURNISHED FOR INFORMATIONAL USE ONLY, AND ARE SUBJECT TO CHANGE AT ANY TIME ...SERVICE AND SUPPORT Visit our multi-language web site at http://support.asus.com 2 Notebook PC E-Manual Products and corporate names appearing in any form or by any language in this Warranty Statement. ASUS ASSUMES NO RESPONSIBILITY OR LIABILITY FOR ANY ERRORS OR INACCURACIES THAT MAY APPEAR IN THIS MANUAL, INCLUDING THE PRODUCTS AND SOFTWARE DESCRIBED IN IT. ASUS...
Users Manual for English Edition
Page 3
... Lift to open the display panel 22 Press the power button 22 Gestures for the touchpad 23 Moving the pointer...23 One-finger gestures...24 Two-finger gestures...25 Three-finger gesture...26 Using the keyboard...27 Chapter 3: Working with Chrome™ OS Starting for the first time 30 Sign-in area...31 Browse as Guest...31 User account...32 Notebook PC E-Manual 3
... Lift to open the display panel 22 Press the power button 22 Gestures for the touchpad 23 Moving the pointer...23 One-finger gestures...24 Two-finger gestures...25 Three-finger gesture...26 Using the keyboard...27 Chapter 3: Working with Chrome™ OS Starting for the first time 30 Sign-in area...31 Browse as Guest...31 User account...32 Notebook PC E-Manual 3
Users Manual for English Edition
Page 4
... Connecting to the Internet 38 Enabling your Wi-Fi connection 38 Switching to a new Wi-Fi network connection 38 Adding a network connection 39 Chrome browser...41 Printing documents 43 Saving PDF files...43 Google Cloud Print...45 Managing your files 50 Files app...50 Google Drive...54 Resetting your Notebook PC 58 Using Powerwash...58 Turning your Notebook PC off 60 Using Chrome™ OS...60 Using the power button on your Notebook...
... Connecting to the Internet 38 Enabling your Wi-Fi connection 38 Switching to a new Wi-Fi network connection 38 Adding a network connection 39 Chrome browser...41 Printing documents 43 Saving PDF files...43 Google Cloud Print...45 Managing your files 50 Files app...50 Google Drive...54 Resetting your Notebook PC 58 Using Powerwash...58 Turning your Notebook PC off 60 Using Chrome™ OS...60 Using the power button on your Notebook...
Users Manual for English Edition
Page 6
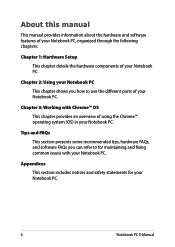
... to use the different parts of using the Chrome™ operating system (OS) in your Notebook PC. Chapter 3: Working with your Notebook PC. Appendices This section includes notices and safety statements for maintaining and fixing common issues with Chrome™ OS This chapter provides an overview of your Notebook PC. About this manual This manual provides information about the hardware and software features...
... to use the different parts of using the Chrome™ operating system (OS) in your Notebook PC. Chapter 3: Working with your Notebook PC. Appendices This section includes notices and safety statements for maintaining and fixing common issues with Chrome™ OS This chapter provides an overview of your Notebook PC. About this manual This manual provides information about the hardware and software features...
Users Manual for English Edition
Page 9
... to strong magnetic or electrical fields. Caring for your Notebook PC Disconnect the AC power and remove the battery pack (if applicable) before cleaning your Notebook PC using a dry cloth. Do not place objects on or near your Notebook PC to dusty environments. Notebook PC E-Manual 9 Do not use or expose your Notebook PC near liquids, rain, or moisture. Do not...
... to strong magnetic or electrical fields. Caring for your Notebook PC Disconnect the AC power and remove the battery pack (if applicable) before cleaning your Notebook PC using a dry cloth. Do not place objects on or near your Notebook PC to dusty environments. Notebook PC E-Manual 9 Do not use or expose your Notebook PC near liquids, rain, or moisture. Do not...
Users Manual for English Edition
Page 11
Chapter 1: Hardware Setup Notebook PC E-Manual 11
Chapter 1: Hardware Setup Notebook PC E-Manual 11

Users Manual for English Edition
Page 13
...™ OS, and controls other multimedia files on your Notebook PC. Camera indicator The camera indicator lights up when the built-in camera is in this manual. Camera The built-in camera allows you to use the function keys, allows quick access to the Using touchpad gestures section in use of a regular mouse. Keyboard The keyboard provides full-sized QWERTY keys with a comfortable travel depth for typing. Notebook PC E-Manual 13 Touchpad The touchpad allows the use . It also...
...™ OS, and controls other multimedia files on your Notebook PC. Camera indicator The camera indicator lights up when the built-in camera is in this manual. Camera The built-in camera allows you to use the function keys, allows quick access to the Using touchpad gestures section in use of a regular mouse. Keyboard The keyboard provides full-sized QWERTY keys with a comfortable travel depth for typing. Notebook PC E-Manual 13 Touchpad The touchpad allows the use . It also...
Users Manual for English Edition
Page 15
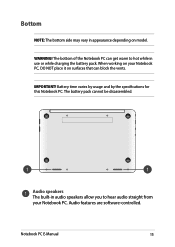
IMPORTANT! Audio features are software-controlled. When working on your Notebook PC. Audio speakers The built-in audio speakers allow you to hot while in appearance depending on surfaces that can get warm to hear audio straight from your Notebook PC, DO NOT place it on model. Battery time varies by usage and by the specifications for this Notebook PC. The battery pack cannot be disassembled. Notebook PC E-Manual 15 Bottom NOTE: The bottom side may vary in use or while charging the battery pack. WARNING! The bottom of the Notebook PC can block the vents.
IMPORTANT! Audio features are software-controlled. When working on your Notebook PC. Audio speakers The built-in audio speakers allow you to hot while in appearance depending on surfaces that can get warm to hear audio straight from your Notebook PC, DO NOT place it on model. Battery time varies by usage and by the specifications for this Notebook PC. The battery pack cannot be disassembled. Notebook PC E-Manual 15 Bottom NOTE: The bottom side may vary in use or while charging the battery pack. WARNING! The bottom of the Notebook PC can block the vents.
Users Manual for English Edition
Page 17
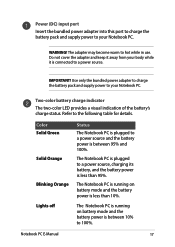
... Notebook PC. Use only the bundled power adapter to charge the battery pack and supply power to hot while in use. Two-color battery charge indicator The two-color LED provides a visual indication of the battery's charge status. WARNING! Color Solid Green Solid Orange Blinking Orange Lights off Status The Notebook PC is plugged to 100%. The Notebook PC is running on battery mode and the battery power is between 95% and 100%. Notebook PC E-Manual...
... Notebook PC. Use only the bundled power adapter to charge the battery pack and supply power to hot while in use. Two-color battery charge indicator The two-color LED provides a visual indication of the battery's charge status. WARNING! Color Solid Green Solid Orange Blinking Orange Lights off Status The Notebook PC is plugged to 100%. The Notebook PC is running on battery mode and the battery power is between 95% and 100%. Notebook PC E-Manual...
Users Manual for English Edition
Page 18
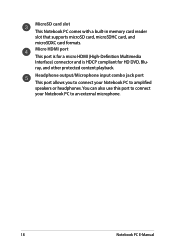
You can also use this port to connect your Notebook PC to an external microphone. 18 Notebook PC E-Manual Headphone output/Microphone input combo jack port This port allows you to connect your Notebook PC to amplified speakers or headphones. Micro HDMI port This port is for a micro HDMI (High-Definition Multimedia Interface) connector and is HDCP compliant for HD DVD, Bluray, and other protected content playback. MicroSD card slot This Notebook PC comes with a built-in memory card reader slot that supports microSD card, microSDHC card, and microSDXC card formats.
You can also use this port to connect your Notebook PC to an external microphone. 18 Notebook PC E-Manual Headphone output/Microphone input combo jack port This port allows you to connect your Notebook PC to amplified speakers or headphones. Micro HDMI port This port is for a micro HDMI (High-Definition Multimedia Interface) connector and is HDCP compliant for HD DVD, Bluray, and other protected content playback. MicroSD card slot This Notebook PC comes with a built-in memory card reader slot that supports microSD card, microSDHC card, and microSDXC card formats.
Users Manual for English Edition
Page 21
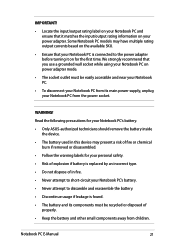
... for your Notebook PC's battery. • Only ASUS-authorized technicians should remove the battery inside the device. • The battery used in this device may have multiple rating output currents based on the available SKU. • Ensure that your Notebook PC is connected to the power adapter before turning it matches the input/output rating information on your power adapter. Notebook PC E-Manual 21 IMPORTANT! • Locate the input...
... for your Notebook PC's battery. • Only ASUS-authorized technicians should remove the battery inside the device. • The battery used in this device may have multiple rating output currents based on the available SKU. • Ensure that your Notebook PC is connected to the power adapter before turning it matches the input/output rating information on your power adapter. Notebook PC E-Manual 21 IMPORTANT! • Locate the input...
Users Manual for English Edition
Page 30
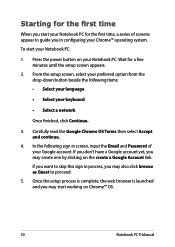
... in screen, input the Email and Password of screens appear to guide you may start your Google account. Press the power button on Chrome™ OS. 30 Notebook PC E-Manual Carefully read the Google Chrome OS Terms then select Accept and continue. 4. To start working on your keyboard • Select a network Once finished, click Continue. 3. Wait for the first time, a series of your Notebook PC...
... in screen, input the Email and Password of screens appear to guide you may start your Google account. Press the power button on Chrome™ OS. 30 Notebook PC E-Manual Carefully read the Google Chrome OS Terms then select Accept and continue. 4. To start working on your keyboard • Select a network Once finished, click Continue. 3. Wait for the first time, a series of your Notebook PC...
Users Manual for English Edition
Page 38
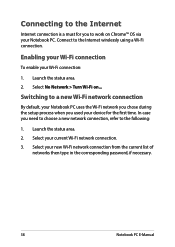
... connection: 1. Switching to a new Wi-Fi network connection By default, your Notebook PC uses the Wi-Fi network you chose during the setup process when you need to choose a new network connection, refer to the Internet wirelessly using a Wi-Fi connection. Select No Network > Turn Wi-Fi on Chrome™ OS via your Notebook PC. Select your new Wi-Fi network connection from the current list of networks then type in the corresponding password, if necessary. 38 Notebook PC E-Manual...
... connection: 1. Switching to a new Wi-Fi network connection By default, your Notebook PC uses the Wi-Fi network you chose during the setup process when you need to choose a new network connection, refer to the Internet wirelessly using a Wi-Fi connection. Select No Network > Turn Wi-Fi on Chrome™ OS via your Notebook PC. Select your new Wi-Fi network connection from the current list of networks then type in the corresponding password, if necessary. 38 Notebook PC E-Manual...
Users Manual for English Edition
Page 48
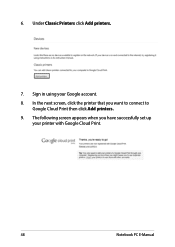
6. Under Classic Printers click Add printers. 7. Sign in using your printer with Google Cloud Print. 48 Notebook PC E-Manual In the next screen, click the printer that you have successfully set up your Google account. 8. The following screen appears when you want to connect to Google Cloud Print then click Add printers. 9.
6. Under Classic Printers click Add printers. 7. Sign in using your printer with Google Cloud Print. 48 Notebook PC E-Manual In the next screen, click the printer that you have successfully set up your Google account. 8. The following screen appears when you want to connect to Google Cloud Print then click Add printers. 9.

Users Manual for English Edition
Page 62
... and make it a habit to create a backup data on the cloud or an external storage device. • Refrain from using the Notebook PC at extremely high temperatures. • If you are not going to use your Notebook PC for a long period of time (at least a month), we recommend that you take out the battery if the battery is removable. • Disconnect all external devices...
... and make it a habit to create a backup data on the cloud or an external storage device. • Refrain from using the Notebook PC at extremely high temperatures. • If you are not going to use your Notebook PC for a long period of time (at least a month), we recommend that you take out the battery if the battery is removable. • Disconnect all external devices...

Users Manual for English Edition
Page 63
..., consult an authorized ASUS service center. 2. You can try doing any of your operating system to adjust the appearance of the following suggestions: • Use the function keys to adjust the display brightness. • Disconnect unused USB devices. • Close unused applications, especially those that take up too much system memory. Notebook PC E-Manual 63 How can I maximize my Notebook PC 's battery life? My display panel has an uneven...
..., consult an authorized ASUS service center. 2. You can try doing any of your operating system to adjust the appearance of the following suggestions: • Use the function keys to adjust the display brightness. • Disconnect unused USB devices. • Close unused applications, especially those that take up too much system memory. Notebook PC E-Manual 63 How can I maximize my Notebook PC 's battery life? My display panel has an uneven...
Users Manual for English Edition
Page 64
... jack is attached correctly. You can 't I do if my Notebook PC's power adapter gets lost or my battery stops working? Contact your local ASUS service center for assistance. 7. Make sure that nothing accidentally touches or presses on the keyboard. 64 Notebook PC E-Manual My battery LED indicator does not light up the speaker volume. • Check if your touchpad while you type on your speakers were set to your Notebook PC and remove...
... jack is attached correctly. You can 't I do if my Notebook PC's power adapter gets lost or my battery stops working? Contact your local ASUS service center for assistance. 7. Make sure that nothing accidentally touches or presses on the keyboard. 64 Notebook PC E-Manual My battery LED indicator does not light up the speaker volume. • Check if your touchpad while you type on your speakers were set to your Notebook PC and remove...
Users Manual for English Edition
Page 65
... suggestions: • Remove all connected USB devices then restart your Notebook PC. • If the problem still exists, your system. Notebook PC E-Manual 65 You can I turn on my Notebook PC, the power indicator lights up but not my drive activity indicator. Press any of the following suggestions: • Force shutdown your Notebook PC by pressing the power button for assistance. 2. Delete the applications you recently installed or were not...
... suggestions: • Remove all connected USB devices then restart your Notebook PC. • If the problem still exists, your system. Notebook PC E-Manual 65 You can I turn on my Notebook PC, the power indicator lights up but not my drive activity indicator. Press any of the following suggestions: • Force shutdown your Notebook PC by pressing the power button for assistance. 2. Delete the applications you recently installed or were not...
Users Manual for English Edition
Page 66
... problem still exists, contact your local ASUS service center for assistance. 5. 4. You can I fix this? How can try doing any of the following suggestions: • Remove all connected devices to resume your Notebook PC and connect to a power outlet then press the power button. 66 Notebook PC E-Manual Connect the power adapter to your last working state. • Your system might have completely used up . My Notebook PC does not boot...
... problem still exists, contact your local ASUS service center for assistance. 5. 4. You can I fix this? How can try doing any of the following suggestions: • Remove all connected devices to resume your Notebook PC and connect to a power outlet then press the power button. 66 Notebook PC E-Manual Connect the power adapter to your last working state. • Your system might have completely used up . My Notebook PC does not boot...

Users Manual for English Edition
Page 83
... the mouse, press any key on power management and its benefits to sleep within10 and 30 minutes of the U.S. The monitor and computer are automatically set to the environment. In addition, please visit http://www.energystar.gov for detail information on the keyboard, or press the power button. NOTE: Energy Star is NOT supported on the ENERGY STAR joint program. Users could...
... the mouse, press any key on power management and its benefits to sleep within10 and 30 minutes of the U.S. The monitor and computer are automatically set to the environment. In addition, please visit http://www.energystar.gov for detail information on the keyboard, or press the power button. NOTE: Energy Star is NOT supported on the ENERGY STAR joint program. Users could...


