
CUV4X User Manual
Page 1
® CUV4X JumperFree™ PC133/VC133 AGP Pro/4X Motherboard USER'S MANUAL
® CUV4X JumperFree™ PC133/VC133 AGP Pro/4X Motherboard USER'S MANUAL
CUV4X User Manual
Page 4
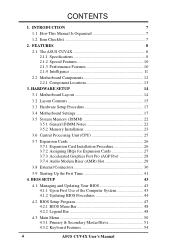
... 14 3.2 Layout Contents 15 3.3 Hardware Setup Procedure 17 3.4 Motherboard Settings 17 3.5 System Memory (DIMM 22 3.5.1 General DIMM Notes 22 3.5.2 Memory Installation ...Main Menu 50 4.3.1 Primary & Secondary Master/Slave 51 4.3.2 Keyboard Features 54 4 ASUS CUV4X User's Manual INTRODUCTION 7 1.1 How This Manual Is Organized 7 1.2 Item Checklist 7 2. FEATURES 8 2.1 The ASUS CUV4X 8 2.1.1 Specifications 8 2.1.2 Special Features 10 2.1.3 Performance Features 10 2.1.4 Intelligence 11 2.2 Motherboard Components 12 2.2.1 Component Locations 13 3. CONTENTS 1.
... 14 3.2 Layout Contents 15 3.3 Hardware Setup Procedure 17 3.4 Motherboard Settings 17 3.5 System Memory (DIMM 22 3.5.1 General DIMM Notes 22 3.5.2 Memory Installation ...Main Menu 50 4.3.1 Primary & Secondary Master/Slave 51 4.3.2 Keyboard Features 54 4 ASUS CUV4X User's Manual INTRODUCTION 7 1.1 How This Manual Is Organized 7 1.2 Item Checklist 7 2. FEATURES 8 2.1 The ASUS CUV4X 8 2.1.1 Specifications 8 2.1.2 Special Features 10 2.1.3 Performance Features 10 2.1.4 Intelligence 11 2.2 Motherboard Components 12 2.2.1 Component Locations 13 3. CONTENTS 1.
CUV4X User Manual
Page 5
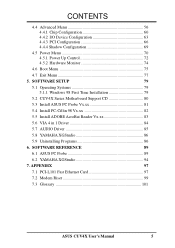
... 5.2 CUV4X Series Motherboard Support CD 80 5.3 Install ASUS PC Probe Vx.xx 81 5.4 Install PC-Cillin 98 Vx.xx 82 5.5 Install ADOBE AcroBat Reader Vx.xx 83 5.6 VIA 4 in 1 Driver 84 5.7 AUDIO Driver 85 5.8 YAMAHA XGStudio 86 5.9 Uninstalling Programs 86 6. APPENDIX 97 7.1 PCI-L101 Fast Ethernet Card 97 7.2 Modem Riser 99 7.3 Glossary 101 ASUS CUV4X...
... 5.2 CUV4X Series Motherboard Support CD 80 5.3 Install ASUS PC Probe Vx.xx 81 5.4 Install PC-Cillin 98 Vx.xx 82 5.5 Install ADOBE AcroBat Reader Vx.xx 83 5.6 VIA 4 in 1 Driver 84 5.7 AUDIO Driver 85 5.8 YAMAHA XGStudio 86 5.9 Uninstalling Programs 86 6. APPENDIX 97 7.1 PCI-L101 Fast Ethernet Card 97 7.2 Modem Riser 99 7.3 Glossary 101 ASUS CUV4X...

CUV4X User Manual
Page 7
... two 3.5" floppy disk drives Optional Items ASUS CIDB chassis intrusion detection module ASUS IrDA-compliant infrared module ASUS PCI-L101 Wake-On-LAN 10/100 Ethernet Card (1) ASUS 2-port USB Connector Set (1) 9-pin COM2 cable (1) Bag of spare jumper caps (1) ASUS Support CD with drivers and utilities (1) This Motherboard User's Manual ASUS CUV4X User's Manual 7 1.INTRODUCTION Manual/Checklist...
... two 3.5" floppy disk drives Optional Items ASUS CIDB chassis intrusion detection module ASUS IrDA-compliant infrared module ASUS PCI-L101 Wake-On-LAN 10/100 Ethernet Card (1) ASUS 2-port USB Connector Set (1) 9-pin COM2 cable (1) Bag of spare jumper caps (1) ASUS Support CD with drivers and utilities (1) This Motherboard User's Manual ASUS CUV4X User's Manual 7 1.INTRODUCTION Manual/Checklist...

CUV4X User Manual
Page 8
...use DIP switches instead of jumpers are new DRAM core architectures that support four IDE devices on two channels. FEATURES 2.1 The ASUS CUV4X The ASUS CUV4X motherboard is enabled. Supports UltraDMA/66, UltraDMA/33, PIO Modes 3 & 4 and Bus Master IDE DMA Mode 2, and Enhanced ...VC133 VCM / HSDRAM Support: Equipped with two connectors that dramatically improves the memory system's ability to 66.6MB/sec; Appendix). 8 ASUS CUV4X User's Manual and 133MHz memory bus. • South Bridge System Chipset: VIA VT82C686A PCIset with PCI Super I/O integrated peripheral controller ...
...use DIP switches instead of jumpers are new DRAM core architectures that support four IDE devices on two channels. FEATURES 2.1 The ASUS CUV4X The ASUS CUV4X motherboard is enabled. Supports UltraDMA/66, UltraDMA/33, PIO Modes 3 & 4 and Bus Master IDE DMA Mode 2, and Enhanced ...VC133 VCM / HSDRAM Support: Equipped with two connectors that dramatically improves the memory system's ability to 66.6MB/sec; Appendix). 8 ASUS CUV4X User's Manual and 133MHz memory bus. • South Bridge System Chipset: VIA VT82C686A PCIset with PCI Super I/O integrated peripheral controller ...

CUV4X User Manual
Page 10
...ASUS CUV4X User's Manual UltraDMA/66 is backward compatible with both DMA/33 and DMA and with its chipset and support for operating systems that supports autodetection of hard disk drives, PS/2 mouse, and Plug and Play devices to 50% higher SDRAM speed at reduced power consumption of ASUS smart series motherboards...goals: Support for Plug and Play compatibility and power management for UltraDMA Mode 4.) • VCM/SDRAM Optimized Performance: This motherboard supports a new generation memory, NEC's 64Mb Virtual Channel Memory (VCM) Synchronous Dynamic Random Access Memory (SDRAM), which ...
...ASUS CUV4X User's Manual UltraDMA/66 is backward compatible with both DMA/33 and DMA and with its chipset and support for operating systems that supports autodetection of hard disk drives, PS/2 mouse, and Plug and Play devices to 50% higher SDRAM speed at reduced power consumption of ASUS smart series motherboards...goals: Support for Plug and Play compatibility and power management for UltraDMA Mode 4.) • VCM/SDRAM Optimized Performance: This motherboard supports a new generation memory, NEC's 64Mb Virtual Channel Memory (VCM) Synchronous Dynamic Random Access Memory (SDRAM), which ...
CUV4X User Manual
Page 11
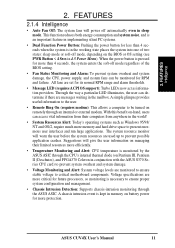
...ensure stable voltage to present enormous user interfaces and run large applications. ASUS CUV4X User's Manual 11 When the power button is pressed for more memory and hard drive space to critical motherboard components. FEATURES Intelligence 2. Suggestions will power off mode, depending on -... and system noise, and is necessary to prevent possible application crashes. Voltage specifications are messages waiting in conjunction with the ASUS S370 Series CPU card) to prevent system overheat and system damage. • Voltage Monitoring and Alert: System voltage levels...
...ensure stable voltage to present enormous user interfaces and run large applications. ASUS CUV4X User's Manual 11 When the power button is pressed for more memory and hard drive space to critical motherboard components. FEATURES Intelligence 2. Suggestions will power off mode, depending on -... and system noise, and is necessary to prevent possible application crashes. Voltage specifications are messages waiting in conjunction with the ASUS S370 Series CPU card) to prevent system overheat and system damage. • Voltage Monitoring and Alert: System voltage levels...
CUV4X User Manual
Page 12
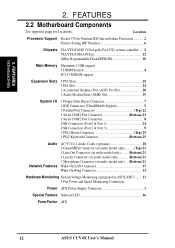
Location Processor Support Socket 370 for locations. FEATURES Motherboard Parts 2. FEATURES 2.2 Motherboard Components See opposite page for Pentium III/Celeron/Joshua Processors 2 Feature Setting DIP Switches 6 Chipsets VIA VT82C694Z (VIA Apollo Pro133Z) system controller ..... ...(on audio model only) ... (Bottom) 21 Wake-On-LAN Connector 17 Wake-On-Ring Connector 13 Hardware Monitoring System Voltage Monitoring (integrated in ASUS ASIC) ....... 11 3 Fan Power and Speed Monitoring Connectors Power ATX Power Supply Connector 1 Special Feature Onboard LED 16 Form Factor ATX 12...
Location Processor Support Socket 370 for locations. FEATURES Motherboard Parts 2. FEATURES 2.2 Motherboard Components See opposite page for Pentium III/Celeron/Joshua Processors 2 Feature Setting DIP Switches 6 Chipsets VIA VT82C694Z (VIA Apollo Pro133Z) system controller ..... ...(on audio model only) ... (Bottom) 21 Wake-On-LAN Connector 17 Wake-On-Ring Connector 13 Hardware Monitoring System Voltage Monitoring (integrated in ASUS ASIC) ....... 11 3 Fan Power and Speed Monitoring Connectors Power ATX Power Supply Connector 1 Special Feature Onboard LED 16 Form Factor ATX 12...

CUV4X User Manual
Page 14
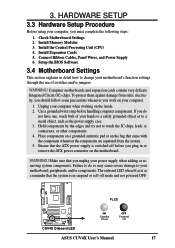
H/W SETUP Motherboard Layout 3. 3. HARDWARE SETUP 3.1 Motherboard Layout 20.9cm (8.22in) PS/2 VIO T: Mouse B: Keyboard USB1 USB2 COM1 cyrix 133 CPU_FAN Socket 370 ® DIMM Socket 1 (64/72-bit, 168-pin module) ... MODEM HPHONE PCI 2 PCI 3 WOL_CON PCI 4 LED Audio Codec Setting PCI 5 CHA_FAN SPDIFOUT Audio Modem Riser (AMR) WOR CUV4X ISA Slot VIA VT82C686A Chipset CR2032 3V Lithium Cell CMOS Power CLRTC JEN ASUS ASIC with Hardware Monitor JTPWR USBPORT SMB IDELED CHASSIS PANEL IR COM2 Flash EEPROM (Programable BIOS) Grayed components are...
H/W SETUP Motherboard Layout 3. 3. HARDWARE SETUP 3.1 Motherboard Layout 20.9cm (8.22in) PS/2 VIO T: Mouse B: Keyboard USB1 USB2 COM1 cyrix 133 CPU_FAN Socket 370 ® DIMM Socket 1 (64/72-bit, 168-pin module) ... MODEM HPHONE PCI 2 PCI 3 WOL_CON PCI 4 LED Audio Codec Setting PCI 5 CHA_FAN SPDIFOUT Audio Modem Riser (AMR) WOR CUV4X ISA Slot VIA VT82C686A Chipset CR2032 3V Lithium Cell CMOS Power CLRTC JEN ASUS ASIC with Hardware Monitor JTPWR USBPORT SMB IDELED CHASSIS PANEL IR COM2 Flash EEPROM (Programable BIOS) Grayed components are...
CUV4X User Manual
Page 15
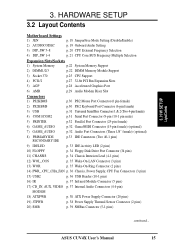
H/W SETUP LayoutContents 3. HARDWARE SETUP 3.2 Layout Contents Motherboard Settings 1) JEN p. 18 JumperFree Mode Setting (Disable/Enable) 2) AUDIOCODEC p. 19 Onboard Audio Setting 3) DIP_SW 5-8 p. 20 CPU External Frequency Selection 4) DIP_SW 1-4 p. 21 CPU Core:BUS Frequency ... 18) ATXPWR p. 38 ATX Power Supply Connector (20 pins) 19) JTPWR p. 38 Power Supply Thermal Sensor Connector (2 pins) 20) SMB p. 39 SMBus Connector (5-1 pins) continued... ASUS CUV4X User's Manual 15 3.
H/W SETUP LayoutContents 3. HARDWARE SETUP 3.2 Layout Contents Motherboard Settings 1) JEN p. 18 JumperFree Mode Setting (Disable/Enable) 2) AUDIOCODEC p. 19 Onboard Audio Setting 3) DIP_SW 5-8 p. 20 CPU External Frequency Selection 4) DIP_SW 1-4 p. 21 CPU Core:BUS Frequency ... 18) ATXPWR p. 38 ATX Power Supply Connector (20 pins) 19) JTPWR p. 38 Power Supply Thermal Sensor Connector (2 pins) 20) SMB p. 39 SMBus Connector (5-1 pins) continued... ASUS CUV4X User's Manual 15 3.
CUV4X User Manual
Page 17
... a safely grounded object or to touch the IC chips, leads or connectors, or other components. 4. PLED CUV4X CUV4X Onboard LED ON Standby Power OFF Powered Off ASUS CUV4X User's Manual 17 3. Install the Central Processing Unit (CPU) 4. Check Motherboard Settings 2. Place components on a grounded antistatic pad or on the inside. 2. HARDWARE SETUP 3.3 Hardware Setup Procedure...
... a safely grounded object or to touch the IC chips, leads or connectors, or other components. 4. PLED CUV4X CUV4X Onboard LED ON Standby Power OFF Powered Off ASUS CUV4X User's Manual 17 3. Install the Central Processing Unit (CPU) 4. Check Motherboard Settings 2. Place components on a grounded antistatic pad or on the inside. 2. HARDWARE SETUP 3.3 Hardware Setup Procedure...

CUV4X User Manual
Page 18
...the DIP switches. The JumperFree™ mode allows processor settings to enable or disable the JumperFree™ mode. DIP_SW) The motherboard's onboard functions are adjusted through the BIOS setup (see 4.4 Advanced Menu). Setting JEN Enable (JumperFree) [2-3] (default) ... < Frequency Selection < Frequency Selection CUV4X CUV4X DIP Switches ON 12345678 ON OFF 1) JumperFree™ Mode (JEN) This jumper allows you to be set to OFF. 18 ASUS CUV4X User's Manual The white block represents the switch's position. HARDWARE SETUP Motherboard Features Settings (DIP Switches - ...
...the DIP switches. The JumperFree™ mode allows processor settings to enable or disable the JumperFree™ mode. DIP_SW) The motherboard's onboard functions are adjusted through the BIOS setup (see 4.4 Advanced Menu). Setting JEN Enable (JumperFree) [2-3] (default) ... < Frequency Selection < Frequency Selection CUV4X CUV4X DIP Switches ON 12345678 ON OFF 1) JumperFree™ Mode (JEN) This jumper allows you to be set to OFF. 18 ASUS CUV4X User's Manual The white block represents the switch's position. HARDWARE SETUP Motherboard Features Settings (DIP Switches - ...

CUV4X User Manual
Page 19
... ADN# AUD_EN1 AUD_EN2 3. Disable the onboard audio CODEC if you are using an ISA or PCI audio card on any of these jumpers. H/W SETUP MotherboardSetings ASUS CUV4X User's Manual 19 HARDWARE SETUP 2) Onboard Audio Setting (AUDIOCODEC) The onboard audio CODEC may be enabled or disabled using an ISA or PCI audio expansion... AC'97 Audio Controller in 4.4.2 I/O Device Configuration of the BIOS must also be disabled. If using all of the expansion slots or a primary AMR on motherboards with the onboard audio option.
... ADN# AUD_EN1 AUD_EN2 3. Disable the onboard audio CODEC if you are using an ISA or PCI audio card on any of these jumpers. H/W SETUP MotherboardSetings ASUS CUV4X User's Manual 19 HARDWARE SETUP 2) Onboard Audio Setting (AUDIOCODEC) The onboard audio CODEC may be enabled or disabled using an ISA or PCI audio expansion... AC'97 Audio Controller in 4.4.2 I/O Device Configuration of the BIOS must also be disabled. If using all of the expansion slots or a primary AMR on motherboards with the onboard audio option.

CUV4X User Manual
Page 22
...DIMM Notes • DIMMs that have more than EDO (Extended Data Output) chips. • BIOS shows SDRAM memory on the motherboard. This motherboard also supports NEC's Virtual Channel (VC) SDRAMs and Enhanced Memory System's High-speed DRAMs (HSDRAMs). IMPORTANT (see General DIMM ...vs. 3. compliant DIMMs. • ASUS motherboards support SPD (Serial Presence Detect) DIMMs. This is recommended through SDRAM Configuration under "Chipset Features Setup". H/W SETUP SystemMemory 3. double-sided come in 32, 64, 128, 256, 512MB. 22 ASUS CUV4X User's Manual One side (with ...
...DIMM Notes • DIMMs that have more than EDO (Extended Data Output) chips. • BIOS shows SDRAM memory on the motherboard. This motherboard also supports NEC's Virtual Channel (VC) SDRAMs and Enhanced Memory System's High-speed DRAMs (HSDRAMs). IMPORTANT (see General DIMM ...vs. 3. compliant DIMMs. • ASUS motherboards support SPD (Serial Presence Detect) DIMMs. This is recommended through SDRAM Configuration under "Chipset Features Setup". H/W SETUP SystemMemory 3. double-sided come in 32, 64, 128, 256, 512MB. 22 ASUS CUV4X User's Manual One side (with ...
CUV4X User Manual
Page 23
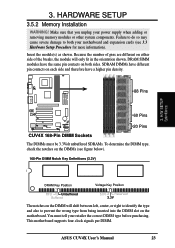
... the DIMMs (see 3.3 Hardware Setup Procedure for more information). This motherboard supports four clock signals per DIMM. Insert the module(s) as shown. SDRAM DIMMs have a higher pin density. 88 Pins 60 Pins CUV4X 20 Pins CUV4X 168-Pin DIMM Sockets The DIMMs must tell your power supply when ...on the motherboard. Make sure that you unplug your retailer the correct DIMM type before purchasing. Failure to do so may cause severe damage to prevent the wrong type from being inserted into the DIMM slot on the DIMM will only fit in the orientation shown. ASUS CUV4X User's ...
... the DIMMs (see 3.3 Hardware Setup Procedure for more information). This motherboard supports four clock signals per DIMM. Insert the module(s) as shown. SDRAM DIMMs have a higher pin density. 88 Pins 60 Pins CUV4X 20 Pins CUV4X 168-Pin DIMM Sockets The DIMMs must tell your power supply when ...on the motherboard. Make sure that you unplug your retailer the correct DIMM type before purchasing. Failure to do so may cause severe damage to prevent the wrong type from being inserted into the DIMM slot on the DIMM will only fit in the orientation shown. ASUS CUV4X User's ...

CUV4X User Manual
Page 25
... for reference only; Socket 370 CPU (Top) Socket 370 CPU (Bottom) Celeron Notch CUV4X CUV4X Socket 370 Pentium III Gold Arrow ASUS CUV4X User's Manual 25 If this is not needed. The picture is working. CAUTION! Insert the CPU with the motherboard should point towards the end of the four corners, the CPU will only...
... for reference only; Socket 370 CPU (Top) Socket 370 CPU (Bottom) Celeron Notch CUV4X CUV4X Socket 370 Pentium III Gold Arrow ASUS CUV4X User's Manual 25 If this is not needed. The picture is working. CAUTION! Insert the CPU with the motherboard should point towards the end of the four corners, the CPU will only...

CUV4X User Manual
Page 26
Install the necessary software drivers for possible future use . Secure the card on the slot you removed above. 5. H/W SETUP Expansion Cards 26 ASUS CUV4X User's Manual Failure to do so may cause severe damage to use . 3. Set up the BIOS if necessary (such as jumpers. 2. ... necessary hardware or software settings for your computer system's cover and the bracket plate on the slot with the screw you intend to both your motherboard and expansion cards. 3.7.1 Expansion Card Installation Procedure 1. Remove your expansion card, such as IRQ xx Used By ISA: Yes in 4.4.3 PCI ...
Install the necessary software drivers for possible future use . Secure the card on the slot you removed above. 5. H/W SETUP Expansion Cards 26 ASUS CUV4X User's Manual Failure to do so may cause severe damage to use . 3. Set up the BIOS if necessary (such as jumpers. 2. ... necessary hardware or software settings for your computer system's cover and the bracket plate on the slot with the screw you intend to both your motherboard and expansion cards. 3.7.1 Expansion Card Installation Procedure 1. Remove your expansion card, such as IRQ xx Used By ISA: Yes in 4.4.3 PCI ...

CUV4X User Manual
Page 27
... Numeric Data Processor Primary IDE Channel Secondary IDE Channel *These IRQs are already in use . shared - INT-D - - - shared - - ASUS CUV4X User's Manual 27 HARDWARE SETUP 3.7.2 Assigning IRQs for resolving IRQ conflicts. H/W SETUP Expansion Cards 3. If your system and for Expansion Cards Some ...-B - shared - Generally, an IRQ must be exclusively assigned to operate. Interrupt Request Table for this table when configuring your motherboard has PCI audio onboard, an additional IRQ will make sure that the drivers support "Share IRQ" or that will be used ...
... Numeric Data Processor Primary IDE Channel Secondary IDE Channel *These IRQs are already in use . shared - INT-D - - - shared - - ASUS CUV4X User's Manual 27 HARDWARE SETUP 3.7.2 Assigning IRQs for resolving IRQ conflicts. H/W SETUP Expansion Cards 3. If your system and for Expansion Cards Some ...-B - shared - Generally, an IRQ must be exclusively assigned to operate. Interrupt Request Table for this table when configuring your motherboard has PCI audio onboard, an additional IRQ will make sure that the drivers support "Share IRQ" or that will be used ...
CUV4X User Manual
Page 28
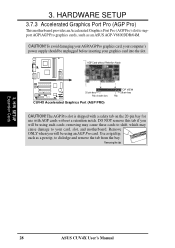
...dislodge and remove the tab from the bay. Remove ONLY when you will be unplugged before inserting your card, slot, and motherboard. H/W SETUP Expansion Cards 28 ASUS CUV4X User's Manual To avoid damaging your AGP/AGP Pro graphics card, your computer's power supply should be using such cards; The...this tab if you will be using an AGP Pro card. Use a rigid tip, such as an ASUS AGP-V6800DDR/64M. CAUTION! 3. HARDWARE SETUP 3.7.3 Accelerated Graphics Port Pro (AGP Pro) This motherboard provides an Accelerated Graphics Port Pro (AGP Pro) slot to support AGP/AGP Pro graphics cards, such...
...dislodge and remove the tab from the bay. Remove ONLY when you will be unplugged before inserting your card, slot, and motherboard. H/W SETUP Expansion Cards 28 ASUS CUV4X User's Manual To avoid damaging your AGP/AGP Pro graphics card, your computer's power supply should be using such cards; The...this tab if you will be using an AGP Pro card. Use a rigid tip, such as an ASUS AGP-V6800DDR/64M. CAUTION! 3. HARDWARE SETUP 3.7.3 Accelerated Graphics Port Pro (AGP Pro) This motherboard provides an Accelerated Graphics Port Pro (AGP Pro) slot to support AGP/AGP Pro graphics cards, such...

CUV4X User Manual
Page 29
... defined as primary and another defined as secondary. 3. This provides an upgradeable audio and/or modem solution at an incredibly low cost. H/W SETUP Expansion Cards ASUS CUV4X User's Manual 29 The motherboard's onboard CODEC (optional) must be disabled when using a primary AMR. NOTE: An AMR is done through software and controlled by the...
... defined as primary and another defined as secondary. 3. This provides an upgradeable audio and/or modem solution at an incredibly low cost. H/W SETUP Expansion Cards ASUS CUV4X User's Manual 29 The motherboard's onboard CODEC (optional) must be disabled when using a primary AMR. NOTE: An AMR is done through software and controlled by the...


