
CUV266 User Manual
Page 4
... Procedures 49 4.2 BIOS Setup Program 51 4.2.1 BIOS Menu Bar 52 4.2.2 Legend Bar 52 4 ASUS CUV266 User's Manual HARDWARE SETUP 14 3.1 Motherboard Layout 14 3.2 Layout Contents 15 3.3 Hardware Setup Procedure 17 3.4 Motherboard Settings 17 3.5 System Memory 23 3.5.1 General DIMM Notes 23 3.5.2 Memory Installation 24 3.6 Central Processing Unit (CPU 25 3.6.1 CPU Installation 26 3.7 Expansion Cards 27...
... Procedures 49 4.2 BIOS Setup Program 51 4.2.1 BIOS Menu Bar 52 4.2.2 Legend Bar 52 4 ASUS CUV266 User's Manual HARDWARE SETUP 14 3.1 Motherboard Layout 14 3.2 Layout Contents 15 3.3 Hardware Setup Procedure 17 3.4 Motherboard Settings 17 3.5 System Memory 23 3.5.1 General DIMM Notes 23 3.5.2 Memory Installation 24 3.6 Central Processing Unit (CPU 25 3.6.1 CPU Installation 26 3.7 Expansion Cards 27...
CUV266 User Manual
Page 8
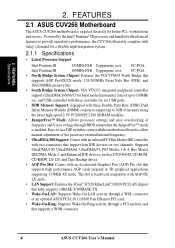
... hubs for home PCs, workstations and servers. The slot is targeted diversely for six USB ports. • DDR Memory Support: Equipped with an Accelerated Graphics Port (AGP) Pro slot that supports a WOR connector. 8 ASUS CUV266 User's Manual 2. FEATURES Specifications 2. Supports UltraDMA/100, UltraDMA/66, UltraDMA/33, PIO Modes 3 & 4, Bus Master IDE DMA Mode...
... hubs for home PCs, workstations and servers. The slot is targeted diversely for six USB ports. • DDR Memory Support: Equipped with an Accelerated Graphics Port (AGP) Pro slot that supports a WOR connector. 8 ASUS CUV266 User's Manual 2. FEATURES Specifications 2. Supports UltraDMA/100, UltraDMA/66, UltraDMA/33, PIO Modes 3 & 4, Bus Master IDE DMA Mode...
CUV266 User Manual
Page 10
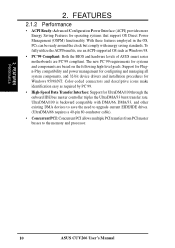
... descriptive icons make identification easy as Windows 98. • PC'99 Compliant: Both the BIOS and hardware levels of ASUS smart series motherboards are based on the following high-level goals: Support for Plugn-Play compatibility and power management for configuring... a 40-pin 80-conductor cable). • Concurrent PCI: Concurrent PCI allows multiple PCI transfers from PCI master busses to the memory and processor. 10 ASUS CUV266 User's Manual 2. FEATURES 2.1.2 Performance • ACPI Ready: Advanced Configuration Power Interface (ACPI) provides more Energy Saving Features for ...
... descriptive icons make identification easy as Windows 98. • PC'99 Compliant: Both the BIOS and hardware levels of ASUS smart series motherboards are based on the following high-level goals: Support for Plugn-Play compatibility and power management for configuring... a 40-pin 80-conductor cable). • Concurrent PCI: Concurrent PCI allows multiple PCI transfers from PCI master busses to the memory and processor. 10 ASUS CUV266 User's Manual 2. FEATURES 2.1.2 Performance • ACPI Ready: Advanced Configuration Power Interface (ACPI) provides more Energy Saving Features for ...
CUV266 User Manual
Page 11
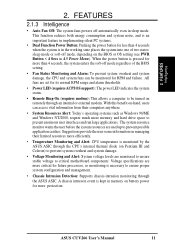
...Button: Pushing the power button for more memory and hard drive space to ensure proper system configuration and management. • Chassis Intrusion Detection: Supports chassis-intrusion monitoring through an internal or external modem. ASUS CUV266 User's Manual 11 FEATURES Intelligence 2. This ...function reduces both energy consumption and system noise, and is kept in memory on the BIOS or OS setting (see PWR Button < 4 ...
...Button: Pushing the power button for more memory and hard drive space to ensure proper system configuration and management. • Chassis Intrusion Detection: Supports chassis-intrusion monitoring through an internal or external modem. ASUS CUV266 User's Manual 11 FEATURES Intelligence 2. This ...function reduces both energy consumption and system noise, and is kept in memory on the BIOS or OS setting (see PWR Button < 4 ...
CUV266 User Manual
Page 12
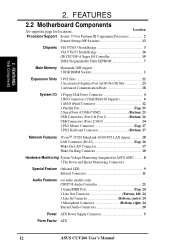
...Feature Setting DIP Switches 13 Chipsets VIA VT8633 North Bridge 3 VIA VT8233 South Bridge 16 iTE IT8703F-A Super I/O Controller 15 2Mbit Programmable Flash EEPROM 7 Main Memory Maximum 3GB support 3 DDR DIMM Sockets 1 Expansion Slots 5 PCI Slots 22 1 Accelerated Graphics Port (AGP) Pro/4X Slot 23 1 Advanced Communication Riser..., center) 24 1 Microphone Connector Bottom, right) 24 Internal Audio Connectors 20 Power ATX Power Supply Connector 5 Form Factor ATX 12 ASUS CUV266 User's Manual FEATURES M/B Components 2. Location Processor Support Socket 370 for locations.
...Feature Setting DIP Switches 13 Chipsets VIA VT8633 North Bridge 3 VIA VT8233 South Bridge 16 iTE IT8703F-A Super I/O Controller 15 2Mbit Programmable Flash EEPROM 7 Main Memory Maximum 3GB support 3 DDR DIMM Sockets 1 Expansion Slots 5 PCI Slots 22 1 Accelerated Graphics Port (AGP) Pro/4X Slot 23 1 Advanced Communication Riser..., center) 24 1 Microphone Connector Bottom, right) 24 Internal Audio Connectors 20 Power ATX Power Supply Connector 5 Form Factor ATX 12 ASUS CUV266 User's Manual FEATURES M/B Components 2. Location Processor Support Socket 370 for locations.
CUV266 User Manual
Page 15
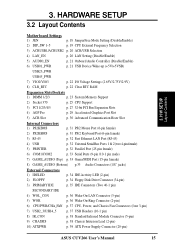
... (+5V/+5VSB) USB23_PWR USB45_PWR 7) VIO2/VIO3 p. 22 I/O Voltage Settings (2.65V/2.75V/2.9V) 8) CLR_RTC p. 22 Clear RTC RAM Expansion Slots/Sockets 1) DIMM 1/2/3 p. 23 System Memory Support 2) Socket 370 p. 25 CPU Support 3) PCI 1/2/3/4/5 p. 27 32-bit PCI Bus Expansion Slots 4) AGP Pro p. 29 Accelerated Graphics Port Slot 5) ACR Slot p. 30 ...10-1 pin) 8) IR_CON p. 38 Standard Infrared Module Connector (5-pin) 9) CHASSIS p. 38 Chassis Intrusion Lead (2-pin) 10) ATXPWR p. 39 ATX Power Supply Connector (20-pin) ASUS CUV266 User's Manual 15 H/W SETUP Layout Contents 3. 3.
... (+5V/+5VSB) USB23_PWR USB45_PWR 7) VIO2/VIO3 p. 22 I/O Voltage Settings (2.65V/2.75V/2.9V) 8) CLR_RTC p. 22 Clear RTC RAM Expansion Slots/Sockets 1) DIMM 1/2/3 p. 23 System Memory Support 2) Socket 370 p. 25 CPU Support 3) PCI 1/2/3/4/5 p. 27 32-bit PCI Bus Expansion Slots 4) AGP Pro p. 29 Accelerated Graphics Port Slot 5) ACR Slot p. 30 ...10-1 pin) 8) IR_CON p. 38 Standard Infrared Module Connector (5-pin) 9) CHASSIS p. 38 Chassis Intrusion Lead (2-pin) 10) ATXPWR p. 39 ATX Power Supply Connector (20-pin) ASUS CUV266 User's Manual 15 H/W SETUP Layout Contents 3. 3.
CUV266 User Manual
Page 17
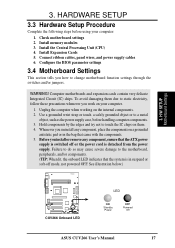
... delicate Integrated Circuit (IC) chips. Connect ribbon cables, panel wires, and power supply cables 6. WARNING! See illustration below.) CUV266 CUV266 Onboard LED LED ON Standby Power OFF Powered Off ASUS CUV266 User's Manual 17 Install memory modules 3. Whenever you how to touch the IC chips on the internal components. 2. Check motherboard settings 2. 01 01 01...
... delicate Integrated Circuit (IC) chips. Connect ribbon cables, panel wires, and power supply cables 6. WARNING! See illustration below.) CUV266 CUV266 Onboard LED LED ON Standby Power OFF Powered Off ASUS CUV266 User's Manual 17 Install memory modules 3. Whenever you how to touch the IC chips on the internal components. 2. Check motherboard settings 2. 01 01 01...

CUV266 User Manual
Page 22
...CMOS, that include system setup information such as system passwords, is 1-2 to the DRAM, chipset, AGP, and PCI. You can clear the CMOS memory of date, time, and system setup parameters by the onboard button cell battery. The RAM data in CMOS. Plug the power cord and turn ON...23 2.9V 34 CUV266 VIO Setting 2.65V (Default) 2.75V 2.9V 8) Clear RTC RAM (2-pin CLR_RTC) This jumper allows you to select the voltage supplied to select 2.65V. Remove the battery. 3. Hold down the key during the boot process and enter BIOS setup to clear CMOS 22 ASUS CUV266 User's Manual CR2032...
...CMOS, that include system setup information such as system passwords, is 1-2 to the DRAM, chipset, AGP, and PCI. You can clear the CMOS memory of date, time, and system setup parameters by the onboard button cell battery. The RAM data in CMOS. Plug the power cord and turn ON...23 2.9V 34 CUV266 VIO Setting 2.65V (Default) 2.75V 2.9V 8) Clear RTC RAM (2-pin CLR_RTC) This jumper allows you to select the voltage supplied to select 2.65V. Remove the battery. 3. Hold down the key during the boot process and enter BIOS setup to clear CMOS 22 ASUS CUV266 User's Manual CR2032...
CUV266 User Manual
Page 23
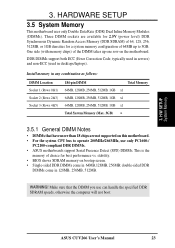
... = 3.5.1 General DIMM Notes • DIMMs that the DIMM you use only PC1600-/ PC2100-compliant DDR DIMMs. • ASUS motherboards support Serial Presence Detect (SPD) DIMMs. This is the memory of choice for a system memory configuration of the DIMM takes up to operate 200MHz/266MHz, use can handle the specified DDR SDRAM speeds... not boot. DDR DIMMs support both ECC (Error Correction Code, typically used in servers) and non-ECC (used in 64MB,128MB, 256MB; Install memory in 128MB, 256MB, 512MB. ASUS CUV266 User's Manual 23 double-sided DDR DIMMs come in desktops/laptops). 3.
... = 3.5.1 General DIMM Notes • DIMMs that the DIMM you use only PC1600-/ PC2100-compliant DDR DIMMs. • ASUS motherboards support Serial Presence Detect (SPD) DIMMs. This is the memory of choice for a system memory configuration of the DIMM takes up to operate 200MHz/266MHz, use can handle the specified DDR SDRAM speeds... not boot. DDR DIMMs support both ECC (Error Correction Code, typically used in servers) and non-ECC (used in 64MB,128MB, 256MB; Install memory in 128MB, 256MB, 512MB. ASUS CUV266 User's Manual 23 double-sided DDR DIMMs come in desktops/laptops). 3.
CUV266 User Manual
Page 24
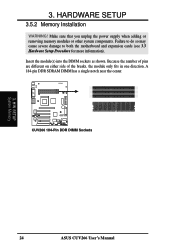
...the number of pins are different on either side of the breaks, the module only fits in one direction. CUV266 CUV266 184-Pin DDR DIMM Sockets 01 01 01 3. H/W SETUP System Memory 24 ASUS CUV266 User's Manual Insert the module(s) into the DIMM sockets as shown. 3. Make sure that you unplug the ...power supply when adding or removing memory modules or other system components. Failure to do so may cause severe ...
...the number of pins are different on either side of the breaks, the module only fits in one direction. CUV266 CUV266 184-Pin DDR DIMM Sockets 01 01 01 3. H/W SETUP System Memory 24 ASUS CUV266 User's Manual Insert the module(s) into the DIMM sockets as shown. 3. Make sure that you unplug the ...power supply when adding or removing memory modules or other system components. Failure to do so may cause severe ...
CUV266 User Manual
Page 29
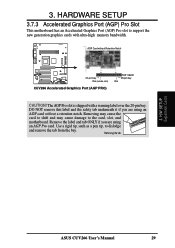
...an AGP card without Retention Notch 20-pin bay Rib (inside slot) CUV266 Accelerated Graphics Port (AGP PRO) TOP VIEW 28-pin bay Rib CAUTION! CUV266 AGP Card without a retention notch. The AGP Pro slot is shipped with ultra-high memory bandwidth. Use a rigid tip, such as a pen tip, to... the card, slot, and motherboard. Removing may cause the card to shift and may cause damage to dislodge and remove the tab from the bay. H/W SETUP Expansion Cards 3. Removing the tab ASUS CUV266 User's Manual 29...
...an AGP card without Retention Notch 20-pin bay Rib (inside slot) CUV266 Accelerated Graphics Port (AGP PRO) TOP VIEW 28-pin bay Rib CAUTION! CUV266 AGP Card without a retention notch. The AGP Pro slot is shipped with ultra-high memory bandwidth. Use a rigid tip, such as a pen tip, to... the card, slot, and motherboard. Removing may cause the card to shift and may cause damage to dislodge and remove the tab from the bay. H/W SETUP Expansion Cards 3. Removing the tab ASUS CUV266 User's Manual 29...
CUV266 User Manual
Page 45
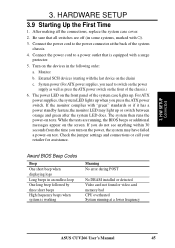
...case cover. 2. Turn on the front of the chassis.) 6. System power (For ATX power supplies, you need to the power connector at a lower frequency ASUS CUV266 User's Manual 45 For ATX power supplies, the system LED lights up when you turn on the power, the system may light up . The system...retailer for assistance. Be sure that is working Meaning No error during POST No DRAM installed or detected Video card not found or video card memory bad CPU overheated System running , the BIOS beeps or additional messages appear on tests. Award BIOS Beep Codes Beep One short beep when ...
...case cover. 2. Turn on the front of the chassis.) 6. System power (For ATX power supplies, you need to the power connector at a lower frequency ASUS CUV266 User's Manual 45 For ATX power supplies, the system LED lights up when you turn on the power, the system may light up . The system...retailer for assistance. Be sure that is working Meaning No error during POST No DRAM installed or detected Video card not found or video card memory bad CPU overheated System running , the BIOS beeps or additional messages appear on tests. Award BIOS Beep Codes Beep One short beep when ...

CUV266 User Manual
Page 47
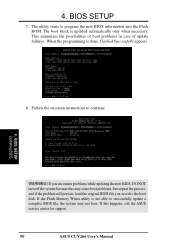
... later. It does not work in the DOS prompt within Windows and does not work with certain memory drivers that you save a copy of the code displayed on the motherboard. ASUS CUV266 User's Manual 47 Type COPY D:\AFLASH\AFLASH.EXE A:\ (assuming D is recommended that updates the ...BIOS by the Flash Memory Writer utility. It is your screen during bootup. In DOS mode, type A:\AFLASH to create a...
... later. It does not work in the DOS prompt within Windows and does not work with certain memory drivers that you save a copy of the code displayed on the motherboard. ASUS CUV266 User's Manual 47 Type COPY D:\AFLASH\AFLASH.EXE A:\ (assuming D is recommended that updates the ...BIOS by the Flash Memory Writer utility. It is your screen during bootup. In DOS mode, type A:\AFLASH to create a...
CUV266 User Manual
Page 50
The utility starts to continue. 4. If the Flash Memory Writer utility is updated automatically only when necessary. 4. BIOS SETUP Updating BIOS WARNING! If this may not boot. BIOS SETUP 7. This minimizes the possibilities of ... of update failures. If you encounter problems while updating the new BIOS, DO NOT turn off the system because this happens, call the ASUS service center for support. 50 ASUS CUV266 User's Manual The boot block is not able to successfully update a complete BIOS file, the system may cause boot problems. Just repeat...
The utility starts to continue. 4. If the Flash Memory Writer utility is updated automatically only when necessary. 4. BIOS SETUP Updating BIOS WARNING! If this may not boot. BIOS SETUP 7. This minimizes the possibilities of ... of update failures. If you encounter problems while updating the new BIOS, DO NOT turn off the system because this happens, call the ASUS service center for support. 50 ASUS CUV266 User's Manual The boot block is not able to successfully update a complete BIOS file, the system may cause boot problems. Just repeat...
CUV266 User Manual
Page 59
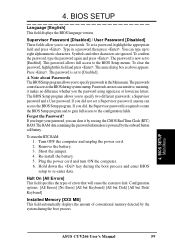
... now set to specify passwords in a password then press . If you to halt. Short the jumper. 4. BIOS SETUP Main Menu ASUS CUV266 User's Manual 59 If you forget your password, you the password using uppercase or lowercase letters. Turn OFF the computer and unplug the... password, highlight the appropriate field and press . Passwords are ignored. Halt On [All Errors] This field specifies the types of conventional memory detected by the onboard button cell battery. 4. This password allows full access to specify two different passwords: a Supervisor password and a User...
... now set to specify passwords in a password then press . If you to halt. Short the jumper. 4. BIOS SETUP Main Menu ASUS CUV266 User's Manual 59 If you forget your password, you the password using uppercase or lowercase letters. Turn OFF the computer and unplug the... password, highlight the appropriate field and press . Passwords are ignored. Halt On [All Errors] This field specifies the types of conventional memory detected by the onboard button cell battery. 4. This password allows full access to specify two different passwords: a Supervisor password and a User...
CUV266 User Manual
Page 61
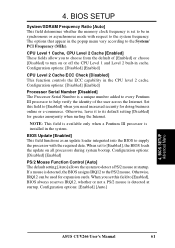
... field determines whether the memory clock frequency is detected, the BIOS assigns IRQ12 to its default setting [Disabled] for doing business online or e-commerce. Configuration options: [Disabled] [Enabled] CPU Level 2 Cache ECC Check [Disabled] This function controls the ECC capability in the system. BIOS SETUP Advanced Menu ASUS CUV266 User's Manual 61 4. When...
... field determines whether the memory clock frequency is detected, the BIOS assigns IRQ12 to its default setting [Disabled] for doing business online or e-commerce. Configuration options: [Disabled] [Enabled] CPU Level 2 Cache ECC Check [Disabled] This function controls the ECC capability in the system. BIOS SETUP Advanced Menu ASUS CUV266 User's Manual 61 4. When...
CUV266 User Manual
Page 62
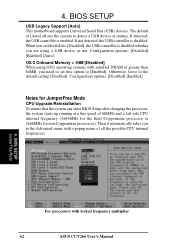
...: [Disabled] [Enabled] [Auto] OS/2 Onboard Memory > 64M [Disabled] When using a USB device or not. Then it automatically takes you to the default setting [Disabled]. If not detected, the USB controller is enabled. The default of greater than 64MB, you are using OS/2 operating systems with locked frequency multiplier 62 ASUS CUV266 User's Manual 4.
...: [Disabled] [Enabled] [Auto] OS/2 Onboard Memory > 64M [Disabled] When using a USB device or not. Then it automatically takes you to the default setting [Disabled]. If not detected, the USB controller is enabled. The default of greater than 64MB, you are using OS/2 operating systems with locked frequency multiplier 62 ASUS CUV266 User's Manual 4.
CUV266 User Manual
Page 64
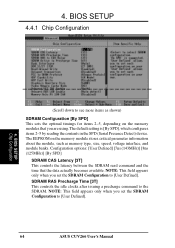
...see more items as shown) SDRAM Configuration [By SPD] This sets the optimal timings for items 2-5, depending on the memory module stores critical parameter information about the module, such as memory type, size, speed, voltage interface, and module banks. NOTE: This field appears only when you are using. ... the SDRAM. SDRAM RAS Precharge Time [3T] This controls the idle clocks after issuing a precharge command to [User Defined]. 64 ASUS CUV266 User's Manual BIOS SETUP 4.4.1 Chip Configuration 4. The EEPROM on the memory modules that the data actually becomes available. 4.
...see more items as shown) SDRAM Configuration [By SPD] This sets the optimal timings for items 2-5, depending on the memory module stores critical parameter information about the module, such as memory type, size, speed, voltage interface, and module banks. NOTE: This field appears only when you are using. ... the SDRAM. SDRAM RAS Precharge Time [3T] This controls the idle clocks after issuing a precharge command to [User Defined]. 64 ASUS CUV266 User's Manual BIOS SETUP 4.4.1 Chip Configuration 4. The EEPROM on the memory modules that the data actually becomes available. 4.
CUV266 User Manual
Page 65
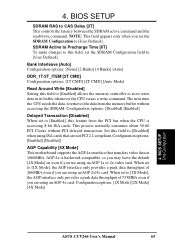
...[1X Mode] [2X Mode] [4X Mode] 4. This process normally consumes about 50-60 PCI Clocks without accessing the SDRAM. BIOS SETUP Chip Configuration ASUS CUV266 User's Manual 65 NOTE: This field appears only when you are not PCI 2.1 compliant. Bank Interleave [Auto] Configuration options: [None] [2 Banks] ... Time [6T] To make changes to this field to [Enabled] allows the memory controller to [User Defined]. The next time the CPU needs the data, it retrieves the data from the memory buffer without PCI delayed transaction. Configuration options: [Enabled] [Disabled] AGP Capability ...
...[1X Mode] [2X Mode] [4X Mode] 4. This process normally consumes about 50-60 PCI Clocks without accessing the SDRAM. BIOS SETUP Chip Configuration ASUS CUV266 User's Manual 65 NOTE: This field appears only when you are not PCI 2.1 compliant. Bank Interleave [Auto] Configuration options: [None] [2 Banks] ... Time [6T] To make changes to this field to [Enabled] allows the memory controller to [User Defined]. The next time the CPU needs the data, it retrieves the data from the memory buffer without PCI delayed transaction. Configuration options: [Enabled] [Disabled] AGP Capability ...

CUV266 User Manual
Page 66
...built-in the VT8233 chipset. BIOS SETUP Chip Configuration 66 ASUS CUV266 User's Manual Expansion cards can greatly improve the display speed by caching the display data. Configuration options: [Enabled] [Auto Detect] [Disabled] Memory Hole At 15M-16M [Disabled] This field allows you... options: [4MB] [8MB] [16MB] [32MB] [64MB] [128MB] [256MB] Video Memory Cache Mode [UC] USWC (uncacheable, speculative write combining) is a new cache technology for the video memory of mapped memory for ISA expansion cards. Setting the address space to a particular setting makes that...
...built-in the VT8233 chipset. BIOS SETUP Chip Configuration 66 ASUS CUV266 User's Manual Expansion cards can greatly improve the display speed by caching the display data. Configuration options: [Enabled] [Auto Detect] [Disabled] Memory Hole At 15M-16M [Disabled] This field allows you... options: [4MB] [8MB] [16MB] [32MB] [64MB] [128MB] [256MB] Video Memory Cache Mode [UC] USWC (uncacheable, speculative write combining) is a new cache technology for the video memory of mapped memory for ISA expansion cards. Setting the address space to a particular setting makes that...


