CUSL2 User Manual
Page 4
... 4.3.2 Keyboard Features 56 4.4 Advanced Menu 58 4.4.1 Chip Configuration 61 4.4.2 I/O Device Configuration 64 4.4.3 PCI Configuration 66 4.4.4 Shadow Configuration 68 4 ASUS CUSL2 User's Manual CONTENTS 1. HARDWARE SETUP 14 3.1 CUSL2 Motherboard Layout 14 3.2 Layout Contents 15 3.3 Hardware Setup Procedure 17 3.4 Motherboard Settings 17 3.5 System Memory (DIMM 24 3.5.1 General DIMM Notes 24 3.5.2 Memory Installation 25 3.6 Central Processing Unit (CPU 26 3.7 Expansion...
... 4.3.2 Keyboard Features 56 4.4 Advanced Menu 58 4.4.1 Chip Configuration 61 4.4.2 I/O Device Configuration 64 4.4.3 PCI Configuration 66 4.4.4 Shadow Configuration 68 4 ASUS CUSL2 User's Manual CONTENTS 1. HARDWARE SETUP 14 3.1 CUSL2 Motherboard Layout 14 3.2 Layout Contents 15 3.3 Hardware Setup Procedure 17 3.4 Motherboard Settings 17 3.5 System Memory (DIMM 24 3.5.1 General DIMM Notes 24 3.5.2 Memory Installation 25 3.6 Central Processing Unit (CPU 26 3.7 Expansion...
CUSL2 User Manual
Page 7
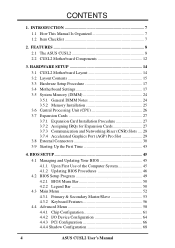
...-compliant infrared module ASUS CUSL2 User's Manual 7 If you discover damaged or missing items, contact your package is divided into the following sections: 1. HARDWARE SETUP 4. SOFTWARE REFERENCE 7. APPENDIX Manual information and checklist Production information and specifications Intructions on setting up the motherboard. INTRODUCTION Manual / Checklist 1. FEATURES 3. BIOS SETUP 5. INTRODUCTION 2. SOFTWARE SETUP 6. 1. Package Contents (1) ASUS Motherboard (1) 40-pin 80...
...-compliant infrared module ASUS CUSL2 User's Manual 7 If you discover damaged or missing items, contact your package is divided into the following sections: 1. HARDWARE SETUP 4. SOFTWARE REFERENCE 7. APPENDIX Manual information and checklist Production information and specifications Intructions on setting up the motherboard. INTRODUCTION Manual / Checklist 1. FEATURES 3. BIOS SETUP 5. INTRODUCTION 2. SOFTWARE SETUP 6. 1. Package Contents (1) ASUS Motherboard (1) 40-pin 80...
CUSL2 User Manual
Page 8
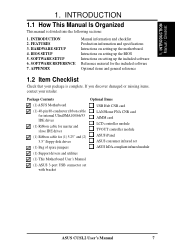
...interconnect targeted at 3D graphical applications using a 1X, 2X, or 4X mode bus. quency and Vcore voltage all through BIOS setup when JumperFree™ mode is carefully designed for the demanding PC user who wants advanced features processed by the fastest processors. ... of fre- able in 64, 128, 256, 512MB densities) up to 512MB. • Integrated Graphics! FEATURES 2.1 The ASUS CUSL2 The ASUS CUSL2 motherboard is enabled. The 24-bit 230MHz RAMDAC graphics controller supports 3D hyper pipelined architecture, parallel data processing and compression, precise pixel ...
...interconnect targeted at 3D graphical applications using a 1X, 2X, or 4X mode bus. quency and Vcore voltage all through BIOS setup when JumperFree™ mode is carefully designed for the demanding PC user who wants advanced features processed by the fastest processors. ... of fre- able in 64, 128, 256, 512MB densities) up to 512MB. • Integrated Graphics! FEATURES 2.1 The ASUS CUSL2 The ASUS CUSL2 motherboard is enabled. The 24-bit 230MHz RAMDAC graphics controller supports 3D hyper pipelined architecture, parallel data processing and compression, precise pixel ...

CUSL2 User Manual
Page 9
... and space reserved for keeping time! • Firmware Hub: Provides security-enhancements in firmware-based virus protection, and autodetection of most devices for virtually automatic setup. • Smart BIOS: 4Mbit firmware gives a new easy-to access box with system information LED display, front I /O: Provides two high-speed UART ...also be directed from PCI master busses to the memory and processor. • Onboard LED: The onboard LED will light up to the motherboard. ASUS CUSL2 User's Manual 9 FEATURES Specifications 2. UART2 can log chassis open events into LDCM. 2.
... and space reserved for keeping time! • Firmware Hub: Provides security-enhancements in firmware-based virus protection, and autodetection of most devices for virtually automatic setup. • Smart BIOS: 4Mbit firmware gives a new easy-to access box with system information LED display, front I /O: Provides two high-speed UART ...also be directed from PCI master busses to the memory and processor. • Onboard LED: The onboard LED will light up to the motherboard. ASUS CUSL2 User's Manual 9 FEATURES Specifications 2. UART2 can log chassis open events into LDCM. 2.
CUSL2 User Manual
Page 11
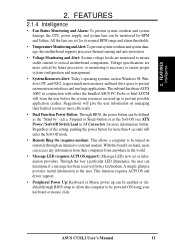
...setup to allow the computer to present enormous user interfaces and run large applications. Suspend or Sleep) button or as Windows 98, Windows NT, and OS/2, require much more information) button. ASUS CUSL2 User's Manual 11 2. FEATURES Intelligence 2. Voltage specifications are monitored to ensure stable current to critical motherboard components. With this motherboard...through an internal or external modem. All the fans are set for RPM and failure. The onboard hardware ASUS ASIC in the world. • Message LED (requires ACPI OS support): Message LEDs now act as the...
...setup to allow the computer to present enormous user interfaces and run large applications. Suspend or Sleep) button or as Windows 98, Windows NT, and OS/2, require much more information) button. ASUS CUSL2 User's Manual 11 2. FEATURES Intelligence 2. Voltage specifications are monitored to ensure stable current to critical motherboard components. With this motherboard...through an internal or external modem. All the fans are set for RPM and failure. The onboard hardware ASUS ASIC in the world. • Message LED (requires ACPI OS support): Message LEDs now act as the...
CUSL2 User Manual
Page 14
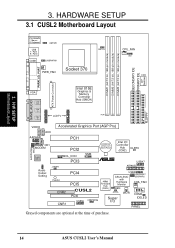
HARDWARE SETUP 3.1 CUSL2 Motherboard Layout PS/2KBMS T: Mouse B: Keyboard USB T: Port1 B: Port2 COM1 KBPWR USBPWR01 PWR_FAN Socket 370 BS133 CPU_FAN VIO DSW DIMM1 (64/72 bit, 168-pin module) ... SMB PCI3 ® USB47 Audio Codec Setting JTPWR PLED2 CNR2 CNR1 AFPANEL PCI4 PCI5 CUSL2 PCI6 USB56 USBPWR56 4Mbit Firmware Hub (FWH) USB2 USBPWR47 ASUS ASIC USBPWR2 with Hardware CHA_FAN Monitor JEN ACHA Super I/O WOR COM2 IDELED PANEL Grayed components are optional at the time of purchase. 14 ASUS CUSL2 User's Manual 3. H/W SETUP Motherboard Layout FLOPPY 3.
HARDWARE SETUP 3.1 CUSL2 Motherboard Layout PS/2KBMS T: Mouse B: Keyboard USB T: Port1 B: Port2 COM1 KBPWR USBPWR01 PWR_FAN Socket 370 BS133 CPU_FAN VIO DSW DIMM1 (64/72 bit, 168-pin module) ... SMB PCI3 ® USB47 Audio Codec Setting JTPWR PLED2 CNR2 CNR1 AFPANEL PCI4 PCI5 CUSL2 PCI6 USB56 USBPWR56 4Mbit Firmware Hub (FWH) USB2 USBPWR47 ASUS ASIC USBPWR2 with Hardware CHA_FAN Monitor JEN ACHA Super I/O WOR COM2 IDELED PANEL Grayed components are optional at the time of purchase. 14 ASUS CUSL2 User's Manual 3. H/W SETUP Motherboard Layout FLOPPY 3.
CUSL2 User Manual
Page 15
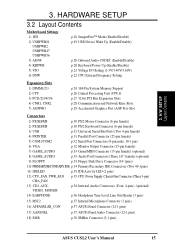
H/W SETUP Layout Contents 3. 3. HARDWARE SETUP 3.2 Layout Contents Motherboard Settings 1) JEN 2) USBPWR01 USBPWR2 USBPWR47 USBPWR56 3) ADN# 4) KBPWR 5) VIO 6) DSW p.18 JumperFree™ Mode (Enable/Disable) p.19 USB Device Wake Up (Enable/Disable) p.20... (Four 4-pins) (optional) 14) EARPHONE p.36 Headphone True-Level Line Out Header (3 pins) 15) MIC2 p.37 Internal Microphone Connector (3 pins) 16) AFPANEL/IR_CON p.37 ASUS iPanel Connector (12-1 pins) 17) AAPANEL p.37 ASUS iPanel Audio Connector (12-1 pins) 18) SMB p.38 SMBus Connector (5-1 pins) ASUS CUSL2 User's Manual 15
H/W SETUP Layout Contents 3. 3. HARDWARE SETUP 3.2 Layout Contents Motherboard Settings 1) JEN 2) USBPWR01 USBPWR2 USBPWR47 USBPWR56 3) ADN# 4) KBPWR 5) VIO 6) DSW p.18 JumperFree™ Mode (Enable/Disable) p.19 USB Device Wake Up (Enable/Disable) p.20... (Four 4-pins) (optional) 14) EARPHONE p.36 Headphone True-Level Line Out Header (3 pins) 15) MIC2 p.37 Internal Microphone Connector (3 pins) 16) AFPANEL/IR_CON p.37 ASUS iPanel Connector (12-1 pins) 17) AAPANEL p.37 ASUS iPanel Audio Connector (12-1 pins) 18) SMB p.38 SMBus Connector (5-1 pins) ASUS CUSL2 User's Manual 15
CUSL2 User Manual
Page 17
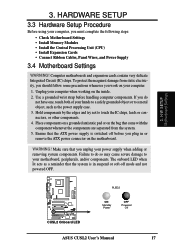
... the bag that the system is switched off mode and not powered OFF. 3. H/W SETUP Motherboard Settings ® CUSL2 CUSL2 Onboard LED PLED2 ON Standby Power OFF Powered Off ASUS CUSL2 User's Manual 17 Unplug your power supply when adding or removing system components. WARNING! ...If you must complete the following steps: • Check Motherboard Settings • Install Memory Modules • Install the Central...
... the bag that the system is switched off mode and not powered OFF. 3. H/W SETUP Motherboard Settings ® CUSL2 CUSL2 Onboard LED PLED2 ON Standby Power OFF Powered Off ASUS CUSL2 User's Manual 17 Unplug your power supply when adding or removing system components. WARNING! ...If you must complete the following steps: • Check Motherboard Settings • Install Memory Modules • Install the Central...
CUSL2 User Manual
Page 18
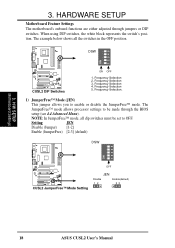
...position. Frequency Selection 3. Frequency Selection 5. H/W SETUP Motherboard Settings 3. HARDWARE SETUP Motherboard Feature Settings The motherboard's onboard functions are either adjusted through the BIOS setup (see 4.4 Advanced Menu). DSW ON 12345 ® CUSL2 CUSL2 DIP Switches ON OFF 1. Frequency Selection 4. The...Jumper) [1-2] Enable (JumperFree) [2-3] (default) DSW ON 12345 OFF ® CUSL2 CUSL2 JumperFree™ Mode Setting JEN Disable Enable(default) 12 23 18 ASUS CUSL2 User's Manual The JumperFree™ mode allows processor settings to be set to ...
...position. Frequency Selection 3. Frequency Selection 5. H/W SETUP Motherboard Settings 3. HARDWARE SETUP Motherboard Feature Settings The motherboard's onboard functions are either adjusted through the BIOS setup (see 4.4 Advanced Menu). DSW ON 12345 ® CUSL2 CUSL2 DIP Switches ON OFF 1. Frequency Selection 4. The...Jumper) [1-2] Enable (JumperFree) [2-3] (default) DSW ON 12345 OFF ® CUSL2 CUSL2 JumperFree™ Mode Setting JEN Disable Enable(default) 12 23 18 ASUS CUSL2 User's Manual The JumperFree™ mode allows processor settings to be set to ...
CUSL2 User Manual
Page 19
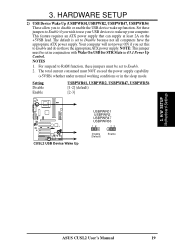
...Enable if you wish to use your computer. Setting Disable Enable USBPWR01, USBPWR2, USBPWR47, USBPWR56 [1-2] (default) [2-3] ® CUSL2 CUSL2 USB Device Wake Up USBPWR01 USBPWR2 USBPWR47 USBPWR56 12 23 Disable (Default) Enable 3. The default is set in conjunction with Wake... under normal working conditions or in 4.5.1 Power Up Control. HARDWARE SETUP 2) USB Device Wake Up (USBPWR01,USBPWR2, USBPWR47, USBPWR56) These allow you set to wake up function. H/W SETUP Motherboard Settings ASUS CUSL2 User's Manual 19 NOTES 1. The total current consumed must be ...
...Enable if you wish to use your computer. Setting Disable Enable USBPWR01, USBPWR2, USBPWR47, USBPWR56 [1-2] (default) [2-3] ® CUSL2 CUSL2 USB Device Wake Up USBPWR01 USBPWR2 USBPWR47 USBPWR56 12 23 Disable (Default) Enable 3. The default is set in conjunction with Wake... under normal working conditions or in 4.5.1 Power Up Control. HARDWARE SETUP 2) USB Device Wake Up (USBPWR01,USBPWR2, USBPWR47, USBPWR56) These allow you set to wake up function. H/W SETUP Motherboard Settings ASUS CUSL2 User's Manual 19 NOTES 1. The total current consumed must be ...
CUSL2 User Manual
Page 20
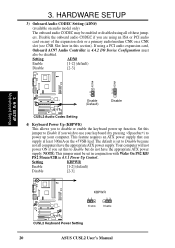
...or a primary audio/modem CNR on the +5VSB lead. If using all computers have the appropriate ATX power supply. HARDWARE SETUP 3) Onboard Audio CODEC Setting (ADN#) (available on any of these jump- Your computer will not power ON if you ...CUSL2 CUSL2 Keyboard Power Setting 20 ASUS CUSL2 User's Manual 3. The default is set in conjunction with Wake On PS2 KB/ PS2 Mouse/CIR in 4.4.2 I/O Device Configuration must be set to Enable but do not have the appropriate ATX power supply. H/W SETUP Motherboard Settings 3 2 2 1 Enable Disable ® (Default) CUSL2 CUSL2...
...or a primary audio/modem CNR on the +5VSB lead. If using all computers have the appropriate ATX power supply. HARDWARE SETUP 3) Onboard Audio CODEC Setting (ADN#) (available on any of these jump- Your computer will not power ON if you ...CUSL2 CUSL2 Keyboard Power Setting 20 ASUS CUSL2 User's Manual 3. The default is set in conjunction with Wake On PS2 KB/ PS2 Mouse/CIR in 4.4.2 I/O Device Configuration must be set to Enable but do not have the appropriate ATX power supply. H/W SETUP Motherboard Settings 3 2 2 1 Enable Disable ® (Default) CUSL2 CUSL2...
CUSL2 User Manual
Page 21
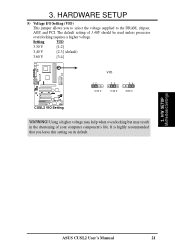
... supplied to the DRAM, chipset, AGP, and PCI. Setting VIO 3.30 V [1-2] 3.40 V [2-3] (default) 3.60 V [3-4] ® CUSL2 CUSL2 VIO Setting VIO 12 3.30 V 23 3.40 V 34 3.60 V WARNING! The default setting of your computer component's life. H/W SETUP Motherboard Settings ASUS CUSL2 User's Manual 21 Using a higher voltage may help when overclocking but may result in the shortening...
... supplied to the DRAM, chipset, AGP, and PCI. Setting VIO 3.30 V [1-2] 3.40 V [2-3] (default) 3.60 V [3-4] ® CUSL2 CUSL2 VIO Setting VIO 12 3.30 V 23 3.40 V 34 3.60 V WARNING! The default setting of your computer component's life. H/W SETUP Motherboard Settings ASUS CUSL2 User's Manual 21 Using a higher voltage may help when overclocking but may result in the shortening...
CUSL2 User Manual
Page 22
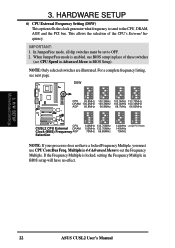
...Setup). DSW ON 12345 ON 12345 ON 12345 ON 12345 CPU 66.8MHz 100.3MHz 103.0MHz 133.70MHz DRAM 100.2MHz 100.3MHz 103.0MHz 100.30MHz AGP 66.8MHz 66.8MHz 68.7MHz 66.85MHz ® ON 12345 ON 12345 ON 12345 ON 12345 CUSL2 CPU CUSL2... next page. IMPORTANT: 1. Multiple in place of the CPU's External frequency. HARDWARE SETUP 6) CPU External Frequency Setting (DSW) This option tells the clock generator what frequency ...use BIOS setup in 4.4 Advanced Menu to the CPU, DRAM, AGP, and the PCI bus. 3. H/W SETUP Motherboard Settings 22 ASUS CUSL2 User's Manual NOTE: Only selected...
...Setup). DSW ON 12345 ON 12345 ON 12345 ON 12345 CPU 66.8MHz 100.3MHz 103.0MHz 133.70MHz DRAM 100.2MHz 100.3MHz 103.0MHz 100.30MHz AGP 66.8MHz 66.8MHz 68.7MHz 66.85MHz ® ON 12345 ON 12345 ON 12345 ON 12345 CUSL2 CPU CUSL2... next page. IMPORTANT: 1. Multiple in place of the CPU's External frequency. HARDWARE SETUP 6) CPU External Frequency Setting (DSW) This option tells the clock generator what frequency ...use BIOS setup in 4.4 Advanced Menu to the CPU, DRAM, AGP, and the PCI bus. 3. H/W SETUP Motherboard Settings 22 ASUS CUSL2 User's Manual NOTE: Only selected...
CUSL2 User Manual
Page 23
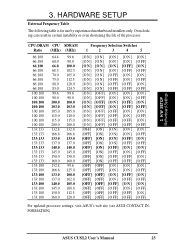
HARDWARE SETUP External Frequency Table The following table is for use by experienced motherboard installers only. CPU:DRAM CPU Ratio (MHz) 66:100 66:100 66:100 66:100 66:100 66:100 66... [OFF] [O N ] [O FF] [O FF] [OFF] [OFF] [O FF] [O N ] [O N ] [OFF] [OFF] [O FF] [O N ] [O FF] [OFF] [OFF] [O FF] [O FF] [O N ] [OFF] [OFF] [O FF] [O FF] [O FF] For updated processor settings, visit ASUS's web site (see ASUS CONTACT INFORMATION) ASUS CUSL2 User's Manual 23 H/W SETUP Motherboard Settings 3. 3. Overclocking can result in system instability or even shortening the life of the processor.
HARDWARE SETUP External Frequency Table The following table is for use by experienced motherboard installers only. CPU:DRAM CPU Ratio (MHz) 66:100 66:100 66:100 66:100 66:100 66:100 66... [OFF] [O N ] [O FF] [O FF] [OFF] [OFF] [O FF] [O N ] [O N ] [OFF] [OFF] [O FF] [O N ] [O FF] [OFF] [OFF] [O FF] [O FF] [O N ] [OFF] [OFF] [O FF] [O FF] [O FF] For updated processor settings, visit ASUS's web site (see ASUS CONTACT INFORMATION) ASUS CUSL2 User's Manual 23 H/W SETUP Motherboard Settings 3. 3. Overclocking can result in system instability or even shortening the life of the processor.
CUSL2 User Manual
Page 24
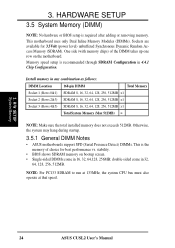
... SETUP System Memory 24 ASUS CUSL2 User's Manual One side (with memory chips) of choice for 3.3Volt (power level) unbuffered Synchronous Dynamic Random Access Memory (SDRAM). NOTE: For PC133 SDRAM to run at 133MHz, the system CPU bus must also operate at that speed. 3. This motherboard ... may hang during startup. 3.5.1 General DIMM Notes • ASUS motherboards support SPD (Serial Presence Detect) DIMMs. This is required after adding or removing memory. HARDWARE SETUP 3.5 System Memory (DIMM) NOTE: No hardware or BIOS setup is the memory of the DIMM takes up one row on...
... SETUP System Memory 24 ASUS CUSL2 User's Manual One side (with memory chips) of choice for 3.3Volt (power level) unbuffered Synchronous Dynamic Random Access Memory (SDRAM). NOTE: For PC133 SDRAM to run at 133MHz, the system CPU bus must also operate at that speed. 3. This motherboard ... may hang during startup. 3.5.1 General DIMM Notes • ASUS motherboards support SPD (Serial Presence Detect) DIMMs. This is required after adding or removing memory. HARDWARE SETUP 3.5 System Memory (DIMM) NOTE: No hardware or BIOS setup is the memory of the DIMM takes up one row on...
CUSL2 User Manual
Page 25
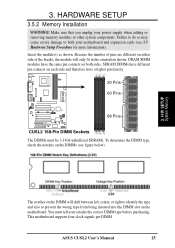
...and also to both sides. You must be 3.3Volt unbuffered SDRAMs. To determine the DIMM type, check the notches on the motherboard. This motherboard supports four clock signals per DIMM. Failure to do so may cause severe damage to prevent the wrong type from being inserted ...the DIMMs (see 3.3 Hardware Setup Procedure for more information). Make sure that you unplug your retailer the correct DIMM type before purchasing. H/W SETUP System Memory The notches on either side of pins are different on the DIMM will only fit in the orientation shown. ASUS CUSL2 User's Manual 25
...and also to both sides. You must be 3.3Volt unbuffered SDRAMs. To determine the DIMM type, check the notches on the motherboard. This motherboard supports four clock signals per DIMM. Failure to do so may cause severe damage to prevent the wrong type from being inserted ...the DIMMs (see 3.3 Hardware Setup Procedure for more information). Make sure that you unplug your retailer the correct DIMM type before purchasing. H/W SETUP System Memory The notches on either side of pins are different on the DIMM will only fit in the orientation shown. ASUS CUSL2 User's Manual 25
CUSL2 User Manual
Page 26
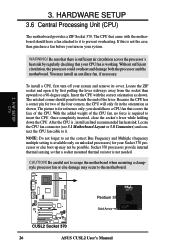
... be possible. NOTE: Do not forget to set the correct Bus Frequency and Multiple (frequency multiple setting is required to the motherboard. 3. H/W SETUP CPU Pentium III ® Gold Arrow CUSL2 CUSL2 Socket 370 26 ASUS CUSL2 User's Manual Be sure that a socket mounted thermal resistor is working. Be careful not to a 90-degree angle. Socket 370...
... be possible. NOTE: Do not forget to set the correct Bus Frequency and Multiple (frequency multiple setting is required to the motherboard. 3. H/W SETUP CPU Pentium III ® Gold Arrow CUSL2 CUSL2 Socket 370 26 ASUS CUSL2 User's Manual Be sure that a socket mounted thermal resistor is working. Be careful not to a 90-degree angle. Socket 370...
CUSL2 User Manual
Page 27
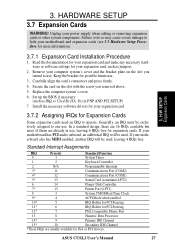
...Port 13 8 Numeric Data Processor 14* 9 Primary IDE Channel 15* 10 Secondary IDE Channel *These IRQs are already in PNP AND PCI SETUP) 7. Read the documentation for your expansion card and make any necessary hardware or software settings for Expansion Cards Some expansion cards need an ...IRQ to both your motherboard has PCI audio onboard, an additional IRQ will be used . Replace the computer system's cover. 6. In a standard design, there are 16 IRQs available but most of them are usually available for more information). 3. ASUS CUSL2 User's Manual 27 Remove your...
...Port 13 8 Numeric Data Processor 14* 9 Primary IDE Channel 15* 10 Secondary IDE Channel *These IRQs are already in PNP AND PCI SETUP) 7. Read the documentation for your expansion card and make any necessary hardware or software settings for Expansion Cards Some expansion cards need an ...IRQ to both your motherboard has PCI audio onboard, an additional IRQ will be used . Replace the computer system's cover. 6. In a standard design, there are 16 IRQs available but most of them are usually available for more information). 3. ASUS CUSL2 User's Manual 27 Remove your...
CUSL2 User Manual
Page 28
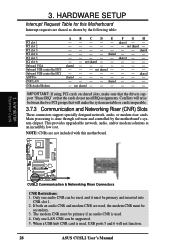
...SETUP Interrupt Request Table for this Motherboard Interrupt requests are not included with this motherboard. 3. shared not shared shared - - - - not shared - - - - - - Conflicts will arise between the two PCI groups that the cards do not need IRQ assignments. NOTE: CNRs are shared as shown by the motherboard... modem CNR must be primary if no audio CNR is used. 4. H/W SETUP Expansion Cards ® CUSL2 CUSL2 Communication & Networking Riser Connectors CNR Restrictions: 1. When a USB hub CNR ... that will not function. 28 ASUS CUSL2 User's Manual shared shared - - - -
...SETUP Interrupt Request Table for this Motherboard Interrupt requests are not included with this motherboard. 3. shared not shared shared - - - - not shared - - - - - - Conflicts will arise between the two PCI groups that the cards do not need IRQ assignments. NOTE: CNRs are shared as shown by the motherboard... modem CNR must be primary if no audio CNR is used. 4. H/W SETUP Expansion Cards ® CUSL2 CUSL2 Communication & Networking Riser Connectors CNR Restrictions: 1. When a USB hub CNR ... that will not function. 28 ASUS CUSL2 User's Manual shared shared - - - -
CUSL2 User Manual
Page 29
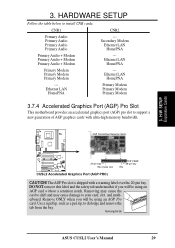
... from the bay. AGP Card without a retention notch. Removing the tab ASUS CUSL2 User's Manual 29 Use a rigid tip, such as a pen tip, to your card, slot, and motherboard. Remove ONLY when you will be using an AGP Pro card. HARDWARE SETUP Follow the table below to support a new generation of AGP graphics cards...
... from the bay. AGP Card without a retention notch. Removing the tab ASUS CUSL2 User's Manual 29 Use a rigid tip, such as a pen tip, to your card, slot, and motherboard. Remove ONLY when you will be using an AGP Pro card. HARDWARE SETUP Follow the table below to support a new generation of AGP graphics cards...


