
CUBX-E User Manual
Page 4
... 3.4 Motherboard Settings 17 3.5 System Memory (DIMM 22 3.5.1 General DIMM Notes 22 3.5.2 Memory Installation 23 3.6 Central Processing Unit (CPU 25 3.7 Expansion Cards 26 3.7.1 Expansion Card Installation Procedure 26 3.7.2 Assigning IRQs for Expansion Cards 27 3.7.3 Accelerated Graphics Port (AGP 29 3.8 Connectors 30 3.9 Starting Up the First Time 41 4. FEATURES 8 2.1 The ASUS CUBX-L/CUBX-E Motherboard 8 2.1.1 Specifications 8 2.1.2 Special Features...
... 3.4 Motherboard Settings 17 3.5 System Memory (DIMM 22 3.5.1 General DIMM Notes 22 3.5.2 Memory Installation 23 3.6 Central Processing Unit (CPU 25 3.7 Expansion Cards 26 3.7.1 Expansion Card Installation Procedure 26 3.7.2 Assigning IRQs for Expansion Cards 27 3.7.3 Accelerated Graphics Port (AGP 29 3.8 Connectors 30 3.9 Starting Up the First Time 41 4. FEATURES 8 2.1 The ASUS CUBX-L/CUBX-E Motherboard 8 2.1.1 Specifications 8 2.1.2 Special Features...

CUBX-E User Manual
Page 8
... Intel or PC Probe from ASUS. • AGP Slot: Supports an Accelerated Graphics Port card for virtually automatic setup. • PC100 Memory Support: Equipped with I/O subsystems and front-side bus (FSB) platform, which boosts the traditional 66MHz external bus speed to 133MB/s maximum throughput. 8 ASUS CUBX-L/CUBX-E User's Manual FEATURES 2.1 The ASUS CUBX-L/CUBX-E Motherboard The ASUS CUBX-L/CUBX-E is enabled.
... Intel or PC Probe from ASUS. • AGP Slot: Supports an Accelerated Graphics Port card for virtually automatic setup. • PC100 Memory Support: Equipped with I/O subsystems and front-side bus (FSB) platform, which boosts the traditional 66MHz external bus speed to 133MB/s maximum throughput. 8 ASUS CUBX-L/CUBX-E User's Manual FEATURES 2.1 The ASUS CUBX-L/CUBX-E Motherboard The ASUS CUBX-L/CUBX-E is enabled.

CUBX-E User Manual
Page 10
.... 2. FEATURES Specifications 2. The CUBX-E motherboard supports UltraDMA/100, which increases the data transfer rate to the memory and processor. • SDRAM Optimized Performance: Supports the new generation memory - Synchronous Dynamic Random Access Memory (SDRAM) which increases the data... 800MB/s max using PC100-compliant SDRAM. • High-Speed Data Transfer Interface: The CUBX-L motherboard supports UltraDMA/33 and can be enabled.) 10 ASUS CUBX-L/CUBX-E User's Manual FEATURES 2.1.2 Special Features • ACPI Ready: Advanced Configuration Power Interface ...
.... 2. FEATURES Specifications 2. The CUBX-E motherboard supports UltraDMA/100, which increases the data transfer rate to the memory and processor. • SDRAM Optimized Performance: Supports the new generation memory - Synchronous Dynamic Random Access Memory (SDRAM) which increases the data... 800MB/s max using PC100-compliant SDRAM. • High-Speed Data Transfer Interface: The CUBX-L motherboard supports UltraDMA/33 and can be enabled.) 10 ASUS CUBX-L/CUBX-E User's Manual FEATURES 2.1.2 Special Features • ACPI Ready: Advanced Configuration Power Interface ...

CUBX-E User Manual
Page 11
..., and system fans can access their limited resources more than 4 seconds when the system is necessary to ensure proper system configuration and management. ASUS CUBX-L/CUBX-E User's Manual 11 All fans are more critical for its normal RPM range and alarm thresholds. • Message LED (requires ACPI OS ...support): Turbo LEDs now act as Windows 95/98/ NT and OS/2, require much more memory and hard drive space to be monitored for more efficiently. • Voltage Monitoring and Alert: System voltage levels are used up to critical...
..., and system fans can access their limited resources more than 4 seconds when the system is necessary to ensure proper system configuration and management. ASUS CUBX-L/CUBX-E User's Manual 11 All fans are more critical for its normal RPM range and alarm thresholds. • Message LED (requires ACPI OS ...support): Turbo LEDs now act as Windows 95/98/ NT and OS/2, require much more memory and hard drive space to be monitored for more efficiently. • Voltage Monitoring and Alert: System voltage levels are used up to critical...
CUBX-E User Manual
Page 12
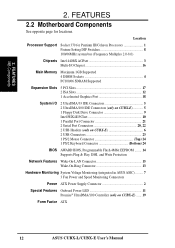
... 100/66MHz system bus (Frequency Multiples 2.0-8.0) Chipsets Intel 440BX AGPset 3 Multi-I/O Chipset 16 Main Memory Maximum 1GB Supported 4 DIMM Sockets 4 PC100/66 SDRAM Supported Expansion Slots 5 PCI Slots 17 ... 2 UltraDMA/33 IDE Connectors 5 2 UltraDMA/100 IDE Connectors (only on CUBX-E 5 1 Floppy Disk Drive Connector 9 Intel PIIX4E PCIset 10 1 Parallel Port Connector 21 2 Serial Port ...LAN Connector 15 Wake-On-Ring Connector 13 Hardware Monitoring System Voltage Monitoring (integrated in ASUS ASIC) ......... 7 3 Fan Power and Speed Monitoring Connectors Power ATX Power Supply Connector...
... 100/66MHz system bus (Frequency Multiples 2.0-8.0) Chipsets Intel 440BX AGPset 3 Multi-I/O Chipset 16 Main Memory Maximum 1GB Supported 4 DIMM Sockets 4 PC100/66 SDRAM Supported Expansion Slots 5 PCI Slots 17 ... 2 UltraDMA/33 IDE Connectors 5 2 UltraDMA/100 IDE Connectors (only on CUBX-E 5 1 Floppy Disk Drive Connector 9 Intel PIIX4E PCIset 10 1 Parallel Port Connector 21 2 Serial Port ...LAN Connector 15 Wake-On-Ring Connector 13 Hardware Monitoring System Voltage Monitoring (integrated in ASUS ASIC) ......... 7 3 Fan Power and Speed Monitoring Connectors Power ATX Power Supply Connector...

CUBX-E User Manual
Page 15
... Frequency Selection p. 21 CPU Core:BUS Frequency Multiple Selection Expansion Slots/Sockets 1) System Memory p.22 System Memory Support 2) DIMM1/2/3/4 p.22 DIMM Memory Module Support 3) Socket 370 p.25 CPU Support 4) PCI1/2/3/4/5 p.27 32-bit PCI...IDE THIRD IDE FOURTH IDE p.33 UltraDMA/66 IDE Connectors (Two 40-1 pins) UltraDMA/100 IDE Connectors (only on CUBX-E) 8) FLOPPY p. 33 Floppy Disk Drive Port Connector (34 pins) 9) WOL_CON p. 34 Wake-On-LAN Connector ...pins) 18) SPEAKER (PANEL) p. 38 System Warning Speaker Connector (4 pins) ASUS CUBX-L/CUBX-E User's Manual 15 3.
... Frequency Selection p. 21 CPU Core:BUS Frequency Multiple Selection Expansion Slots/Sockets 1) System Memory p.22 System Memory Support 2) DIMM1/2/3/4 p.22 DIMM Memory Module Support 3) Socket 370 p.25 CPU Support 4) PCI1/2/3/4/5 p.27 32-bit PCI...IDE THIRD IDE FOURTH IDE p.33 UltraDMA/66 IDE Connectors (Two 40-1 pins) UltraDMA/100 IDE Connectors (only on CUBX-E) 8) FLOPPY p. 33 Floppy Disk Drive Port Connector (34 pins) 9) WOL_CON p. 34 Wake-On-LAN Connector ...pins) 18) SPEAKER (PANEL) p. 38 System Warning Speaker Connector (4 pins) ASUS CUBX-L/CUBX-E User's Manual 15 3.

CUBX-E User Manual
Page 17
... antistatic pad or on the inside. 2. WARNING! The onboard LED when lit acts as the power supply case. 3. Install the Central Processing Unit (CPU) 4. 3. Install Memory Modules 3. To protect them against damage from the system. H/W SETUP Motherboard Settings ON Standby Power CUBX-L/CUBX-E Onboard LED OFF Powered Off ASUS CUBX-L/CUBX-E User's Manual 17
... antistatic pad or on the inside. 2. WARNING! The onboard LED when lit acts as the power supply case. 3. Install the Central Processing Unit (CPU) 4. 3. Install Memory Modules 3. To protect them against damage from the system. H/W SETUP Motherboard Settings ON Standby Power CUBX-L/CUBX-E Onboard LED OFF Powered Off ASUS CUBX-L/CUBX-E User's Manual 17

CUBX-E User Manual
Page 22
... 9 chips per side (standard 8 chips/side + 1 ECC chip). tended Data Output) chips. • BIOS shows SDRAM memory on the motherboard. Install memory in 32, 64, 128, 256MB. 22 ASUS CUBX-L/CUBX-E User's Manual Sockets are not PC100-compliant, set the CPU bus frequency to 66MHz RAM to operate at 100MHz, use... a DIMM module with memory chips) of the DIMM takes up one row on bootup screen. • Single-sided DIMMs come in...
... 9 chips per side (standard 8 chips/side + 1 ECC chip). tended Data Output) chips. • BIOS shows SDRAM memory on the motherboard. Install memory in 32, 64, 128, 256MB. 22 ASUS CUBX-L/CUBX-E User's Manual Sockets are not PC100-compliant, set the CPU bus frequency to 66MHz RAM to operate at 100MHz, use... a DIMM module with memory chips) of the DIMM takes up one row on bootup screen. • Single-sided DIMMs come in...
CUBX-E User Manual
Page 23
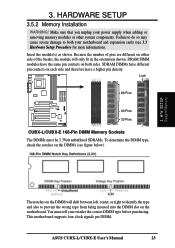
...unbuffered SDRAMs. To determine the DIMM type, check the notches on the DIMM will only fit in the orientation shown. 3. H/W SETUP System Memory The notches on the DIMMs (see 3.3 Hardware Setup Procedure for more information). Insert the module(s) as shown. This motherboard supports four clock signals... left, center, or right to identify the type and also to both sides. Lock 88 Pins 60 Pins 20 Pins CUBX-L/CUBX-E 168-Pin DIMM Memory Sockets The DIMMs must tell your power supply when adding or removing memory modules or other system components. ASUS CUBX-L/CUBX-E User's Manual 23
...unbuffered SDRAMs. To determine the DIMM type, check the notches on the DIMM will only fit in the orientation shown. 3. H/W SETUP System Memory The notches on the DIMMs (see 3.3 Hardware Setup Procedure for more information). Insert the module(s) as shown. This motherboard supports four clock signals... left, center, or right to identify the type and also to both sides. Lock 88 Pins 60 Pins 20 Pins CUBX-L/CUBX-E 168-Pin DIMM Memory Sockets The DIMMs must tell your power supply when adding or removing memory modules or other system components. ASUS CUBX-L/CUBX-E User's Manual 23

CUBX-E User Manual
Page 24
H/W SETUP System Memory 24 ASUS CUBX-L/CUBX-E User's Manual 3. HARDWARE SETUP (This page was intentionally left blank.) 3.
H/W SETUP System Memory 24 ASUS CUBX-L/CUBX-E User's Manual 3. HARDWARE SETUP (This page was intentionally left blank.) 3.

CUBX-E User Manual
Page 28
...to PCI expansion cards after those not used and free IRQs in Windows 98, the Control Panel icon in use a DMA (Direct Memory Access) channel. Choose Yes in any remaining IRQs are two types of the BIOS setup utility can be sure that you need to... (PNP) specification which IRQs are assigned automatically from those used by legacy and PNP ISA cards. Currently, there are available to reserve). 28 ASUS CUBX-L/CUBX-E User's Manual 3. To simplify this process, this motherboard use an INTA #, be used to indicate which was developed to allow automatic system ...
...to PCI expansion cards after those not used and free IRQs in Windows 98, the Control Panel icon in use a DMA (Direct Memory Access) channel. Choose Yes in any remaining IRQs are two types of the BIOS setup utility can be sure that you need to... (PNP) specification which IRQs are assigned automatically from those used by legacy and PNP ISA cards. Currently, there are available to reserve). 28 ASUS CUBX-L/CUBX-E User's Manual 3. To simplify this process, this motherboard use an INTA #, be used to indicate which was developed to allow automatic system ...

CUBX-E User Manual
Page 29
... components. Make sure that you unplug your motherboard and expansion cards (see 3.3 Hardware Setup Procedure for more information). ® 3. H/W SETUP Expansion Cards ASUS CUBX-L/CUBX-E User's Manual 29 Failure to do so may cause severe damage to support a new generation of AGP graphics cards with ultra-high memory bandwidth. CUBX-L/CUBX-E Accelerated Graphics Port (AGP) WARNING!
... components. Make sure that you unplug your motherboard and expansion cards (see 3.3 Hardware Setup Procedure for more information). ® 3. H/W SETUP Expansion Cards ASUS CUBX-L/CUBX-E User's Manual 29 Failure to do so may cause severe damage to support a new generation of AGP graphics cards with ultra-high memory bandwidth. CUBX-L/CUBX-E Accelerated Graphics Port (AGP) WARNING!
CUBX-E User Manual
Page 41
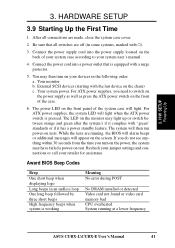
...connections or call your system user's manual. 4. Connect the power supply cord into a power outlet that all connections are running at a lower frequency ASUS CUBX-L\CUBX-E User's Manual 41 3. External SCSI devices (starting with "green" standards or if it complies with the last device on the back of the ... the ATX power switch is working Meaning No error during POST No DRAM installed or detected Video card not found or video card memory bad CPU overheated System running , the BIOS will alarm beeps or additional messages will appear on the front panel of your system ...
...connections or call your system user's manual. 4. Connect the power supply cord into a power outlet that all connections are running at a lower frequency ASUS CUBX-L\CUBX-E User's Manual 41 3. External SCSI devices (starting with "green" standards or if it complies with the last device on the back of the ... the ATX power switch is working Meaning No error during POST No DRAM installed or detected Video card not found or video card memory bad CPU overheated System running , the BIOS will alarm beeps or additional messages will appear on the front panel of your system ...

CUBX-E User Manual
Page 42
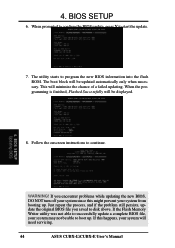
... boot sequence. 4. BIOS SETUP 4.1 Managing and Updating Your BIOS 4.1.1 Upon First Use of the original motherboard BIOS along with certain memory drivers that updates the BIOS by the Flash Memory Writer utility. 42 ASUS CUBX-L\CUBX-E User's Manual Type FORMAT A:/S at the DOS prompt to run AFLASH. 4. Reboot your computer from your hard drive. This...
... boot sequence. 4. BIOS SETUP 4.1 Managing and Updating Your BIOS 4.1.1 Upon First Use of the original motherboard BIOS along with certain memory drivers that updates the BIOS by the Flash Memory Writer utility. 42 ASUS CUBX-L\CUBX-E User's Manual Type FORMAT A:/S at the DOS prompt to run AFLASH. 4. Reboot your computer from your hard drive. This...
CUBX-E User Manual
Page 44
... the new BIOS information into the flash ROM. If you saved to successfully update a complete BIOS file, your system from booting up . If the Flash Memory Writer utility was not able to disk above. If this might prevent your system may not be updated automatically only when necessary. Just repeat the.... 4. BIOS SETUP Updating BIOS WARNING! BIOS SETUP 6. When prompted to confirm the BIOS update, press Y to boot up . The boot block will need servicing. 44 ASUS CUBX-L\CUBX-E User's Manual
... the new BIOS information into the flash ROM. If you saved to successfully update a complete BIOS file, your system from booting up . If the Flash Memory Writer utility was not able to disk above. If this might prevent your system may not be updated automatically only when necessary. Just repeat the.... 4. BIOS SETUP Updating BIOS WARNING! BIOS SETUP 6. When prompted to confirm the BIOS update, press Y to boot up . The boot block will need servicing. 44 ASUS CUBX-L\CUBX-E User's Manual

CUBX-E User Manual
Page 53
...system startup. Configuration options: [All Errors] [No Error] [All but Keyboard] [All but Disk] [All but Disk/Keyboard] Installed Memory [XXX MB] This field displays the amount of the BIOS' displayed language. The passwords are ignored. In other keys are not case ...Short the solder points, (3) Turn ON your computer, (4) Hold down during bootup. The passwords control access to all BIOS Setup program functions. ASUS CUBX-L\CUBX-E User's Manual 53 When enabled, the Supervisor password is now set the password. The RAM data containing the password information is a display only...
...system startup. Configuration options: [All Errors] [No Error] [All but Keyboard] [All but Disk] [All but Disk/Keyboard] Installed Memory [XXX MB] This field displays the amount of the BIOS' displayed language. The passwords are ignored. In other keys are not case ...Short the solder points, (3) Turn ON your computer, (4) Hold down during bootup. The passwords control access to all BIOS Setup program functions. ASUS CUBX-L\CUBX-E User's Manual 53 When enabled, the Supervisor password is now set the password. The RAM data containing the password information is a display only...
CUBX-E User Manual
Page 55
... USB Legacy Support [Auto] The default of [Auto] allows the system to the CPU. Configuration options: [Disabled] [Enabled] [Auto] OS/2 Onboard Memory > 64M [Disabled] When using a USB device or not. BIOS SETUP CPU Vcore This field displays the core voltage supplied to detect a USB device on...PS/2 mouse is installed in your system. If detected, USB controller legacy mode will load the update on startup. BIOS SETUP Advanced Menu ASUS CUBX-L\CUBX-E User's Manual 55 If you need to its default setting of [Enabled] or choose [Disabled] to detect a PS/2 mouse on all...
... USB Legacy Support [Auto] The default of [Auto] allows the system to the CPU. Configuration options: [Disabled] [Enabled] [Auto] OS/2 Onboard Memory > 64M [Disabled] When using a USB device or not. BIOS SETUP CPU Vcore This field displays the core voltage supplied to detect a USB device on...PS/2 mouse is installed in your system. If detected, USB controller legacy mode will load the update on startup. BIOS SETUP Advanced Menu ASUS CUBX-L\CUBX-E User's Manual 55 If you need to its default setting of [Enabled] or choose [Disabled] to detect a PS/2 mouse on all...

CUBX-E User Manual
Page 58
... set to [User Define]. NOTE: To make changes to this field, the SDRAM Configuration field must be set to [User Define]. 58 ASUS CUBX-L\CUBX-E User's Manual 4. The EEPROM on default setting. BIOS SETUP Chip Configuration (Scroll down to the SDRAM. NOTE: To make changes to this... field, the SDRAM Configuration field must be set to [User Define]. Leave on the memory module stores critical parameter information about the module, such as shown.) SDRAM Configuration [By SPD] This sets the optimal timings for items 2-5,...
... set to [User Define]. NOTE: To make changes to this field, the SDRAM Configuration field must be set to [User Define]. 58 ASUS CUBX-L\CUBX-E User's Manual 4. The EEPROM on default setting. BIOS SETUP Chip Configuration (Scroll down to the SDRAM. NOTE: To make changes to this... field, the SDRAM Configuration field must be set to [User Define]. Leave on the memory module stores critical parameter information about the module, such as shown.) SDRAM Configuration [By SPD] This sets the optimal timings for items 2-5,...
CUBX-E User Manual
Page 59
... 2.1 Support [Enabled] This function allows you to enable or disable PCI 2.1 features including passive release and delayed transaction. BIOS SETUP Chip Configuration ASUS CUBX-L\CUBX-E User's Manual 59 Configuration options: [Disabled] [Enabled] Memory Hole At 15M-16M [Disabled] This field allows you do not want to use UltraDMA100/66 mode. Configuration options: [Disabled] [Enabled...
... 2.1 Support [Enabled] This function allows you to enable or disable PCI 2.1 features including passive release and delayed transaction. BIOS SETUP Chip Configuration ASUS CUBX-L\CUBX-E User's Manual 59 Configuration options: [Disabled] [Enabled] Memory Hole At 15M-16M [Disabled] This field allows you do not want to use UltraDMA100/66 mode. Configuration options: [Disabled] [Enabled...

CUBX-E User Manual
Page 65
...[Enabled] This field allows you will then appear for this address range, you have more than the ROM. Shadowing a ROM reduces the memory available between 640K and 1024K by the amount used for shadowing other expansion card ROMs. If you install other expansion cards with ROMs on ... used for selecting the block size. Relocating to set the base address and block size of [No/ICU]. Configuration options: [Disabled] [Enabled] ASUS CUBX-L\CUBX-E User's Manual 65 If you have such a card and you to RAM enhances system performance, as information access is faster than one legacy ISA...
...[Enabled] This field allows you will then appear for this address range, you have more than the ROM. Shadowing a ROM reduces the memory available between 640K and 1024K by the amount used for shadowing other expansion card ROMs. If you install other expansion cards with ROMs on ... used for selecting the block size. Relocating to set the base address and block size of [No/ICU]. Configuration options: [Disabled] [Enabled] ASUS CUBX-L\CUBX-E User's Manual 65 If you have such a card and you to RAM enhances system performance, as information access is faster than one legacy ISA...


