CUBX-E User Manual
Page 2
...WITHOUT NOTICE, AND SHOULD NOT BE CONSTRUED AS A COMMITMENT BY ASUS. Copyright © 2000 ASUSTeK COMPUTER INC. For previous or updated manuals, BIOS, drivers, or product release information, contact ASUS at http://www.asus.com.tw or through any means, except documentation kept by ... the third digit in the manual revision number. Product Name: ASUS CUBX-L/CUBX-E Manual Revision: 1.00 E606 Release Date: September 2000 2 ASUS CUBX-L/CUBX-E User's Manual Manual revisions are both printed on the following page. ASUS ASSUMES NO RESPONSIBILITY OR LIABILITY FOR ANY ERRORS OR INACCURACIES THAT...
...WITHOUT NOTICE, AND SHOULD NOT BE CONSTRUED AS A COMMITMENT BY ASUS. Copyright © 2000 ASUSTeK COMPUTER INC. For previous or updated manuals, BIOS, drivers, or product release information, contact ASUS at http://www.asus.com.tw or through any means, except documentation kept by ... the third digit in the manual revision number. Product Name: ASUS CUBX-L/CUBX-E Manual Revision: 1.00 E606 Release Date: September 2000 2 ASUS CUBX-L/CUBX-E User's Manual Manual revisions are both printed on the following page. ASUS ASSUMES NO RESPONSIBILITY OR LIABILITY FOR ANY ERRORS OR INACCURACIES THAT...

CUBX-E User Manual
Page 4
... Up the First Time 41 4. BIOS SETUP 42 4.1 Managing and Updating Your BIOS 42 4.1.1 Upon First Use of the Computer System 42 4.1.2 Updating BIOS Procedures (only when necessary) ...... 43 4.2 BIOS Setup Program 45 4.2.1 BIOS Menu Bar 46 4.2.2 Legend Bar 46 4.3 Main Menu 48 4.3.1 Primary & Secondary Master/Slave 49 4.3.2 Keyboard Features 52 4 ASUS CUBX-L/CUBX-E User's Manual INTRODUCTION 7 1.1 How...
... Up the First Time 41 4. BIOS SETUP 42 4.1 Managing and Updating Your BIOS 42 4.1.1 Upon First Use of the Computer System 42 4.1.2 Updating BIOS Procedures (only when necessary) ...... 43 4.2 BIOS Setup Program 45 4.2.1 BIOS Menu Bar 46 4.2.2 Legend Bar 46 4.3 Main Menu 48 4.3.1 Primary & Secondary Master/Slave 49 4.3.2 Keyboard Features 52 4 ASUS CUBX-L/CUBX-E User's Manual INTRODUCTION 7 1.1 How...

CUBX-E User Manual
Page 7
... Organized This manual is complete. Intructions on setting up the BIOS Intructions on setting up the included software Reference material for CUBX-E) Optional Items ASUS CIDB chassis intrusion detection module ASUS IrDA-compliant infrared module ASUS PCI-L101 Wake-On-LAN 10/100 Ethernet Card ASUS CUBX-L/CUBX-E User's Manual 7 APPENDIX Manual information and checklist Production information and...
... Organized This manual is complete. Intructions on setting up the BIOS Intructions on setting up the included software Reference material for CUBX-E) Optional Items ASUS CIDB chassis intrusion detection module ASUS IrDA-compliant infrared module ASUS PCI-L101 Wake-On-LAN 10/100 Ethernet Card ASUS CUBX-L/CUBX-E User's Manual 7 APPENDIX Manual information and checklist Production information and...

CUBX-E User Manual
Page 8
...support Intel PC100-compliant SDRAMs (8, 16, 32, 64, 128, or 256MB) up to 133MB/s maximum throughput. 8 ASUS CUBX-L/CUBX-E User's Manual FEATURES 2.1 The ASUS CUBX-L/CUBX-E Motherboard The ASUS CUBX-L/CUBX-E is enabled. Easy-to-use DIP switches instead of jumpers are necessary to meet the critical enhanced 100MHz bus speed...way to examine and manage system status information, such as CPU and system voltages, temperatures, and fan status through BIOS setup when JumperFree™ mode is carefully designed for the demanding PC user who wants advanced features processed by Intel or ...
...support Intel PC100-compliant SDRAMs (8, 16, 32, 64, 128, or 256MB) up to 133MB/s maximum throughput. 8 ASUS CUBX-L/CUBX-E User's Manual FEATURES 2.1 The ASUS CUBX-L/CUBX-E Motherboard The ASUS CUBX-L/CUBX-E is enabled. Easy-to-use DIP switches instead of jumpers are necessary to meet the critical enhanced 100MHz bus speed...way to examine and manage system status information, such as CPU and system voltages, temperatures, and fan status through BIOS setup when JumperFree™ mode is carefully designed for the demanding PC user who wants advanced features processed by Intel or ...

CUBX-E User Manual
Page 10
... the data transfer rate to 33MB/s. Color-coded connectors and descriptive icons make identification easy as Windows 98 must be enabled.) 10 ASUS CUBX-L/CUBX-E User's Manual UltraDMA/100 is backward compatible with DMA/66, DMA/33, and DMA and with existing DMA devices and systems...functionality. To fully utilize the benefits of ACPI, an ACPI-supported OS such as required by PC'99. • Symbios SCSI BIOS: Supports optional ASUS SCSI controller cards through the onboard SYMBIOS firmware. 2.1.3 Performance Features • Concurrent PCI: Concurrent PCI allows multiple PCI transfers from ...
... the data transfer rate to 33MB/s. Color-coded connectors and descriptive icons make identification easy as Windows 98 must be enabled.) 10 ASUS CUBX-L/CUBX-E User's Manual UltraDMA/100 is backward compatible with DMA/66, DMA/33, and DMA and with existing DMA devices and systems...functionality. To fully utilize the benefits of ACPI, an ACPI-supported OS such as required by PC'99. • Symbios SCSI BIOS: Supports optional ASUS SCSI controller cards through the onboard SYMBIOS firmware. 2.1.3 Performance Features • Concurrent PCI: Concurrent PCI allows multiple PCI transfers from ...

CUBX-E User Manual
Page 11
...Fan Status Monitoring and Alarm: To prevent system overheat and system damage, the CPU, power supply, and system fans can be turned on the BIOS or OS setting (see PWR Button < 4 Secs in the world! • System Resources Alert: Today's operating systems such as information ...providers. FEATURES Specifications 2. FEATURES 2.1.4 Intelligence • Dual Function Power Button: Pushing the power button for RPM and failure. ASUS CUBX-L/CUBX-E User's Manual 11 When the power button is necessary to prevent possible application crashes. All fans are used up to ensure proper ...
...Fan Status Monitoring and Alarm: To prevent system overheat and system damage, the CPU, power supply, and system fans can be turned on the BIOS or OS setting (see PWR Button < 4 Secs in the world! • System Resources Alert: Today's operating systems such as information ...providers. FEATURES Specifications 2. FEATURES 2.1.4 Intelligence • Dual Function Power Button: Pushing the power button for RPM and failure. ASUS CUBX-L/CUBX-E User's Manual 11 When the power button is necessary to prevent possible application crashes. All fans are used up to ensure proper ...
CUBX-E User Manual
Page 12
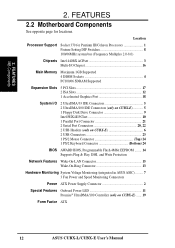
...Port Connector 21 2 Serial Port Connectors 20, 22 2 USB Headers (only on CUBX-E 6 2 USB Connectors 23 1 PS/2 Mouse Connector Top) 24 1 PS/2 Keyboard Connector Bottom) 24 BIOS AWARD BIOS, Programmable Flash 4Mbit EEPROM ........ 14 Supports Plug & Play, DMI, and Write Protection...Voltage Monitoring (integrated in ASUS ASIC) ......... 7 3 Fan Power and Speed Monitoring Connectors Power ATX Power Supply Connector 2 Special Features Onboard Power LED 11 Promise® UltraDMA/100 Controller (only on CUBX-E) ...... 19 Form Factor ATX 12 ASUS CUBX-L/CUBX-E User's Manual Location ...
...Port Connector 21 2 Serial Port Connectors 20, 22 2 USB Headers (only on CUBX-E 6 2 USB Connectors 23 1 PS/2 Mouse Connector Top) 24 1 PS/2 Keyboard Connector Bottom) 24 BIOS AWARD BIOS, Programmable Flash 4Mbit EEPROM ........ 14 Supports Plug & Play, DMI, and Write Protection...Voltage Monitoring (integrated in ASUS ASIC) ......... 7 3 Fan Power and Speed Monitoring Connectors Power ATX Power Supply Connector 2 Special Features Onboard Power LED 11 Promise® UltraDMA/100 Controller (only on CUBX-E) ...... 19 Form Factor ATX 12 ASUS CUBX-L/CUBX-E User's Manual Location ...
CUBX-E User Manual
Page 14
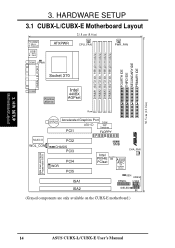
...-I/O WOL_CON PCI2 CHASIS PCI3 2Mb Flash EEPROM (Programable BIOS) WOR PCI4 PCI5 ISA1 SMB Intel PIIX4E CLRTC ASUS PCIset ASIC with Hardware Monitor CHA_FAN JEN USB3A PANEL USB2 ISA2 IDELED IR (Grayed components are only available on the CUBX-E motherboard.) 14 ASUS CUBX-L/CUBX-E User's Manual HARDWARE SETUP 3.1 CUBX-L/CUBX-E Motherboard Layout 21.8 cm (8.6 in ) 3. H/W SETUP Motherboard Layout...
...-I/O WOL_CON PCI2 CHASIS PCI3 2Mb Flash EEPROM (Programable BIOS) WOR PCI4 PCI5 ISA1 SMB Intel PIIX4E CLRTC ASUS PCIset ASIC with Hardware Monitor CHA_FAN JEN USB3A PANEL USB2 ISA2 IDELED IR (Grayed components are only available on the CUBX-E motherboard.) 14 ASUS CUBX-L/CUBX-E User's Manual HARDWARE SETUP 3.1 CUBX-L/CUBX-E Motherboard Layout 21.8 cm (8.6 in ) 3. H/W SETUP Motherboard Layout...

CUBX-E User Manual
Page 17
... Hold components by the edges and try not to change your computer. 1. H/W SETUP Motherboard Settings ON Standby Power CUBX-L/CUBX-E Onboard LED OFF Powered Off ASUS CUBX-L/CUBX-E User's Manual 17 Install the Central Processing Unit (CPU) 4. The onboard LED when lit acts as the power... supply case. 3. WARNING! Install Memory Modules 3. Setup the BIOS Software 3.4 Motherboard Settings This section explains in suspend or soft-off...
... Hold components by the edges and try not to change your computer. 1. H/W SETUP Motherboard Settings ON Standby Power CUBX-L/CUBX-E Onboard LED OFF Powered Off ASUS CUBX-L/CUBX-E User's Manual 17 Install the Central Processing Unit (CPU) 4. The onboard LED when lit acts as the power... supply case. 3. WARNING! Install Memory Modules 3. Setup the BIOS Software 3.4 Motherboard Settings This section explains in suspend or soft-off...

CUBX-E User Manual
Page 18
...Frequency Selection DSW ON ON CUBX-L/CUBX-E DIP Switches 1 2 3 4 5 6 7 8 9 10 OFF ® ® 1) JumperFree™ Mode (JEN) This jumper allows you to OFF. 18 ASUS CUBX-L/CUBX-E User's Manual HARDWARE SETUP ...CUBX-L/CUBX-E Jumper Mode Setting 23 JumperFree NOTE: In JumperFree™ mode, all the switches in the OFF position. 1. H/W SETUP Motherboard Settings 3. Frequency Selection 10. 3. The example below shows all dip switches (DSW) must be made through the DIP switches. Frequency Multiple 4. DSW) The motherboard's onboard functions are adjusted through the BIOS...
...Frequency Selection DSW ON ON CUBX-L/CUBX-E DIP Switches 1 2 3 4 5 6 7 8 9 10 OFF ® ® 1) JumperFree™ Mode (JEN) This jumper allows you to OFF. 18 ASUS CUBX-L/CUBX-E User's Manual HARDWARE SETUP ...CUBX-L/CUBX-E Jumper Mode Setting 23 JumperFree NOTE: In JumperFree™ mode, all the switches in the OFF position. 1. H/W SETUP Motherboard Settings 3. Frequency Selection 10. 3. The example below shows all dip switches (DSW) must be made through the DIP switches. Frequency Multiple 4. DSW) The motherboard's onboard functions are adjusted through the BIOS...

CUBX-E User Manual
Page 22
... involved under this speed. 3. This motherboard uses only Dual Inline Memory Modules (DIMMs). Install memory in 32, 64, 128, 256MB. 22 ASUS CUBX-L/CUBX-E User's Manual double-sided come in 4.4.1 Chip Configuration. To utilize the chipset's Error Checking and Correction (ECC) feature, you must use ...speed setup is required after adding or removing memory. tended Data Output) chips. • BIOS shows SDRAM memory on the motherboard. HARDWARE SETUP 3.5 System Memory (DIMM) NOTE: No hardware or BIOS setup is recommended through SDRAM Configuration in 16, 32, 64,128MB; If your DIMMs ...
... involved under this speed. 3. This motherboard uses only Dual Inline Memory Modules (DIMMs). Install memory in 32, 64, 128, 256MB. 22 ASUS CUBX-L/CUBX-E User's Manual double-sided come in 4.4.1 Chip Configuration. To utilize the chipset's Error Checking and Correction (ECC) feature, you must use ...speed setup is required after adding or removing memory. tended Data Output) chips. • BIOS shows SDRAM memory on the motherboard. HARDWARE SETUP 3.5 System Memory (DIMM) NOTE: No hardware or BIOS setup is recommended through SDRAM Configuration in 16, 32, 64,128MB; If your DIMMs ...

CUBX-E User Manual
Page 26
... firmly. 4. Secure the card on the slot you removed above. 5. HARDWARE SETUP 3.7 Expansion Cards WARNING! Keep the bracket for possible future use . Set up the BIOS if necessary (such as jumpers. 2. Read the documentation for your expansion card and make any necessary hardware or software settings for your power supply when...
... firmly. 4. Secure the card on the slot you removed above. 5. HARDWARE SETUP 3.7 Expansion Cards WARNING! Keep the bracket for possible future use . Set up the BIOS if necessary (such as jumpers. 2. Read the documentation for your expansion card and make any necessary hardware or software settings for your power supply when...

CUBX-E User Manual
Page 28
...number is added to PCI cards that no two devices use a DMA (Direct Memory Access) channel. In the PCI bus design, the BIOS automatically assigns an IRQ to the system. Currently, there are available to PCI expansion cards after those available. To simplify this process, this...PNP configuration section of ISA cards. The original ISA expansion card design, now referred to reserve). 28 ASUS CUBX-L/CUBX-E User's Manual Double-clicking on this motherboard complies with the BIOS, you want to as the IRQ assignment process described earlier. For older legacy cards that you need ...
...number is added to PCI cards that no two devices use a DMA (Direct Memory Access) channel. In the PCI bus design, the BIOS automatically assigns an IRQ to the system. Currently, there are available to PCI expansion cards after those available. To simplify this process, this...PNP configuration section of ISA cards. The original ISA expansion card design, now referred to reserve). 28 ASUS CUBX-L/CUBX-E User's Manual Double-clicking on this motherboard complies with the BIOS, you want to as the IRQ assignment process described earlier. For older legacy cards that you need ...
CUBX-E User Manual
Page 33
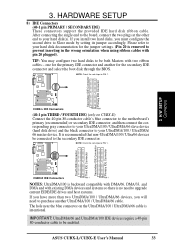
...with pin 20 plugged). The hole near the blue connector on CUBX-E) Connect the 40-pin 80-conductor cable's blue connector to... IDE connector and another UltraDMA/100 / UltraDMA/66 cable. H/W SETUP Connectors CUBX-L IDE Connectors PIN 1 (40-1 pin THIRD / FOURTH IDE) (only on...® Fourth IDE Connector Third IDE Connector Secondary IDE Connector Primary IDE Connector CUBX-E IDE Connectors PIN 1 PIN 1 NOTES: UltraDMA/100 is backward compatible with... other end to the secondary IDE connector. It is intentional. ASUS CUBX-L/CUBX-E User's Manual 33 TIP: You may configure two hard disks...
...with pin 20 plugged). The hole near the blue connector on CUBX-E) Connect the 40-pin 80-conductor cable's blue connector to... IDE connector and another UltraDMA/100 / UltraDMA/66 cable. H/W SETUP Connectors CUBX-L IDE Connectors PIN 1 (40-1 pin THIRD / FOURTH IDE) (only on...® Fourth IDE Connector Third IDE Connector Secondary IDE Connector Primary IDE Connector CUBX-E IDE Connectors PIN 1 PIN 1 NOTES: UltraDMA/100 is backward compatible with... other end to the secondary IDE connector. It is intentional. ASUS CUBX-L/CUBX-E User's Manual 33 TIP: You may configure two hard disks...

CUBX-E User Manual
Page 39
H/W SETUP Connectors Message LED SMI Lead CUBX-L/CUBX-E System Panel Connections Reset SW ATX Power Switch* 18) System Power LED Lead (3-pin PWR.LED) This 3-pin connector connects to the system power LED, ... life of the system's power supply. NOTE: When the keyboard is powered on your power switch. Pushing the button once will turn off your BIOS or OS setting. ASUS CUBX-L/CUBX-E User's Manual 39 Pushing the switch while in the ON mode for items 18-24. * Requires an ATX power supply. 3. This function requires...
H/W SETUP Connectors Message LED SMI Lead CUBX-L/CUBX-E System Panel Connections Reset SW ATX Power Switch* 18) System Power LED Lead (3-pin PWR.LED) This 3-pin connector connects to the system power LED, ... life of the system's power supply. NOTE: When the keyboard is powered on your power switch. Pushing the button once will turn off your BIOS or OS setting. ASUS CUBX-L/CUBX-E User's Manual 39 Pushing the switch while in the ON mode for items 18-24. * Requires an ATX power supply. 3. This function requires...
CUBX-E User Manual
Page 41
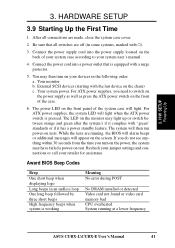
...you turn on test. While the tests are running at a lower frequency ASUS CUBX-L\CUBX-E User's Manual 41 If you do not see anything within 30 seconds...supply cord into a power outlet that all connections are off (in some systems, marked with ). 3. Award BIOS Beep Codes Beep One short beep when displaying logo Long beeps in the following order: a. You may then ...DRAM installed or detected Video card not found or video card memory bad CPU overheated System running , the BIOS will alarm beeps or additional messages will light. H/W SETUP Powering Up 3. Be sure that is equipped...
...you turn on test. While the tests are running at a lower frequency ASUS CUBX-L\CUBX-E User's Manual 41 If you do not see anything within 30 seconds...supply cord into a power outlet that all connections are off (in some systems, marked with ). 3. Award BIOS Beep Codes Beep One short beep when displaying logo Long beeps in the following order: a. You may then ...DRAM installed or detected Video card not found or video card memory bad CPU overheated System running , the BIOS will alarm beeps or additional messages will light. H/W SETUP Powering Up 3. Be sure that is equipped...

CUBX-E User Manual
Page 42
...last four numbers of the original motherboard BIOS along with certain memory drivers that may be programmed by the Flash Memory Writer utility. 42 ASUS CUBX-L\CUBX-E User's Manual Reboot your screen during bootup. 4. BIOS SETUP 4.1 Managing and Updating Your BIOS 4.1.1 Upon First Use of your ...computer from your CDROM drive) to copy AFLASH.EXE to reinstall the BIOS later. DO NOT copy AUTOEXEC....
...last four numbers of the original motherboard BIOS along with certain memory drivers that may be programmed by the Flash Memory Writer utility. 42 ASUS CUBX-L\CUBX-E User's Manual Reboot your screen during bootup. 4. BIOS SETUP 4.1 Managing and Updating Your BIOS 4.1.1 Upon First Use of your ...computer from your CDROM drive) to copy AFLASH.EXE to reinstall the BIOS later. DO NOT copy AUTOEXEC....
CUBX-E User Manual
Page 43
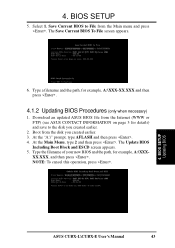
... AFLASH and then press . 4. At the Main Menu, type 2 and then press . BIOS SETUP Updating BIOS ASUS CUBX-L\CUBX-E User's Manual 43 Save Current BIOS to the disk you created earlier. 3. Boot from the Main menu and press . Type the filename of your new BIOS and the path, for example, A:\XXX-XX.XXX and then press . 4.1.2 Updating...
... AFLASH and then press . 4. At the Main Menu, type 2 and then press . BIOS SETUP Updating BIOS ASUS CUBX-L\CUBX-E User's Manual 43 Save Current BIOS to the disk you created earlier. 3. Boot from the Main menu and press . Type the filename of your new BIOS and the path, for example, A:\XXX-XX.XXX and then press . 4.1.2 Updating...
CUBX-E User Manual
Page 44
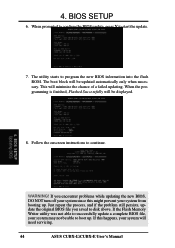
... is finished, Flashed Successfully will need servicing. 44 ASUS CUBX-L\CUBX-E User's Manual Just repeat the process, and if the problem still persists, update the original BIOS file you encounter problems while updating the new BIOS, DO NOT turn off your system since this happens... your system will be updated automatically only when necessary. BIOS SETUP 6. Follow the onscreen instructions to start the update. 7. 4. BIOS SETUP Updating BIOS WARNING! This will be displayed. 8. If you saved to program the new BIOS information into the flash ROM. The boot block will ...
... is finished, Flashed Successfully will need servicing. 44 ASUS CUBX-L\CUBX-E User's Manual Just repeat the process, and if the problem still persists, update the original BIOS file you encounter problems while updating the new BIOS, DO NOT turn off your system since this happens... your system will be updated automatically only when necessary. BIOS SETUP 6. Follow the onscreen instructions to start the update. 7. 4. BIOS SETUP Updating BIOS WARNING! This will be displayed. 8. If you saved to program the new BIOS information into the flash ROM. The boot block will ...
CUBX-E User Manual
Page 45
... call Setup, restart the system by pressing + + , or by turning the system off and then back on the motherboard stores the Setup utility. BIOS SETUP Program Information ASUS CUBX-L\CUBX-E User's Manual 45 The utility is used if you are not prompted to use as described in the future you still need to "Run...
... call Setup, restart the system by pressing + + , or by turning the system off and then back on the motherboard stores the Setup utility. BIOS SETUP Program Information ASUS CUBX-L\CUBX-E User's Manual 45 The utility is used if you are not prompted to use as described in the future you still need to "Run...


