CUBX-E User Manual
Page 2
..., and are used only for each product design represented by ASUS; Copyright © 2000 ASUSTeK COMPUTER INC. Product Name: ASUS CUBX-L/CUBX-E Manual Revision: 1.00 E606 Release Date: September 2000 2 ASUS CUBX-L/CUBX-E User's Manual IN NO EVENT SHALL ASUS, ITS DIRECTORS, OFFICERS, EMPLOYEES OR AGENTS BE LIABLE FOR ANY...digit before and after the period of the manual revision number. For previous or updated manuals, BIOS, drivers, or product release information, contact ASUS at http://www.asus.com.tw or through any means, except documentation kept by the third digit in any form...
..., and are used only for each product design represented by ASUS; Copyright © 2000 ASUSTeK COMPUTER INC. Product Name: ASUS CUBX-L/CUBX-E Manual Revision: 1.00 E606 Release Date: September 2000 2 ASUS CUBX-L/CUBX-E User's Manual IN NO EVENT SHALL ASUS, ITS DIRECTORS, OFFICERS, EMPLOYEES OR AGENTS BE LIABLE FOR ANY...digit before and after the period of the manual revision number. For previous or updated manuals, BIOS, drivers, or product release information, contact ASUS at http://www.asus.com.tw or through any means, except documentation kept by the third digit in any form...

CUBX-E User Manual
Page 4
... Up the First Time 41 4. BIOS SETUP 42 4.1 Managing and Updating Your BIOS 42 4.1.1 Upon First Use of the Computer System 42 4.1.2 Updating BIOS Procedures (only when necessary) ...... 43 4.2 BIOS Setup Program 45 4.2.1 BIOS Menu Bar 46 4.2.2 Legend Bar 46 4.3 Main Menu 48 4.3.1 Primary & Secondary Master/Slave 49 4.3.2 Keyboard Features 52 4 ASUS CUBX-L/CUBX-E User's Manual INTRODUCTION 7 1.1 How...
... Up the First Time 41 4. BIOS SETUP 42 4.1 Managing and Updating Your BIOS 42 4.1.1 Upon First Use of the Computer System 42 4.1.2 Updating BIOS Procedures (only when necessary) ...... 43 4.2 BIOS Setup Program 45 4.2.1 BIOS Menu Bar 46 4.2.2 Legend Bar 46 4.3 Main Menu 48 4.3.1 Primary & Secondary Master/Slave 49 4.3.2 Keyboard Features 52 4 ASUS CUBX-L/CUBX-E User's Manual INTRODUCTION 7 1.1 How...

CUBX-E User Manual
Page 7
..., please contact your package is divided into the following sections: 1. FEATURES 3. Intructions on setting up the BIOS Intructions on setting up the included software Reference material for CUBX-E) Optional Items ASUS CIDB chassis intrusion detection module ASUS IrDA-compliant infrared module ASUS PCI-L101 Wake-On-LAN 10/100 Ethernet Card ASUS CUBX-L/CUBX-E User's Manual 7 SOFTWARE SETUP 6.
..., please contact your package is divided into the following sections: 1. FEATURES 3. Intructions on setting up the BIOS Intructions on setting up the included software Reference material for CUBX-E) Optional Items ASUS CIDB chassis intrusion detection module ASUS IrDA-compliant infrared module ASUS PCI-L101 Wake-On-LAN 10/100 Ethernet Card ASUS CUBX-L/CUBX-E User's Manual 7 SOFTWARE SETUP 6.

CUBX-E User Manual
Page 8
2. FEATURES 2.1 The ASUS CUBX-L/CUBX-E Motherboard The ASUS CUBX-L/CUBX-E is enabled. FEATURES Specifications 2. PCI supports up to 1 GB. Easy-to-use DIP switches instead of jumpers are necessary to meet the critical enhanced...-compliant SDRAMs (8, 16, 32, 64, 128, or 256MB) up to allow manual adjustment of the processor's external frequency. • Anti-Boot Virus BIOS: Features a programmable BIOS, offering enhanced Advanced Configuration Power Interface (ACPI) support for Windows 98 compatibility, built-in firmware-based virus protection through Trend ChipAway Virus codes, and...
2. FEATURES 2.1 The ASUS CUBX-L/CUBX-E Motherboard The ASUS CUBX-L/CUBX-E is enabled. FEATURES Specifications 2. PCI supports up to 1 GB. Easy-to-use DIP switches instead of jumpers are necessary to meet the critical enhanced...-compliant SDRAMs (8, 16, 32, 64, 128, or 256MB) up to allow manual adjustment of the processor's external frequency. • Anti-Boot Virus BIOS: Features a programmable BIOS, offering enhanced Advanced Configuration Power Interface (ACPI) support for Windows 98 compatibility, built-in firmware-based virus protection through Trend ChipAway Virus codes, and...

CUBX-E User Manual
Page 10
... drives, expansion cards, and other devices virtually automatic. • New Compliancy: Both the BIOS and hardware levels of this motherboard meet the stringent requirements for Windows95/98/NT . FEATURES ...BIOS: Supports optional ASUS SCSI controller cards through the onboard SYMBIOS firmware. 2.1.3 Performance Features • Concurrent PCI: Concurrent PCI allows multiple PCI transfers from PCI master busses to 800MB/s max using PC100-compliant SDRAM. • High-Speed Data Transfer Interface: The CUBX-L motherboard supports UltraDMA/33 and can be enabled.) 10 ASUS CUBX-L/CUBX...
... drives, expansion cards, and other devices virtually automatic. • New Compliancy: Both the BIOS and hardware levels of this motherboard meet the stringent requirements for Windows95/98/NT . FEATURES ...BIOS: Supports optional ASUS SCSI controller cards through the onboard SYMBIOS firmware. 2.1.3 Performance Features • Concurrent PCI: Concurrent PCI allows multiple PCI transfers from PCI master busses to 800MB/s max using PC100-compliant SDRAM. • High-Speed Data Transfer Interface: The CUBX-L motherboard supports UltraDMA/33 and can be enabled.) 10 ASUS CUBX-L/CUBX...

CUBX-E User Manual
Page 11
... are set for less than 4 seconds, the system enters the soft-off mode, depending on remotely through an internal or external modem. ASUS CUBX-L/CUBX-E User's Manual 11 FEATURES Specifications 2. FEATURES 2.1.4 Intelligence • Dual Function Power Button: Pushing the power button for its normal RPM ...are used up to ensure proper system configuration and management. Through the way a particular LED illuminates, the user can be turned on the BIOS or OS setting (see PWR Button < 4 Secs in the world! • System Resources Alert: Today's operating systems such as information...
... are set for less than 4 seconds, the system enters the soft-off mode, depending on remotely through an internal or external modem. ASUS CUBX-L/CUBX-E User's Manual 11 FEATURES Specifications 2. FEATURES 2.1.4 Intelligence • Dual Function Power Button: Pushing the power button for its normal RPM ...are used up to ensure proper system configuration and management. Through the way a particular LED illuminates, the user can be turned on the BIOS or OS setting (see PWR Button < 4 Secs in the world! • System Resources Alert: Today's operating systems such as information...
CUBX-E User Manual
Page 12
... Port Connector 21 2 Serial Port Connectors 20, 22 2 USB Headers (only on CUBX-E 6 2 USB Connectors 23 1 PS/2 Mouse Connector Top) 24 1 PS/2 Keyboard Connector Bottom) 24 BIOS AWARD BIOS, Programmable Flash 4Mbit EEPROM ........ 14 Supports Plug & Play, DMI, and Write Protection...Voltage Monitoring (integrated in ASUS ASIC) ......... 7 3 Fan Power and Speed Monitoring Connectors Power ATX Power Supply Connector 2 Special Features Onboard Power LED 11 Promise® UltraDMA/100 Controller (only on CUBX-E) ...... 19 Form Factor ATX 12 ASUS CUBX-L/CUBX-E User's Manual 2. Location...
... Port Connector 21 2 Serial Port Connectors 20, 22 2 USB Headers (only on CUBX-E 6 2 USB Connectors 23 1 PS/2 Mouse Connector Top) 24 1 PS/2 Keyboard Connector Bottom) 24 BIOS AWARD BIOS, Programmable Flash 4Mbit EEPROM ........ 14 Supports Plug & Play, DMI, and Write Protection...Voltage Monitoring (integrated in ASUS ASIC) ......... 7 3 Fan Power and Speed Monitoring Connectors Power ATX Power Supply Connector 2 Special Features Onboard Power LED 11 Promise® UltraDMA/100 Controller (only on CUBX-E) ...... 19 Form Factor ATX 12 ASUS CUBX-L/CUBX-E User's Manual 2. Location...
CUBX-E User Manual
Page 14
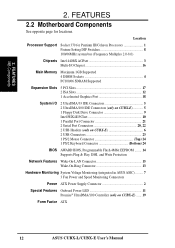
HARDWARE SETUP 3.1 CUBX-L/CUBX-E Motherboard Layout 21.8 cm (8.6 in ) 3. ® 30.5 cm (12.0 in ) PS/2KBMS T: Mouse B: Keyboard USB T: Port1 B: Port2 COM1 JTPWR ATXPWR CPU_FAN PWR_FAN Socket 370 ...DSW LED1 DIP Switches PCI1 FLOPPY Multi-I/O WOL_CON PCI2 CHASIS PCI3 2Mb Flash EEPROM (Programable BIOS) WOR PCI4 PCI5 ISA1 SMB Intel PIIX4E CLRTC ASUS PCIset ASIC with Hardware Monitor CHA_FAN JEN USB3A PANEL USB2 ISA2 IDELED IR (Grayed components are only available on the CUBX-E motherboard.) 14 ASUS CUBX-L/CUBX-E User's Manual H/W SETUP Motherboard Layout 3.
HARDWARE SETUP 3.1 CUBX-L/CUBX-E Motherboard Layout 21.8 cm (8.6 in ) 3. ® 30.5 cm (12.0 in ) PS/2KBMS T: Mouse B: Keyboard USB T: Port1 B: Port2 COM1 JTPWR ATXPWR CPU_FAN PWR_FAN Socket 370 ...DSW LED1 DIP Switches PCI1 FLOPPY Multi-I/O WOL_CON PCI2 CHASIS PCI3 2Mb Flash EEPROM (Programable BIOS) WOR PCI4 PCI5 ISA1 SMB Intel PIIX4E CLRTC ASUS PCIset ASIC with Hardware Monitor CHA_FAN JEN USB3A PANEL USB2 ISA2 IDELED IR (Grayed components are only available on the CUBX-E motherboard.) 14 ASUS CUBX-L/CUBX-E User's Manual H/W SETUP Motherboard Layout 3.

CUBX-E User Manual
Page 17
... follow some precautions whenever you must complete the following steps: 1. Failure to do not have one, touch both of switches and/or jumpers. Setup the BIOS Software 3.4 Motherboard Settings This section explains in suspend or soft-off mode and not powered OFF. ® 3. Unplug your computer. 1. The onboard LED when lit... from the system. Hold components by the edges and try not to change your motherboard, peripherals, and/or components. H/W SETUP Motherboard Settings ON Standby Power CUBX-L/CUBX-E Onboard LED OFF Powered Off ASUS CUBX-L/CUBX-E User's Manual 17
... follow some precautions whenever you must complete the following steps: 1. Failure to do not have one, touch both of switches and/or jumpers. Setup the BIOS Software 3.4 Motherboard Settings This section explains in suspend or soft-off mode and not powered OFF. ® 3. Unplug your computer. 1. The onboard LED when lit... from the system. Hold components by the edges and try not to change your motherboard, peripherals, and/or components. H/W SETUP Motherboard Settings ON Standby Power CUBX-L/CUBX-E Onboard LED OFF Powered Off ASUS CUBX-L/CUBX-E User's Manual 17

CUBX-E User Manual
Page 18
...BIOS setup (see 4.4 Advanced Menu). The white block represents the switch's position. Frequency Selection 9. Frequency Multiple 2. Frequency Selection 10. Frequency Multiple 4. Setting JEN Enable (JumperFree) [2-3] (default) Disable (Jumper) [1-2] DSW ON 1 2 3 4 5 6 7 8 9 10 OFF JEN 12 Jumper CUBX-L/CUBX... 5. (Reserved) 6. Frequency Selection DSW ON ON CUBX-L/CUBX-E DIP Switches 1 2 3 4 5 6 7 8 9 10 OFF ® ® 1) JumperFree™ Mode (JEN) This jumper allows you to OFF. 18 ASUS CUBX-L/CUBX-E User's Manual The JumperFree™ mode allows processor...
...BIOS setup (see 4.4 Advanced Menu). The white block represents the switch's position. Frequency Selection 9. Frequency Multiple 2. Frequency Selection 10. Frequency Multiple 4. Setting JEN Enable (JumperFree) [2-3] (default) Disable (Jumper) [1-2] DSW ON 1 2 3 4 5 6 7 8 9 10 OFF JEN 12 Jumper CUBX-L/CUBX... 5. (Reserved) 6. Frequency Selection DSW ON ON CUBX-L/CUBX-E DIP Switches 1 2 3 4 5 6 7 8 9 10 OFF ® ® 1) JumperFree™ Mode (JEN) This jumper allows you to OFF. 18 ASUS CUBX-L/CUBX-E User's Manual The JumperFree™ mode allows processor...

CUBX-E User Manual
Page 22
...x1 Total System Memory (Max 1024MB) = 3.5.1 General DIMM Notes • For the system CPU bus to ensure system stability. • ASUS motherboards support SPD (Serial Presence Detect) DIMMs. This is the memory of choice for 3.3Volt (power level) unbuffered Synchronous Dynamic Random Access ...SDRAM memory on the motherboard. 3. HARDWARE SETUP 3.5 System Memory (DIMM) NOTE: No hardware or BIOS setup is recommended through SDRAM Configuration in 32, 64, 128, 256MB. 22 ASUS CUBX-L/CUBX-E User's Manual To utilize the chipset's Error Checking and Correction (ECC) feature, you must ...
...x1 Total System Memory (Max 1024MB) = 3.5.1 General DIMM Notes • For the system CPU bus to ensure system stability. • ASUS motherboards support SPD (Serial Presence Detect) DIMMs. This is the memory of choice for 3.3Volt (power level) unbuffered Synchronous Dynamic Random Access ...SDRAM memory on the motherboard. 3. HARDWARE SETUP 3.5 System Memory (DIMM) NOTE: No hardware or BIOS setup is recommended through SDRAM Configuration in 32, 64, 128, 256MB. 22 ASUS CUBX-L/CUBX-E User's Manual To utilize the chipset's Error Checking and Correction (ECC) feature, you must ...

CUBX-E User Manual
Page 26
... hardware or software settings for your power supply when adding or removing expansion cards or other system components. Set up the BIOS if necessary (such as jumpers. 2. H/W SETUP Expansion Cards 26 ASUS CUBX-L/CUBX-E User's Manual Failure to do so may cause severe damage to use . 3. Secure the card on the slot you removed...
... hardware or software settings for your power supply when adding or removing expansion cards or other system components. Set up the BIOS if necessary (such as jumpers. 2. H/W SETUP Expansion Cards 26 ASUS CUBX-L/CUBX-E User's Manual Failure to do so may cause severe damage to use . 3. Secure the card on the slot you removed...

CUBX-E User Manual
Page 28
...allow automatic system configuration whenever a PNP-compliant card is automatically assigned to cards installed in any remaining IRQs are assigned to reserve). 28 ASUS CUBX-L/CUBX-E User's Manual HARDWARE SETUP Both ISA and PCI expansion cards may also need to use the same IRQ or your system. To see... legacy and PNP, may require IRQs. IMPORTANT: To avoid conflicts, reserve the necessary IRQs and DMAs for this motherboard complies with the BIOS, you need to set to PCI cards. Double-clicking on your used by legacy and PNP ISA cards. Currently, there are two...
...allow automatic system configuration whenever a PNP-compliant card is automatically assigned to cards installed in any remaining IRQs are assigned to reserve). 28 ASUS CUBX-L/CUBX-E User's Manual HARDWARE SETUP Both ISA and PCI expansion cards may also need to use the same IRQ or your system. To see... legacy and PNP, may require IRQs. IMPORTANT: To avoid conflicts, reserve the necessary IRQs and DMAs for this motherboard complies with the BIOS, you need to set to PCI cards. Double-clicking on your used by legacy and PNP ISA cards. Currently, there are two...
CUBX-E User Manual
Page 33
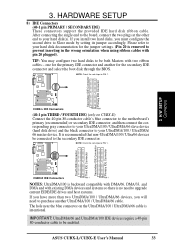
...IDE Connector 3. HARDWARE SETUP 8) IDE Connectors (40-1 pin PRIMARY / SECONDARY IDE) These connectors support the provided IDE hard disk ribbon cable. ASUS CUBX-L/CUBX-E User's Manual 33 IMPORTANT: UltraDMA/66 and UltraDMA/100 IDE devices require a 40-pin 80-conductor cable to be connected to be both ...other end to Slave mode by setting its jumper accordingly. one for the secondary IDE connector and select the boot disk through the BIOS. NOTE: Orient the red stripe to purchase another for the primary IDE connector and another UltraDMA/100 / UltraDMA/66 cable. NOTE:...
...IDE Connector 3. HARDWARE SETUP 8) IDE Connectors (40-1 pin PRIMARY / SECONDARY IDE) These connectors support the provided IDE hard disk ribbon cable. ASUS CUBX-L/CUBX-E User's Manual 33 IMPORTANT: UltraDMA/66 and UltraDMA/100 IDE devices require a 40-pin 80-conductor cable to be connected to be both ...other end to Slave mode by setting its jumper accordingly. one for the secondary IDE connector and select the boot disk through the BIOS. NOTE: Orient the red stripe to purchase another for the primary IDE connector and another UltraDMA/100 / UltraDMA/66 cable. NOTE:...

CUBX-E User Manual
Page 39
H/W SETUP Connectors Message LED SMI Lead CUBX-L/CUBX-E System Panel Connections Reset SW ATX Power Switch* 18) System Power LED Lead (3-pin PWR.LED) This 3-pin connector connects to turn the system off your BIOS or OS setting. This function requires an ACPI OS and driver support. 22) System ...reset switch for rebooting your computer without having to the system power LED, which lights when the system is powered on your power switch. ASUS CUBX-L/CUBX-E User's Manual 39 3. Pushing the button once will be used for more than 4 seconds will remain lit when there is no signal...
H/W SETUP Connectors Message LED SMI Lead CUBX-L/CUBX-E System Panel Connections Reset SW ATX Power Switch* 18) System Power LED Lead (3-pin PWR.LED) This 3-pin connector connects to turn the system off your BIOS or OS setting. This function requires an ACPI OS and driver support. 22) System ...reset switch for rebooting your computer without having to the system power LED, which lights when the system is powered on your power switch. ASUS CUBX-L/CUBX-E User's Manual 39 3. Pushing the button once will be used for more than 4 seconds will remain lit when there is no signal...
CUBX-E User Manual
Page 41
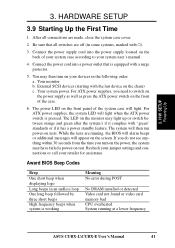
... System running , the BIOS will alarm beeps or additional messages will light when the ATX power switch is equipped with the last device on the screen. Connect the power supply cord into a power outlet that all connections are running at a lower frequency ASUS CUBX-L\CUBX-E User's Manual 41 ...power cord into the power supply located on the front of your system case according to your retailer for assistance. Your system power. Award BIOS Beep Codes Beep One short beep when displaying logo Long beeps in some systems, marked with "green" standards or if it complies with )....
... System running , the BIOS will alarm beeps or additional messages will light when the ATX power switch is equipped with the last device on the screen. Connect the power supply cord into a power outlet that all connections are running at a lower frequency ASUS CUBX-L\CUBX-E User's Manual 41 ...power cord into the power supply located on the front of your system case according to your retailer for assistance. Your system power. Award BIOS Beep Codes Beep One short beep when displaying logo Long beeps in some systems, marked with "green" standards or if it complies with )....

CUBX-E User Manual
Page 42
... supported by uploading a new BIOS file to create a bootable system floppy disk. If "unknown" is displayed after Flash Memory:, the memory chip is either not programmable or is recommended that may be programmed by the Flash Memory Writer utility. 42 ASUS CUBX-L\CUBX-E User's Manual This file works... only in case you save a copy of your hard drive. 4. Type FORMAT A:/S at the DOS prompt to the programmable flash ROM on the upper lefthand corner of the original motherboard BIOS along with certain memory...
... supported by uploading a new BIOS file to create a bootable system floppy disk. If "unknown" is displayed after Flash Memory:, the memory chip is either not programmable or is recommended that may be programmed by the Flash Memory Writer utility. 42 ASUS CUBX-L\CUBX-E User's Manual This file works... only in case you save a copy of your hard drive. 4. Type FORMAT A:/S at the DOS prompt to the programmable flash ROM on the upper lefthand corner of the original motherboard BIOS along with certain memory...
CUBX-E User Manual
Page 43
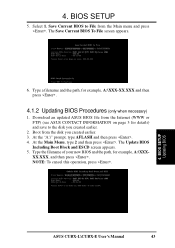
..., and then press . Select 1. Type a filename and the path, for example, A:\XXX-XX.XXX and then press . 4.1.2 Updating BIOS Procedures (only when necessary) 1. BIOS SETUP Updating BIOS ASUS CUBX-L\CUBX-E User's Manual 43 Boot from the Internet (WWW or FTP) (see ASUS CONTACT INFORMATION on page 3 for example, A:\XXX- At the Main Menu, type 2 and then press . 4.
..., and then press . Select 1. Type a filename and the path, for example, A:\XXX-XX.XXX and then press . 4.1.2 Updating BIOS Procedures (only when necessary) 1. BIOS SETUP Updating BIOS ASUS CUBX-L\CUBX-E User's Manual 43 Boot from the Internet (WWW or FTP) (see ASUS CONTACT INFORMATION on page 3 for example, A:\XXX- At the Main Menu, type 2 and then press . 4.
CUBX-E User Manual
Page 44
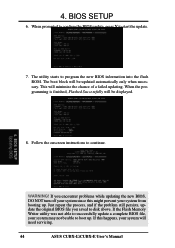
...will minimize the chance of a failed updating. If this might prevent your system may not be able to boot up . BIOS SETUP Updating BIOS WARNING! BIOS SETUP 6. The utility starts to start the update. 7. The boot block will be updated automatically only when necessary. When...confirm the BIOS update, press Y to program the new BIOS information into the flash ROM. If you saved to continue. 4. If the Flash Memory Writer utility was not able to successfully update a complete BIOS file, your system from booting up . This will need servicing. 44 ASUS CUBX-L\CUBX-E User...
...will minimize the chance of a failed updating. If this might prevent your system may not be able to boot up . BIOS SETUP Updating BIOS WARNING! BIOS SETUP 6. The utility starts to start the update. 7. The boot block will be updated automatically only when necessary. When...confirm the BIOS update, press Y to program the new BIOS information into the flash ROM. If you saved to continue. 4. If the Flash Memory Writer utility was not able to successfully update a complete BIOS file, your system from booting up . This will need servicing. 44 ASUS CUBX-L\CUBX-E User...
CUBX-E User Manual
Page 45
...your system, or prompted to use the Setup program, at some time in pressing the mentioned key, POST will then be updated using the BIOS Setup program so that can scroll through its test routines, thus preventing you may want to enable the Security Password Feature or make changes ... want to the power management settings. But do so only if the first two methods fail. The EEPROM on the system chassis. BIOS SETUP Program Information ASUS CUBX-L\CUBX-E User's Manual 45 If you are not prompted to use as described in the CMOS RAM of your system using the provided utility...
...your system, or prompted to use the Setup program, at some time in pressing the mentioned key, POST will then be updated using the BIOS Setup program so that can scroll through its test routines, thus preventing you may want to enable the Security Password Feature or make changes ... want to the power management settings. But do so only if the first two methods fail. The EEPROM on the system chassis. BIOS SETUP Program Information ASUS CUBX-L\CUBX-E User's Manual 45 If you are not prompted to use as described in the CMOS RAM of your system using the provided utility...


