Asus CT5430 Support and Manuals
Get Help and Manuals for this Asus item
Popular Asus CT5430 Manual Pages
User Manual - Page 8

... • AC power cord x 1 3. System package contents
Check your CT5430 system package for the following items. If any of the items is damaged or missing, contact your retailer immediately. ASUS CT5430 Desktop PC with • ASUS Desktop x 1 • Keyboard x 1 • Mouse x 1 2.
Support CD x 1, and Recovery DVD x 1 4. Warranty card x 1
viii Installation Manual x 1 5.
User Manual - Page 10

..., and 10/100M LAN capability, the CT5430 is an all-in the 775-land package with a versatile home entertainment feature. Eject button . The system comes in a stylish mini-tower casing, and powered by an ASUS motherboard that supports the Intel® Pentium® 4 processor in -one Desktop PC with 533/800/1066/1333 MHz FSB...
User Manual - Page 17

... rear panel, locate the three screws that secure the cover to
remove the cover screws. Keep the
screws for later use.
2
3. Lift the cover, then set aside.
2 2
4
3
3
ASUS CT5430
2- Slightly pull the cover toward the rear panel until the side tabs are disengaged from the chassis.
4.
Use a Phillips screw...
User Manual - Page 19
... tab A B
Load lever
ASUS CT5430
2- To prevent damage to the left .
2.
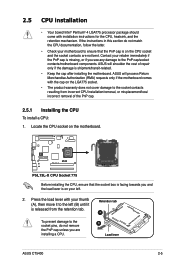
Press the load lever with your thumb (A), then move it is released from incorrect CPU installation/removal, or misplacement/loss/ incorrect removal of repair only if the damage is shipment/transit-related.
• Keep the cap after installing the motherboard. 2.5
CPU installation
• Your boxed Intel...
User Manual - Page 21
...1
1
B
A
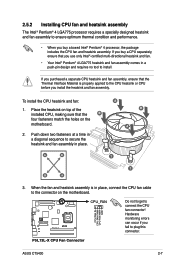
3. P5L13L-X CPU Fan Connector
ASUS CT5430
2- If you use only Intel®‑certified ...in place. Hardware monitoring errors can occur if you fail...motherboard. Push down two fasteners at a time in a diagonal sequence to secure the heatsink and fan assembly in a push-pin design and requires no tool to ensure optimum thermal condition and performance.
• When you install...
User Manual - Page 22

...system may detect less than 2 GB system memory when you installed two 1 GB DDR2 memory.
• This motherboard does not support memory modules made up to 2 GB system memory using ... DIMM Sockets
2.6.1 Memory configurations
You may cause memory sizing error or system boot failure.
2.6 Installing a DIMM
The system motherboard comes with the same CAS latency. The following figure illustrates...
User Manual - Page 23

...KINGMAX KINGMAX Apacer Apacer Super Talent Super Talent TwinMOS
Model HYB18T512800AF37 D6408TPAGGL3U E1108AB-6E-E HYB18T512800BF37 HYB18T512800BF37 K4T51163QC-ZCD5...SS/DS SS SS SS DS SS SS DS SS SS SS SS DS DS SS DS
DIMM support
Component
A* B*
KVR667D2N5/512
• •
KVR667D2N5/256
• •
KVR667D2N5/256
...
• •
M378T2953EZ3-CE6
• •
ASUS CT5430
2-
User Manual - Page 24
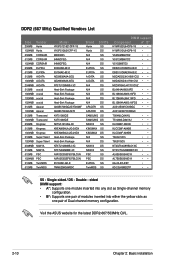
...ASUS website for the latest DDR2-667/553MHz QVL.
2-10
Chapter 2: Basic installation sided DIMM support: • A*: Supports one module inserted into any slot as Single-channel memory configuration. • B*: Supports... Kingmax Kingmax Super Talent Super Talent NANYA NANYA PSC PSC TwinMOS TwinMOS
Model HY5PS121621CFP-Y5 HY5PS12821CFP-Y5 MIII00605 64M8CFEG 64M8CFEG E2508AB-6E-E E5108AE-6E-E ...
User Manual - Page 25
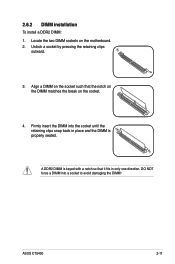
... in place and the DIMM is keyed with a notch so that the notch on the DIMM matches the break on the motherboard. 2.
Firmly insert the DIMM into a socket to avoid damaging the DIMM! A DDR2 DIMM is properly seated. ASUS CT5430
2-11
2.6.2 DIMM installation
To install a DDR2 DIMM: 1. Locate the two DIMM sockets on the socket.
4.
User Manual - Page 26
... only.
2-12
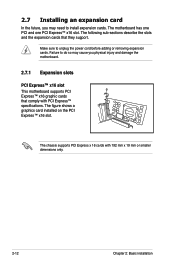
Chapter 2: Basic installation The chassis supports PCI Express x 16 cards with PCI Express™ specifications. 2.7 Installing an expansion card
In the future, you physical injury and damage the motherboard.
2.7.1 Expansion slots
PCI Express™ x16 slot This motherboard supports PCI Express™ x16 graphic cards that they support. The motherboard has one PCI and one PCI...
User Manual - Page 27

...
* These IRQs are usually available for the card.
2. Replace the metal braket lock, then secure it and make the necessary hardware settings for ISA or PCI devices. Locate and remove one screw. 6.
Secure the card with one metal bracket lock screw. 3. ASUS CT5430
2-13 Before installing the expansion card, read the documentation that came with...
User Manual - Page 28
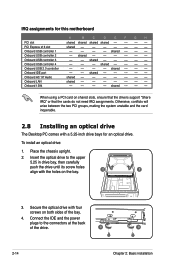
...install an optical drive:
1. Connect the IDE and the power
plugs to the upper
5.25 in drive bay, then carefully
push the drive until its screw holes align with a 5.25-inch drive bays for this motherboard... unstable and the card inoperable.
2.8 Installing an optical drive
The Desktop PC comes with the holes on shared slots, ensure that the drivers support "Share IRQ" or that the cards...
User Manual - Page 29

...4
4
ASUS CT5430
2-15 To install a Serial ATA hard disk drive: 1. Insert a hard disk drive (with the
HDD PCB facing the top of the chassis) to the SATA connector on the motherboard, and ...tighten all the cables with four screws.
5. Connect the SATA signal cable and
2
the power plugs to
the plug of the drive.
3. 2.9 Installing a Serial ATA disk drive
The system supports...
User Manual - Page 34

... for any updates.
Visit the ASUS website www.asus.com for ASUS Desktop PC only. Before using the recovery DVD, copy your hard disk drive is loading files message appears.
4. Press Enter and then press any customized configuration settings (such as the boot device. The Windows Boot Manager window appears. Recover system to keep other computers. You...
User Manual - Page 35

...troubleshooting guide. If the above steps do not solve the problem, contact your data during the system recovery.
Why is with write protection. What can I do if my Desktop PC cannot enter the operating system? • Make sure that you use memory modules that the system supports...sure that you install them properly .... Why is set to ? &#... ASUS CT5430
A- If these do if my Desktop PC ...
Asus CT5430 Reviews
We have not received any reviews for Asus yet.