User Manual
Page 11
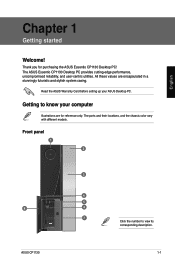
... the chassis color vary with different models. Getting to view its corresponding description. English Chapter 1 Getting started Welcome! All these values are for purchasing the ASUS Essentio CP1130 Desktop PC! ASUS CP1130 1-1 Thank you for reference only. The ASUS Essentio CP1130 Desktop PC provides cutting-edge performance, uncompromised reliability, and user-centric utilities.
... the chassis color vary with different models. Getting to view its corresponding description. English Chapter 1 Getting started Welcome! All these values are for purchasing the ASUS Essentio CP1130 Desktop PC! ASUS CP1130 1-1 Thank you for reference only. The ASUS Essentio CP1130 Desktop PC provides cutting-edge performance, uncompromised reliability, and user-centric utilities.
User Manual
Page 13
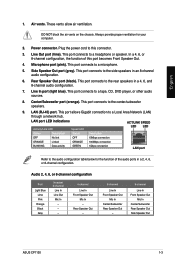
... Speaker Out Mic In Center/Subwoofer Rear Speaker Out - 8-channel Line In Front Speaker Out Mic In Center/Subwoofer Rear Speaker Out Side Speaker Out ASUS CP1130 1-3 Rear Speaker Out port (black). DO NOT block the air vents on the chassis. These vents allow air ventilation.
... Speaker Out Mic In Center/Subwoofer Rear Speaker Out - 8-channel Line In Front Speaker Out Mic In Center/Subwoofer Rear Speaker Out Side Speaker Out ASUS CP1130 1-3 Rear Speaker Out port (black). DO NOT block the air vents on the chassis. These vents allow air ventilation.
User Manual
Page 15
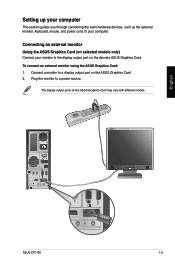
... Card: 1. Connect a monitor to a display output port on the discrete ASUS Graphics Card. Plug the monitor to a power source. English ASUS CP1130 1-5 Setting up your computer This section guides you through connecting the main hardware devices, such as the external monitor, keyboard..., mouse, and power cord, to your monitor to the display output port on the ASUS Graphics Card. 2. Connecting an external...
... Card: 1. Connect a monitor to a display output port on the discrete ASUS Graphics Card. Plug the monitor to a power source. English ASUS CP1130 1-5 Setting up your computer This section guides you through connecting the main hardware devices, such as the external monitor, keyboard..., mouse, and power cord, to your monitor to the display output port on the ASUS Graphics Card. 2. Connecting an external...
User Manual
Page 17
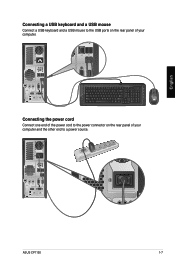
C Connecting the power cord Connect one end of the power cord to the power connector on the rear panel of your computer and the other end to the USB ports on the rear panel of your computer. English Connecting a USB keyboard and a USB mouse Connect a USB keyboard and a USB mouse to a power source. ASUS CP1130 1-7
C Connecting the power cord Connect one end of the power cord to the power connector on the rear panel of your computer and the other end to the USB ports on the rear panel of your computer. English Connecting a USB keyboard and a USB mouse Connect a USB keyboard and a USB mouse to a power source. ASUS CP1130 1-7
User Manual
Page 19
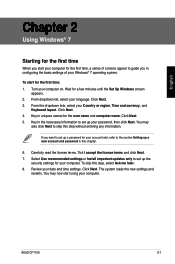
... important updates only to set up a user account and password in configuring the basic settings of your Windows® 7 operating system. Review your computer on. ASUS CP1130 2-1 Click Next. 3. Click Next. 5. Click Next. Turn your date and time settings. From the dropdown lists, select your language. You may also click Next to...
... important updates only to set up a user account and password in configuring the basic settings of your Windows® 7 operating system. Review your computer on. ASUS CP1130 2-1 Click Next. 3. Click Next. 5. Click Next. Turn your date and time settings. From the dropdown lists, select your language. You may also click Next to...
User Manual
Page 21
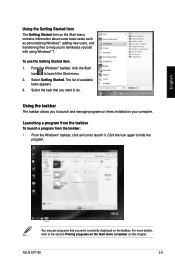
... the Start icon to hide the program. Click the icon again to launch the Start menu. 2. Select Getting Started. The list of available tasks appears. 3. ASUS CP1130 2-3 Launching a program from the taskbar To launch a program from the taskbar: • From the Windows® taskbar, click an icon to the section Pinning programs...
... the Start icon to hide the program. Click the icon again to launch the Start menu. 2. Select Getting Started. The list of available tasks appears. 3. ASUS CP1130 2-3 Launching a program from the taskbar To launch a program from the taskbar: • From the Windows® taskbar, click an icon to the section Pinning programs...
User Manual
Page 23
... taskbar, right-click the program that you want to open it. Volume Click this icon to remove from the taskbar, then select Unpin this chapter. ASUS CP1130 2-5 English Unpinning programs from the Start menu To unpin programs from the taskbar: 1. For more details, refer to launch the Start menu. 2. From the Windows...
... taskbar, right-click the program that you want to open it. Volume Click this icon to remove from the taskbar, then select Unpin this chapter. ASUS CP1130 2-5 English Unpinning programs from the Start menu To unpin programs from the taskbar: 1. For more details, refer to launch the Start menu. 2. From the Windows...
User Manual
Page 25
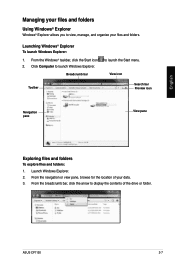
... of your files and folders. View icon Toolbar Search bar Preview icon Navigation pane View pane Exploring files and folders To explore files and folders: 1. ASUS CP1130 2-7 Click Computer to launch the Start menu. Launch Windows Explorer. 2. From the navigation or view pane, browse for the location of the drive or folder...
... of your files and folders. View icon Toolbar Search bar Preview icon Navigation pane View pane Exploring files and folders To explore files and folders: 1. ASUS CP1130 2-7 Click Computer to launch the Start menu. Launch Windows Explorer. 2. From the navigation or view pane, browse for the location of the drive or folder...

User Manual
Page 27
... select your preferred sorting type. Key in a name for the new folder. Launch Windows Explorer. 2. Launch Windows Explorer. 2. Grouping your files To group your files: 1. ASUS CP1130 2-9 Adding a new folder To add a new folder: 1. From the toolbar, click New folder. 3. Right-click anywhere on the View pane. 3. From the menu that appears...
... select your preferred sorting type. Key in a name for the new folder. Launch Windows Explorer. 2. Launch Windows Explorer. 2. Grouping your files To group your files: 1. ASUS CP1130 2-9 Adding a new folder To add a new folder: 1. From the toolbar, click New folder. 3. Right-click anywhere on the View pane. 3. From the menu that appears...

User Manual
Page 29
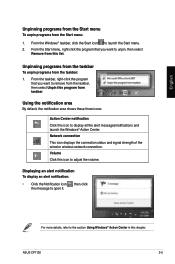
... the previous section Customizing icons and notifications in this chapter. To launch Windows 7 Action Center, click the Notification icon , then click Open Action Center. 2. English ASUS CP1130 2-11 Launching Windows® 7 Action Center To launch Windows® 7 Action Center: 1.
... the previous section Customizing icons and notifications in this chapter. To launch Windows 7 Action Center, click the Notification icon , then click Open Action Center. 2. English ASUS CP1130 2-11 Launching Windows® 7 Action Center To launch Windows® 7 Action Center: 1.

User Manual
Page 31
Select Create a new account. 4. English ASUS CP1130 2-13 Setting up a user account To set up a user account and password You may create user accounts and passwords for people who will use your computer. When done, click Create Account. From the Windows® taskbar, click > Getting Started > Add new users. 2. Select Manage another account. 3. Key in the name of the new user. 5. Select either Standard user or Administrator as the user type. 6. Setting up a user account: 1.
Select Create a new account. 4. English ASUS CP1130 2-13 Setting up a user account To set up a user account and password You may create user accounts and passwords for people who will use your computer. When done, click Create Account. From the Windows® taskbar, click > Getting Started > Add new users. 2. Select Manage another account. 3. Key in the name of the new user. 5. Select either Standard user or Administrator as the user type. 6. Setting up a user account: 1.
User Manual
Page 33
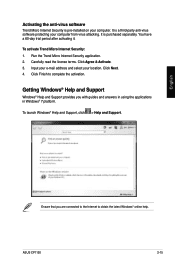
... select your computer. Getting Windows® Help and Support Windows® Help and Support provides you are connected to the Internet to complete the activation. ASUS CP1130 2-15 Click Finish to obtain the latest Windows® online help. To activate Trend Micro Internet Security: 1. Click Next. 4. To launch Windows® Help and...
... select your computer. Getting Windows® Help and Support Windows® Help and Support provides you are connected to the Internet to complete the activation. ASUS CP1130 2-15 Click Finish to obtain the latest Windows® online help. To activate Trend Micro Internet Security: 1. Click Next. 4. To launch Windows® Help and...

User Manual
Page 34
... the USB storage device to your computer Connecting a USB storage device This desktop PC provides USB 2.0/1.1 ports on your computer, then click Eject USB2.0 FlashDisk. ASUS CP1130 3-1 DO NOT remove a USB storage device when data transfer is in progress. Doing so may cause data loss or damage the USB storage device. Chapter...
... the USB storage device to your computer Connecting a USB storage device This desktop PC provides USB 2.0/1.1 ports on your computer, then click Eject USB2.0 FlashDisk. ASUS CP1130 3-1 DO NOT remove a USB storage device when data transfer is in progress. Doing so may cause data loss or damage the USB storage device. Chapter...
User Manual
Page 36
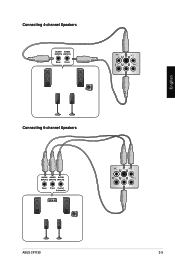
English Connecting 4-channel Speakers Connecting 6-channel Speakers ASUS CP1130 3-3
English Connecting 4-channel Speakers Connecting 6-channel Speakers ASUS CP1130 3-3
User Manual
Page 38
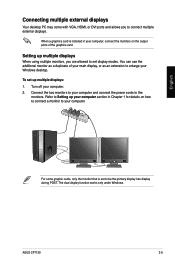
... monitors, you to be the primary display has display during POST. To set to connect multiple external displays. Connect the two monitors to your computer. 2. ASUS CP1130 3-5 Refer to Setting up multiple displays: 1. English For some graphic cards, only the monitor that is installed in Chapter 1 for details on the output ports...
... monitors, you to be the primary display has display during POST. To set to connect multiple external displays. Connect the two monitors to your computer. 2. ASUS CP1130 3-5 Refer to Setting up multiple displays: 1. English For some graphic cards, only the monitor that is installed in Chapter 1 for details on the output ports...

User Manual
Page 40
The HDMI cable is purchased separately. • To get the best display performance, ensure that your computer. • You need an HDMI cable to the HDMI port of your HDMI cable is less than 15 meters. English ASUS CP1130 3-7 Connecting an HDTV Connect a High Definition TV (HDTV) to connect the HDTV and the computer.
The HDMI cable is purchased separately. • To get the best display performance, ensure that your computer. • You need an HDMI cable to the HDMI port of your HDMI cable is less than 15 meters. English ASUS CP1130 3-7 Connecting an HDTV Connect a High Definition TV (HDTV) to connect the HDTV and the computer.
User Manual
Page 41
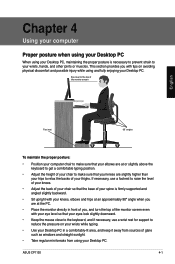
... back of your chair so that the base of your spine is necessary to prevent strain to your wrists, hands, and other joints or muscles. ASUS CP1130 4-1 Chapter 4 Using your computer Proper posture when using your Desktop PC When using your Desktop PC. This section provides you , and turn the top of...
... back of your chair so that the base of your spine is necessary to prevent strain to your wrists, hands, and other joints or muscles. ASUS CP1130 4-1 Chapter 4 Using your computer Proper posture when using your Desktop PC When using your Desktop PC. This section provides you , and turn the top of...
User Manual
Page 43
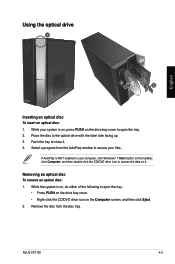
... drive bay cover. • Right-click the CD/DVD drive icon on the drive bay cover to access the data on it . 4. While your files. ASUS CP1130 4-3 Using the optical drive 1 English 2 3 Inserting an optical disc To insert an optical disc: 1. Place the disc to close it . Push the tray to the...
... drive bay cover. • Right-click the CD/DVD drive icon on the drive bay cover to access the data on it . 4. While your files. ASUS CP1130 4-3 Using the optical drive 1 English 2 3 Inserting an optical disc To insert an optical disc: 1. Place the disc to close it . Push the tray to the...

User Manual
Page 45
... connection settings. Connect one end of an RJ-45 cable to the LAN (RJ-45) port on the DSL/cable modem and your Internet connection. ASUS CP1130 5-1 English Modem RJ-45 cable 3. Contact your Internet Service Provider (ISP) for details or assistance in setting up your DSL/cable modem. 2. Connecting via a DSL...
... connection settings. Connect one end of an RJ-45 cable to the LAN (RJ-45) port on the DSL/cable modem and your Internet connection. ASUS CP1130 5-1 English Modem RJ-45 cable 3. Contact your Internet Service Provider (ISP) for details or assistance in setting up your DSL/cable modem. 2. Connecting via a DSL...
User Manual
Page 47
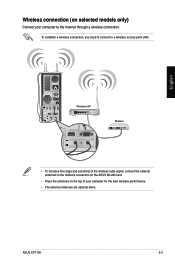
To establish a wireless connection, you need to connect to a wireless access point (AP). English Wireless AP Modem • To increase the range and sensitivity of the wireless radio signal, connect the external antennas to the antenna connectors on the ASUS WLAN Card. • Place the antennas on selected models only) Connect your computer for the best wireless performance. • The external antennas are optional items. ASUS CP1130 5-3 Wireless connection (on the top of your computer to the Internet through a wireless connection.
To establish a wireless connection, you need to connect to a wireless access point (AP). English Wireless AP Modem • To increase the range and sensitivity of the wireless radio signal, connect the external antennas to the antenna connectors on the ASUS WLAN Card. • Place the antennas on selected models only) Connect your computer for the best wireless performance. • The external antennas are optional items. ASUS CP1130 5-3 Wireless connection (on the top of your computer to the Internet through a wireless connection.


