
User Manual
Page 5
English Contents Chapter 6: Using the Utilities ASUS AI Manager 6-1 ASUS EPU-4 Engine 6-6 ASUS Update 6-10 ASUS MyLogo2 6-11 Nero 9 ...6-12 Recovering your system 6-16 Chapter 7: Troubleshooting iv
English Contents Chapter 6: Using the Utilities ASUS AI Manager 6-1 ASUS EPU-4 Engine 6-6 ASUS Update 6-10 ASUS MyLogo2 6-11 Nero 9 ...6-12 Recovering your system 6-16 Chapter 7: Troubleshooting iv

User Manual
Page 12
... in this button to eject the optical disk drive tray. 3. Front I/O ports cover. Press this bay. 4. Optical disk drive eject button. Rear panel 1 7 8 9 1 1 2 3 4 5 6 10 11 12 13 14 Click the number to a headphone or speaker. 6. MultiMediaCard / Secure Digital™ / Memory Stick™ / Memory Stick Pro™ card slot. Optical disk drive...
... in this button to eject the optical disk drive tray. 3. Front I/O ports cover. Press this bay. 4. Optical disk drive eject button. Rear panel 1 7 8 9 1 1 2 3 4 5 6 10 11 12 13 14 Click the number to a headphone or speaker. 6. MultiMediaCard / Secure Digital™ / Memory Stick™ / Memory Stick Pro™ card slot. Optical disk drive...
User Manual
Page 14
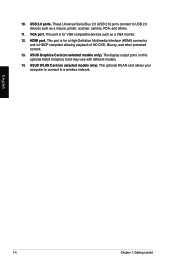
... Multimedia Interface (HDMI) connector, and is for VGA-compatible devices such as a mouse, printer, scanner, camera, PDA, and others. 11. ASUS WLAN Card (on selected models only). This port is HDCP compliant allowing playback of HD DVD, Blu-ray, and other protected content. 13. ...HDMI port. English 1-4 Chapter 1: Getting started ASUS Graphics Card (on selected models only). These Universal Serial Bus 2.0 (USB 2.0) ports connect to a wireless network. The display output ports on ...
... Multimedia Interface (HDMI) connector, and is for VGA-compatible devices such as a mouse, printer, scanner, camera, PDA, and others. 11. ASUS WLAN Card (on selected models only). This port is HDCP compliant allowing playback of HD DVD, Blu-ray, and other protected content. 13. ...HDMI port. English 1-4 Chapter 1: Getting started ASUS Graphics Card (on selected models only). These Universal Serial Bus 2.0 (USB 2.0) ports connect to a wireless network. The display output ports on ...

User Manual
Page 30
From the Windows Update screen, click the task that you to check and install the latest updates to do. Using Windows® Update Windows Update allows you want to enhance the security and performance of your computer. Select All Programs > Windows Update. 3. From the Windows® taskbar, click the Start icon to launch the Start menu. 2. Launching Windows® Update To launch Windows® Update: 1. English 2-12 Chapter 2: Using Windows® 7
From the Windows Update screen, click the task that you to check and install the latest updates to do. Using Windows® Update Windows Update allows you want to enhance the security and performance of your computer. Select All Programs > Windows Update. 3. From the Windows® taskbar, click the Start icon to launch the Start menu. 2. Launching Windows® Update To launch Windows® Update: 1. English 2-12 Chapter 2: Using Windows® 7

User Manual
Page 44
Keys 12. Press to launch the Favorites folder in Windows® Internet 22. Press to launch Microsoft® Excel. 18. Launches Windows® Media Player. Increases picture ... playback in Windows® Media Player. Turns the volume's mute mode on Windows® Vista / Windows® 7 operating systems. 4-4 Chapter 4: Using your computer ASUS SK-2045 keyboard 6 7 8 9 10 11 12 13 14 15 16 17 1 18 2 ` 19 3 20 4 21 5 22 English Keys 1. 2. 3. 4. 5. 6. 7. 8. 9. 10. 11. Explorer. Press to launch Microsoft® Internet Explorer...
Keys 12. Press to launch the Favorites folder in Windows® Internet 22. Press to launch Microsoft® Excel. 18. Launches Windows® Media Player. Increases picture ... playback in Windows® Media Player. Turns the volume's mute mode on Windows® Vista / Windows® 7 operating systems. 4-4 Chapter 4: Using your computer ASUS SK-2045 keyboard 6 7 8 9 10 11 12 13 14 15 16 17 1 18 2 ` 19 3 20 4 21 5 22 English Keys 1. 2. 3. 4. 5. 6. 7. 8. 9. 10. 11. Explorer. Press to launch Microsoft® Internet Explorer...

User Manual
Page 61
From the main menu, click Nero 9 Essentials. 6-12 Chapter 6: Using the Utilities Insert the Nero 9 DVD into your Nero 9 DVD. 3. English Nero 9 Nero 9 allows you to create, copy, burn, edit, share, and update different kinds of your optical drive. 2. If Autorun is disabled, double-click the SeupX.exe file from the main directory of data. If Autorun is enabled, the main menu appears automatically. Installing Nero 9 To install Nero 9: 1.
From the main menu, click Nero 9 Essentials. 6-12 Chapter 6: Using the Utilities Insert the Nero 9 DVD into your Nero 9 DVD. 3. English Nero 9 Nero 9 allows you to create, copy, burn, edit, share, and update different kinds of your optical drive. 2. If Autorun is disabled, double-click the SeupX.exe file from the main directory of data. If Autorun is enabled, the main menu appears automatically. Installing Nero 9 To install Nero 9: 1.