User Manual
Page 11
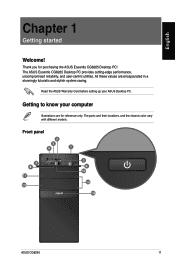
... casing. English Chapter 1 Getting started Welcome! Front panel 2 3 4 1 7 8 11 13 5 6 9 10 12 14 ASUS CG8265 11 Thank you for reference only. Getting to know your ASUS Desktop PC. All these values are for purchasing the ASUS Essentio CG8265 Desktop PC! The ASUS Essentio CG8265 Desktop PC provides cutting-edge performance, uncompromised reliability, and user-centric utilities. The...
... casing. English Chapter 1 Getting started Welcome! Front panel 2 3 4 1 7 8 11 13 5 6 9 10 12 14 ASUS CG8265 11 Thank you for reference only. Getting to know your ASUS Desktop PC. All these values are for purchasing the ASUS Essentio CG8265 Desktop PC! The ASUS Essentio CG8265 Desktop PC provides cutting-edge performance, uncompromised reliability, and user-centric utilities. The...

User Manual
Page 13
... power supply to external Serial ATA hard disk drives. 7. ���U�S��B�3�.�0�p��o�rt�s�. ASUS CG8265 13 These Universal Serial Bus 2.0 (USB 2.0) ports connect to USB 2.0 devices such as a mouse, printer, scanner, camera, PDA, and others . • DO NOT connect a keyboard...
... power supply to external Serial ATA hard disk drives. 7. ���U�S��B�3�.�0�p��o�rt�s�. ASUS CG8265 13 These Universal Serial Bus 2.0 (USB 2.0) ports connect to USB 2.0 devices such as a mouse, printer, scanner, camera, PDA, and others . • DO NOT connect a keyboard...
User Manual
Page 15
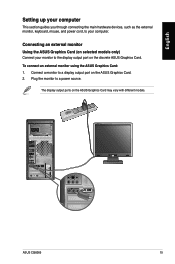
... external monitor, keyboard, mouse, and power cord, to a display output port on the ASUS Graphics Card. 2. ASUS CG8265 15 Plug the monitor to the display output port on the discrete ASUS Graphics Card. To connect an external monitor using the ASUS Graphics Card: 1. The display output ports on selected models only) Connect your monitor to...
... external monitor, keyboard, mouse, and power cord, to a display output port on the ASUS Graphics Card. 2. ASUS CG8265 15 Plug the monitor to the display output port on the discrete ASUS Graphics Card. To connect an external monitor using the ASUS Graphics Card: 1. The display output ports on selected models only) Connect your monitor to...

User Manual
Page 17
Connect your computer and the other end to a power source. ASUS CG8265 17 Connecting the power cord Connect one end of the power cord to the power connector on the rear panel of your USB keyboard and USB mouse to the USB 2.0 ports. English Connecting a USB keyboard and a USB mouse Connect a USB keyboard and a USB mouse to the USB ports on the rear panel of your computer.
Connect your computer and the other end to a power source. ASUS CG8265 17 Connecting the power cord Connect one end of the power cord to the power connector on the rear panel of your USB keyboard and USB mouse to the USB 2.0 ports. English Connecting a USB keyboard and a USB mouse Connect a USB keyboard and a USB mouse to the USB ports on the rear panel of your computer.
User Manual
Page 19
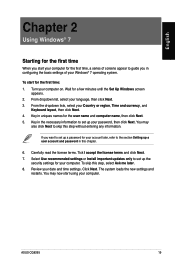
... to guide you want to set up your password, then click Next. Carefully read the license terms. Tick I accept the license terms and click Next. 7. ASUS CG8265 19 Key in this chapter. 6. You may now start for the first time: 1. Click Next. Turn your language, then click Next. 3. From the dropdown lists...
... to guide you want to set up your password, then click Next. Carefully read the license terms. Tick I accept the license terms and click Next. 7. ASUS CG8265 19 Key in this chapter. 6. You may now start for the first time: 1. Click Next. Turn your language, then click Next. 3. From the dropdown lists...

User Manual
Page 21
... this program to taskbar. You may pin items on the jumplist such as favorite websites, often-visited folders or drives, or recently played media files. ASUS CG8265 21 To pin items to launch the Start menu. 2. Unpinning items from the jumplist To unpin items from the taskbar: 1. From the Windows® taskbar...
... this program to taskbar. You may pin items on the jumplist such as favorite websites, often-visited folders or drives, or recently played media files. ASUS CG8265 21 To pin items to launch the Start menu. 2. Unpinning items from the jumplist To unpin items from the taskbar: 1. From the Windows® taskbar...

User Manual
Page 23
... toolbar, click the View icon . 4. From the navigation pane, select the location of your data. 3. Arranging your files To arrange your files: 1. Launch Windows Explorer. 2. ASUS CG8265 23 From the navigation or view pane, browse for the location of your data. 3. You may also right-click anywhere on the View pane, click...
... toolbar, click the View icon . 4. From the navigation pane, select the location of your data. 3. Arranging your files To arrange your files: 1. Launch Windows Explorer. 2. ASUS CG8265 23 From the navigation or view pane, browse for the location of your data. 3. You may also right-click anywhere on the View pane, click...

User Manual
Page 25
... Administrator as the user type. 6. From Windows 7 Action Center, click the task that you want to do . Select Manage another account. 3. Select Create a new account. 4. ASUS CG8265 25 Launching Windows® 7 Action Center To launch Windows® 7 Action Center: 1. Select All Programs > Windows Update. 3. Setting up a user account To set up a user...
... Administrator as the user type. 6. From Windows 7 Action Center, click the task that you want to do . Select Manage another account. 3. Select Create a new account. 4. ASUS CG8265 25 Launching Windows® 7 Action Center To launch Windows® 7 Action Center: 1. Select All Programs > Windows Update. 3. Setting up a user account To set up a user...

User Manual
Page 27
... storage device from the Windows notification area on both the front and rear panels. When the Safe to your computer, then click Eject USB2.0 FlashDisk. 2. ASUS CG8265 27 The USB ports allow you to connect USB devices such as storage devices.
... storage device from the Windows notification area on both the front and rear panels. When the Safe to your computer, then click Eject USB2.0 FlashDisk. 2. ASUS CG8265 27 The USB ports allow you to connect USB devices such as storage devices.

User Manual
Page 29
English Connecting 4-channel Speakers Connecting 6-channel Speakers ASUS CG8265 29
English Connecting 4-channel Speakers Connecting 6-channel Speakers ASUS CG8265 29

User Manual
Page 31
... Your desktop PC may come with VGA, HDMI, or DVI ports and allows you are allowed to be the primary display has display during POST. ASUS CG8265 31
... Your desktop PC may come with VGA, HDMI, or DVI ports and allows you are allowed to be the primary display has display during POST. ASUS CG8265 31

User Manual
Page 33
The HDMI cable is purchased separately. • To get the best display performance, ensure that your computer. • You need an HDMI cable to connect the HDTV and the computer. ASUS CG8265 33 English Connecting an HDTV Connect a High Definition TV (HDTV) to the HDMI port of your HDMI cable is less than 15 meters.
The HDMI cable is purchased separately. • To get the best display performance, ensure that your computer. • You need an HDMI cable to connect the HDTV and the computer. ASUS CG8265 33 English Connecting an HDTV Connect a High Definition TV (HDTV) to the HDMI port of your HDMI cable is less than 15 meters.

User Manual
Page 35
... approximately 90º angle when you are at or slightly above the keyboard to get a comfortable typing position. • Adjust the height of your thighs. ASUS CG8265 35 English Chapter 4 Using your computer Proper posture when using your Desktop PC When using and fully enjoying your Desktop PC. This section provides you...
... approximately 90º angle when you are at or slightly above the keyboard to get a comfortable typing position. • Adjust the height of your thighs. ASUS CG8265 35 English Chapter 4 Using your computer Proper posture when using your Desktop PC When using and fully enjoying your Desktop PC. This section provides you...

User Manual
Page 37
Place the disc to close it . Select a program from the disc tray. ASUS CG8265 37 Removing an optical disc To remove an optical disc: 1. Remove the disc from the AutoPlay window to access your files. Push the tray to ...
Place the disc to close it . Select a program from the disc tray. ASUS CG8265 37 Removing an optical disc To remove an optical disc: 1. Remove the disc from the AutoPlay window to access your files. Push the tray to ...

User Manual
Page 39
.... Turns the volume's mute mode on Windows® XP / Vista / 7 operating systems. • Install the keyboard driver before using. ASUS CG8265 39 Goes to the next track in a media player. Increases the system volume. ASUS-Razer Arctosa Gaming keyboard English Keys 1. 2. 3. 4. 5. 6. 7. 8. Visit the Razer website at www.razersupport.com to download the driver...
.... Turns the volume's mute mode on Windows® XP / Vista / 7 operating systems. • Install the keyboard driver before using. ASUS CG8265 39 Goes to the next track in a media player. Increases the system volume. ASUS-Razer Arctosa Gaming keyboard English Keys 1. 2. 3. 4. 5. 6. 7. 8. Visit the Razer website at www.razersupport.com to download the driver...

User Manual
Page 41
English ASUS KB34211 modern wired keyboard 12 3 Hot keys 1. 2. 3. Description Turns the volume's mute mode on Windows® Vista / Windows® 7 / XP operating systems. ASUS CG8265 41 Decreases the system volume. Increases the system volume. The special function keys only work on /off.
English ASUS KB34211 modern wired keyboard 12 3 Hot keys 1. 2. 3. Description Turns the volume's mute mode on Windows® Vista / Windows® 7 / XP operating systems. ASUS CG8265 41 Decreases the system volume. Increases the system volume. The special function keys only work on /off.

User Manual
Page 43
... the other end to a DSL/cable modem. Refer to the documentation that came with your computer to a DSL/cable modem or a local area network (LAN). ASUS CG8265 43 Set up your DSL/cable modem. Connecting via a DSL/cable modem To connect via a DSL/cable modem: 1. Contact your Internet Service Provider (ISP) for...
... the other end to a DSL/cable modem. Refer to the documentation that came with your computer to a DSL/cable modem or a local area network (LAN). ASUS CG8265 43 Set up your DSL/cable modem. Connecting via a DSL/cable modem To connect via a DSL/cable modem: 1. Contact your Internet Service Provider (ISP) for...

User Manual
Page 45
... the wireless network that you need to the Internet through a wireless connection. You may need to connect to a wireless access point (AP). ASUS CG8265 45 English Wireless connection (on the top of the wireless radio signal, connect the external antennas to the antenna connectors on the... ASUS WLAN Card. • Place the antennas on selected models only) Connect your computer to key in the notification area to the wireless network. 5....
... the wireless network that you need to the Internet through a wireless connection. You may need to connect to a wireless access point (AP). ASUS CG8265 45 English Wireless connection (on the top of the wireless radio signal, connect the external antennas to the antenna connectors on the... ASUS WLAN Card. • Place the antennas on selected models only) Connect your computer to key in the notification area to the wireless network. 5....
User Manual
Page 47
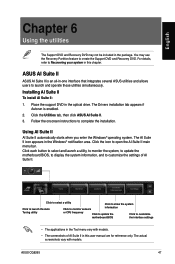
...AI Suite II: 1. The AI Suite II icon appears in -one interface that integrates several ASUS utilities and allows users to launch and operate these utilities simultaneously. ASUS CG8265 47 ASUS AI Suite II ASUS AI Suite II is enabled. 2. Using AI Suite II AI Suite II automatically starts when...system, to update the motherboard BIOS, to display the system information, and to complete the installation. Click the Utilities tab, then click ASUS AI Suite II. 3. Follow the onscreen instructions to customize the settings of AI Suite II in the package. You may not be included...
...AI Suite II: 1. The AI Suite II icon appears in -one interface that integrates several ASUS utilities and allows users to launch and operate these utilities simultaneously. ASUS CG8265 47 ASUS AI Suite II ASUS AI Suite II is enabled. 2. Using AI Suite II AI Suite II automatically starts when...system, to update the motherboard BIOS, to display the system information, and to complete the installation. Click the Utilities tab, then click ASUS AI Suite II. 3. Follow the onscreen instructions to customize the settings of AI Suite II in the package. You may not be included...

User Manual
Page 49
Launching and configuring DIGI+ VRM ASUS DIGI+ VRM allows you to adjust VRM voltage and frequency modulation to increase VRM efficiency. 7. Load-line Calibration Higher load-line calibration could get more ... boost may vary depending on the AI Suite II main menu bar. 1 4 2 5 3 6 Application helps 7 Apply all changes immediately Undo all changes without applying Function description 1. ASUS CG8265 49 DIGI+ VRM CPU Current Capability Protection DIGI+ VRM CPU Current Capability provides wider total power range for overclocking. Reduce phase number under heavy system...
Launching and configuring DIGI+ VRM ASUS DIGI+ VRM allows you to adjust VRM voltage and frequency modulation to increase VRM efficiency. 7. Load-line Calibration Higher load-line calibration could get more ... boost may vary depending on the AI Suite II main menu bar. 1 4 2 5 3 6 Application helps 7 Apply all changes immediately Undo all changes without applying Function description 1. ASUS CG8265 49 DIGI+ VRM CPU Current Capability Protection DIGI+ VRM CPU Current Capability provides wider total power range for overclocking. Reduce phase number under heavy system...


