
User Guide
Page 3
... Services viii Chapter 1: Product introduction 1.1 Welcome 1-1 1.2 Package contents 1-1 1.3 Monitor introduction 1-2 1.3.1 Front view 1-2 1.3.2 Back view 1-3 Chapter 2: Setup 2.1 Assembling the monitor arm/base 2-1 2.2 Detaching the arm/base (for VESA wall mount 2-2 2.3 Adjusting the monitor 2-4 2.4 Connecting the cables 2-6 2.5 Turning on the monitor 2-7 Chapter 3: General instructions 3.1 OSD (On-Screen Display) menu 3-1 3.1.1 How to reconfigure 3-1 3.1.2 OSD function introduction 3-2 3.2 Specifications summary 3-9 3.3 Troubleshooting (FAQ 3-11 3.4 Supported operating modes...
... Services viii Chapter 1: Product introduction 1.1 Welcome 1-1 1.2 Package contents 1-1 1.3 Monitor introduction 1-2 1.3.1 Front view 1-2 1.3.2 Back view 1-3 Chapter 2: Setup 2.1 Assembling the monitor arm/base 2-1 2.2 Detaching the arm/base (for VESA wall mount 2-2 2.3 Adjusting the monitor 2-4 2.4 Connecting the cables 2-6 2.5 Turning on the monitor 2-7 Chapter 3: General instructions 3.1 OSD (On-Screen Display) menu 3-1 3.1.1 How to reconfigure 3-1 3.1.2 OSD function introduction 3-2 3.2 Specifications summary 3-9 3.3 Troubleshooting (FAQ 3-11 3.4 Supported operating modes...

User Guide
Page 4
... power management feature is a joint program of the FCC Rules. The use of shielded cables for a Class B digital device, pursuant to comply with the limits for connection of user inactivity. This equipment has been tested and found to Part 15 of the U.S. These limits are automatically set to sleep after 10 and 30 minutes of the monitor to the graphics card...
... power management feature is a joint program of the FCC Rules. The use of shielded cables for a Class B digital device, pursuant to comply with the limits for connection of user inactivity. This equipment has been tested and found to Part 15 of the U.S. These limits are automatically set to sleep after 10 and 30 minutes of the monitor to the graphics card...
User Guide
Page 6
... your local power standard. • Do not overload power strips and extention cords. This symbol of the volume control as well as the equalizer to open the monitor cabinet. Safety information • Before setting up the monitor, carefully read all cables are correctly connected and the power cables are not damaged. Contact a qualified service technician or your retailer. • Before using the product, make sure all...
... your local power standard. • Do not overload power strips and extention cords. This symbol of the volume control as well as the equalizer to open the monitor cabinet. Safety information • Before setting up the monitor, carefully read all cables are correctly connected and the power cables are not damaged. Contact a qualified service technician or your retailer. • Before using the product, make sure all...

User Guide
Page 7
... after switching the image. Turn your monitor off the Power Switch for hours. • When the screen becomes black or flashes, or cannot work anymore, contact your monitor, it may drip inside the monitor and cause an electric shock. Never spray cleaner directly on the desktop pattern you use. • When the same image is displayed for use with the monitor: • You may find slightly uneven brightness...
... after switching the image. Turn your monitor off the Power Switch for hours. • When the screen becomes black or flashes, or cannot work anymore, contact your monitor, it may drip inside the monitor and cause an electric shock. Never spray cleaner directly on the desktop pattern you use. • When the same image is displayed for use with the monitor: • You may find slightly uneven brightness...

User Guide
Page 12
... Key Lock function between on /off . Power button/power indicator • Turns the monitor on and off with a long press for 5 seconds. 3. Status Description White Amber Off On Standby mode Off 2. Menu button: • Press this button to display the OSD menu when the OSD is as the below table. Selects an available input source. 1-2 Chapter 1: Product introduction 1.3 1.3.1 Monitor introduction Front view C1241Q C1241QSB Menu Close Input Select Brightness Blue Light Filter Menu Close Input Select Brightness Blue Light Filter...
... Key Lock function between on /off . Power button/power indicator • Turns the monitor on and off with a long press for 5 seconds. 3. Status Description White Amber Off On Standby mode Off 2. Menu button: • Press this button to display the OSD menu when the OSD is as the below table. Selects an available input source. 1-2 Chapter 1: Product introduction 1.3 1.3.1 Monitor introduction Front view C1241Q C1241QSB Menu Close Input Select Brightness Blue Light Filter Menu Close Input Select Brightness Blue Light Filter...

User Guide
Page 13
... port connects PC audio source by the audio cable. 3. This 15-pin port is connected. 4. These ports are for connection with an HDMI compatible device. 6. USB 2.0 upstream port. Shortcut • Press this button to display the OSD menu when the OSD is for connection with USB devices, such as USB keyboard/mouse, USB flash drive, etc. This port is off . • Default: Brightness hotkey • To change the hotkey function, go to the Shortcut > Shortcut 2 menu. 1.3.2 Back view C1241Q 10 C1241QSB...
... port connects PC audio source by the audio cable. 3. This 15-pin port is connected. 4. These ports are for connection with an HDMI compatible device. 6. USB 2.0 upstream port. Shortcut • Press this button to display the OSD menu when the OSD is for connection with USB devices, such as USB keyboard/mouse, USB flash drive, etc. This port is off . • Default: Brightness hotkey • To change the hotkey function, go to the Shortcut > Shortcut 2 menu. 1.3.2 Back view C1241Q 10 C1241QSB...

User Guide
Page 15
... monitor arm/base To assemble the monitor base: 1. C1241Q C1241QSB 1 180° 2 ASUS C1241 Series LCD Monitor 2-1 C1241QSB: Fix the base to the arm by fastening the bundled screw. 4. C1241Q: Fix the base to the arm by rotating the base until it fits into the groove on the base. 3. C1241QSB: Remove the stop screw at the bottom of the monitor face down on the arm fits into place. We recommend that you cover...
... monitor arm/base To assemble the monitor base: 1. C1241Q C1241QSB 1 180° 2 ASUS C1241 Series LCD Monitor 2-1 C1241QSB: Fix the base to the arm by fastening the bundled screw. 4. C1241Q: Fix the base to the arm by rotating the base until it fits into the groove on the base. 3. C1241QSB: Remove the stop screw at the bottom of the monitor face down on the arm fits into place. We recommend that you cover...

User Guide
Page 19
... the angle you need. -5°~+35° 0° -90° 0° 90° It is normal that the monitor slightly shakes while you adjust the viewing angle. 2.4 Connecting the cables Connect the cables as the following instructions: C1241Q C1241QSB • To connect the power cord: Connect one end of the power cord securely to the monitor's AC input port, the other end to a power outlet. • To connect the VGA/HDMI/DP cable: ASUS C1241 Series LCD Monitor 2-5
... the angle you need. -5°~+35° 0° -90° 0° 90° It is normal that the monitor slightly shakes while you adjust the viewing angle. 2.4 Connecting the cables Connect the cables as the following instructions: C1241Q C1241QSB • To connect the power cord: Connect one end of the power cord securely to the monitor's AC input port, the other end to a power outlet. • To connect the VGA/HDMI/DP cable: ASUS C1241 Series LCD Monitor 2-5
User Guide
Page 20
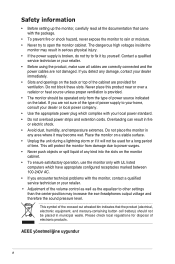
... Input Select item in port, the other end of the VGA/HDMI/DP cable to work. The power indicator lights up in white to the monitor's line out port when an HDMI/DP signal is ON. 2-6 Chapter 2: Setup Connect the other end to the computer's audio-out port. • To use the USB 2.0 ports (C1241QSB only): Take an USB 2.0 cable, and plug the smaller end (type B) of the VGA/HDMI/DP cable to your computer's VGA/HDMI/DP jack. Make...
... Input Select item in port, the other end of the VGA/HDMI/DP cable to work. The power indicator lights up in white to the monitor's line out port when an HDMI/DP signal is ON. 2-6 Chapter 2: Setup Connect the other end to the computer's audio-out port. • To use the USB 2.0 ports (C1241QSB only): Take an USB 2.0 cable, and plug the smaller end (type B) of the VGA/HDMI/DP cable to your computer's VGA/HDMI/DP jack. Make...
User Guide
Page 23
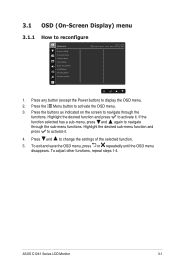
... press to activate it . 4. Press the Menu button to change the settings of the selected function. 5. Highlight the desired function and press to activate it . Press and to activate the OSD menu. 3. Press any button (except the Power button) to reconfigure Splendid Scenery Mode Standard Mode Theater Mode Game Mode Night View Mode sRGB Mode Reading Mode Darkroom Mode ASUS C1241 Standard Mode HDMI 1920 x 1080 @ 60Hz 1. 3.1 OSD (On-Screen Display) menu 3.1.1 How to display the OSD menu. 2.
... press to activate it . 4. Press the Menu button to change the settings of the selected function. 5. Highlight the desired function and press to activate it . Press and to activate the OSD menu. 3. Press any button (except the Power button) to reconfigure Splendid Scenery Mode Standard Mode Theater Mode Game Mode Night View Mode sRGB Mode Reading Mode Darkroom Mode ASUS C1241 Standard Mode HDMI 1920 x 1080 @ 60Hz 1. 3.1 OSD (On-Screen Display) menu 3.1.1 How to display the OSD menu. 2.
User Guide
Page 25
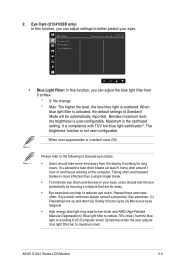
.... Eye Care (C1241QSB only) In this function, you can adjust the blue light filter from 0 to take some time away from the display if working at the computer. When blue light filter is activated, the default settings of continuous working for long hours. It is user-configurable. ASUS C1241 Series LCD Monitor 3-3 Taking short and frequent breaks is scattered. It is advised to Max. * 0: No change. * Max...
.... Eye Care (C1241QSB only) In this function, you can adjust the blue light filter from 0 to take some time away from the display if working at the computer. When blue light filter is activated, the default settings of continuous working for long hours. It is user-configurable. ASUS C1241 Series LCD Monitor 3-3 Taking short and frequent breaks is scattered. It is advised to Max. * 0: No change. * Max...
User Guide
Page 26
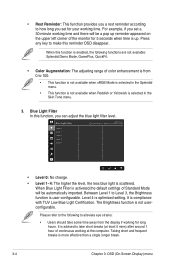
... you set for your working time. When this function, you can adjust the blue light filter level. Blue Light Filter Level 0 Level 1 Level 2 Level 3 Level 4 ASUS C1241 Standard Mode HDMI 1920 x 1080 @ 60Hz • Level 0: No change. • Level 1~4: The higher the level, the less blue light is more effective than a single longer break. 3-4 Chapter 3: OSD (On-Screen Display) menu Level 4 is compliance with TUV Low Blue Light Certification...
... you set for your working time. When this function, you can adjust the blue light filter level. Blue Light Filter Level 0 Level 1 Level 2 Level 3 Level 4 ASUS C1241 Standard Mode HDMI 1920 x 1080 @ 60Hz • Level 0: No change. • Level 1~4: The higher the level, the less blue light is more effective than a single longer break. 3-4 Chapter 3: OSD (On-Screen Display) menu Level 4 is compliance with TUV Low Blue Light Certification...
User Guide
Page 27
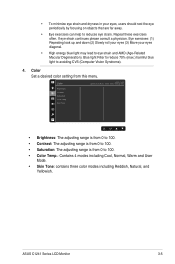
... and User Mode. • Skin Tone: contains three color modes including Reddish, Natural, and Yellowish. Repeat these exercises often. Color Brightness Contrast Saturation Color Temp. ASUS C1241 Series LCD Monitor 3-5 If eye strain continues please consult a physician. Skin Tone ASUS C1241 Standard Mode HDMI 1920 x 1080 @ 60Hz • Brightness: The adjusting range is from 0 to 100. • Contrast: The adjusting range is from 0 to 100. • Saturation: The adjusting range is from this menu...
... and User Mode. • Skin Tone: contains three color modes including Reddish, Natural, and Yellowish. Repeat these exercises often. Color Brightness Contrast Saturation Color Temp. ASUS C1241 Series LCD Monitor 3-5 If eye strain continues please consult a physician. Skin Tone ASUS C1241 Standard Mode HDMI 1920 x 1080 @ 60Hz • Brightness: The adjusting range is from 0 to 100. • Contrast: The adjusting range is from 0 to 100. • Saturation: The adjusting range is from this menu...

User Guide
Page 28
... VGA input): adjusts the horizontal position (H-Position) and the vertical position (V-Position) of the pixel clock signal. If the frequency is not correct, the screen shows vertical stripes and the image is from this menu. Image ASUS C1241 Standard Mode HDMI 1920 x 1080 @ 60Hz Sharpness Trace Free Aspect Control VividPixel ASCR Adaptive-Sync Position More • Sharpness: The adjusting range is only available for the HDMI input source. • VividPixel: Enhances the outline of the displayed picture and generates high-quality images on screen...
... VGA input): adjusts the horizontal position (H-Position) and the vertical position (V-Position) of the pixel clock signal. If the frequency is not correct, the screen shows vertical stripes and the image is from this menu. Image ASUS C1241 Standard Mode HDMI 1920 x 1080 @ 60Hz Sharpness Trace Free Aspect Control VividPixel ASCR Adaptive-Sync Position More • Sharpness: The adjusting range is only available for the HDMI input source. • VividPixel: Enhances the outline of the displayed picture and generates high-quality images on screen...
User Guide
Page 29
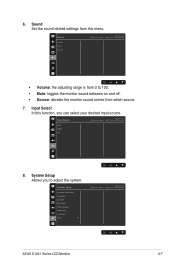
... VGA HDMI DP 8. 6. Sound Volume Mute Source ASUS C1241 Standard Mode HDMI 1920 x 1080 @ 60Hz • Volume: the adjusting range is from 0 to adjust the system. System Setup Allows you to 100. • Mute: toggles the monitor sound between on and off. • Source: decides the monitor sound comes from this function, you can select your desired input source. Sound Set the sound related settings from which source. 7. System Setup Splendid Demo Mode GamePlus QuickFit ECO Mode USB Charging OSD Setup Language...
... VGA HDMI DP 8. 6. Sound Volume Mute Source ASUS C1241 Standard Mode HDMI 1920 x 1080 @ 60Hz • Volume: the adjusting range is from 0 to adjust the system. System Setup Allows you to 100. • Mute: toggles the monitor sound between on and off. • Source: decides the monitor sound comes from this function, you can select your desired input source. Sound Set the sound related settings from which source. 7. System Setup Splendid Demo Mode GamePlus QuickFit ECO Mode USB Charging OSD Setup Language...
User Guide
Page 31
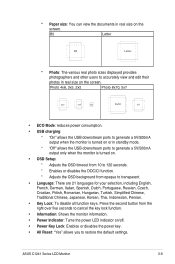
... disable all function keys. ASUS C1241 Series LCD Monitor 3-9 Press the second button from opaque to restore the default settings. Photo 4x6, 3x5, 2x2 Photo 8x10, 5x7 4x6 3x5 2x2 8x10 5x7 • ECO Mode: reduces power consumption. • USB charging: * "On" allows the USB downstream ports to generate a 5V/500mA output when the monitor is turned on or in standby mode. * "Off" allows the USB downstream ports...
... disable all function keys. ASUS C1241 Series LCD Monitor 3-9 Press the second button from opaque to restore the default settings. Photo 4x6, 3x5, 2x2 Photo 8x10, 5x7 4x6 3x5 2x2 8x10 5x7 • ECO Mode: reduces power consumption. • USB charging: * "On" allows the USB downstream ports to generate a 5V/500mA output when the monitor is turned on or in standby mode. * "Off" allows the USB downstream ports...

User Guide
Page 32
Shortcut ASUS C1241 Standard Mode HDMI 1920 x 1080 @ 60Hz Shortcut 1 Shortcut 2 • Shortcut 1/Shortcut 2: selects a function for shortcut: Blue Light Filter, Splendid, Brightness, Auto Adjust, Contrast, Color Temp., Volume, GamePlus. 3-10 Chapter 3: OSD (On-Screen Display) menu 7. When a certain function is selected or activated, your shortcut key may not support. Available function choices for Shortcut 1 and 2 buttons. Shortcut Defines the functions for Shortcut 1 and 2 buttons.
Shortcut ASUS C1241 Standard Mode HDMI 1920 x 1080 @ 60Hz Shortcut 1 Shortcut 2 • Shortcut 1/Shortcut 2: selects a function for shortcut: Blue Light Filter, Splendid, Brightness, Auto Adjust, Contrast, Color Temp., Volume, GamePlus. 3-10 Chapter 3: OSD (On-Screen Display) menu 7. When a certain function is selected or activated, your shortcut key may not support. Available function choices for Shortcut 1 and 2 buttons. Shortcut Defines the functions for Shortcut 1 and 2 buttons.

User Guide
Page 33
3.2 Specifications summary Panel Type Panel size Max. Resolution Pixel pitch Brightness (Typ.) Contrast Ratio (Typ.) Contrast Ratio (Max.) Viewing angle (H/V) CR>10 Display colors Response time Splendid Video Enhancement Splendid selection Auto adjustment Color temperature selection Analog input Digital input Earphone jack Audio input Speaker (Built-in) USB 2.0 port Colors Power LED Tilt Pivot Swivel Height Adjustment Kensington lock AC input voltage Power consumption Temperature (Operating) Temperature (Non-operating) TFT LCD 23.8" (16:9, 60.5 cm) wide screen 1920 x 1080 0.2745 mm 250 cd/...
3.2 Specifications summary Panel Type Panel size Max. Resolution Pixel pitch Brightness (Typ.) Contrast Ratio (Typ.) Contrast Ratio (Max.) Viewing angle (H/V) CR>10 Display colors Response time Splendid Video Enhancement Splendid selection Auto adjustment Color temperature selection Analog input Digital input Earphone jack Audio input Speaker (Built-in) USB 2.0 port Colors Power LED Tilt Pivot Swivel Height Adjustment Kensington lock AC input voltage Power consumption Temperature (Operating) Temperature (Non-operating) TFT LCD 23.8" (16:9, 60.5 cm) wide screen 1920 x 1080 0.2745 mm 250 cd/...

User Guide
Page 34
..., E-Standby VN MEPS *Specifications are subject to change without notice. **Measuring a screen brightness of 200 nits without stand); 5.31 kg (net with stand); 6.8 kg (gross) 21 languages (English, French, German, Italian, Spanish, Dutch, Portuguese, Russian, Czech, Croatian, Polish, Romanian, Hungarian, Turkish, Simplified Chinese, Traditional Chinese, Japanese, Korean, Thai, Indonesian, Persian) Quick start guide, warranty card, power cord, HDMI cable (optional), DisplayPort cable (optional), VGA cable (optional), USB cable (optional), mini PC...
..., E-Standby VN MEPS *Specifications are subject to change without notice. **Measuring a screen brightness of 200 nits without stand); 5.31 kg (net with stand); 6.8 kg (gross) 21 languages (English, French, German, Italian, Spanish, Dutch, Portuguese, Russian, Czech, Croatian, Polish, Romanian, Hungarian, Turkish, Simplified Chinese, Traditional Chinese, Japanese, Korean, Thai, Indonesian, Persian) Quick start guide, warranty card, power cord, HDMI cable (optional), DisplayPort cable (optional), VGA cable (optional), USB cable (optional), mini PC...
User Guide
Page 37
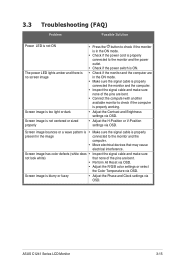
... working. • Adjust the Contrast and Brightness settings via OSD. • Adjust the H-Position or V-Position settings via OSD. 3.3 Troubleshooting (FAQ) Problem Possible Solution Power LED is not ON The power LED lights amber and there is no screen image Screen image is too light or dark Screen image is not centered or sized properly • Press the button to check if the monitor is in the ON mode. • Check if the power cord is properly connected to the monitor and the power outlet. • Check...
... working. • Adjust the Contrast and Brightness settings via OSD. • Adjust the H-Position or V-Position settings via OSD. 3.3 Troubleshooting (FAQ) Problem Possible Solution Power LED is not ON The power LED lights amber and there is no screen image Screen image is too light or dark Screen image is not centered or sized properly • Press the button to check if the monitor is in the ON mode. • Check if the power cord is properly connected to the monitor and the power outlet. • Check...


