User Manual
Page 10
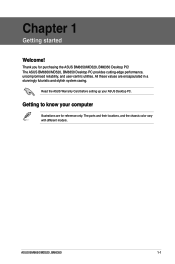
All these values are for purchasing the ASUS BM6650/MD520, BM6350 Desktop PC! ASUS BM6650/MD520, BM6350 1-1 Chapter 1 Getting started Welcome! The ASUS BM6650/MD520, BM6350 Desktop PC provides cutting-edge performance, uncompromised reliability, and user-centric utilities. The ports and their locations, and the chassis color vary with different models. Thank you for reference only. Getting to know your ASUS Desktop PC. Read the ASUS Warranty Card before setting up your computer Illustrations are encapsulated in a stunningly futuristic and stylish system casing.
All these values are for purchasing the ASUS BM6650/MD520, BM6350 Desktop PC! ASUS BM6650/MD520, BM6350 1-1 Chapter 1 Getting started Welcome! The ASUS BM6650/MD520, BM6350 Desktop PC provides cutting-edge performance, uncompromised reliability, and user-centric utilities. The ports and their locations, and the chassis color vary with different models. Thank you for reference only. Getting to know your ASUS Desktop PC. Read the ASUS Warranty Card before setting up your computer Illustrations are encapsulated in a stunningly futuristic and stylish system casing.
User Manual
Page 12
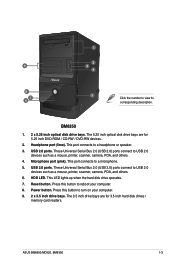
...). This LED lights up when the hard disk drive operates. 7. Press this button to USB 2.0 devices such as a mouse, printer, scanner, camera, PDA, and others . 6. ASUS BM6650/MD520, BM6350 1-3 Headphone port (lime). Reset button. 9 8 7 6 1 2 3 4 5 Click the number to reboot your computer. 9. 2 x 3.5 inch drive bays. The 3.5 inch drive bays are for 3.5 inch hard...
...). This LED lights up when the hard disk drive operates. 7. Press this button to USB 2.0 devices such as a mouse, printer, scanner, camera, PDA, and others . 6. ASUS BM6650/MD520, BM6350 1-3 Headphone port (lime). Reset button. 9 8 7 6 1 2 3 4 5 Click the number to reboot your computer. 9. 2 x 3.5 inch drive bays. The 3.5 inch drive bays are for 3.5 inch hard...
User Manual
Page 14
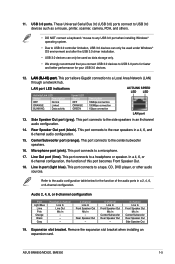
In a 4, 6, or 8-channel configuration, the function of the audio ports in a 2, 4, 6, or 8-channel configuration. Line In port (light blue). ASUS BM6650/MD520, BM6350 1-5 This port allows Gigabit connection to a microphone. 17. This port connects to a Local Area Network (LAN) through a network hub. Line Out port (lime). ...
In a 4, 6, or 8-channel configuration, the function of the audio ports in a 2, 4, 6, or 8-channel configuration. Line In port (light blue). ASUS BM6650/MD520, BM6350 1-5 This port allows Gigabit connection to a microphone. 17. This port connects to a Local Area Network (LAN) through a network hub. Line Out port (lime). ...

User Manual
Page 16
ASUS BM6650/MD520, BM6350 1-7 Hence, connect your monitor to a display output port on the rear panel of this user manual for details. Using the onboard display output ports Connect your computer, refer to Connecting multiple external monitors in Chapter 3 of your computer comes with an ASUS Graphics Card, the graphics card is set as...
ASUS BM6650/MD520, BM6350 1-7 Hence, connect your monitor to a display output port on the rear panel of this user manual for details. Using the onboard display output ports Connect your computer, refer to Connecting multiple external monitors in Chapter 3 of your computer comes with an ASUS Graphics Card, the graphics card is set as...
User Manual
Page 18
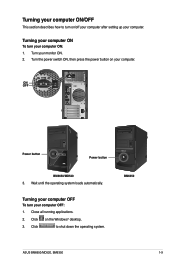
... computer. Wait until the operating system loads automatically. Turn your computer ON: 1. Click to turn on your computer. ON OFF Power button Power button BM6650/MD520 3. BM6350 ASUS BM6650/MD520, BM6350 1-9 Close all running applications. 2. Turning your computer ON/OFF This section describes how to shut down the operating system. Turning your computer...
... computer. Wait until the operating system loads automatically. Turn your computer ON: 1. Click to turn on your computer. ON OFF Power button Power button BM6650/MD520 3. BM6350 ASUS BM6650/MD520, BM6350 1-9 Close all running applications. 2. Turning your computer ON/OFF This section describes how to shut down the operating system. Turning your computer...

User Manual
Page 19
... your password, then click Next. Click Next. 4. Click Next. From dropdown list, select your Country or region, Time and currency, and Keyboard layout. Click Next. 3. ASUS BM6650/MD520, BM6350 2-1 Carefully read the license terms. Tick I accept the license terms and click Next. 7. To start for your date and time settings. From the...
... your password, then click Next. Click Next. 4. Click Next. From dropdown list, select your Country or region, Time and currency, and Keyboard layout. Click Next. 3. ASUS BM6650/MD520, BM6350 2-1 Carefully read the license terms. Tick I accept the license terms and click Next. 7. To start for your date and time settings. From the...
User Manual
Page 21
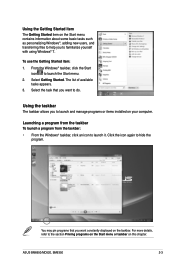
Select the task that you want constantly displayed on the taskbar. Click the icon again to launch the Start menu. 2. ASUS BM6650/MD520, BM6350 2-3 From the Windows® taskbar, click the Start icon to hide the program. Using the taskbar The taskbar allows you to familiarize yourself ...
Select the task that you want constantly displayed on the taskbar. Click the icon again to launch the Start menu. 2. ASUS BM6650/MD520, BM6350 2-3 From the Windows® taskbar, click the Start icon to hide the program. Using the taskbar The taskbar allows you to familiarize yourself ...
User Manual
Page 23
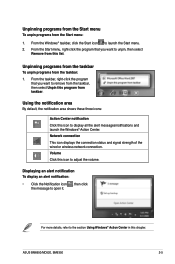
Volume Click this chapter. For more details, refer to the section Using Windows® Action Center in this icon to adjust the volume. ASUS BM6650/MD520, BM6350 2-5 From the Start menu, right-click the program that you want to remove from the taskbar, then select Unpin this program from this ...
Volume Click this chapter. For more details, refer to the section Using Windows® Action Center in this icon to adjust the volume. ASUS BM6650/MD520, BM6350 2-5 From the Start menu, right-click the program that you want to remove from the taskbar, then select Unpin this program from this ...
User Manual
Page 25
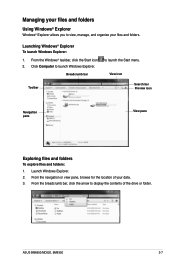
Launching Windows® Explorer To launch Windows Explorer: 1. ASUS BM6650/MD520, BM6350 2-7 From the Windows® taskbar, click the Start icon 2. Launch Windows Explorer. 2. Breadcrumb bar to display the contents of your files and folders. ...
Launching Windows® Explorer To launch Windows Explorer: 1. ASUS BM6650/MD520, BM6350 2-7 From the Windows® taskbar, click the Start icon 2. Launch Windows Explorer. 2. Breadcrumb bar to display the contents of your files and folders. ...

User Manual
Page 27
... on the View pane. 3. From the menu that appears, select Sort by , then select your preferred sorting type. Key in a name for the new folder. ASUS BM6650/MD520, BM6350 2-9
... on the View pane. 3. From the menu that appears, select Sort by , then select your preferred sorting type. Key in a name for the new folder. ASUS BM6650/MD520, BM6350 2-9
User Manual
Page 29
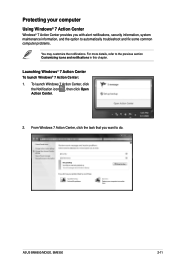
...; 7 Action Center Windows® 7 Action Center provides you want to do. To launch Windows 7 Action Center, click the Notification icon , then click Open Action Center. 2. ASUS BM6650/MD520, BM6350 2-11 For more details, refer to automatically troubleshoot and fix some common computer problems. You may customize the notifications. Launching Windows® 7 Action...
...; 7 Action Center Windows® 7 Action Center provides you want to do. To launch Windows 7 Action Center, click the Notification icon , then click Open Action Center. 2. ASUS BM6650/MD520, BM6350 2-11 For more details, refer to automatically troubleshoot and fix some common computer problems. You may customize the notifications. Launching Windows® 7 Action...
User Manual
Page 31
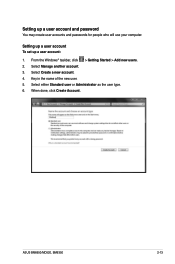
From the Windows® taskbar, click > Getting Started > Add new users. 2. Select Create a new account. 4. Setting up a user account: 1. When done, click Create Account. Select Manage another account. 3. ASUS BM6650/MD520, BM6350 2-13 Setting up a user account To set up a user account and password You may create user accounts and passwords for people who will use your computer. Key in the name of the new user. 5. Select either Standard user or Administrator as the user type. 6.
From the Windows® taskbar, click > Getting Started > Add new users. 2. Select Create a new account. 4. Setting up a user account: 1. When done, click Create Account. Select Manage another account. 3. ASUS BM6650/MD520, BM6350 2-13 Setting up a user account To set up a user account and password You may create user accounts and passwords for people who will use your computer. Key in the name of the new user. 5. Select either Standard user or Administrator as the user type. 6.

User Manual
Page 33
It is pre-installed on your computer. To activate Trend Micro Internet Security: 1. ASUS BM6650/MD520, BM6350 2-15 To launch Windows® Help and Support, click > Help and Support. Input your e-mail address and select your computer from virus attacking. ...
It is pre-installed on your computer. To activate Trend Micro Internet Security: 1. ASUS BM6650/MD520, BM6350 2-15 To launch Windows® Help and Support, click > Help and Support. Input your e-mail address and select your computer from virus attacking. ...
User Manual
Page 34
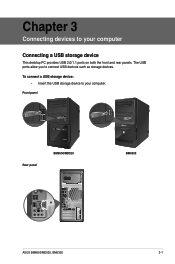
The USB ports allow you to your computer Connecting a USB storage device This desktop PC provides USB 2.0/1.1 ports on both the front and rear panels. To connect a USB storage device: • Insert the USB storage device to connect USB devices such as storage devices. Chapter 3 Connecting devices to your computer. Front panel Rear panel BM6650/MD520 BM6350 ASUS BM6650/MD520, BM6350 3-1
The USB ports allow you to your computer Connecting a USB storage device This desktop PC provides USB 2.0/1.1 ports on both the front and rear panels. To connect a USB storage device: • Insert the USB storage device to connect USB devices such as storage devices. Chapter 3 Connecting devices to your computer. Front panel Rear panel BM6650/MD520 BM6350 ASUS BM6650/MD520, BM6350 3-1
User Manual
Page 36
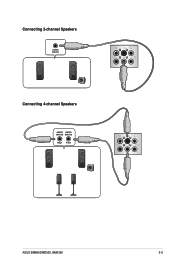
Connecting 2-channel Speakers Connecting 4-channel Speakers ASUS BM6650/MD520, BM6350 3-3
Connecting 2-channel Speakers Connecting 4-channel Speakers ASUS BM6650/MD520, BM6350 3-3
User Manual
Page 38
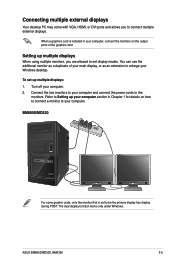
...your Windows desktop. Turn off your computer. When a graphics card is set up multiple displays When using multiple monitors, you to set display modes. BM6650/MD520 For some graphic cards, only the monitor that is installed in Chapter 1 for details on the output ports of your main display, or ...on how to connect a monitor to the monitors. You can use the additional monitor as a duplicate of the graphics card. Setting up multiple displays: 1. ASUS BM6650/MD520, BM6350 3-5 Connect the two monitors to your computer and connect the power cords to your computer. 2.
...your Windows desktop. Turn off your computer. When a graphics card is set up multiple displays When using multiple monitors, you to set display modes. BM6650/MD520 For some graphic cards, only the monitor that is installed in Chapter 1 for details on the output ports of your main display, or ...on how to connect a monitor to the monitors. You can use the additional monitor as a duplicate of the graphics card. Setting up multiple displays: 1. ASUS BM6650/MD520, BM6350 3-5 Connect the two monitors to your computer and connect the power cords to your computer. 2.
User Manual
Page 40
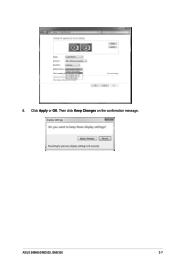
ASUS BM6650/MD520, BM6350 3-7 Click Apply or OK. 6. Then click Keep Changes on the confirmation message.
ASUS BM6650/MD520, BM6350 3-7 Click Apply or OK. 6. Then click Keep Changes on the confirmation message.
User Manual
Page 42
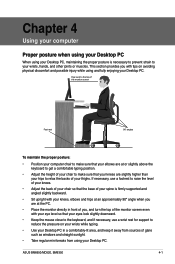
... are at the PC. • Place the monitor directly in a comfortably-lit area, and keep it away from using and fully enjoying your Desktop PC. ASUS BM6650/MD520, BM6350 4-1 If necessary, use a wrist rest for support to your wrists, hands, and other joints or muscles. This section provides you , and turn the...
... are at the PC. • Place the monitor directly in a comfortably-lit area, and keep it away from using and fully enjoying your Desktop PC. ASUS BM6650/MD520, BM6350 4-1 If necessary, use a wrist rest for support to your wrists, hands, and other joints or muscles. This section provides you , and turn the...
User Manual
Page 43
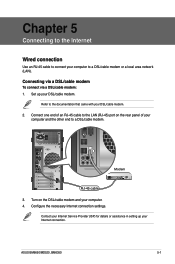
Refer to the documentation that came with your computer. 4. Configure the necessary Internet connection settings. ASUS BM6650/MD520, BM6350 5-1 Set up your DSL/cable modem. Turn on the rear panel of your computer to a DSL/cable modem or a local area network (LAN). ...
Refer to the documentation that came with your computer. 4. Configure the necessary Internet connection settings. ASUS BM6650/MD520, BM6350 5-1 Set up your DSL/cable modem. Turn on the rear panel of your computer to a DSL/cable modem or a local area network (LAN). ...

User Manual
Page 45
...the onscreen instructions to customize the settings of AI Suite II. The AI Suite II icon appears in -one interface that integrates several ASUS utilities and allows users to launch and operate these utilities simultaneously. Click each button to select and launch a utility, to monitor the...Windows® notification area. For details, refer to Recovering your system in the optical drive. Click the icon to customize the interface settings ASUS BM6650/MD520, BM6350 6-1 Chapter 6 Using the Utilities The Support DVD and Recovery DVD may use the Recovery Partition feature to create the Support ...
...the onscreen instructions to customize the settings of AI Suite II. The AI Suite II icon appears in -one interface that integrates several ASUS utilities and allows users to launch and operate these utilities simultaneously. Click each button to select and launch a utility, to monitor the...Windows® notification area. For details, refer to Recovering your system in the optical drive. Click the icon to customize the interface settings ASUS BM6650/MD520, BM6350 6-1 Chapter 6 Using the Utilities The Support DVD and Recovery DVD may use the Recovery Partition feature to create the Support ...


