
User Manual
Page 4
... and, if not installed and used in accordance with FCC regulations. Changes or modifications to assure compliance with manufacturerʼs instructions, may cause undesired operation. Operation is encouraged to try to correct the interference by the party responsible for help. The use of shielded cables for connection of the following two conditions: • This device may not cause...
... and, if not installed and used in accordance with FCC regulations. Changes or modifications to assure compliance with manufacturerʼs instructions, may cause undesired operation. Operation is encouraged to try to correct the interference by the party responsible for help. The use of shielded cables for connection of the following two conditions: • This device may not cause...

User Manual
Page 8
... Check your retailer immediately. DVD • Support DVD x1 5. Documentation • User Manual x1 • Warranty card x1 If any of the above items is damaged or missing, contact your system package for the exact specifications. Memory card reader 3. Check with • ASUS Desktop x1 • Mouse x1 • Keyboard x1 2. Optical disk drive (ODD) 2. LAN cable 4. Cables • Power cord x1 3. Optional items 1. Power strip Specifications depend...
... Check your retailer immediately. DVD • Support DVD x1 5. Documentation • User Manual x1 • Warranty card x1 If any of the above items is damaged or missing, contact your system package for the exact specifications. Memory card reader 3. Check with • ASUS Desktop x1 • Mouse x1 • Keyboard x1 2. Optical disk drive (ODD) 2. LAN cable 4. Cables • Power cord x1 3. Optional items 1. Power strip Specifications depend...

User Manual
Page 10
...Bus 2.0 (USB 2.0) ports connect to a microphone. 3. Press this button to a headphone or speaker. 4. USB 2.0 ports. HDD LED. This LED lights up when the hard disk drive operates. 7. Power LED. The 3.5 inch drive bays are for 3.5 inch hard disk drives / memory card readers. 1-2 Chapter 1: Getting started ENGLISH Front panel 1 2 3 9 4 8 5 7 6 BM6660/MD710 1. 2 x 5.25 inch optical disk drive bays. This port connects to turn on your computer. 8. The 5.25 inch optical disk drive bays are for 5.25 inch DVD-ROM / CD-RW / DVD-RW devices. 2. Microphone port (pink...
...Bus 2.0 (USB 2.0) ports connect to a microphone. 3. Press this button to a headphone or speaker. 4. USB 2.0 ports. HDD LED. This LED lights up when the hard disk drive operates. 7. Power LED. The 3.5 inch drive bays are for 3.5 inch hard disk drives / memory card readers. 1-2 Chapter 1: Getting started ENGLISH Front panel 1 2 3 9 4 8 5 7 6 BM6660/MD710 1. 2 x 5.25 inch optical disk drive bays. This port connects to turn on your computer. 8. The 5.25 inch optical disk drive bays are for 5.25 inch DVD-ROM / CD-RW / DVD-RW devices. 2. Microphone port (pink...

User Manual
Page 11
HDD LED. Press this button to USB 2.0 devices such as a mouse, printer, scanner, camera, PDA, and others . 4. The 5.25 inch optical disk drive bays are for 5.25 inch DVD-ROM / CD-RW / DVD-RW devices. 2. These Universal Serial Bus 2.0 (USB 2.0) ports connect to reboot your computer. 9. 2 x 3.5 inch drive bays. ASUS BM6660/MD710, BP6260/SD710, BM6360 1-3 USB 2.0 ports. Microphone port (pink). USB 2.0 ports. This LED lights up when the hard disk drive operates. 7. The 3.5 inch drive bays are for 3.5 inch hard disk drives / memory card readers. This port connects to a ...
HDD LED. Press this button to USB 2.0 devices such as a mouse, printer, scanner, camera, PDA, and others . 4. The 5.25 inch optical disk drive bays are for 5.25 inch DVD-ROM / CD-RW / DVD-RW devices. 2. These Universal Serial Bus 2.0 (USB 2.0) ports connect to reboot your computer. 9. 2 x 3.5 inch drive bays. ASUS BM6660/MD710, BP6260/SD710, BM6360 1-3 USB 2.0 ports. Microphone port (pink). USB 2.0 ports. This LED lights up when the hard disk drive operates. 7. The 3.5 inch drive bays are for 3.5 inch hard disk drives / memory card readers. This port connects to a ...

User Manual
Page 12
...LED lights up when the hard disk drive operates. 7. Power button. Press this button to a microphone. 5. This port connects to USB 2.0 devices such as a mouse, printer, scanner, camera, PDA, and others. 6. HDD LED. Headphone port (lime). The 5.25 inch optical disk drive bay is for 3.5 inch hard disk drives / memory card readers. 3. Microphone port (pink). These Universal Serial Bus 2.0 (USB 2.0) ports connect to a headphone or speaker. 4. ENGLISH 7 6 1 2 5 4 3 BP6260 1. 5.25 inch optical disk drive bay. USB 2.0 ports. The 3.5 inch drive bays are for 5.25 inch DVD-ROM...
...LED lights up when the hard disk drive operates. 7. Power button. Press this button to a microphone. 5. This port connects to USB 2.0 devices such as a mouse, printer, scanner, camera, PDA, and others. 6. HDD LED. Headphone port (lime). The 5.25 inch optical disk drive bay is for 3.5 inch hard disk drives / memory card readers. 3. Microphone port (pink). These Universal Serial Bus 2.0 (USB 2.0) ports connect to a headphone or speaker. 4. ENGLISH 7 6 1 2 5 4 3 BP6260 1. 5.25 inch optical disk drive bay. USB 2.0 ports. The 3.5 inch drive bays are for 5.25 inch DVD-ROM...

User Manual
Page 14
... Windows® OS environment and after the USB 3.0 driver installation. • USB 3.0 devices can only be used as a mouse, printer, scanner, camera, PDA, and others. 9. Line In port (light blue). This port connects to a microphone. 11. Rear Speaker Out - 6-channel Line In Front Speaker Out Mic In Center/Subwoofer Rear Speaker Out - 13. The display output ports on selected models only). LAN (RJ-45) port. This port connects to a tape, CD, DVD player, or other audio sources. LAN port LED...
... Windows® OS environment and after the USB 3.0 driver installation. • USB 3.0 devices can only be used as a mouse, printer, scanner, camera, PDA, and others. 9. Line In port (light blue). This port connects to a microphone. 11. Rear Speaker Out - 6-channel Line In Front Speaker Out Mic In Center/Subwoofer Rear Speaker Out - 13. The display output ports on selected models only). LAN (RJ-45) port. This port connects to a tape, CD, DVD player, or other audio sources. LAN port LED...

User Manual
Page 16
..., set the switch to 115V. Audio 2, 4, or 6-channel configuration Port Light Blue Lime Pink Orange Black Gray Headset 2-channel Line In Line Out Mic In - - - 4-channel Line In Front Speaker Out Mic In - Remove the expansion slot bracket when installing an expansion card. 11. Air vents. Microphone port (pink). Use this connector. 13. ENGLISH • DO NOT connect a keyboard / mouse to any USB 3.0 port when installing Windows® operating system...
..., set the switch to 115V. Audio 2, 4, or 6-channel configuration Port Light Blue Lime Pink Orange Black Gray Headset 2-channel Line In Line Out Mic In - - - 4-channel Line In Front Speaker Out Mic In - Remove the expansion slot bracket when installing an expansion card. 11. Air vents. Microphone port (pink). Use this connector. 13. ENGLISH • DO NOT connect a keyboard / mouse to any USB 3.0 port when installing Windows® operating system...
User Manual
Page 18
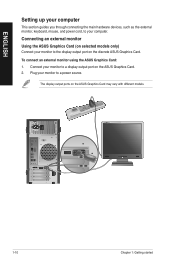
... ASUS Graphics Card. 2. Connect your monitor to the display output port on the discrete ASUS Graphics Card. To connect an external monitor using the ASUS Graphics Card: 1. Connecting an external monitor Using the ASUS Graphics Card (on selected models only) Connect your monitor to a display output port on the ASUS Graphics Card may vary with different models. 1-10 Chapter 1: Getting started ENGLISH Setting up your computer This section guides you through connecting the main hardware devices, such as the external monitor, keyboard, mouse, and power cord, to a power source. Plug...
... ASUS Graphics Card. 2. Connect your monitor to the display output port on the discrete ASUS Graphics Card. To connect an external monitor using the ASUS Graphics Card: 1. Connecting an external monitor Using the ASUS Graphics Card (on selected models only) Connect your monitor to a display output port on the ASUS Graphics Card may vary with different models. 1-10 Chapter 1: Getting started ENGLISH Setting up your computer This section guides you through connecting the main hardware devices, such as the external monitor, keyboard, mouse, and power cord, to a power source. Plug...

User Manual
Page 20
Hence, connect your monitor to a display output port on the graphics card. • To connect multiple external monitors to Connecting multiple external monitors in the BIOS. BP6260 ENGLISH • If your computer, refer to your computer comes with an ASUS Graphics Card, the graphics card is set as the primary display device in Chapter 3 of this user manual for details. 1-12 Chapter 1: Getting started
Hence, connect your monitor to a display output port on the graphics card. • To connect multiple external monitors to Connecting multiple external monitors in the BIOS. BP6260 ENGLISH • If your computer, refer to your computer comes with an ASUS Graphics Card, the graphics card is set as the primary display device in Chapter 3 of this user manual for details. 1-12 Chapter 1: Getting started
User Manual
Page 25
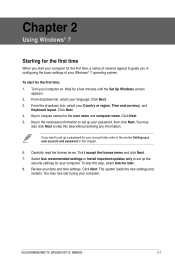
... currency, and Keyboard layout. Review your computer on. Chapter 2 Using Windows® 7 Starting for the first time When you start your computer for the first time, a series of your Windows® 7 operating system. To start using your password, then click Next. Turn your date and time settings. You may now start for the first time: 1. Select Use recommended settings or Install important updates only to set up your...
... currency, and Keyboard layout. Review your computer on. Chapter 2 Using Windows® 7 Starting for the first time When you start your computer for the first time, a series of your Windows® 7 operating system. To start using your password, then click Next. Turn your date and time settings. You may now start for the first time: 1. Select Use recommended settings or Install important updates only to set up your...
User Manual
Page 31
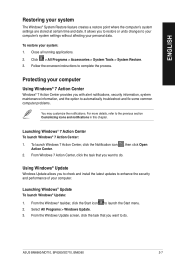
... instructions to launch the Start menu. 2. Launching Windows® 7 Action Center To launch Windows® 7 Action Center: 1. Launching Windows® Update To launch Windows® Update: 1. From the Windows Update screen, click the task that you with alert notifications, security information, system maintenance information, and the option to do . ENGLISH Restoring your system: 1. Protecting your computer Using Windows® 7 Action Center Windows® 7 Action Center provides you want to automatically troubleshoot...
... instructions to launch the Start menu. 2. Launching Windows® 7 Action Center To launch Windows® 7 Action Center: 1. Launching Windows® Update To launch Windows® Update: 1. From the Windows Update screen, click the task that you with alert notifications, security information, system maintenance information, and the option to do . ENGLISH Restoring your system: 1. Protecting your computer Using Windows® 7 Action Center Windows® 7 Action Center provides you want to automatically troubleshoot...
User Manual
Page 33
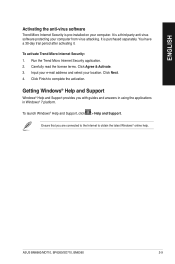
... and Support. Run the Trend Micro Internet Security application. 2. Click Next. 4. It is pre-installed on your location. It is purchased separately. Getting Windows® Help and Support Windows® Help and Support provides you are connected to the Internet to complete the activation. Click Finish to obtain the latest Windows® online help. Ensure that you with guides and answers in using the...
... and Support. Run the Trend Micro Internet Security application. 2. Click Next. 4. It is pre-installed on your location. It is purchased separately. Getting Windows® Help and Support Windows® Help and Support provides you are connected to the Internet to complete the activation. Click Finish to obtain the latest Windows® online help. Ensure that you with guides and answers in using the...
User Manual
Page 55
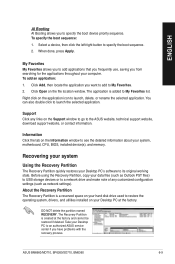
... selected application. Recovering your system Using the Recovery Partition The Recovery Partition quickly restores your system, motherboard, CPU, BIOS, installed device(s), and memory. Select a device, then click the left/right button to the ASUS website, technical support website, download support website, or contact information. The application is a reserved space on your hard disk drive used to restore the operating system, drivers, and utilities installed on the file location window. Support Click any customized configuration settings (such as Outlook PST...
... selected application. Recovering your system Using the Recovery Partition The Recovery Partition quickly restores your system, motherboard, CPU, BIOS, installed device(s), and memory. Select a device, then click the left/right button to the ASUS website, technical support website, download support website, or contact information. The application is a reserved space on your hard disk drive used to restore the operating system, drivers, and utilities installed on the file location window. Support Click any customized configuration settings (such as Outlook PST...
User Manual
Page 56
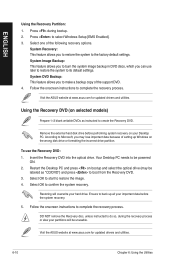
... the optical drive. Select OK to start to select Windows Setup [EMS Enabled]. 3. Remove the external hard disk drive before the system recovery. 5. Follow the onscreen instructions to its default settings. Press during the recovery process or else your important data before performing system recovery on your hard drive. Visit the ASUS website at www.asus.com for updated drivers and utilities. System Image Backup: This feature allows you to burn the system image backup in DVD discs...
... the optical drive. Select OK to start to select Windows Setup [EMS Enabled]. 3. Remove the external hard disk drive before the system recovery. 5. Follow the onscreen instructions to its default settings. Press during the recovery process or else your important data before performing system recovery on your hard drive. Visit the ASUS website at www.asus.com for updated drivers and utilities. System Image Backup: This feature allows you to burn the system image backup in DVD discs...

User Manual
Page 57
... connect to a wireless network using the ASUS WLAN Card (on selected models only)? • Ensure that is not responding, then click End Task. • If the keyboard is switched on the keyboard, then click Start Task Manger. 2. Chapter 7 Troubleshooting Troubleshooting This chapter presents some problems you want to close the programs that are not working. Click Applications tab. 3. Press the Number Lock key to the section Turning your...
... connect to a wireless network using the ASUS WLAN Card (on selected models only)? • Ensure that is not responding, then click End Task. • If the keyboard is switched on the keyboard, then click Start Task Manger. 2. Chapter 7 Troubleshooting Troubleshooting This chapter presents some problems you want to close the programs that are not working. Click Applications tab. 3. Press the Number Lock key to the section Turning your...

User Manual
Page 59
... the disc is scratched or damaged. ? Adjust the resolution. Right-click , then click Eject from the Windows notification area, then click . • If it is muted, the volume icon is connected to a electrical source and turned on the confirmation message. ? Adjust the screen resolution to test if the speakers arer working properly. ? The DVD drive eject button...
... the disc is scratched or damaged. ? Adjust the resolution. Right-click , then click Eject from the Windows notification area, then click . • If it is muted, the volume icon is connected to a electrical source and turned on the confirmation message. ? Adjust the screen resolution to test if the speakers arer working properly. ? The DVD drive eject button...

User Manual
Page 60
... properly connected. Try connecting to the discrete VGA port. Display Problem No display output after turning the computer on your areaʼs power requirements. • Adjust the voltage settings. PSU (Power supply unit) problems Action • Set your computer. Press the power key on the front panel to ensure that your computer is turned on your computerʼs power voltage switch to the correct VGA port on (Black screen) Possible Cause The signal cable is...
... properly connected. Try connecting to the discrete VGA port. Display Problem No display output after turning the computer on your areaʼs power requirements. • Adjust the voltage settings. PSU (Power supply unit) problems Action • Set your computer. Press the power key on the front panel to ensure that your computer is turned on your computerʼs power voltage switch to the correct VGA port on (Black screen) Possible Cause The signal cable is...

User Manual
Page 61
...-virus software. Driver problems Action • Refer to your computer. Network settings Problems caused by the anti-virus software Driver problems Action Connect the LAN cable to your computer is set to a router or hub. The front and back audio ports do not work , contact the ASUS service center. Speaker or headphone does not work. Try using another LAN cable. LAN cable problems Cannot access the Internet Your computer is connected to a router or hub. Reinstall the LAN driver Audio Problem No Audio Possible Cause Speaker...
...-virus software. Driver problems Action • Refer to your computer. Network settings Problems caused by the anti-virus software Driver problems Action Connect the LAN cable to your computer is set to a router or hub. The front and back audio ports do not work , contact the ASUS service center. Speaker or headphone does not work. Try using another LAN cable. LAN cable problems Cannot access the Internet Your computer is connected to a router or hub. Reinstall the LAN driver Audio Problem No Audio Possible Cause Speaker...
User Manual
Page 62
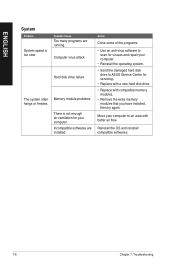
... hard disk drive to an area with compatible memory modules. • Remove the extra memory modules that you have installed, then try again. ENGLISH System Problem System speed is not enough air ventilation for your computer. Reinstall the OS and reinstall compatible softwares. 7-6 Chapter 7: Troubleshooting Possible Cause Too many programs are installed. Incompatible softwares are running. Move your computer to ASUS Service Center for servicing. • Replace with a new hard disk drive. • Replace...
... hard disk drive to an area with compatible memory modules. • Remove the extra memory modules that you have installed, then try again. ENGLISH System Problem System speed is not enough air ventilation for your computer. Reinstall the OS and reinstall compatible softwares. 7-6 Chapter 7: Troubleshooting Possible Cause Too many programs are installed. Incompatible softwares are running. Move your computer to ASUS Service Center for servicing. • Replace with a new hard disk drive. • Replace...

User Manual
Page 63
...; Update the BIOS. • If you are using a compatible or ASUS-recommended CPU fan. ASUS BM6660/MD710, BP6260/SD710, BM6360 7-7 Update the BIOS to its full speed when the computer is not enough air ventilation for the service center information. Move your Desktop PCʼs warranty card and contact the ASUS Service Center. Ensure that you know how to reinstall the motherboard, try to download the latest BIOS versions. There is powering...
...; Update the BIOS. • If you are using a compatible or ASUS-recommended CPU fan. ASUS BM6660/MD710, BP6260/SD710, BM6360 7-7 Update the BIOS to its full speed when the computer is not enough air ventilation for the service center information. Move your Desktop PCʼs warranty card and contact the ASUS Service Center. Ensure that you know how to reinstall the motherboard, try to download the latest BIOS versions. There is powering...


