

User Manual
Page 13
...-D port 2 x USB 2.0 ports 2 x USB 2.0 ports 8-channel audio ports 1 x Power switch 1 x VGA port Air vents 1 x RJ-45 port 4 x Expansion slots Side cover lock Expansion slot lock BM5670/MD300, BM5270 ASUS BM5670/MD300, BP5270/SD300, BM5270 1-3
...-D port 2 x USB 2.0 ports 2 x USB 2.0 ports 8-channel audio ports 1 x Power switch 1 x VGA port Air vents 1 x RJ-45 port 4 x Expansion slots Side cover lock Expansion slot lock BM5670/MD300, BM5270 ASUS BM5670/MD300, BP5270/SD300, BM5270 1-3

User Manual
Page 15
... Out Microphone Front Speaker Out Line In Power connector PS/2 Mouse/ Keyboard VGA RJ-45 Rear Speaker Out Center/ Subwoofer Expansion slots BM5670/MD300, BM5270 ASUS BM5670/MD300, BP5270/SD300, BM5270 1-5 Connect the PS/2 keyboard to the PS/2 keyboard port at the rear panel or the USB keyboard... to a USB port either at the rear panel or front panel. 1.4 Connecting to the keyboard and the mouse Your ASUS Desktop PC package includes a ...
... Out Microphone Front Speaker Out Line In Power connector PS/2 Mouse/ Keyboard VGA RJ-45 Rear Speaker Out Center/ Subwoofer Expansion slots BM5670/MD300, BM5270 ASUS BM5670/MD300, BP5270/SD300, BM5270 1-5 Connect the PS/2 keyboard to the PS/2 keyboard port at the rear panel or the USB keyboard... to a USB port either at the rear panel or front panel. 1.4 Connecting to the keyboard and the mouse Your ASUS Desktop PC package includes a ...
User Manual
Page 19
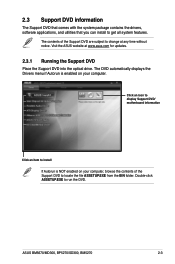
... to locate the file ASSETUP.EXE from the BIN folder. Double-click ASSETUP.EXE to get all system features. ASUS BM5670/MD300, BP5270/SD300, BM5270 2-3 The contents of the Support DVD to change at www.asus.com for updates. 2.3.1 Running the Support DVD Place the Support DVD into the optical drive. Visit the...
... to locate the file ASSETUP.EXE from the BIN folder. Double-click ASSETUP.EXE to get all system features. ASUS BM5670/MD300, BP5270/SD300, BM5270 2-3 The contents of the Support DVD to change at www.asus.com for updates. 2.3.1 Running the Support DVD Place the Support DVD into the optical drive. Visit the...

User Manual
Page 21
.... Adobe Reader 9 Installs the Adobe Reader that allows you to launch AI Disk, AI Security, AI Gear, and AI Probe easily. ASUS BM5670/MD300, BP5270/SD300, BM5270 2-5 ASUS AI Manager Installs ASUS AI Manager that allows you to open, view, and print documents in Windows® environment. 2.3.3 Utilities menu The Utilities menu shows the...
.... Adobe Reader 9 Installs the Adobe Reader that allows you to launch AI Disk, AI Security, AI Gear, and AI Probe easily. ASUS BM5670/MD300, BP5270/SD300, BM5270 2-5 ASUS AI Manager Installs ASUS AI Manager that allows you to open, view, and print documents in Windows® environment. 2.3.3 Utilities menu The Utilities menu shows the...

User Manual
Page 23
2.3.6 Other information The icons on the top right corner of the screen give additional information on the motherboard and the contents of the motherboard. Browse this DVD Displays the Support DVD contents in graphical format. ASUS BM5670/MD300, BP5270/SD300, BM5270 2-7 Click an icon to display the specified information. Motherboard Info Displays the general specifications of the Support DVD.
2.3.6 Other information The icons on the top right corner of the screen give additional information on the motherboard and the contents of the motherboard. Browse this DVD Displays the Support DVD contents in graphical format. ASUS BM5670/MD300, BP5270/SD300, BM5270 2-7 Click an icon to display the specified information. Motherboard Info Displays the general specifications of the Support DVD.
User Manual
Page 25
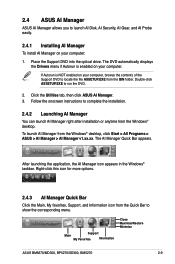
...is enabled on your computer, browse the contents of the Support DVD to show the corresponding menu. Click the Utilities tab, then click ASUS AI Manager. 3. To launch AI Manager from the Quick Bar to locate the file ASSETUP.EXE from the Windows® desktop. Double...icon from the Windows® desktop, click Start > All Programs > ASUS > AI Manager > AI Manager v1.xx.xx. Follow the onscreen instructions to run the DVD. 2. Main Support My Favorites Information Close Maximize/Restore Minimize ASUS BM5670/MD300, BP5270/SD300, BM5270 2-9 The AI Manager Quick Bar appears. ...
...is enabled on your computer, browse the contents of the Support DVD to show the corresponding menu. Click the Utilities tab, then click ASUS AI Manager. 3. To launch AI Manager from the Quick Bar to locate the file ASSETUP.EXE from the Windows® desktop. Double...icon from the Windows® desktop, click Start > All Programs > ASUS > AI Manager > AI Manager v1.xx.xx. Follow the onscreen instructions to run the DVD. 2. Main Support My Favorites Information Close Maximize/Restore Minimize ASUS BM5670/MD300, BP5270/SD300, BM5270 2-9 The AI Manager Quick Bar appears. ...

User Manual
Page 27
Click OK. Key in a password consisting of up to lock your removable storage devices such as a USB flash disk and a CD/DVD disk, which ensures more security for the first time, key in your password hint (optional). 4. ASUS BM5670/MD300, BP5270/SD300, BM5270 2-11 If you to set passwords to 20 alphanumeric characters. 2 Confirm your password. 3. AI Security AI Security allows you are using AI Security for your data. To lock a device: 1.
Click OK. Key in a password consisting of up to lock your removable storage devices such as a USB flash disk and a CD/DVD disk, which ensures more security for the first time, key in your password hint (optional). 4. ASUS BM5670/MD300, BP5270/SD300, BM5270 2-11 If you to set passwords to 20 alphanumeric characters. 2 Confirm your password. 3. AI Security AI Security allows you are using AI Security for your data. To lock a device: 1.
User Manual
Page 29
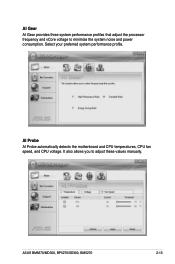
AI Probe AI Probe automatically detects the motherboard and CPU temperatures, CPU fan speed, and CPU voltage. ASUS BM5670/MD300, BP5270/SD300, BM5270 2-13 It also allows you to minimize the system noise and power consumption. Select your preferred system performance profile. AI Gear AI Gear provides three system performance profiles that adjust the processor frequency and vCore voltage to adjust these values manually.
AI Probe AI Probe automatically detects the motherboard and CPU temperatures, CPU fan speed, and CPU voltage. ASUS BM5670/MD300, BP5270/SD300, BM5270 2-13 It also allows you to minimize the system noise and power consumption. Select your preferred system performance profile. AI Gear AI Gear provides three system performance profiles that adjust the processor frequency and vCore voltage to adjust these values manually.
User Manual
Page 31
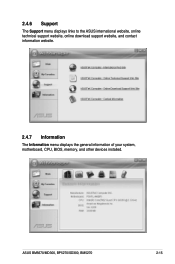
ASUS BM5670/MD300, BP5270/SD300, BM5270 2-15 2.4.6 Support The Support menu displays links to the ASUS international website, online technical support website, online download support website, and contact information website. 2.4.7 Information The Information menu displays the general information of your system, motherboard, CPU, BIOS, memory, and other devices installed.
ASUS BM5670/MD300, BP5270/SD300, BM5270 2-15 2.4.6 Support The Support menu displays links to the ASUS international website, online technical support website, online download support website, and contact information website. 2.4.7 Information The Information menu displays the general information of your system, motherboard, CPU, BIOS, memory, and other devices installed.

User Manual
Page 33
.... Insert the Recovery DVD into the optical drive when a Please select boot device menu appears. Recover Windows to complete the system configurations. ASUS BM5670/MD300, BP5270/SD300, BM5270 2-17 Press Next to recover now, click Finish. You can back up 40%. When a Recovery finish message...restarts. DO NOT use it restarts, follow steps 3-6 below. 3. Select the optical drive as drive "C". After the system reboots, an ASUS Preload window appears. Turn on your hard disk and creates two new system partitions. The system restarts. Select where to recover the system ...
.... Insert the Recovery DVD into the optical drive when a Please select boot device menu appears. Recover Windows to complete the system configurations. ASUS BM5670/MD300, BP5270/SD300, BM5270 2-17 Press Next to recover now, click Finish. You can back up 40%. When a Recovery finish message...restarts. DO NOT use it restarts, follow steps 3-6 below. 3. Select the optical drive as drive "C". After the system reboots, an ASUS Preload window appears. Turn on your hard disk and creates two new system partitions. The system restarts. Select where to recover the system ...


