

B85M-K User's Manual
Page 1
B85M-K Motherboard
B85M-K Motherboard

B85M-K User's Manual
Page 3
Contents Safety information...iv About this guide...iv Package contents...vi B85M-K specifications summary vi Product introduction 1.1 Before you proceed 1-1 1.2 Motherboard overview 1-1 1.3 Central Processing Unit (CPU 1-4 1.4 System memory 1-7 1.5 Expansion slots 1-9 1.6 Jumpers...1-11 1.7 Connectors 1-13 1.8 Onboard LEDs 1-20 1.9 Software support 1-21 BIOS information 2.1 ... Main menu...2-9 2.4 Ai Tweaker menu 2-10 2.5 Advanced menu 2-11 2.6 Monitor menu 2-12 2.7 Boot menu 2-13 2.8 Tools menu 2-14 2.9 Exit menu...2-14 Appendices Notices...A-1 ASUS contact information A-3 iii
Contents Safety information...iv About this guide...iv Package contents...vi B85M-K specifications summary vi Product introduction 1.1 Before you proceed 1-1 1.2 Motherboard overview 1-1 1.3 Central Processing Unit (CPU 1-4 1.4 System memory 1-7 1.5 Expansion slots 1-9 1.6 Jumpers...1-11 1.7 Connectors 1-13 1.8 Onboard LEDs 1-20 1.9 Software support 1-21 BIOS information 2.1 ... Main menu...2-9 2.4 Ai Tweaker menu 2-10 2.5 Advanced menu 2-11 2.6 Monitor menu 2-12 2.7 Boot menu 2-13 2.8 Tools menu 2-14 2.9 Exit menu...2-14 Appendices Notices...A-1 ASUS contact information A-3 iii

B85M-K User's Manual
Page 4
...cord. How this guide This user guide contains the information you add a device. • Before connecting or removing signal cables from the motherboard, ensure that your area. Do not place the product in your power supply is organized This guide contains the following parts: •...If you are not damaged. About this guide is set to change system settings through the BIOS Setup menus. Detailed descriptions of the motherboard and the new technology it by yourself. If possible, disconnect all power cables are also provided. These devices could interrupt the grounding ...
...cord. How this guide This user guide contains the information you add a device. • Before connecting or removing signal cables from the motherboard, ensure that your area. Do not place the product in your power supply is organized This guide contains the following parts: •...If you are not damaged. About this guide is set to change system settings through the BIOS Setup menus. Detailed descriptions of the motherboard and the new technology it by yourself. If possible, disconnect all power cables are also provided. These devices could interrupt the grounding ...
B85M-K User's Manual
Page 6
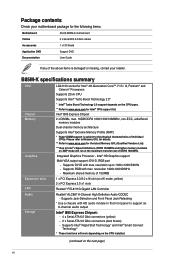
... audio module in the front panel to 1920 x1200@60Hz - Graphics Integrated Graphics Processor - Package contents Check your motherboard package for the following items. Motherboard ASUS B85M-K motherboard Cables 2 x Serial ATA 6.0 Gb/s cables Accessories 1 x I/O Shield Application DVD Support DVD Documentation User Guide... LAN Controller Audio Storage Realtek® ALC887 8-Channel High Definition Audio CODEC - Supports RGB with max. B85M-K specifications summary CPU LGA1150 socket for the latest Memory QVL (Qualified Vendors List). *** Due to the physical characteristics of DDR3 ...
... audio module in the front panel to 1920 x1200@60Hz - Graphics Integrated Graphics Processor - Package contents Check your motherboard package for the following items. Motherboard ASUS B85M-K motherboard Cables 2 x Serial ATA 6.0 Gb/s cables Accessories 1 x I/O Shield Application DVD Support DVD Documentation User Guide... LAN Controller Audio Storage Realtek® ALC887 8-Channel High Definition Audio CODEC - Supports RGB with max. B85M-K specifications summary CPU LGA1150 socket for the latest Memory QVL (Qualified Vendors List). *** Due to the physical characteristics of DDR3 ...

B85M-K User's Manual
Page 9
...is detached from the power supply. Failure to do so may cause severe damage to the motherboard, peripherals, or components. 1.2 Motherboard overview Before you install the motherboard, study the configuration of your chassis to avoid touching the ICs on them. • ... in the correct orientation. Ensure that the motherboard fits into the chassis in the image below. ASUS B85M-K 1-1 Product introduction 1 1.1 Before you proceed Take note of the following precautions before you install motherboard components or change any motherboard settings. • Unplug the power cord ...
...is detached from the power supply. Failure to do so may cause severe damage to the motherboard, peripherals, or components. 1.2 Motherboard overview Before you install the motherboard, study the configuration of your chassis to avoid touching the ICs on them. • ... in the correct orientation. Ensure that the motherboard fits into the chassis in the image below. ASUS B85M-K 1-1 Product introduction 1 1.1 Before you proceed Take note of the following precautions before you install motherboard components or change any motherboard settings. • Unplug the power cord ...

B85M-K User's Manual
Page 10
Doing so can damage the motherboard. 1.2.2 Screw holes Place six screws into the holes indicated by circles to secure the motherboard to the chassis. Place this side towards the rear of the chassis B85M-K 1-2 Chapter 1: Product introduction Do not overtighten the screws!
Doing so can damage the motherboard. 1.2.2 Screw holes Place six screws into the holes indicated by circles to secure the motherboard to the chassis. Place this side towards the rear of the chassis B85M-K 1-2 Chapter 1: Product introduction Do not overtighten the screws!

B85M-K User's Manual
Page 11
VD2 PCIEX1_2 USBPW5-10 B85 7 F_PANEL CLRTC SPDIF_OUT USB56 USB3_910 SATA3G_1 SATA3G_2 SATA6G_1 SATA6G_2 AAFP USB78 16 15 14 13 12 11 10 9 8 ASUS B85M-K 1-3 1.2.3 Motherboard layout 1 23 4 17.5cm(6.9in) 35 KBMS ASP ATX12V 1255 CPU_FAN DVI DDR3 DIMM_B1 (64bit, 240-pin module) DDR3 DIMM_A1 (64bit, 240-pin module) VGA LGA1150 2 USB3_12 22.6cm(8.9in) EATXPWR PS2_USBPW1-4 LAN_USB34 CHA_FAN SATA6G_4 BATTERY AUDIO B85M-K PCIEX16 8 RTL 8111G SATA6G_3 Super I/O PCIEX1_1 Intel® 64Mb BIOS 6 SPEAKER SB_PWR ALC 887-
VD2 PCIEX1_2 USBPW5-10 B85 7 F_PANEL CLRTC SPDIF_OUT USB56 USB3_910 SATA3G_1 SATA3G_2 SATA6G_1 SATA6G_2 AAFP USB78 16 15 14 13 12 11 10 9 8 ASUS B85M-K 1-3 1.2.3 Motherboard layout 1 23 4 17.5cm(6.9in) 35 KBMS ASP ATX12V 1255 CPU_FAN DVI DDR3 DIMM_B1 (64bit, 240-pin module) DDR3 DIMM_A1 (64bit, 240-pin module) VGA LGA1150 2 USB3_12 22.6cm(8.9in) EATXPWR PS2_USBPW1-4 LAN_USB34 CHA_FAN SATA6G_4 BATTERY AUDIO B85M-K PCIEX16 8 RTL 8111G SATA6G_3 Super I/O PCIEX1_1 Intel® 64Mb BIOS 6 SPEAKER SB_PWR ALC 887-

B85M-K User's Manual
Page 12
...B85M-K B85M-K CPU socket LGA1150 Unplug all power cables before installing the CPU. • Upon purchase of the motherboard, ensure that the PnP cap is shipment/ transit-related. • Keep the cap after installing the motherboard. ASUS will process Return Merchandise Authorization (RMA) requests only if the motherboard...18 1-19 1-16 1-12 1-11 1-15 1-15 1-20 1.3 Central Processing Unit (CPU) This motherboard comes with the cap on the socket and the socket contacts are not bent. ASUS will shoulder the cost of the PnP cap. 1-4 Chapter 1: Product introduction ATX power connectors (24-...
...B85M-K B85M-K CPU socket LGA1150 Unplug all power cables before installing the CPU. • Upon purchase of the motherboard, ensure that the PnP cap is shipment/ transit-related. • Keep the cap after installing the motherboard. ASUS will process Return Merchandise Authorization (RMA) requests only if the motherboard...18 1-19 1-16 1-12 1-11 1-15 1-15 1-20 1.3 Central Processing Unit (CPU) This motherboard comes with the cap on the socket and the socket contacts are not bent. ASUS will shoulder the cost of the PnP cap. 1-4 Chapter 1: Product introduction ATX power connectors (24-...

B85M-K User's Manual
Page 15
... DDR or DDR2 module. A DDR3 module is recommended to the DDR3 slot. ASUS B85M-K 1-7 DIMM_A1 DIMM_B1 Channel Sockets Channel A DIMM_A1 B85M-K Channel B DIMM_B1 B85M-K 240-pin DDR3 DIMM sockets 1.4.2 Memory configurations You may install 1GB, 2GB..., 4GB, and 8GB unbuffered non‑ECC DDR3 DIMMs into the DIMM sockets. DO NOT install a DDR or DDR2 memory module to protect the CPU. To uninstall the CPU heatsink and fan assembly 1 2 A B B A 1.4 System memory 1.4.1 Overview This motherboard...
... DDR or DDR2 module. A DDR3 module is recommended to the DDR3 slot. ASUS B85M-K 1-7 DIMM_A1 DIMM_B1 Channel Sockets Channel A DIMM_A1 B85M-K Channel B DIMM_B1 B85M-K 240-pin DDR3 DIMM sockets 1.4.2 Memory configurations You may install 1GB, 2GB..., 4GB, and 8GB unbuffered non‑ECC DDR3 DIMMs into the DIMM sockets. DO NOT install a DDR or DDR2 memory module to protect the CPU. To uninstall the CPU heatsink and fan assembly 1 2 A B B A 1.4 System memory 1.4.1 Overview This motherboard...

B85M-K User's Manual
Page 16
.... 1-8 Chapter 1: Product introduction Align a DIMM on the socket such that the notch on the DIMM matches the DIMM slot key on the motherboard. • This motherboard does not support DIMMs made up of 512 megabits (Mb) chips or less. • Memory modules with memory frequency higher than the vendor... A and Channel B. Check with the same CAS latency. For effective use a more memory on the motherboard, the actual usable memory for the OS can be supported with 8GB or above DIMMs. ASUS will run at a lower frequency than 2133 MHz and its Serial Presence Detect (SPD), which is then...
.... 1-8 Chapter 1: Product introduction Align a DIMM on the socket such that the notch on the DIMM matches the DIMM slot key on the motherboard. • This motherboard does not support DIMMs made up of 512 megabits (Mb) chips or less. • Memory modules with memory frequency higher than the vendor... A and Channel B. Check with the same CAS latency. For effective use a more memory on the motherboard, the actual usable memory for the OS can be supported with 8GB or above DIMMs. ASUS will run at a lower frequency than 2133 MHz and its Serial Presence Detect (SPD), which is then...

B85M-K User's Manual
Page 17
... is properly seated. Simultaneously press the retaining clips outward to install expansion cards. DIMM notch 1.5 Expansion slots In the future, you physical injury and damage motherboard components. ASUS B85M-K 1-9 The DIMM might get 1 damaged when it fits in the wrong direction to avoid damaging the DIMM. 3. The following sub‑sections describe the...
... is properly seated. Simultaneously press the retaining clips outward to install expansion cards. DIMM notch 1.5 Expansion slots In the future, you physical injury and damage motherboard components. ASUS B85M-K 1-9 The DIMM might get 1 damaged when it fits in the wrong direction to avoid damaging the DIMM. 3. The following sub‑sections describe the...

B85M-K User's Manual
Page 18
... Otherwise, conflicts will arise between the two PCI groups, making the system unstable and the card inoperable. 1.5.3 PCI Express x1 slots This motherboard supports two PCI Express x1 network cards, SCSI cards, and other cards that comply with the PCI Express specifications. 1.5.4 PCI Express x16 slot ...that the cards do not need IRQ assignments. C shared - H - Remove the system unit cover (if your motherboard is completely seated on BIOS setup. 2. Keep the screw for this motherboard LAN PCIE x16 PCIE x1_1 PCIE x1_2 Intel PCH SATA Controller HD Audio USB2.0_1 USB2.0_2 USB3.0 A shared ...
... Otherwise, conflicts will arise between the two PCI groups, making the system unstable and the card inoperable. 1.5.3 PCI Express x1 slots This motherboard supports two PCI Express x1 network cards, SCSI cards, and other cards that comply with the PCI Express specifications. 1.5.4 PCI Express x16 slot ...that the cards do not need IRQ assignments. C shared - H - Remove the system unit cover (if your motherboard is completely seated on BIOS setup. 2. Keep the screw for this motherboard LAN PCIE x16 PCIE x1_1 PCIE x1_2 Intel PCH SATA Controller HD Audio USB2.0_1 USB2.0_2 USB3.0 A shared ...

B85M-K User's Manual
Page 23
...panel audio module to this connector to avail of the system chassis. +5V SPDIFOUT GND B85M-K SPDIF_OUT B85M-K Digital audio connector The S/PDIF module is for a chassis-mounted front panel audio I .../O module cable to this connector, then install the module to a slot opening at the back of the motherboard...out_R NC Line out_L PORT1 L PORT1 R PORT2 R SENSE_SEND PORT2 L B85M-K HD-audio-compliant pin definition B85M-K Front panel audio connector Legacy AC'97 compliant definition • We ...
...panel audio module to this connector to avail of the system chassis. +5V SPDIFOUT GND B85M-K SPDIF_OUT B85M-K Digital audio connector The S/PDIF module is for a chassis-mounted front panel audio I .../O module cable to this connector, then install the module to a slot opening at the back of the motherboard...out_R NC Line out_L PORT1 L PORT1 R PORT2 R SENSE_SEND PORT2 L B85M-K HD-audio-compliant pin definition B85M-K Front panel audio connector Legacy AC'97 compliant definition • We ...

B85M-K User's Manual
Page 24
... PWR GND B85M-K CPU fan connector Do not forget to connect the fan cables to a slot opening at the back of maximum 1A (12 W) fan power. Insufficient air flow inside the system may damage the motherboard components. Only the 4-pin CPU fan support the ASUS Fan Xpert feature.... 4. These USB connectors comply with USB 2.0 specifications and supports up to 480Mbps connection speed. Doing so will damage the motherboard!
... PWR GND B85M-K CPU fan connector Do not forget to connect the fan cables to a slot opening at the back of maximum 1A (12 W) fan power. Insufficient air flow inside the system may damage the motherboard components. Only the 4-pin CPU fan support the ASUS Fan Xpert feature.... 4. These USB connectors comply with USB 2.0 specifications and supports up to 480Mbps connection speed. Doing so will damage the motherboard!

B85M-K User's Manual
Page 28
Standby Power LED The motherboard comes with a standby power LED that lights up to indicate that the system is a reminder that you should shut down the system and unplug the power cable before removing or plugging in soft-off mode. 1.8 Onboard LEDs 1. B85M-K SB_PWR B85M-K Onboard LED 1-20 Chapter 1: Product introduction The illustration below shows the location of the onboard LED. This is ON, in sleep mode, or in any motherboard component.
Standby Power LED The motherboard comes with a standby power LED that lights up to indicate that the system is a reminder that you should shut down the system and unplug the power cable before removing or plugging in soft-off mode. 1.8 Onboard LEDs 1. B85M-K SB_PWR B85M-K Onboard LED 1-20 Chapter 1: Product introduction The illustration below shows the location of the onboard LED. This is ON, in sleep mode, or in any motherboard component.

B85M-K User's Manual
Page 29
..., AHCI Driver, Manual, Contact and Specials tabs to change at www.asus.com for detailed information. 1.9.2 Support DVD information The Support DVD that comes with the motherboard package contains the drivers, software applications, and utilities that you can install... to install If Autorun is enabled in your computer, browse the contents of the Support DVD are subject to display their respective menus. Double-click the ASSETUP.EXE to maximize the features of your hardware. ASUS B85M...
..., AHCI Driver, Manual, Contact and Specials tabs to change at www.asus.com for detailed information. 1.9.2 Support DVD information The Support DVD that comes with the motherboard package contains the drivers, software applications, and utilities that you can install... to install If Autorun is enabled in your computer, browse the contents of the Support DVD are subject to display their respective menus. Double-click the ASSETUP.EXE to maximize the features of your hardware. ASUS B85M...
B85M-K User's Manual
Page 31
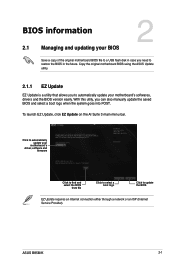
... Save a copy of the original motherboard BIOS file to a USB flash disk in the future. With this utlity, you need to restore the BIOS in case you can also manually update the saved BIOS and select a boot logo when the system goes into POST. ASUS B85M-K 2-1 To launch EZ Update, ...click EZ Update on the AI Suite 3 main menu bar. BIOS information 2.1 Managing and updating your motherboard's softwares, drivers and the BIOS version easily.
... Save a copy of the original motherboard BIOS file to a USB flash disk in the future. With this utlity, you need to restore the BIOS in case you can also manually update the saved BIOS and select a boot logo when the system goes into POST. ASUS B85M-K 2-1 To launch EZ Update, ...click EZ Update on the AI Suite 3 main menu bar. BIOS information 2.1 Managing and updating your motherboard's softwares, drivers and the BIOS version easily.

B85M-K User's Manual
Page 33
... BIOS 1. NTFS is an auto recovery tool that you can use as shown. You can restore a corrupted BIOS file using the motherboard support DVD or a USB flash drive that contains the updated BIOS file. • Before using this utility, rename the BIOS file... setting. When found, the utility reads the BIOS file and enters ASUS EZ Flash 2 utility automatically. 4. Turn off the computer and disconnect all SATA hard disk drives (optional). ASUS B85M-K 2-3 2.1.3 ASUS CrashFree BIOS 3 utility The ASUS CrashFree BIOS 3 is not supported under DOS environment. The utility automatically...
... BIOS 1. NTFS is an auto recovery tool that you can use as shown. You can restore a corrupted BIOS file using the motherboard support DVD or a USB flash drive that contains the updated BIOS file. • Before using this utility, rename the BIOS file... setting. When found, the utility reads the BIOS file and enters ASUS EZ Flash 2 utility automatically. 4. Turn off the computer and disconnect all SATA hard disk drives (optional). ASUS B85M-K 2-3 2.1.3 ASUS CrashFree BIOS 3 utility The ASUS CrashFree BIOS 3 is not supported under DOS environment. The utility automatically...

B85M-K User's Manual
Page 36
... see on how to the default value. See section 1.6 Jumpers for information on your screen. • Visit the ASUS website at www.asus.com to download the latest BIOS file for this motherboard. • Ensure that a USB mouse is connected to your data or system. Select the Load Optimized Defaults item ...details. • If the system fails to boot after changing any BIOS setting, try to clear the CMOS and reset the motherboard to erase the RTC RAM. Refer to your motherboard if you enter the BIOS setup program. Using the power button, reset button, or the ++ keys to force reset from a...
... see on how to the default value. See section 1.6 Jumpers for information on your screen. • Visit the ASUS website at www.asus.com to download the latest BIOS file for this motherboard. • Ensure that a USB mouse is connected to your data or system. Select the Load Optimized Defaults item ...details. • If the system fails to boot after changing any BIOS setting, try to clear the CMOS and reset the motherboard to erase the RTC RAM. Refer to your motherboard if you enter the BIOS setup program. Using the power button, reset button, or the ++ keys to force reset from a...

B85M-K User's Manual
Page 40
Scroll down to malfunction. The configuration options for this section vary depending on the motherboard. 2.4 Ai Tweaker menu The Ai Tweaker menu items allow you installed on the CPU and DIMM model you to configure overclocking-related items. Be cautious when changing the settings of the Ai Tweaker menu items. Incorrect field values can cause the system to display the following items: 2-10 Chapter 2: Getting started
Scroll down to malfunction. The configuration options for this section vary depending on the motherboard. 2.4 Ai Tweaker menu The Ai Tweaker menu items allow you installed on the CPU and DIMM model you to configure overclocking-related items. Be cautious when changing the settings of the Ai Tweaker menu items. Incorrect field values can cause the system to display the following items: 2-10 Chapter 2: Getting started


