B75M-PLUS User's Manual
Page 3
... About this guide...iv Package contents...vi B75M-PLUS specifications summary vi Chapter 1: Product introduction 1.1 Before you proceed 1-1 1.2 Motherboard overview 1-1 1.3 Central Processing Unit (CPU 1-3 1.4 System memory 1-7 1.5 Expansion slots 1-10 1.6 Jumpers...1-11 1.7 Connectors 1-13 1.9 Onboard LEDs 1-21 1.10 Software support 1-22 Chapter 2: BIOS information 2.1 Managing and updating your BIOS 2-1 2.2 BIOS setup program 2-6 2.3 Main menu...2-9 2.4 Ai Tweaker...
... About this guide...iv Package contents...vi B75M-PLUS specifications summary vi Chapter 1: Product introduction 1.1 Before you proceed 1-1 1.2 Motherboard overview 1-1 1.3 Central Processing Unit (CPU 1-3 1.4 System memory 1-7 1.5 Expansion slots 1-10 1.6 Jumpers...1-11 1.7 Connectors 1-13 1.9 Onboard LEDs 1-21 1.10 Software support 1-22 Chapter 2: BIOS information 2.1 Managing and updating your BIOS 2-1 2.2 BIOS setup program 2-6 2.3 Main menu...2-9 2.4 Ai Tweaker...

B75M-PLUS User's Manual
Page 4
... a stable surface. • If you detect any damage, contact your power supply is broken, do not try to fix it supports. • Chapter 2: BIOS information This chapter tells how to the correct voltage in any area where it may become wet. • Place the product on it, carefully read... provided. About this guide is organized This guide contains the following parts: • Chapter 1: Product introduction This chapter describes the features of the BIOS parameters are using, contact your local power company. • If the power supply is set to change system settings through the...
... a stable surface. • If you detect any damage, contact your power supply is broken, do not try to fix it supports. • Chapter 2: BIOS information This chapter tells how to the correct voltage in any area where it may become wet. • Place the product on it, carefully read... provided. About this guide is organized This guide contains the following parts: • Chapter 1: Product introduction This chapter describes the features of the BIOS parameters are using, contact your local power company. • If the power supply is set to change system settings through the...
B75M-PLUS User's Manual
Page 7
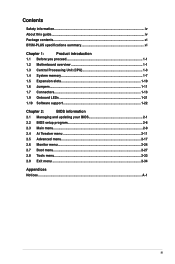
...ASUS EZ Flash 2 - ASUS CrashFree BIOS 3 - ASUS MyLogo 2 1 x PS/2 keyboard port (purple) 1 x PS/2 mouse port (green) 1 x HDMI port 1 x DVI-D port 1 x D-Sub port 1 x LAN (RJ-45) port 4 x USB 2.0/1.1 ports 2 x USB 3.0 ports 3 x Audio jacks (continued on the next page) vii ASUS DIGI+VRM: Digital Power Design for the CPU and iGPU - AI Charger - ASUS Fan Xpert ASUS EZ DIY - B75M-PLUS... specifications summary Storage LAN Audio USB ASUS unique features Rear panel ...
...ASUS EZ Flash 2 - ASUS CrashFree BIOS 3 - ASUS MyLogo 2 1 x PS/2 keyboard port (purple) 1 x PS/2 mouse port (green) 1 x HDMI port 1 x DVI-D port 1 x D-Sub port 1 x LAN (RJ-45) port 4 x USB 2.0/1.1 ports 2 x USB 3.0 ports 3 x Audio jacks (continued on the next page) vii ASUS DIGI+VRM: Digital Power Design for the CPU and iGPU - AI Charger - ASUS Fan Xpert ASUS EZ DIY - B75M-PLUS... specifications summary Storage LAN Audio USB ASUS unique features Rear panel ...
B75M-PLUS User's Manual
Page 8
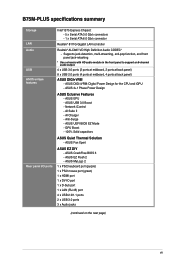
viii B75M-PLUS specifications summary Internal connectors/ switches/ buttons BIOS features Manageability Support DVD Form factor 1 x USB 3.0 connector supports additional 2 USB 3.0 ports 2 x USB 2.0 connectors support additional 4 USB 2.0 ports 1 x SATA 6.0 Gb/s ... ATX 12V power connector 1 x Speaker connector 64 Mb Flash ROM, AMI BIOS, PnP, DMI2.0, WfM2.0, SM BIOS 2.7, ACPI 2.0a, Multi-language BIOS, ASUS EZ Flash 2, ASUS CrashFree BIOS 3 WfM 2.0, DMI 2.0, WOL by PME, WOR by PME, PXE Drivers ASUS utilities ASUS Update Anti-virus software (OEM version) MicroATX form factor: 8.9"x 7.8" (22...
viii B75M-PLUS specifications summary Internal connectors/ switches/ buttons BIOS features Manageability Support DVD Form factor 1 x USB 3.0 connector supports additional 2 USB 3.0 ports 2 x USB 2.0 connectors support additional 4 USB 2.0 ports 1 x SATA 6.0 Gb/s ... ATX 12V power connector 1 x Speaker connector 64 Mb Flash ROM, AMI BIOS, PnP, DMI2.0, WfM2.0, SM BIOS 2.7, ACPI 2.0a, Multi-language BIOS, ASUS EZ Flash 2, ASUS CrashFree BIOS 3 WfM 2.0, DMI 2.0, WOL by PME, WOR by PME, PXE Drivers ASUS utilities ASUS Update Anti-virus software (OEM version) MicroATX form factor: 8.9"x 7.8" (22...

B75M-PLUS User's Manual
Page 10
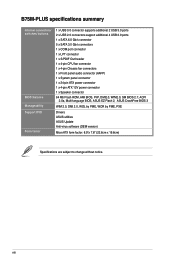
Place this side towards the rear of the chassis B75M-PLUS 1.2.3 Motherboard layout 1 23 34 5 19.8cm(7.8in) KBMS USB34 KB_USBPWB ATX12V CPU_FAN DIGI +VRM DDR3 DIMM_B2 (64bit, 240-pin module) DDR3 DIMM_B1 (64bit,...240-pin module) DVI_VGA LGA1155 1-2 HDMI 1 USB3_12 22.6cm(8.9in) EATXPWR LAN1_USB12 SATA3G_3 AUDIO BATTERY CHA_FAN SATA3G_4 SATA3G_5 SATA6G_1 SATA3G_1 SATA3G_2 PCIEX16 RTL 8111G B75M-PLUS 6 8MB BIOS Super PCIEX1_1 I/O Intel® 18 SB_PWR ALC PCI1 B75 7 887 SPDIF_OUT CLRTC USBPWF 17 LPT COM USB56 USB78 SPEAKER 8 AAFP F_PANEL USB3_34 16 ...
Place this side towards the rear of the chassis B75M-PLUS 1.2.3 Motherboard layout 1 23 34 5 19.8cm(7.8in) KBMS USB34 KB_USBPWB ATX12V CPU_FAN DIGI +VRM DDR3 DIMM_B2 (64bit, 240-pin module) DDR3 DIMM_B1 (64bit,...240-pin module) DVI_VGA LGA1155 1-2 HDMI 1 USB3_12 22.6cm(8.9in) EATXPWR LAN1_USB12 SATA3G_3 AUDIO BATTERY CHA_FAN SATA3G_4 SATA3G_5 SATA6G_1 SATA3G_1 SATA3G_2 PCIEX16 RTL 8111G B75M-PLUS 6 8MB BIOS Super PCIEX1_1 I/O Intel® 18 SB_PWR ALC PCI1 B75 7 887 SPDIF_OUT CLRTC USBPWF 17 LPT COM USB56 USB78 SPEAKER 8 AAFP F_PANEL USB3_34 16 ...

B75M-PLUS User's Manual
Page 18
...specifications. 1-10 Chapter 1: Product introduction Remove the system unit cover (if your motherboard is completely seated on the system and change the necessary BIOS settings, if any. Keep the screw for the expansion card. Secure the card to install expansion cards. Turn on the slot. 5. Before...information on shared slots, ensure that the drivers support "Share IRQ" or that you intend to the card. 3. When using PCI cards on BIOS setup. 2. Remove the bracket opposite the slot that the cards do so may need IRQ assignments. Install the software drivers for later use ...
...specifications. 1-10 Chapter 1: Product introduction Remove the system unit cover (if your motherboard is completely seated on the system and change the necessary BIOS settings, if any. Keep the screw for the expansion card. Secure the card to install expansion cards. Turn on the slot. 5. Before...information on shared slots, ensure that the drivers support "Share IRQ" or that you intend to the card. 3. When using PCI cards on BIOS setup. 2. Remove the bracket opposite the slot that the cards do so may need IRQ assignments. Install the software drivers for later use ...
B75M-PLUS User's Manual
Page 19
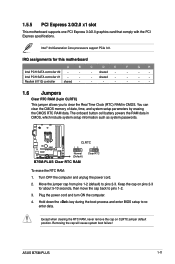
... jumper default position. Removing the cap will cause system boot failure! CLRTC B75M-PLUS 12 Normal (Default) 23 Clear RTC B75M-PLUS Clear RTC RAM To erase the RTC RAM: 1. Hold down the key during the boot process and enter BIOS setup to pins 1-2. 3. Move the jumper cap from pins 1-2 (default...Realtek 8111G controller shared - - - - - - - 1.6 Jumpers Clear RTC RAM (3-pin CLRTC) This jumper allows you to pins 2-3. Plug the power cord and turn ON the computer. 4. ASUS B75M-PLUS 1-11 IRQ assignments for about 5-10 seconds, then move the cap back to reenter data.
... jumper default position. Removing the cap will cause system boot failure! CLRTC B75M-PLUS 12 Normal (Default) 23 Clear RTC B75M-PLUS Clear RTC RAM To erase the RTC RAM: 1. Hold down the key during the boot process and enter BIOS setup to pins 1-2. 3. Move the jumper cap from pins 1-2 (default...Realtek 8111G controller shared - - - - - - - 1.6 Jumpers Clear RTC RAM (3-pin CLRTC) This jumper allows you to pins 2-3. Plug the power cord and turn ON the computer. 4. ASUS B75M-PLUS 1-11 IRQ assignments for about 5-10 seconds, then move the cap back to reenter data.
B75M-PLUS User's Manual
Page 20
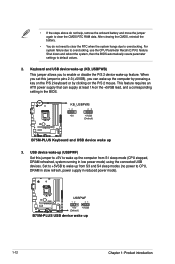
...BIOS. When you to enable or disable the P/S 2 device wake-up the computer by pressing a key on the P/S 2 keyboard or by clicking on the +5VSB lead, and a corresponding setting in low power mode) using the connected USB devices. For system failure due to default values. 2. B75M-PLUS KB_USBPWB 12 23 +5V +5VSB (Default) B75M-PLUS...S3 and S4 sleep modes (no power to CPU, DRAM in slow refresh, power supply in reduced power mode). USBPWF B75M-PLUS 12 23 +5V +5VSB (Default) B75M-PLUS USB device wake up 3. • If the steps above do not need to clear the RTC when the system ...
...BIOS. When you to enable or disable the P/S 2 device wake-up the computer by pressing a key on the P/S 2 keyboard or by clicking on the +5VSB lead, and a corresponding setting in low power mode) using the connected USB devices. For system failure due to default values. 2. B75M-PLUS KB_USBPWB 12 23 +5V +5VSB (Default) B75M-PLUS...S3 and S4 sleep modes (no power to CPU, DRAM in slow refresh, power supply in reduced power mode). USBPWF B75M-PLUS 12 23 +5V +5VSB (Default) B75M-PLUS USB device wake up 3. • If the steps above do not need to clear the RTC when the system ...
B75M-PLUS User's Manual
Page 23
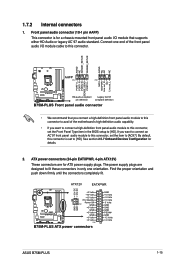
... in the BIOS setup to this connector. The power supply plugs are for details. 2. 1.7.2 Internal connectors 1. AGND NC SENSE1_RETUR SENSE2_RETUR AGND NC NC NC AAFP PIN 1 PIN 1 MIC2 MICPWR Line out_R NC Line out_L PORT1 L PORT1 R PORT2 R SENSE_SEND PORT2 L B75M-PLUS HD-audio-... +12V DC +12V DC B75M-PLUS GND GND +3 Volts +12 Volts +12 Volts +5V Standby Power OK PIN 1 GND +5 Volts GND +5 Volts GND +3 Volts +3 Volts PIN 1 B75M-PLUS ATX power connectors GND +5 Volts +5 Volts +5 Volts -5 Volts GND GND GND PSON# GND -12 Volts +3 Volts ASUS B75M-PLUS 1-15
... in the BIOS setup to this connector. The power supply plugs are for details. 2. 1.7.2 Internal connectors 1. AGND NC SENSE1_RETUR SENSE2_RETUR AGND NC NC NC AAFP PIN 1 PIN 1 MIC2 MICPWR Line out_R NC Line out_L PORT1 L PORT1 R PORT2 R SENSE_SEND PORT2 L B75M-PLUS HD-audio-... +12V DC +12V DC B75M-PLUS GND GND +3 Volts +12 Volts +12 Volts +5V Standby Power OK PIN 1 GND +5 Volts GND +5 Volts GND +3 Volts +3 Volts PIN 1 B75M-PLUS ATX power connectors GND +5 Volts +5 Volts +5 Volts -5 Volts GND GND GND PSON# GND -12 Volts +3 Volts ASUS B75M-PLUS 1-15

B75M-PLUS User's Manual
Page 26
... before using Serial ATA hard disk drives. • When using hot-plug and NCQ, set the SATA Mode Selection item in the BIOS to Serial ATA 6.0 Gb/s hard disk drives via Serial ATA 3.0 Gb/s signal cables. See section 2.5.3 SATA Configuration for details.... [AHCI]. Intel® B75 Serial ATA 6.0Gb/s connector (7-pin SATA6G_1 [gray]) This connector connects to [AHCI]. B75M-PLUS SATA6G_1 GND RSATA_TXP1 RSATA_TXN1 GND RSATA_RXN1 RSATA_RXP1 GND B75M-PLUS Intel® SATA 6.0Gb/s connectors • You must install Windows. See section 2.5.3 SATA Configuration for details. 1-18...
... before using Serial ATA hard disk drives. • When using hot-plug and NCQ, set the SATA Mode Selection item in the BIOS to Serial ATA 6.0 Gb/s hard disk drives via Serial ATA 3.0 Gb/s signal cables. See section 2.5.3 SATA Configuration for details.... [AHCI]. Intel® B75 Serial ATA 6.0Gb/s connector (7-pin SATA6G_1 [gray]) This connector connects to [AHCI]. B75M-PLUS SATA6G_1 GND RSATA_TXP1 RSATA_TXN1 GND RSATA_RXN1 RSATA_RXP1 GND B75M-PLUS Intel® SATA 6.0Gb/s connectors • You must install Windows. See section 2.5.3 SATA Configuration for details. 1-18...
B75M-PLUS User's Manual
Page 31
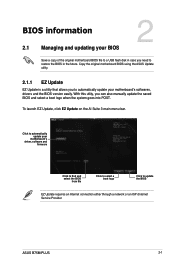
...USB flash disk in the future. Copy the original motherboard BIOS using the ASUS Update utility. 2.1.1 EZ Update EZ Update is a utility that allows you to restore the BIOS in case you can also manually update the saved BIOS and select a boot logo when the system goes into ... update the BIOS EZ Update requires an Internet connection either through a network or an ISP (Internet Service Provider. Click to automatically update your motherboard's softwares, drivers and the BIOS version easily. To launch EZ Update, click EZ Update on the AI Suite 3 main menu bar. ASUS B75M-PLUS 2-1
...USB flash disk in the future. Copy the original motherboard BIOS using the ASUS Update utility. 2.1.1 EZ Update EZ Update is a utility that allows you to restore the BIOS in case you can also manually update the saved BIOS and select a boot logo when the system goes into ... update the BIOS EZ Update requires an Internet connection either through a network or an ISP (Internet Service Provider. Click to automatically update your motherboard's softwares, drivers and the BIOS version easily. To launch EZ Update, click EZ Update on the AI Suite 3 main menu bar. ASUS B75M-PLUS 2-1
B75M-PLUS User's Manual
Page 32
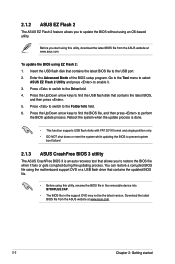
...NOT shut down or reset the system while updating the BIOS to prevent system boot failure! 2.1.3 ASUS CrashFree BIOS 3 utility The ASUS CrashFree BIOS 3 is an auto recovery tool that contains the updated BIOS file. • Before using this utility, rename the BIOS file in the removable device into B75MPLUS.CAP. &#...utility, download the latest BIOS file from the ASUS website at www.asus.com. Press the Up/Down arrow keys to find the BIOS file, and then press to perform the BIOS update process. Press to switch to the Drive field. 4. 2.1.2 ASUS EZ Flash 2 The ASUS EZ Flash 2 feature ...
...NOT shut down or reset the system while updating the BIOS to prevent system boot failure! 2.1.3 ASUS CrashFree BIOS 3 utility The ASUS CrashFree BIOS 3 is an auto recovery tool that contains the updated BIOS file. • Before using this utility, rename the BIOS file in the removable device into B75MPLUS.CAP. &#...utility, download the latest BIOS file from the ASUS website at www.asus.com. Press the Up/Down arrow keys to find the BIOS file, and then press to perform the BIOS update process. Press to switch to the Drive field. 4. 2.1.2 ASUS EZ Flash 2 The ASUS EZ Flash 2 feature ...
B75M-PLUS User's Manual
Page 33
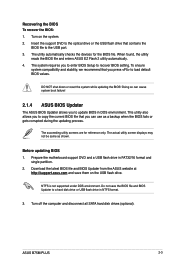
... that you can cause system boot failure! 2.1.4 ASUS BIOS Updater The ASUS BIOS Updater allows you to update BIOS in DOS environment. NTFS is not supported under DOS environment. Doing so can use as shown. Prepare the motherboard support DVD and a USB flash drive in NTFS format. 3. ASUS B75M-PLUS 2-3 The system requires you press to a hard disk...
... that you can cause system boot failure! 2.1.4 ASUS BIOS Updater The ASUS BIOS Updater allows you to update BIOS in DOS environment. NTFS is not supported under DOS environment. Doing so can use as shown. Prepare the motherboard support DVD and a USB flash drive in NTFS format. 3. ASUS B75M-PLUS 2-3 The system requires you press to a hard disk...
B75M-PLUS User's Manual
Page 34
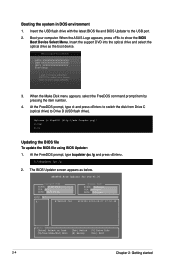
...command prompt item by pressing the item number. 4. The BIOS Updater screen appears as the boot device. 3. Insert the support DVD into the optical drive and select the optical drive as below. ASUSTek BIOS Updater for DOS V1.30 BOARD: B75M-PLUS VER: 5011 DATE: 08/07/2011 B75MPLUS.CAP 4194304... 2012-08-07 17:30:48 2-4 Chapter 2: Getting started When the ASUS Logo appears, press to the USB port. 2. Updating the BIOS file To update the BIOS file using BIOS Updater: 1. At ...
...command prompt item by pressing the item number. 4. The BIOS Updater screen appears as the boot device. 3. Insert the support DVD into the optical drive and select the optical drive as below. ASUSTek BIOS Updater for DOS V1.30 BOARD: B75M-PLUS VER: 5011 DATE: 08/07/2011 B75MPLUS.CAP 4194304... 2012-08-07 17:30:48 2-4 Chapter 2: Getting started When the ASUS Logo appears, press to the USB port. 2. Updating the BIOS file To update the BIOS file using BIOS Updater: 1. At ...
B75M-PLUS User's Manual
Page 35
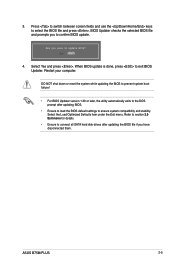
.... • Ensure to connect all SATA hard disk drives after updating BIOS. • Ensure to load the BIOS default settings to confirm BIOS update. 4. ASUS B75M-PLUS 2-5 3. Restart your computer. When BIOS update is done, press to select the BIOS file and press . BIOS Updater checks the selected BIOS file and prompts you have disconnected them. DO NOT shut down...
.... • Ensure to connect all SATA hard disk drives after updating BIOS. • Ensure to load the BIOS default settings to confirm BIOS update. 4. ASUS B75M-PLUS 2-5 3. Restart your computer. When BIOS update is done, press to select the BIOS file and press . BIOS Updater checks the selected BIOS file and prompts you have disconnected them. DO NOT shut down...
B75M-PLUS User's Manual
Page 36
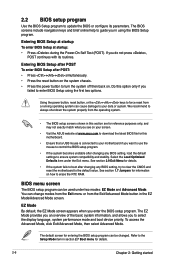
..., try to clear the CMOS and reset the motherboard to erase the RTC RAM. Entering BIOS Setup at startup To enter BIOS Setup at www.asus.com to your screen. • Visit the ASUS website at startup: • Press during the Power-On Self Test (POST). Using the power button, reset... button, or the ++ keys to force reset from a running operating system can change modes from the Exit menu or from the operating system. • The BIOS setup screens shown...
..., try to clear the CMOS and reset the motherboard to erase the RTC RAM. Entering BIOS Setup at startup To enter BIOS Setup at www.asus.com to your screen. • Visit the ASUS website at startup: • Press during the Power-On Self Test (POST). Using the power button, reset... button, or the ++ keys to force reset from a running operating system can change modes from the Exit menu or from the operating system. • The BIOS setup screens shown...
B75M-PLUS User's Manual
Page 37
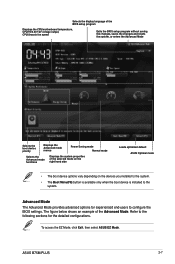
... the boot device is installed to the system. Refer to configure the BIOS settings. To access the EZ Mode, click Exit, then select ASUS EZ Mode. Selects the display language of the BIOS setup program Displays the CPU/motherboard temperature, CPU/5V/3.3V/12V voltage ...BIOS setup program without saving the changes, saves the changes and resets the system, or enters the Advanced Mode Selects the boot device priority Displays the Advanced mode menus Power Saving mode Normal mode Selects the Advanced mode functions Displays the system properties of the Advanced Mode. ASUS B75M-PLUS...
... the boot device is installed to the system. Refer to configure the BIOS settings. To access the EZ Mode, click Exit, then select ASUS EZ Mode. Selects the display language of the BIOS setup program Displays the CPU/motherboard temperature, CPU/5V/3.3V/12V voltage ...BIOS setup program without saving the changes, saves the changes and resets the system, or enters the Advanced Mode Selects the boot device priority Displays the Advanced mode menus Power Saving mode Normal mode Selects the Advanced mode functions Displays the system properties of the Advanced Mode. ASUS B75M-PLUS...
B75M-PLUS User's Manual
Page 39
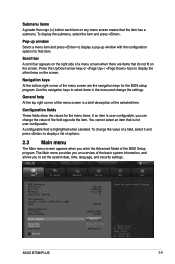
.... General help At the top right corner of the menu screen is not user-configurable. Configuration fields These fields show the values for the BIOS setup program. ASUS B75M-PLUS 2-9 Scroll bar A scroll bar appears on the right side of a menu screen when there are the navigation keys for the menu items. If an...
.... General help At the top right corner of the menu screen is not user-configurable. Configuration fields These fields show the values for the BIOS setup program. ASUS B75M-PLUS 2-9 Scroll bar A scroll bar appears on the right side of a menu screen when there are the navigation keys for the menu items. If an...
B75M-PLUS User's Manual
Page 40
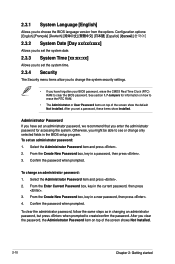
... for information on how to change an administrator password: 1. To set an administrator password, we recommend that you to choose the BIOS language version from the options. Configuration options: [English] [Español 2.3.2 System Date [Day xx/xx/xxxx] Allows you to clear the... BIOS password. After you set the system time. 2.3.4 Security The Security menu items allow you have set an administrator password: 1. From the Create...
... for information on how to change an administrator password: 1. To set an administrator password, we recommend that you to choose the BIOS language version from the options. Configuration options: [English] [Español 2.3.2 System Date [Day xx/xx/xxxx] Allows you to clear the... BIOS password. After you set the system time. 2.3.4 Security The Security menu items allow you have set an administrator password: 1. From the Create...
B75M-PLUS User's Manual
Page 47
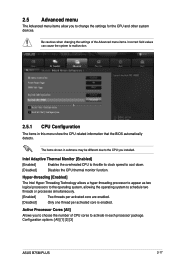
... Be cautious when changing the settings of CPU cores to malfunction. 2.5.1 CPU Configuration The items in this menu show the CPU-related information that the BIOS automatically detects. Intel Adaptive Thermal Monitor [Enabled] [Enabled] Enables the overheated CPU to throttle its clock speed to change the settings for the CPU ...threads per activated core are enabled. [Disabled] Only one thread per activated core is enabled. Active Processor Cores [All] Allows you installed. Configuration options: [All] [1] [2] [3] ASUS B75M-PLUS 2-17 The items shown in each processor package.
... Be cautious when changing the settings of CPU cores to malfunction. 2.5.1 CPU Configuration The items in this menu show the CPU-related information that the BIOS automatically detects. Intel Adaptive Thermal Monitor [Enabled] [Enabled] Enables the overheated CPU to throttle its clock speed to change the settings for the CPU ...threads per activated core are enabled. [Disabled] Only one thread per activated core is enabled. Active Processor Cores [All] Allows you installed. Configuration options: [All] [1] [2] [3] ASUS B75M-PLUS 2-17 The items shown in each processor package.


