User Guide
Page 13
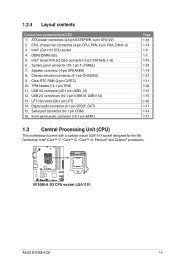
...® Serial ATA 6.0 Gb/s connector (7-pin SATA6G_1~6) 6. Chassis intrusion connector (4-1 pin CHASSIS) 9. ATX power connectors (24-pin EATXPWR, 4-pin ATX12V) 2. Clear RTC RAM (2-pin CLRTC) 10. B150M-A D3 B150M-A D3 CPU socket LGA1151 ASUS B150M-A D3 1-3 TPM header (14-1 pin TPM) 11. 1.2.4 Layout contents Connectors/Jumpers/Slots/LED 1. CPU, chassis fan connectors (4-pin CPU_FAN, 4-pin CHA_FAN1~2) 3. System panel...
...® Serial ATA 6.0 Gb/s connector (7-pin SATA6G_1~6) 6. Chassis intrusion connector (4-1 pin CHASSIS) 9. ATX power connectors (24-pin EATXPWR, 4-pin ATX12V) 2. Clear RTC RAM (2-pin CLRTC) 10. B150M-A D3 B150M-A D3 CPU socket LGA1151 ASUS B150M-A D3 1-3 TPM header (14-1 pin TPM) 11. 1.2.4 Layout contents Connectors/Jumpers/Slots/LED 1. CPU, chassis fan connectors (4-pin CPU_FAN, 4-pin CHA_FAN1~2) 3. System panel...
User Guide
Page 21
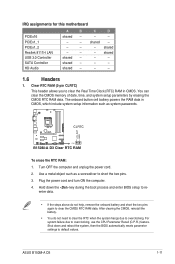
... clear the CMOS memory of date, time, and system setup parameters by erasing the CMOS RTC RAM data. Turn OFF the computer and unplug the power cord. 2. ASUS B150M-A D3 1-11 The onboard button cell battery powers the RAM data in CMOS. Hold down and reboot the system, then the BIOS automatically resets parameter settings...
... clear the CMOS memory of date, time, and system setup parameters by erasing the CMOS RTC RAM data. Turn OFF the computer and unplug the power cord. 2. ASUS B150M-A D3 1-11 The onboard button cell battery powers the RAM data in CMOS. Hold down and reboot the system, then the BIOS automatically resets parameter settings...

User Guide
Page 38
... file for this section are for information on . Press the power button to turn the system off then back on how to erase the RTC RAM. 2-6 Chapter 2: Getting started 2.2 BIOS setup program Use the BIOS Setup program to update the BIOS or configure its routines. If you see on the system... navigation keys and brief online help to guide you in this motherboard. • Ensure that a USB mouse is connected to your screen. • Visit the ASUS website at startup: Press or during the Power-On Self Test (POST). Select the Load Optimized Defaults item under the Exit menu or press hotkey...
... file for this section are for information on . Press the power button to turn the system off then back on how to erase the RTC RAM. 2-6 Chapter 2: Getting started 2.2 BIOS setup program Use the BIOS Setup program to update the BIOS or configure its routines. If you see on the system... navigation keys and brief online help to guide you in this motherboard. • Ensure that a USB mouse is connected to your screen. • Visit the ASUS website at startup: Press or during the Power-On Self Test (POST). Select the Load Optimized Defaults item under the Exit menu or press hotkey...


