User Guide
Page 3
... vi B150M-A D3 specifications summary vi Chapter 1: Product introduction 1.1 Before you proceed 1-1 1.2 Motherboard overview 1-1 1.3 Central Processing Unit (CPU 1-3 ...1.4 System memory 1-7 1.5 Expansion slots 1-10 1.6 Headers 1-11 1.7 Connectors 1-12 1.8 Software support 1-22 Chapter 2: BIOS information 2.1 Managing and updating your BIOS 2-1 2.2 BIOS setup program 2-6 2.3 My Favorites 2-9 2.4 Main menu 2-10 2.5 Ai Tweaker menu 2-11 2.6 Advanced menu 2-12 2.7 Monitor menu 2-12 2.8 Boot menu 2-13 2.9 Tool menu 2-13 2.10 Exit menu 2-13 Appendices Notices...A-1 ASUS...
... vi B150M-A D3 specifications summary vi Chapter 1: Product introduction 1.1 Before you proceed 1-1 1.2 Motherboard overview 1-1 1.3 Central Processing Unit (CPU 1-3 ...1.4 System memory 1-7 1.5 Expansion slots 1-10 1.6 Headers 1-11 1.7 Connectors 1-12 1.8 Software support 1-22 Chapter 2: BIOS information 2.1 Managing and updating your BIOS 2-1 2.2 BIOS setup program 2-6 2.3 My Favorites 2-9 2.4 Main menu 2-10 2.5 Ai Tweaker menu 2-11 2.6 Advanced menu 2-12 2.7 Monitor menu 2-12 2.8 Boot menu 2-13 2.9 Tool menu 2-13 2.10 Exit menu 2-13 Appendices Notices...A-1 ASUS...
User Guide
Page 6
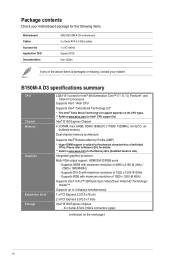
Please refer to Memory QVL for details. ** Refer to www.asus.com for Intel® CPU support list. Integrated graphics processor Multi-VGA output support: HDMI/DVI-D/RGB ports - B150M-A D3 specifications summary CPU Chipset Memory Graphics Expansion slots Storage LGA1151 socket for Intel® ... the Memory QVL (Qualified Vendors List). Package contents Check your motherboard package for the following items. Motherboard Cables Accessories Application DVD Documentation ASUS B150M-A D3 motherboard 2 x Serial ATA 6.0 Gb/s cables 1 x I/O Shield Support DVD User Guide If any of 1920 x 1200 @ ...
Please refer to Memory QVL for details. ** Refer to www.asus.com for Intel® CPU support list. Integrated graphics processor Multi-VGA output support: HDMI/DVI-D/RGB ports - B150M-A D3 specifications summary CPU Chipset Memory Graphics Expansion slots Storage LGA1151 socket for Intel® ... the Memory QVL (Qualified Vendors List). Package contents Check your motherboard package for the following items. Motherboard Cables Accessories Application DVD Documentation ASUS B150M-A D3 motherboard 2 x Serial ATA 6.0 Gb/s cables 1 x I/O Shield Support DVD User Guide If any of 1920 x 1200 @ ...

User Guide
Page 8
... Internal connectors EZ DIY Push Notice - ASUS CrashFree BIOS 3 - Featuring friendly graphics user interface - B150M-A D3 specifications summary ASUS special features ASUS quiet thermal solution Rear panel I /O ...ports * Use a chassis with smart devices in the front panel to support an 8-channel audio output. 1 x USB 3.0/2.0 connector supports additional 2 USB 3.0/2.0 ports (19-pin) 2 x USB 2.0/1.1 connectors support additional 4 USB 2.0 ports 6 x SATA 6.0 Gb/s connectors (gray) 1 x CPU...
... Internal connectors EZ DIY Push Notice - ASUS CrashFree BIOS 3 - Featuring friendly graphics user interface - B150M-A D3 specifications summary ASUS special features ASUS quiet thermal solution Rear panel I /O ...ports * Use a chassis with smart devices in the front panel to support an 8-channel audio output. 1 x USB 3.0/2.0 connector supports additional 2 USB 3.0/2.0 ports (19-pin) 2 x USB 2.0/1.1 connectors support additional 4 USB 2.0 ports 6 x SATA 6.0 Gb/s connectors (gray) 1 x CPU...
User Guide
Page 13
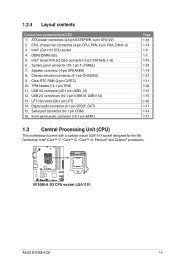
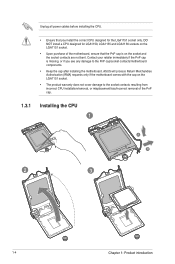
...pin CLRTC) 10. Intel® Serial ATA 6.0 Gb/s connector (7-pin SATA6G_1~6) 6. DDR3 DIMM slots 5. TPM header (14-1 pin TPM) 11. B150M-A D3 B150M-A D3 CPU socket LGA1151 ASUS B150M-A D3 1-3 LPT connector (26-1 pin LPT) 14. ATX power connectors (24-pin EATXPWR, 4-pin ATX12V) 2. System panel connector (10-1 pin F_PANEL)... 1-16 1-14 1-3 1-7 1-19 1-18 1-19 1-21 1-11 1-20 1-15 1-15 1-20 1-17 1-14 1-17 1.3 Central Processing Unit (CPU) This motherboard comes with a surface mount LGA1151 socket designed for the 6th Generation Intel® Core™ i7 / Core™ i5 / Core™...
...pin CLRTC) 10. Intel® Serial ATA 6.0 Gb/s connector (7-pin SATA6G_1~6) 6. DDR3 DIMM slots 5. TPM header (14-1 pin TPM) 11. B150M-A D3 B150M-A D3 CPU socket LGA1151 ASUS B150M-A D3 1-3 LPT connector (26-1 pin LPT) 14. ATX power connectors (24-pin EATXPWR, 4-pin ATX12V) 2. System panel connector (10-1 pin F_PANEL)... 1-16 1-14 1-3 1-7 1-19 1-18 1-19 1-21 1-11 1-20 1-15 1-15 1-20 1-17 1-14 1-17 1.3 Central Processing Unit (CPU) This motherboard comes with a surface mount LGA1151 socket designed for the 6th Generation Intel® Core™ i7 / Core™ i5 / Core™...
User Guide
Page 14
...retailer immediately if the PnP cap is on the socket and the socket contacts are not bent. DO NOT install a CPU designed for the LGA1151 socket only. ASUS will process Return Merchandise Authorization (RMA) requests only if the motherboard comes with the cap on the LGA1151 socket. •...; The product warranty does not cover damage to the socket contacts resulting from incorrect CPU installation/removal, or misplacement/loss/...
...retailer immediately if the PnP cap is on the socket and the socket contacts are not bent. DO NOT install a CPU designed for the LGA1151 socket only. ASUS will process Return Merchandise Authorization (RMA) requests only if the motherboard comes with the cap on the LGA1151 socket. •...; The product warranty does not cover damage to the socket contacts resulting from incorrect CPU installation/removal, or misplacement/loss/...

User Guide
Page 15
ASUS B150M-A D3 1-5 4 C 5 A B 1.3.2 CPU heatsink and fan assembly installation Apply the Thermal Interface Material to the CPU heatsink and CPU before you install the heatsink and fan if necessary.
ASUS B150M-A D3 1-5 4 C 5 A B 1.3.2 CPU heatsink and fan assembly installation Apply the Thermal Interface Material to the CPU heatsink and CPU before you install the heatsink and fan if necessary.

User Guide
Page 16
To install the CPU heatsink and fan assembly 1 A B 2 B A 3 4 To uninstall the CPU heatsink and fan assembly 1 2 A B B A 1-6 Chapter 1: Product introduction
To install the CPU heatsink and fan assembly 1 A B 2 B A 3 4 To uninstall the CPU heatsink and fan assembly 1 2 A B B A 1-6 Chapter 1: Product introduction

User Guide
Page 18
... lower frequency than the vendor-marked value. • You may operate at a higher frequency, refer to the Microsoft® support site at www.asus.com for the latest QVL. 1-8 Chapter 1: Product introduction For effective use a more efficient memory cooling system to install 4GB or more details, refer...-bit Windows® OS, when you install memory modules of the lower-sized channel for single-channel operation. • According to Intel® CPU spec, DIMM voltage below 1.5V is the standard way of memory, we recommend that you want to support a full memory load (4 DIMMs)...
... lower frequency than the vendor-marked value. • You may operate at a higher frequency, refer to the Microsoft® support site at www.asus.com for the latest QVL. 1-8 Chapter 1: Product introduction For effective use a more efficient memory cooling system to install 4GB or more details, refer...-bit Windows® OS, when you install memory modules of the lower-sized channel for single-channel operation. • According to Intel® CPU spec, DIMM voltage below 1.5V is the standard way of memory, we recommend that you want to support a full memory load (4 DIMMs)...
User Guide
Page 21
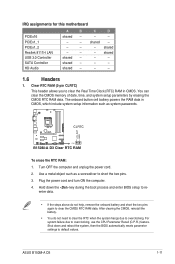
... battery. • You do not help, remove the onboard battery and short the two pins again to re- shared - - - 1.6 Headers 1. ASUS B150M-A D3 1-11 The onboard button cell battery powers the RAM data in CMOS. Use a metal object such as system passwords. shared - - - - Hold down... and reboot the system, then the BIOS automatically resets parameter settings to overclocking, use the CPU Parameter Recall (C.P.R.) feature. shared shared - - - You can clear the CMOS memory of date, time, and system setup parameters by erasing the ...
... battery. • You do not help, remove the onboard battery and short the two pins again to re- shared - - - 1.6 Headers 1. ASUS B150M-A D3 1-11 The onboard button cell battery powers the RAM data in CMOS. Use a metal object such as system passwords. shared - - - - Hold down... and reboot the system, then the BIOS automatically resets parameter settings to overclocking, use the CPU Parameter Recall (C.P.R.) feature. shared shared - - - You can clear the CMOS memory of date, time, and system setup parameters by erasing the ...

User Guide
Page 24
COM PIN 1 RXD DTR DSR CTS DCD TXD GND RTS RI B150M-A D3 B150M-A D3 Serial port (COM) connector The COM module is for a serial (COM) port. CPU and chassis fan connectors (4-pin CPU_FAN, 4-pin CHA_FAN 1/2) Connect the fan cables to the fan connectors on the fan connectors! 1.7.2 Internal connectors 1. Serial port ... wire of each cable matches the ground pin of the connector CPU_FAN CHA_FAN2 CPU FAN PWM CPU FAN IN CPU FAN PWR GND +5V CHA FAN IN CHA FAN PWR GND B150M-A D3 CHA_FAN1 +5V CHA FAN IN CHA FAN PWR GND B150M-A D3 Fan connectors Do not forget to connect the fan cables to a slot...
COM PIN 1 RXD DTR DSR CTS DCD TXD GND RTS RI B150M-A D3 B150M-A D3 Serial port (COM) connector The COM module is for a serial (COM) port. CPU and chassis fan connectors (4-pin CPU_FAN, 4-pin CHA_FAN 1/2) Connect the fan cables to the fan connectors on the fan connectors! 1.7.2 Internal connectors 1. Serial port ... wire of each cable matches the ground pin of the connector CPU_FAN CHA_FAN2 CPU FAN PWM CPU FAN IN CPU FAN PWR GND +5V CHA FAN IN CHA FAN PWR GND B150M-A D3 CHA_FAN1 +5V CHA FAN IN CHA FAN PWR GND B150M-A D3 Fan connectors Do not forget to connect the fan cables to a slot...
User Guide
Page 39
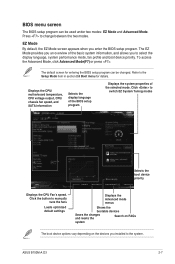
...(F7) or press . Click to change between the two modes. The default screen for details. Click the button to the system. ASUS B150M-A D3 2-7 EZ Mode By default, the EZ Mode screen appears when you installed to manually tune the fans Loads optimized default settings Displays the... BIOS menu screen The BIOS setup program can be used under two modes: EZ Mode and Advanced Mode. Displays the CPU/ motherboard temperature, CPU voltage output, CPU/ chassis fan speed, and SATA information Selects the display language of the BIOS setup program Displays the system properties of the...
...(F7) or press . Click to change between the two modes. The default screen for details. Click the button to the system. ASUS B150M-A D3 2-7 EZ Mode By default, the EZ Mode screen appears when you installed to manually tune the fans Loads optimized default settings Displays the... BIOS menu screen The BIOS setup program can be used under two modes: EZ Mode and Advanced Mode. Displays the CPU/ motherboard temperature, CPU voltage output, CPU/ chassis fan speed, and SATA information Selects the display language of the BIOS setup program Displays the system properties of the...

User Guide
Page 40
... Keys Sub-menu item General help Menu items Configuration fields Popup window Last modified settings Scroll bar Goes back to EZ Mode Displays the CPU/motherboard temperature, CPU and memory voltage output Menu bar The menu bar on top of the Advanced Mode. Advanced Mode The Advanced Mode provides advanced options for...
... Keys Sub-menu item General help Menu items Configuration fields Popup window Last modified settings Scroll bar Goes back to EZ Mode Displays the CPU/motherboard temperature, CPU and memory voltage output Menu bar The menu bar on top of the Advanced Mode. Advanced Mode The Advanced Mode provides advanced options for...
User Guide
Page 43
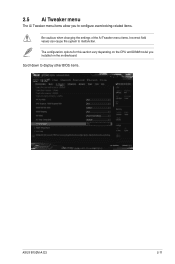
Scroll down to malfunction. 2.5 Ai Tweaker menu The Ai Tweaker menu items allow you installed on the CPU and DIMM model you to configure overclocking-related items. Be cautious when changing the settings of the Ai Tweaker menu items. Incorrect field values can cause the system to display other BIOS items. ASUS B150M-A D3 2-11 The configuration options for this section vary depending on the motherboard.
Scroll down to malfunction. 2.5 Ai Tweaker menu The Ai Tweaker menu items allow you installed on the CPU and DIMM model you to configure overclocking-related items. Be cautious when changing the settings of the Ai Tweaker menu items. Incorrect field values can cause the system to display other BIOS items. ASUS B150M-A D3 2-11 The configuration options for this section vary depending on the motherboard.

User Guide
Page 44
Be cautious when changing the settings of the Advanced menu items. Incorrect field values can cause the system to malfunction. 2.7 Monitor menu The Monitor menu displays the system temperature/power status, and allows you to change the settings for the CPU and other BIOS items. 2-12 Chapter 2: Getting started 2.6 Advanced menu The Advanced menu items allow you to change the fan settings. Scroll down to display the other system devices.
Be cautious when changing the settings of the Advanced menu items. Incorrect field values can cause the system to malfunction. 2.7 Monitor menu The Monitor menu displays the system temperature/power status, and allows you to change the settings for the CPU and other BIOS items. 2-12 Chapter 2: Getting started 2.6 Advanced menu The Advanced menu items allow you to change the fan settings. Scroll down to display the other system devices.


