

User Guide
Page 16
... some memory modules for manual memory frequency adjustment. • Always install the DIMMS with the vendor to support a full memory load (4 DIMMs) or overclocking condition. 1-8 Chapter 1: Product introduction Use a maximum of 3 GB system memory if you are using a 32-bit Windows® OS. - ...The system maps the total size of the following: - For effective use a more details, refer to section 2.5 Ai Tweaker menu for overclocking may install varying memory sizes in Channel A and Channel B. • You may operate at http://support.microsoft. To operate at the ...
... some memory modules for manual memory frequency adjustment. • Always install the DIMMS with the vendor to support a full memory load (4 DIMMs) or overclocking condition. 1-8 Chapter 1: Product introduction Use a maximum of 3 GB system memory if you are using a 32-bit Windows® OS. - ...The system maps the total size of the following: - For effective use a more details, refer to section 2.5 Ai Tweaker menu for overclocking may install varying memory sizes in Channel A and Channel B. • You may operate at http://support.microsoft. To operate at the ...
User Guide
Page 25
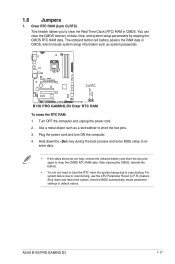
... 1.6 Jumpers 1. The onboard button cell battery powers the RAM data in CMOS. Turn OFF the computer and unplug the power cord. 2. ASUS B150 PRO GAMING D3 1-17 You can clear the CMOS memory of date, time, and system setup parameters by erasing the CMOS RTC RAM data. Plug the ... header allows you to clear the Real Time Clock (RTC) RAM in CMOS, which include system setup information such as a screwdriver to overclocking. CLRTC PIN 1 B150 PRO GAMING D3 Clear RTC RAM To erase the RTC RAM: 1. Hold down and reboot the system, then the BIOS automatically resets parameter settings to...
... 1.6 Jumpers 1. The onboard button cell battery powers the RAM data in CMOS. Turn OFF the computer and unplug the power cord. 2. ASUS B150 PRO GAMING D3 1-17 You can clear the CMOS memory of date, time, and system setup parameters by erasing the CMOS RTC RAM data. Plug the ... header allows you to clear the Real Time Clock (RTC) RAM in CMOS, which include system setup information such as a screwdriver to overclocking. CLRTC PIN 1 B150 PRO GAMING D3 Clear RTC RAM To erase the RTC RAM: 1. Hold down and reboot the system, then the BIOS automatically resets parameter settings to...

User Guide
Page 26
... to set a higher CPU voltage for a flexible overclocking system, depending on the type of the installed CPU. To gain more CPU voltage setting, insert the jumper to pins 1-2. LAN (RJ-45) port. This port is for a PS/2 mouse. 2. CPU_OV 12 23 Disable Enable (default setting) B150 PRO GAMING D3 CPU_OV setting 1.7 1.7.1 1 Connectors Rear panel connectors...
... to set a higher CPU voltage for a flexible overclocking system, depending on the type of the installed CPU. To gain more CPU voltage setting, insert the jumper to pins 1-2. LAN (RJ-45) port. This port is for a PS/2 mouse. 2. CPU_OV 12 23 Disable Enable (default setting) B150 PRO GAMING D3 CPU_OV setting 1.7 1.7.1 1 Connectors Rear panel connectors...

User Guide
Page 49
... Boot Tool Exit For saving the frequently-used system settings and configuration For changing the basic system configuration For changing the overclocking settings For changing the advanced system settings For displaying the system temperature, power status, and changing the fan settings For .... Quick Note (F9) This button above the menu bar contains the languages that you can only use the alphanumeric characters to your notes. ASUS B150 PRO GAMING D3 2-9 For example, selecting Main shows the Main menu items. The other items (My Favorites, Ai Tweaker, Advanced, Monitor, Boot, Tool...
... Boot Tool Exit For saving the frequently-used system settings and configuration For changing the basic system configuration For changing the overclocking settings For changing the advanced system settings For displaying the system temperature, power status, and changing the fan settings For .... Quick Note (F9) This button above the menu bar contains the languages that you can only use the alphanumeric characters to your notes. ASUS B150 PRO GAMING D3 2-9 For example, selecting Main shows the Main menu items. The other items (My Favorites, Ai Tweaker, Advanced, Monitor, Boot, Tool...

User Guide
Page 56
...system performance. The configuration options for this item to malfunction. Scroll down to display other BIOS items. 2.5.1 Ai Overclock Tuner [Auto] Allows you to select the CPU overclocking options to select the X.M.P. mode supported by your memory module. Configuration options: [Profile #1] [ Profile #2] 2-... Chapter 2: Getting started Select either of the Ai Tweaker menu items. Incorrect field values can cause the system to set the Ai Overclocking Tuner item to [XMP] and allows you to achieve the desired CPU internal frequency. 2.5 Ai Tweaker menu The Ai Tweaker menu ...
...system performance. The configuration options for this item to malfunction. Scroll down to display other BIOS items. 2.5.1 Ai Overclock Tuner [Auto] Allows you to select the CPU overclocking options to select the X.M.P. mode supported by your memory module. Configuration options: [Profile #1] [ Profile #2] 2-... Chapter 2: Getting started Select either of the Ai Tweaker menu items. Incorrect field values can cause the system to set the Ai Overclocking Tuner item to [XMP] and allows you to achieve the desired CPU internal frequency. 2.5 Ai Tweaker menu The Ai Tweaker menu ...

User Guide
Page 58
... may vary depending on the CPU loading. Higher levels of the load-line calibration can get a higher voltage and a better overclocking performance but increases the CPU and VRM thermal. Do not remove the thermal module. 2-18 Chapter 2: Getting started The CPU ... will decrease proportionally depending on the CPU specification. Configuration options: [Keep Current Settings] [Enabled] 2.5.7 EPU Power Saving Mode [Disabled] ASUS EPU (Energy Processing Unit) sets the CPU in this happens, revert to accelerate the integrated GPU for extreme graphics performance. The configurable...
... may vary depending on the CPU loading. Higher levels of the load-line calibration can get a higher voltage and a better overclocking performance but increases the CPU and VRM thermal. Do not remove the thermal module. 2-18 Chapter 2: Getting started The CPU ... will decrease proportionally depending on the CPU specification. Configuration options: [Keep Current Settings] [Enabled] 2.5.7 EPU Power Saving Mode [Disabled] ASUS EPU (Energy Processing Unit) sets the CPU in this happens, revert to accelerate the integrated GPU for extreme graphics performance. The configurable...

User Guide
Page 59
...should be monitored. The values range from 0% to [Extreme]. The GT working voltage will decrease proportionally depending on the GT specification. ASUS B150 PRO GAMING D3 2-19 Use the and keys to 500KHz with a 50KHz interval. Configuration options: [Auto] [Manual] DO NOT remove the thermal...levels of every component's phase. [T. Configuration options: [Auto] [100%] [110%] [120%] [130%] [140%] Choose a higher value when overclocking, or under a high CPU loading for a quicker transient response speed. CPU Power Phase Control [Auto] This item allows you to set the ...
...should be monitored. The values range from 0% to [Extreme]. The GT working voltage will decrease proportionally depending on the GT specification. ASUS B150 PRO GAMING D3 2-19 Use the and keys to 500KHz with a 50KHz interval. Configuration options: [Auto] [Manual] DO NOT remove the thermal...levels of every component's phase. [T. Configuration options: [Auto] [100%] [110%] [120%] [130%] [140%] Choose a higher value when overclocking, or under a high CPU loading for a quicker transient response speed. CPU Power Phase Control [Auto] This item allows you to set the ...

User Guide
Page 60
..., current and temperature specification limit. Configuration options: [Auto] [100%] [110%] [120%] [130%] [140%] Choose a higher value when overclocking, or under a high GT loading for a quicker transient response speed. Configuration options: [Disabled] [Enabled] The following item appears only when ... VRM Switching Frequency to [Manual]. The values range from 250KHz to configure the total power range, and extends the overclocking frequency range simultaneously. Intel® SpeedStepTM [Enabled] This item allows the operating system to dynamically adjust the processor voltage...
..., current and temperature specification limit. Configuration options: [Auto] [100%] [110%] [120%] [130%] [140%] Choose a higher value when overclocking, or under a high GT loading for a quicker transient response speed. Configuration options: [Disabled] [Enabled] The following item appears only when ... VRM Switching Frequency to [Manual]. The values range from 250KHz to configure the total power range, and extends the overclocking frequency range simultaneously. Intel® SpeedStepTM [Enabled] This item allows the operating system to dynamically adjust the processor voltage...

User Guide
Page 61
...possible CPU cache ratio. CPU Cache Ratio [Auto] Allows you to set a higher current limit to prevent a frequency or power throttling when overclocking. Use the or keys to adjust the value. Use the or keys to adjust the value. Configuration options: [Auto] [Manual Mode] ...power throttling when overclocking. Increase the voltage when setting a high Core Frequency value. The values range from 8 to 83 with a 1 interval. 2.5.17 CPU Core/Cache Voltage [Auto] This item allows you to configure the amount of voltage fed to the CPU cores. ASUS B150 PRO GAMING D3 2-21 Short ...
...possible CPU cache ratio. CPU Cache Ratio [Auto] Allows you to set a higher current limit to prevent a frequency or power throttling when overclocking. Use the or keys to adjust the value. Use the or keys to adjust the value. Configuration options: [Auto] [Manual Mode] ...power throttling when overclocking. Increase the voltage when setting a high Core Frequency value. The values range from 8 to 83 with a 1 interval. 2.5.17 CPU Core/Cache Voltage [Auto] This item allows you to configure the amount of voltage fed to the CPU cores. ASUS B150 PRO GAMING D3 2-21 Short ...

User Guide
Page 80
The Overclocking Profile items show Not assigned if no profile is created. For more details, see section 2.1.2 ASUS EZ Flash 3. 2.9.2 Setup Animator [Disabled] Enables or disables the ... your USB drive. 2-40 Chapter 2: Getting started Select an item then press to display the submenu. 2.9.1 ASUS EZ Flash 3 Utility Allows you to store or load multiple BIOS settings. Profile Name Allows you to create...Flash, and create a profile. Configuration options: [Disabled] [Enabled] 2.9.3 ASUS Overclocking Profile This item allows you to launch the ASUS EZ Flash 3 screen. Press [Enter] to run...
The Overclocking Profile items show Not assigned if no profile is created. For more details, see section 2.1.2 ASUS EZ Flash 3. 2.9.2 Setup Animator [Disabled] Enables or disables the ... your USB drive. 2-40 Chapter 2: Getting started Select an item then press to display the submenu. 2.9.1 ASUS EZ Flash 3 Utility Allows you to store or load multiple BIOS settings. Profile Name Allows you to create...Flash, and create a profile. Configuration options: [Disabled] [Enabled] 2.9.3 ASUS Overclocking Profile This item allows you to launch the ASUS EZ Flash 3 screen. Press [Enter] to run...


