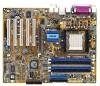
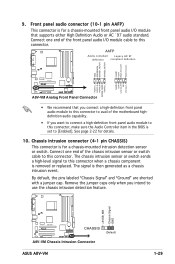
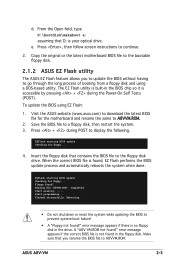
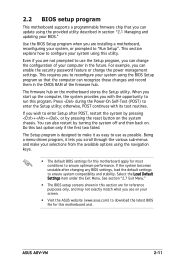
A8V-VM User's Manual for English Edition
Page 14
... devices on it another standout in your package with the list below. 1.2 Package contents Check your motherboard package for buying an ASUS® A8V-VM motherboard! 1.1 Welcome! The motherboard delivers a host of new features and latest technologies, making it , check the items in... of the above items is damaged or missing, contact your retailer. 1- Chapter 1: Product introduction Before you for the following items. Motherboard ASUS A8V-VM motherboard Cables Accessories 1 x floppy disk drive cable 1 x Ultral DMA 133/100/66 cable 1 x SATA power cable 1 x SATA signal...
A8V-VM User's Manual for English Edition
Page 15
... DLSbyXG sound set, 5.1 Virtual TheaterTM and supports all major game audio technologies including Microsoft DirectXTM 8.0, Microsoft DirectSound 3D, A3D, MacroFX, ZoomFX, MultiDrive 5.1, A3D and EAX. ASUS A8V-VM 1- Dual-channel DDR400 memory support Employing the Double Date Rate (DDR) memory technology, the motherboard supports up to 1-22 for details. See page 1-21...
A8V-VM User's Manual for English Edition
Page 17
.... This LED lights up to the motherboard, peripherals, and/or components. Unplug the power cable from the power supply. A8V-VM R A8V-VM Onboard LED SB_PWR ON Standby Power OFF Powered Off ASUS A8V-VM 1- Failure to do so may cause severe damage to indicate that the system is ON, in sleep mode or...
A8V-VM User's Manual for English Edition
Page 21
... into the socket to 90°-100° angle, otherwise the CPU does not fit in one correct orientation. The CPU fits only in completely. 3. ASUS A8V-VM 1- 2. Unlock the socket by pressing the lever sideways, then lift it up to prevent bending the pins and damaging the CPU! 5.
A8V-VM User's Manual for English Edition
Page 23
... the module base. 5. Attach one end of the retention bracket (near the retention bracket lock) to connect the CPU fan connector! 2. CPU_FAN GND +12V Rotation A8V-VM R A8V-VM CPU Fan Connector ASUS A8V-VM Do not forget to the retention module base. When the fan and heatsink assembly is in place. 4.
A8V-VM User's Manual for English Edition
Page 25
...-5BC K4H560838F-TCCC K4H560838F-TCCC K4H560838F-TCB3 K4H560838F-TCB3 DD2508AKTA-5C DD2508AMTA AM3A568AJT-6B K4H560838E-TCCC V58C2256804SAT5B HYB25D256800BT-5B DIMM support A BC v v v v v v v v v v v v v v v v v v v v v v v v v v v v v v v v v v v v v v v v v v v v v v v v v v v v v v v v v v v v v v v v v v v v v v v v v v v v v v v v v v v v v v v v v v v v v v v v v v v v v v v v v v v v v v v v v v v v v ASUS A8V-VM 1-13 Dual-channel* (1) Populated (2) Populated Sockets DIMM_A2 DIMM_B1 - Table 1 Recommended memory configurations Mode DIMM_A1 Single-channel (1) -
A8V-VM User's Manual for English Edition
Page 27
... 1.7.4 Removing a DIMM Follow these steps to unlock the DIMM. 1 1 DDR DIMM notch Support the DIMM lightly with extra force. 2. Remove the DIMM from the socket. ASUS A8V-VM 1-15 Firmly insert the DIMM into a socket to avoid damaging the DIMM. 3. Unlock a DIMM socket by pressing the retaining clips outward. 2. 1.7.3 Installing a DIMM Make...
A8V-VM User's Manual for English Edition
Page 29
... - - - - - PCI Express x16 slot s� ha� r� ed PCI Express x1 slot 1 s� ha� r� ed Onboard USB controller 0 shared - - - - - - - Onboard SATA Controller - ASUS A8V-VM 1-17 shared - - - - - -
A8V-VM User's Manual for English Edition
Page 31
.... Plug the power cord and turn ON the computer. Shut down the key during the boot process and enter BIOS setup to re-enter data. A8V-VM R A8V-VM Clear RTC RAM CLRTC 12 23 Normal (Default) Clear CMOS • Except when clearing the RTC RAM, never remove the cap on pins... move the cap back to clear the Real Time Clock (RTC) RAM in the CMOS, which includes the system setup information such as system passwords. ASUS A8V-VM 1-19 1.9 Jumpers 1. The onboard button cell battery powers the RAM data in CMOS. when the system hangs due to clear the RTC, and just...
A8V-VM User's Manual for English Edition
Page 33
... audio sources. 5. Line Out port (lime). Refer to a Local Area Network (LAN) through a network hub. This port connects a tape, CD, DVD player, or other devices. 3. ASUS A8V-VM 1-21 Parallel port. This port allows Gigabit connection with a speed of this port becomes Front Speaker Out. 6. Line In port (light blue). Microphone port...
A8V-VM User's Manual for English Edition
Page 35
...'s IDE connector, then select the following modes to select the operating mode by hard-disk drive jumper. No. No. PIN 1 PRI_IDE SEC_IDE A8V-VM R A8V-VM IDE Connectors PIN 1 ASUS A8V-VM 1-23 There are for Ultra DMA 133/100/66/33 IDE devices. This prevents incorrect insertion when you connect the IDE cable...
A8V-VM User's Manual for English Edition
Page 37
... wire of each cable matches the ground pin of 1 A~2.22 A (26.64 W max.) at +12V. GND +12V Rotation CPU_FAN GND +12V Rotation A8V-VM R A8V-VM Fan Connectors CHA_FAN ASUS A8V-VM 1-25 CPU and Chassis fan connectors (3-pin CPU_FAN, 3-pin CHA_FAN) The fan connectors support cooling fans of 350 mA~740 mA (8.88...
A8V-VM User's Manual for English Edition
Page 39
...a higher power rating if you use a PSU with higher power output when configuring a system with a minimum of 300 W. EATXPWR A8V-VM R ATX12V +12V DC GND +12V DC GND A8V-VM ATX Power Connectors +3 Volts +12 Volts +12 Volts +5V Standby Power OK Ground +5 Volts Ground +5 Volts Ground +3 ... Volts Ground Ground Ground PSON# Ground -12 Volts +3 Volts • We recommend that the PSU has a minimum power rating of 300 W power rating. ASUS A8V-VM 1 - 27 6. This PSU type has 24-pin and 4-pin power plugs. • If you intend to install additional devices. ATX power connectors (...
A8V-VM User's Manual for English Edition
Page 41
... line out L GND PRESENCE# SENSE1_RETUR SENSE2_RETUR AGND +5VA Line out_R NC Line out_L PORT1 L PORT1 R PORT2 R SENSE_SEND PORT2 L A8V-VM R A8V-VM Analog Front Panel Connector • We recommend that supports either High Definition Audio or AC `97 audio standard. By default, the...mounted front panel audio I /O module cable to use the chassis intrusion detection feature. +5VSB_MB Chassis Signal GND A8V -VM R CHASSIS (Default) A8V-VM Chassis Intrusion Connector ASUS A8V-VM 1-29 Connect one end of the motherboard highdefinition audio capability. • If you connect a high-...
A8V-VM User's Manual for English Edition
Page 45
... Flash utility The ASUS EZ Flash feature allows you rename the BIOS file to go through the long process of booting from a floppy disk and using EZ Flash: 1. Press + during the Power-On Self Tests (POST). When the correct BIOS file is found !" Start programming... A "A8V-VM.ROM not found... a floppy disk, then restart the system. 3. error message appears if there is no floppy disk in the BIOS chip so it is not found ! ASUS A8V-VM 2- Reading file "A8VVM.ROM". Make sure that D: is built-in the drive. Insert the floppy disk that contains the BIOS file to continue. ...
A8V-VM User's Manual for English Edition
Page 47
... the BIOS update process is the latest or the original BIOS file on a piece of paper. done Writing flash ..... done Please restart your computer 100% ASUS A8V-VM 2- Boot the system in DOS mode, then at the DOS prompt. 2. The utility verifies the file and starts updating the BIOS. A:\>afudos /iA8VVM.ROM...
A8V-VM User's Manual for English Edition
Page 49
... floppy disk is found, the utility automatically checks the optical drive for floppy... Starting BIOS recovery... CD-ROM found ! ASUS A8V-VM 2- Checking for the original or updated BIOS file. Visit the ASUS website (www.asus.com) to the optical drive. 3. Starting BIOS recovery... Recovering the BIOS from the support CD To recover the...
A8V-VM User's Manual for English Edition
Page 51
The ASUS Update main window appears. 2. Click Next. Select Update BIOS from the Internet option from the Windows® desktop by clicking Start > Programs > ASUS > ASUSUpdate > ASUSUpdate. ASUS A8V-VM 2- Select the ASUS FTP site nearest you to avoid network traffic, or click Auto Select. Launch the ASUS Update utility from the drop‑down menu, then click Next. 3. Updating the BIOS through the Internet To update the BIOS through the Internet: 1.
A8V-VM User's Manual for English Edition
Page 53
...becomes unstable after POST, restart the system by pressing ++, or by turning the system off and then back on the system chassis. ASUS A8V-VM 2-11 This requires you to reconfigure your system using the BIOS Setup program so that you can change the power management settings....file for most conditions to make your computer in the future. This section explains how to configure your screen. • Visit the ASUS website (www.asus.com) to "Run Setup". 2.2 BIOS setup program This motherboard supports a programmable firmware chip that the computer can recognize these changes ...
A8V-VM User's Manual for English Edition
Page 55
... item. For example, selecting Main shows the Main menu items. The other items on Advanced Chipset settings WARNING: Setting wrong values in ] [English] :[ST320413A] :[ASUS CD-S340] :[Not Detected] :[Not Detected] :[Not Detected] :[Not Detected] Main menu items Use [ENTER], [TAB] or [SHIFT-TAB] to display a ...menu bar displays the specific items for that the iteam has a sub-menu. Press the Up/Down arrow keys or / keys to malfunction. ASUS A8V-VM 2-13 To display the sub-menu, select the item and press . 2.2.6 Configuration fields These fields show the values for the menu items...