A8V-X User's Manual for English Edition
Page 14
...package with the list below. 1.2 Package contents Check your motherboard package for buying an ASUS® A8V-X motherboard! Before you for the following items. Motherboard Cables Accessories Application CDs Documentation ASUS A8V-X motherboard 1 x Serial ATA signal cable 1 x Serial ATA power cable 1 ...x Ultra DMA/133 cable 1 x Floppy disk drive cable I/O shield ASUS motherboard support CD User guide If any of ASUS quality motherboards! 1.1 Welcome! ...
...package with the list below. 1.2 Package contents Check your motherboard package for buying an ASUS® A8V-X motherboard! Before you for the following items. Motherboard Cables Accessories Application CDs Documentation ASUS A8V-X motherboard 1 x Serial ATA signal cable 1 x Serial ATA power cable 1 ...x Ultra DMA/133 cable 1 x Floppy disk drive cable I/O shield ASUS motherboard support CD User guide If any of ASUS quality motherboards! 1.1 Welcome! ...
A8V-X User's Manual for English Edition
Page 15
.../266 DIMMs. The ultra-fast 400MHz memory bus delivers the required bandwidth for details. See page 1-9 for the latest 3D graphics, multimedia, and Internet applications. ASUS A8V-X 1-3 1.3 Special features 1.3.1 Product highlights Latest processor and 64-bit computing technology The AMD Athlon™ 64FX, Athlon™ 64, Athlon™ 64 X2, and AMD...
.../266 DIMMs. The ultra-fast 400MHz memory bus delivers the required bandwidth for details. See page 1-9 for the latest 3D graphics, multimedia, and Internet applications. ASUS A8V-X 1-3 1.3 Special features 1.3.1 Product highlights Latest processor and 64-bit computing technology The AMD Athlon™ 64FX, Athlon™ 64, Athlon™ 64 X2, and AMD...

A8V-X User's Manual for English Edition
Page 17
This protection eliminates the need to buy a replacement ROM chip. See page 2-3 for timely failure detection. ASUS A8V-X 1-5 ASUS MyLogo™ This new feature present in the motherboard allows you to personalize and add style to restore the original BIOS data... the ASIC (integrated in the ITE Super I/O) to overclocking. See section "2.5.4 Hardware Monitor" on page 2-6. See details on page 2-31. 1.3.2 Innovative ASUS features CrashFree BIOS 2 This feature allows you can easily update the system BIOS even before loading the operating system. When the system hangs due to...
This protection eliminates the need to buy a replacement ROM chip. See page 2-3 for timely failure detection. ASUS A8V-X 1-5 ASUS MyLogo™ This new feature present in the motherboard allows you to personalize and add style to restore the original BIOS data... the ASIC (integrated in the ITE Super I/O) to overclocking. See section "2.5.4 Hardware Monitor" on page 2-6. See details on page 2-31. 1.3.2 Innovative ASUS features CrashFree BIOS 2 This feature allows you can easily update the system BIOS even before loading the operating system. When the system hangs due to...
A8V-X User's Manual for English Edition
Page 19
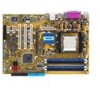
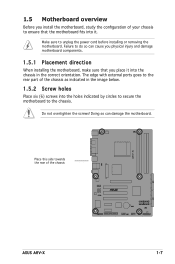
... to secure the motherboard to do so can damage the motherboard. Failure to the chassis. Place this side towards the rear of the chassis ® A8V-X ASUS A8V-X 1-7 Make sure to ensure that you place it into it. Do not overtighten the screws! 1.5 Motherboard overview Before you install the motherboard, study the con...
... to secure the motherboard to do so can damage the motherboard. Failure to the chassis. Place this side towards the rear of the chassis ® A8V-X ASUS A8V-X 1-7 Make sure to ensure that you place it into it. Do not overtighten the screws! 1.5 Motherboard overview Before you install the motherboard, study the con...

A8V-X User's Manual for English Edition
Page 21
A8V-X ASUS A8V-X 1-9 Gold triangle 1.6.2 Installling the CPU To install a CPU: 1. The 128-bit-wide data paths of the marked corner (with only 32-bit or 64-bit .... Take note of these processors can run applications faster than processors with gold triangle) on the CPU. Locate the CPU socket on the motherboard. ® A8V-X CPU Socket 939 Before installing the CPU, make sure that the socket box is facing towards you and the load lever is on the socket...
A8V-X ASUS A8V-X 1-9 Gold triangle 1.6.2 Installling the CPU To install a CPU: 1. The 128-bit-wide data paths of the marked corner (with only 32-bit or 64-bit .... Take note of these processors can run applications faster than processors with gold triangle) on the CPU. Locate the CPU socket on the motherboard. ® A8V-X CPU Socket 939 Before installing the CPU, make sure that the socket box is facing towards you and the load lever is on the socket...
A8V-X User's Manual for English Edition
Page 23
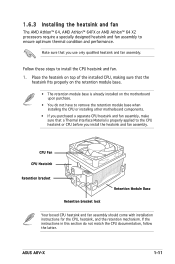
... bracket lock Retention Module Base Your boxed CPU heatsink and fan assembly should come with installation instructions for the CPU, heatsink, and the retention mechanism. ASUS A8V-X 1-11 Follow these steps to ensure optimum thermal condition and performance. 1.6.3 Installing the heatsink and fan The AMD Athlon™ 64, AMD Athlon™ 64FX...
... bracket lock Retention Module Base Your boxed CPU heatsink and fan assembly should come with installation instructions for the CPU, heatsink, and the retention mechanism. ASUS A8V-X 1-11 Follow these steps to ensure optimum thermal condition and performance. 1.6.3 Installing the heatsink and fan The AMD Athlon™ 64, AMD Athlon™ 64FX...
A8V-X User's Manual for English Edition
Page 25
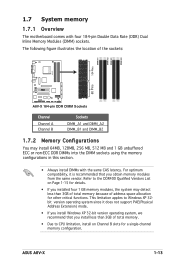
...Modules (DIMM) sockets. The following figure illustrates the location of address space allocation for a single-channel memory configuration. ASUS A8V-X 1-13 For optimum compatibility, it does not support PAE(Physical Address Extension) mode. • If you install Windows XP 32-bit ... recommend that you install less than 3GB of total memory because of the sockets: 104 Pins DIMM_A1 DIMM_A2 DIMM_B1 DIMM_B2 A8V-X 80 Pins ® A8V-X 184-pin DDR DIMM Sockets Channel Channel A Channel B Sockets DIMM_A1 and DIMM_A2 DIMM_B1 and DIMM_B2 1.7.2 Memory Configurations ...
...Modules (DIMM) sockets. The following figure illustrates the location of address space allocation for a single-channel memory configuration. ASUS A8V-X 1-13 For optimum compatibility, it does not support PAE(Physical Address Extension) mode. • If you install Windows XP 32-bit ... recommend that you install less than 3GB of total memory because of the sockets: 104 Pins DIMM_A1 DIMM_A2 DIMM_B1 DIMM_B2 A8V-X 80 Pins ® A8V-X 184-pin DDR DIMM Sockets Channel Channel A Channel B Sockets DIMM_A1 and DIMM_A2 DIMM_B1 and DIMM_B2 1.7.2 Memory Configurations ...

A8V-X User's Manual for English Edition
Page 27
...-D43 V V V DS HY5DU56822DT-D43 V V V Side(s): SS - supports one pair of Dual-channel memory configuration. B - Visit the ASUS website (www.asus.com) for 4 modules inserted into the blue and black slots as one module inserted into either slot, in a Single-channel memory configuration.... C - Double Sided DIMM Support: A - support for the latest DDR400 Qualified Vendors List. ASUS A8V-X 1-15 Single Sided DS - supports one pair of modules inserted into either the blue slots or the black slots as two pairs...
...-D43 V V V DS HY5DU56822DT-D43 V V V Side(s): SS - supports one pair of Dual-channel memory configuration. B - Visit the ASUS website (www.asus.com) for 4 modules inserted into the blue and black slots as one module inserted into either slot, in a Single-channel memory configuration.... C - Double Sided DIMM Support: A - support for the latest DDR400 Qualified Vendors List. ASUS A8V-X 1-15 Single Sided DS - supports one pair of modules inserted into either the blue slots or the black slots as two pairs...

A8V-X User's Manual for English Edition
Page 29
... next page. 3. Replace the system cover. 1.8.2 Configuring an expansion card After installing the expansion card, configure the card by adjusting the software settings. 1. ASUS A8V-X 1-17 We recommended to unplug the power cord before installing an AGP 8X card. 1.8.1 Installing an expansion card To install an expansion card: 1. Remove the...
... next page. 3. Replace the system cover. 1.8.2 Configuring an expansion card After installing the expansion card, configure the card by adjusting the software settings. 1. ASUS A8V-X 1-17 We recommended to unplug the power cord before installing an AGP 8X card. 1.8.1 Installing an expansion card To install an expansion card: 1. Remove the...

A8V-X User's Manual for English Edition
Page 31
... specification. The figure shows a LAN card installed on the card golden fingers to ensure that you ask for 1.5v A8V-X Accelerated Graphics Port (AGP) ASUS A8V-X 1-19 A8V-X ® Keyed for one with PCI specifications. The figure shows a network card installed on this motherboard! 3.3V AGP cards...
... specification. The figure shows a LAN card installed on the card golden fingers to ensure that you ask for 1.5v A8V-X Accelerated Graphics Port (AGP) ASUS A8V-X 1-19 A8V-X ® Keyed for one with PCI specifications. The figure shows a network card installed on this motherboard! 3.3V AGP cards...

A8V-X User's Manual for English Edition
Page 33
... sleep mode (CPU stopped, DRAM refreshed, system running in sleep mode. 3. otherwise, the system would not power up feature. A8V-X KBPWR 12 23 +5V +5VSB (Default) ® A8V-X Keyboard Power Setting ASUS A8V-X 1-21 A8V-X ® A8V-X USB Device Wake Up USBPW1234 2 1 +5V 3 2 +5VSB (Default) USBPW5678 12 23 +5V +5VSB (Default) • The USB device wake...
... sleep mode (CPU stopped, DRAM refreshed, system running in sleep mode. 3. otherwise, the system would not power up feature. A8V-X KBPWR 12 23 +5V +5VSB (Default) ® A8V-X Keyboard Power Setting ASUS A8V-X 1-21 A8V-X ® A8V-X USB Device Wake Up USBPW1234 2 1 +5V 3 2 +5VSB (Default) USBPW5678 12 23 +5V +5VSB (Default) • The USB device wake...

A8V-X User's Manual for English Edition
Page 35
... serial devices. 10. These two 4-pin Universal Serial Bus (USB) ports are available for the provided floppy disk drive (FDD) signal cable. A8V-X Floppy Disk Drive Connector ASUS A8V-X 1-23 USB 2.0 ports 3 and 4. This 9-pin serial port is for connecting USB 2.0 devices. 9. PS/2 keyboard port (purple). Insert one end of the cable...
... serial devices. 10. These two 4-pin Universal Serial Bus (USB) ports are available for the provided floppy disk drive (FDD) signal cable. A8V-X Floppy Disk Drive Connector ASUS A8V-X 1-23 USB 2.0 ports 3 and 4. This 9-pin serial port is for connecting USB 2.0 devices. 9. PS/2 keyboard port (purple). Insert one end of the cable...

A8V-X User's Manual for English Edition
Page 37
ASUS A8V-X 1-25 The current Serial ATA I interface allows up to ...to 300 MB/s data transfer rate, faster than the standard parallel ATA with 133 MB/s (Ultra DMA/133) A8V-X GND RSATA_RXN4 RSATA_RXP4 GND RSATA_TXN4 RSATA_TXP4 GND GND RSATA_RXN2 RSATA_RXP2 GND RSATA_TXN2 RSATA_TXP2 GND SATA4 SATA2 ® GND RSATA_RXN3... RSATA_RXP3 GND RSATA_TXN3 RSATA_TXP3 GND GND RSATA_RXN1 RSATA_RXP1 GND RSATA_TXN1 RSATA_TXP1 GND A8V-X SATA Connectors SATA3 SATA1 Important notes on Serial ATA • The Serial ATA RAID feature (RAID 0, RAID ...
ASUS A8V-X 1-25 The current Serial ATA I interface allows up to ...to 300 MB/s data transfer rate, faster than the standard parallel ATA with 133 MB/s (Ultra DMA/133) A8V-X GND RSATA_RXN4 RSATA_RXP4 GND RSATA_TXN4 RSATA_TXP4 GND GND RSATA_RXN2 RSATA_RXP2 GND RSATA_TXN2 RSATA_TXP2 GND SATA4 SATA2 ® GND RSATA_RXN3... RSATA_RXP3 GND RSATA_TXN3 RSATA_TXP3 GND GND RSATA_RXN1 RSATA_RXP1 GND RSATA_TXN1 RSATA_TXP1 GND A8V-X SATA Connectors SATA3 SATA1 Important notes on Serial ATA • The Serial ATA RAID feature (RAID 0, RAID ...

A8V-X User's Manual for English Edition
Page 39
... USB_P8USB_P8+ GND NC USB+5V USB_P6USB_P6+ GND NC ® USB56 1 A8V-X USB 2.0 Connectors USB78 1 USB+5V USB_P7USB_P7+ GND USB+5V USB_P5USB_P5+ GND The USB/GAME port module is for USB 2.0 ports. Never connect a.... Doing so will damage the motherboard! AAFP Azalia Legacy AC 97 compliant definition compliant definition AGND +5VA BLINE_OUT_R BLINE_OUT_L GND PRESENCE# SENSE1_RETUR SENSE2_RETUR A8V-X ® A8V-X Analog Front Panel Connector ASUS A8V-X PORT1 L PORT1 R PORT2 R SENSE_SEND PORT2 L MIC2 MICPWR Line out_R NC Line out_L 1-27 Connect one end of the front panel ...
... USB_P8USB_P8+ GND NC USB+5V USB_P6USB_P6+ GND NC ® USB56 1 A8V-X USB 2.0 Connectors USB78 1 USB+5V USB_P7USB_P7+ GND USB+5V USB_P5USB_P5+ GND The USB/GAME port module is for USB 2.0 ports. Never connect a.... Doing so will damage the motherboard! AAFP Azalia Legacy AC 97 compliant definition compliant definition AGND +5VA BLINE_OUT_R BLINE_OUT_L GND PRESENCE# SENSE1_RETUR SENSE2_RETUR A8V-X ® A8V-X Analog Front Panel Connector ASUS A8V-X PORT1 L PORT1 R PORT2 R SENSE_SEND PORT2 L MIC2 MICPWR Line out_R NC Line out_L 1-27 Connect one end of the front panel ...

A8V-X User's Manual for English Edition
Page 41
10. GAME/MIDI port connector (16-1 pin GAME) This connector is purchased separately. ASUS A8V-X 1-29 A8V-X +5V SPDIFOUT GND ® SPDIF_OUT A8V-X Digital Audio Connector The S/PDIF module is for a GAME/MIDI port. Connect the S/PDIF module cable to this connector, then install the module to ...a slot opening at the back of the system chassis. A8V-X +5V J2B1 J2CX MIDI_OUT J2CY J2B2 MIDI_IN ® A8V-X GAME Connector GAME +5V J1B1 J1CX GND GND J1CY J1B2 +5V The USB/GAME port module is for playing or ...
10. GAME/MIDI port connector (16-1 pin GAME) This connector is purchased separately. ASUS A8V-X 1-29 A8V-X +5V SPDIFOUT GND ® SPDIF_OUT A8V-X Digital Audio Connector The S/PDIF module is for a GAME/MIDI port. Connect the S/PDIF module cable to this connector, then install the module to ...a slot opening at the back of the system chassis. A8V-X +5V J2B1 J2CX MIDI_OUT J2CY J2B2 MIDI_IN ® A8V-X GAME Connector GAME +5V J1B1 J1CX GND GND J1CY J1B2 +5V The USB/GAME port module is for playing or ...

A8V-X User's Manual for English Edition
Page 45
Visit the ASUS website (www.asus.com) to download the latest BIOS file for the motherboard and rename the same to continue. 2. EZFlash starting BIOS update Checking for floppy... 4. When the correct BIOS file is found ! d. Press , then follow screen instructions to A8V-X.ROM. 2. Press...the floppy disk. Copy the original or the latest motherboard BIOS file to the bootable floppy disk. 2.1.2 ASUS EZ Flash utility The ASUS EZ Flash feature allows you rename the BIOS file to a floppy disk, then restart the system. 3. EZFlash ...
Visit the ASUS website (www.asus.com) to download the latest BIOS file for the motherboard and rename the same to continue. 2. EZFlash starting BIOS update Checking for floppy... 4. When the correct BIOS file is found ! d. Press , then follow screen instructions to A8V-X.ROM. 2. Press...the floppy disk. Copy the original or the latest motherboard BIOS file to the bootable floppy disk. 2.1.2 ASUS EZ Flash utility The ASUS EZ Flash feature allows you rename the BIOS file to a floppy disk, then restart the system. 3. EZFlash ...

A8V-X User's Manual for English Edition
Page 47
A:\>afudos /iA8V-X.ROM AMI Firmware Update Utility - Version 1.19 Copyright (C) 2003 American Megatrends, Inc. done Writing flash ..... done Please restart your computer ASUS A8V-X 2-5 Write the BIOS filename on the bootable floppy disk. A:\>afudos /iA8V-X.ROM 4. The utility returns to type the exact BIOS filename at ...
A:\>afudos /iA8V-X.ROM AMI Firmware Update Utility - Version 1.19 Copyright (C) 2003 American Megatrends, Inc. done Writing flash ..... done Please restart your computer ASUS A8V-X 2-5 Write the BIOS filename on the bootable floppy disk. A:\>afudos /iA8V-X.ROM 4. The utility returns to type the exact BIOS filename at ...

A8V-X User's Manual for English Edition
Page 49
... disk is found, the utility automatically checks the optical drive for this motherboard. Bad BIOS checksum. Floppy not found ! Reading file "A8V-X.ROM". The recovered BIOS may not be the latest BIOS version for the original or updated BIOS file. Starting BIOS recovery... Start fl...displays the following message and automatically checks the floppy disk for CD-ROM... Doing so can cause system boot failure! 4. Visit the ASUS website (www.asus.com) to the optical drive. 3. ASUS A8V-X 2-7 Checking for the original or updated BIOS file. Completed.
... disk is found, the utility automatically checks the optical drive for this motherboard. Bad BIOS checksum. Floppy not found ! Reading file "A8V-X.ROM". The recovered BIOS may not be the latest BIOS version for the original or updated BIOS file. Starting BIOS recovery... Start fl...displays the following message and automatically checks the floppy disk for CD-ROM... Doing so can cause system boot failure! 4. Visit the ASUS website (www.asus.com) to the optical drive. 3. ASUS A8V-X 2-7 Checking for the original or updated BIOS file. Completed.

A8V-X User's Manual for English Edition
Page 51
Click Next. Select Update BIOS from the Internet option from the Windows® desktop by clicking Start > Programs > ASUS > ASUSUpdate > ASUSUpdate. Select the ASUS FTP site nearest you to avoid network traffic, or click Auto Select. ASUS A8V-X 2-9 Launch the ASUS Update utility from the drop-down menu, then click Next. 3. Updating the BIOS through the Internet To update the BIOS through the Internet: 1. The ASUS Update main window appears. 2.
Click Next. Select Update BIOS from the Internet option from the Windows® desktop by clicking Start > Programs > ASUS > ASUSUpdate > ASUSUpdate. Select the ASUS FTP site nearest you to avoid network traffic, or click Auto Select. ASUS A8V-X 2-9 Launch the ASUS Update utility from the drop-down menu, then click Next. 3. Updating the BIOS through the Internet To update the BIOS through the Internet: 1. The ASUS Update main window appears. 2.

A8V-X User's Manual for English Edition
Page 53
... during the Power-On Self-Test (POST) to ensure system compatibility and stability. Select the Load Default Settings item under the Exit Menu. ASUS A8V-X 2-11 This section explains how to download the latest BIOS file for this motherboard apply for reference purposes only, and may not ...exactly match what you can also restart by pressing the reset button on your screen. • Visit the ASUS website (www.asus.com) to configure your selections from the available options using this program. See section "2.7 Exit Menu." • The BIOS ...
... during the Power-On Self-Test (POST) to ensure system compatibility and stability. Select the Load Default Settings item under the Exit Menu. ASUS A8V-X 2-11 This section explains how to download the latest BIOS file for this motherboard apply for reference purposes only, and may not ...exactly match what you can also restart by pressing the reset button on your screen. • Visit the ASUS website (www.asus.com) to configure your selections from the available options using this program. See section "2.7 Exit Menu." • The BIOS ...


