A8V-E SE User's Manual for English Edition
Page 3
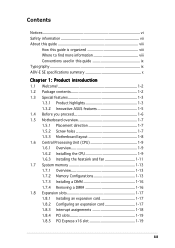
... information viii Conventions used in this guide ix Typography ix A8V-E SE specifications summary x Chapter 1: Product introduction 1.1 Welcome 1-2 1.2 Package contents 1-2 1.3 Special features 1-3 1.3.1 Product highlights 1-3 1.3.2 Innovative ASUS features 1-5 1.4 Before you proceed 1-6 1.5 Motherboard overview 1-7 1.5.1 Placement direction 1-7 1.5.2 Screw holes 1-7 1.5.3 Motherboard layout 1-8 1.6 Central Processing Unit (CPU 1-9 1.6.1 Overview 1-9 1.6.2 Installling the CPU 1-9 1.6.3 Installing the heatsink and fan 1-11 1.7 System memory 1-13...
... information viii Conventions used in this guide ix Typography ix A8V-E SE specifications summary x Chapter 1: Product introduction 1.1 Welcome 1-2 1.2 Package contents 1-2 1.3 Special features 1-3 1.3.1 Product highlights 1-3 1.3.2 Innovative ASUS features 1-5 1.4 Before you proceed 1-6 1.5 Motherboard overview 1-7 1.5.1 Placement direction 1-7 1.5.2 Screw holes 1-7 1.5.3 Motherboard layout 1-8 1.6 Central Processing Unit (CPU 1-9 1.6.1 Overview 1-9 1.6.2 Installling the CPU 1-9 1.6.3 Installing the heatsink and fan 1-11 1.7 System memory 1-13...
A8V-E SE User's Manual for English Edition
Page 4
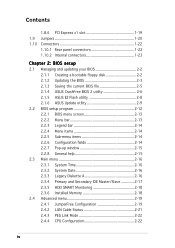
...BIOS setup 2.1 Managing and updating your BIOS 2-2 2.1.1 Creating a bootable floppy disk 2-2 2.1.2 Updating the BIOS 2-3 2.1.3 Saving the current BIOS file 2-5 2.1.4 ASUS CrashFree BIOS 2 utility 2-6 2.1.5 ASUS EZ Flash utility 2-8 2.1.6 ASUS Update utility 2-9 2.2 BIOS setup program 2-12 2.2.1 BIOS menu screen 2-13 2.2.2 Menu bar 2-13 2.2.3 Legend bar 2-14 2.2.4 Menu items 2-14 2.2.5 Sub... Monitoring 2-18 2.3.6 Installed Memory 2-18 2.4 Advanced menu 2-19 2.4.1 JumperFree Configuration 2-19 2.4.2 LAN Cable Status 2-21 2.4.3 PEG Link Mode 2-22 2.4.4 CPU Configuration 2-22 iv
...BIOS setup 2.1 Managing and updating your BIOS 2-2 2.1.1 Creating a bootable floppy disk 2-2 2.1.2 Updating the BIOS 2-3 2.1.3 Saving the current BIOS file 2-5 2.1.4 ASUS CrashFree BIOS 2 utility 2-6 2.1.5 ASUS EZ Flash utility 2-8 2.1.6 ASUS Update utility 2-9 2.2 BIOS setup program 2-12 2.2.1 BIOS menu screen 2-13 2.2.2 Menu bar 2-13 2.2.3 Legend bar 2-14 2.2.4 Menu items 2-14 2.2.5 Sub... Monitoring 2-18 2.3.6 Installed Memory 2-18 2.4 Advanced menu 2-19 2.4.1 JumperFree Configuration 2-19 2.4.2 LAN Cable Status 2-21 2.4.3 PEG Link Mode 2-22 2.4.4 CPU Configuration 2-22 iv
A8V-E SE User's Manual for English Edition
Page 10
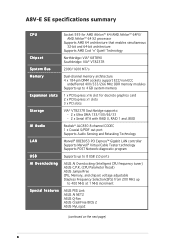
... 64 X2 processor Supports AMD 64 architecture that enables simultaneous 32-bit and 64-bit architecture Supports AMD Cool 'n' Quiet! A8V-E SE specifications summary CPU Socket 939 for discrete graphics card 2 x PCI Express x1 slots 3 x PCI slots Storage VIA® VT8237R Southbridge ...technology Supports POST Network-diagnostic program USB Supports up to 8 USB 2.0 ports AI Overclocking ASUS AI Overclocking (Intelligent CPU frequency tuner) ASUS C.P.R. (CPU Parameter Recall) ASUS JumperFree CPU, Memory, and chipset voltage adjustable Stepless Frequency Selection(SFS) from 200 MHz up to ...
... 64 X2 processor Supports AMD 64 architecture that enables simultaneous 32-bit and 64-bit architecture Supports AMD Cool 'n' Quiet! A8V-E SE specifications summary CPU Socket 939 for discrete graphics card 2 x PCI Express x1 slots 3 x PCI slots Storage VIA® VT8237R Southbridge ...technology Supports POST Network-diagnostic program USB Supports up to 8 USB 2.0 ports AI Overclocking ASUS AI Overclocking (Intelligent CPU frequency tuner) ASUS C.P.R. (CPU Parameter Recall) ASUS JumperFree CPU, Memory, and chipset voltage adjustable Stepless Frequency Selection(SFS) from 200 MHz up to ...
A8V-E SE User's Manual for English Edition
Page 11
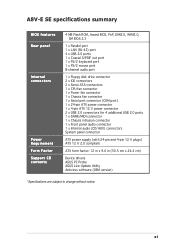
xi A8V-E SE specifications summary BIOS features Rear panel Internal connectors Power Requirement Form Factor... port 1 x PS/2 keyboard port 1 x PS/2 mouse port 8-channel audio port 1 x Floppy disk drive connector 2 x IDE connectors 2 x Serial ATA connectors 1 x CPU fan connector 1 x Power fan connector 1 x Chassis fan connector 1 x Serial port connector (COM port) 1 x 24-pin ATX power connector 1 x 4-pin ATX 12...: 12 in x 9.6 in (30.5 cm x 24.4 cm) Device drivers ASUS PC Probe ASUS Live Update Utility Antivirus software (OEM version) *Specifications are subject to change without notice.
xi A8V-E SE specifications summary BIOS features Rear panel Internal connectors Power Requirement Form Factor... port 1 x PS/2 keyboard port 1 x PS/2 mouse port 8-channel audio port 1 x Floppy disk drive connector 2 x IDE connectors 2 x Serial ATA connectors 1 x CPU fan connector 1 x Power fan connector 1 x Chassis fan connector 1 x Serial port connector (COM port) 1 x 24-pin ATX power connector 1 x 4-pin ATX 12...: 12 in x 9.6 in (30.5 cm x 24.4 cm) Device drivers ASUS PC Probe ASUS Live Update Utility Antivirus software (OEM version) *Specifications are subject to change without notice.
A8V-E SE User's Manual for English Edition
Page 15
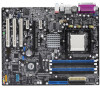
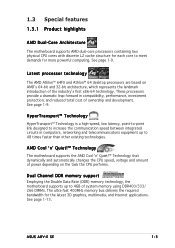
.... 1.3 Special features 1.3.1 Product highlights AMD Dual-Core Architecture The motherboard supports AMD dual-core processors containing two physical CPU cores with discrete L2 cache structure for each core to 48 times faster than other existing technologies. These processors provide ...AMD Cool 'n' Quiet!™ Technology that dynamically and automatically changes the CPU speed, voltage and amount of power depending on AMD's 64-bit and 32-bit architecture, which represents the landmark introduction of ownership and development. ASUS A8V-E SE 1-3 See page 1-13. See page 1-9.
.... 1.3 Special features 1.3.1 Product highlights AMD Dual-Core Architecture The motherboard supports AMD dual-core processors containing two physical CPU cores with discrete L2 cache structure for each core to 48 times faster than other existing technologies. These processors provide ...AMD Cool 'n' Quiet!™ Technology that dynamically and automatically changes the CPU speed, voltage and amount of power depending on AMD's 64-bit and 32-bit architecture, which represents the landmark introduction of ownership and development. ASUS A8V-E SE 1-3 See page 1-13. See page 1-9.

A8V-E SE User's Manual for English Edition
Page 16
... page 1-25 for details. See pages 1-22 and 1-23 for details. See pages 1-21, 1-23 and 1-27 for details. Temperature, fan, and voltage monitoring The CPU temperature is monitored for critical components. The system fan rotations per minute (RPM) is monitored by the ASIC (integrated in the Winbond Super I /O interconnect technology...
... page 1-25 for details. See pages 1-22 and 1-23 for details. See pages 1-21, 1-23 and 1-27 for details. Temperature, fan, and voltage monitoring The CPU temperature is monitored for critical components. The system fan rotations per minute (RPM) is monitored by the ASIC (integrated in the Winbond Super I /O interconnect technology...

A8V-E SE User's Manual for English Edition
Page 17
...AI NET 2 immediately diagnoses the LAN cable(s) and reports shorts and faults up to ensure quiet, cool, and efficient operation. ASUS Q-Fan technology The ASUS Q-Fan technology smartly adjusts the fan speeds according to the system loading to 100 meters at 1 meter accuracy. With this feature ... you to restore the original BIOS data from the support CD in the motherboard allows you to gradually increase the CPU and memory voltage to buy a replacement ROM chip. ASUS A8V-E SE 1-5 This protection eliminates the need to achieve maximum system performance. See page 2-21 for details.
...AI NET 2 immediately diagnoses the LAN cable(s) and reports shorts and faults up to ensure quiet, cool, and efficient operation. ASUS Q-Fan technology The ASUS Q-Fan technology smartly adjusts the fan speeds according to the system loading to 100 meters at 1 meter accuracy. With this feature ... you to restore the original BIOS data from the support CD in the motherboard allows you to gradually increase the CPU and memory voltage to buy a replacement ROM chip. ASUS A8V-E SE 1-5 This protection eliminates the need to achieve maximum system performance. See page 2-21 for details.
A8V-E SE User's Manual for English Edition
Page 21
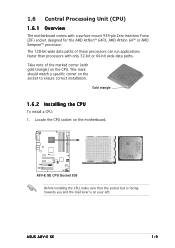
... box is facing towards you and the load lever is on the socket to ensure correct installation. Gold triangle 1.6.2 Installling the CPU To install a CPU: 1. ASUS A8V-E SE 1-9 Take note of these processors can run applications faster than processors with only 32-bit or 64-bit wide data paths. ...Locate the CPU socket on the CPU. The 128-bit-wide data paths of the marked corner (with a surface mount 939-pin Zero Insertion Force ...
... box is facing towards you and the load lever is on the socket to ensure correct installation. Gold triangle 1.6.2 Installling the CPU To install a CPU: 1. ASUS A8V-E SE 1-9 Take note of these processors can run applications faster than processors with only 32-bit or 64-bit wide data paths. ...Locate the CPU socket on the CPU. The 128-bit-wide data paths of the marked corner (with a surface mount 939-pin Zero Insertion Force ...

A8V-E SE User's Manual for English Edition
Page 22
... it is in place, push down the socket lever to 90°-100° angle, otherwise the CPU does not fit in completely. 3. Carefully insert the CPU into the socket to indicate that the CPU corner with the gold triangle matches the socket corner with a small triangle. 4. The lever clicks on ...the side tab to prevent bending the pins and damaging the CPU! 5. DO NOT force the CPU into the socket until it up to secure the CPU. Small triangle Gold triangle The CPU fits only in place. Unlock the socket by pressing the lever sideways, then lift it fits...
... it is in place, push down the socket lever to 90°-100° angle, otherwise the CPU does not fit in completely. 3. Carefully insert the CPU into the socket to indicate that the CPU corner with the gold triangle matches the socket corner with a small triangle. 4. The lever clicks on ...the side tab to prevent bending the pins and damaging the CPU! 5. DO NOT force the CPU into the socket until it up to secure the CPU. Small triangle Gold triangle The CPU fits only in place. Unlock the socket by pressing the lever sideways, then lift it fits...

A8V-E SE User's Manual for English Edition
Page 23
... The retention module base is properly applied to remove the retention module base when installing the CPU or installing other motherboard components. • If you purchased a separate CPU heatsink and fan assembly, make sure that you install the heatsink and fan assembly. If the... is already installed on the motherboard upon purchase. • You do not match the CPU documentation, follow the latter. Follow these steps to ensure optimum thermal condition and performance. ASUS A8V-E SE 1-11 1.6.3 Installing the heatsink and fan The AMD Athlon™ 64, AMD Athlon™...
... The retention module base is properly applied to remove the retention module base when installing the CPU or installing other motherboard components. • If you purchased a separate CPU heatsink and fan assembly, make sure that you install the heatsink and fan assembly. If the... is already installed on the motherboard upon purchase. • You do not match the CPU documentation, follow the latter. Follow these steps to ensure optimum thermal condition and performance. ASUS A8V-E SE 1-11 1.6.3 Installing the heatsink and fan The AMD Athlon™ 64, AMD Athlon™...

A8V-E SE User's Manual for English Edition
Page 24
...and heatsink assembly is in place. Hardware monitoring errors can occur if you cannot snap the retention bracket in place, connect the CPU fan cable to the connector on the retention mechanism to secure the heatsink and fan to the module base. 5. 2. Attach one...module base. 1 2 3 4 5 3. Align the other end of the retention bracket to the retention module base. CPU_FAN Rotation +12V GND A8V-E SE ® A8V-E SE CPU Fan connector Do not forget to plug this connector. 1-12 Chapter 1: Product introduction A clicking sound denotes that the fan and heatsink assembly perfectly ...
...and heatsink assembly is in place. Hardware monitoring errors can occur if you cannot snap the retention bracket in place, connect the CPU fan cable to the connector on the retention mechanism to secure the heatsink and fan to the module base. 5. 2. Attach one...module base. 1 2 3 4 5 3. Align the other end of the retention bracket to the retention module base. CPU_FAN Rotation +12V GND A8V-E SE ® A8V-E SE CPU Fan connector Do not forget to plug this connector. 1-12 Chapter 1: Product introduction A clicking sound denotes that the fan and heatsink assembly perfectly ...

A8V-E SE User's Manual for English Edition
Page 25
... memory modules from the same vendor. 1.7 System memory 1.7.1 Overview The motherboard comes with the same CAS latency. ASUS A8V-E SE 1-13 Refer to the DDR400 Qualified Vendors List on the next page for details. • Due to CPU limitation, install on Channel B slots for better performance (DIMM_A1+DIMM_A2=DIMM_B1+DIMM_B2). • Always install DIMMs...
... memory modules from the same vendor. 1.7 System memory 1.7.1 Overview The motherboard comes with the same CAS latency. ASUS A8V-E SE 1-13 Refer to the DDR400 Qualified Vendors List on the next page for details. • Due to CPU limitation, install on Channel B slots for better performance (DIMM_A1+DIMM_A2=DIMM_B1+DIMM_B2). • Always install DIMMs...
A8V-E SE User's Manual for English Edition
Page 32
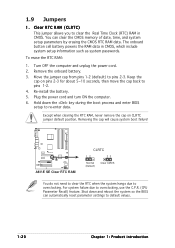
... RAM data. For system failure due to pins 2-3. Remove the onboard battery. 3. Move the jumper cap from pins 1-2 (default) to overclocking, use the C.P.R. (CPU Parameter Recall) feature. A8V-E SE ® A8V-E SE Clear RTC RAM CLRTC 12 23 Normal (Default) Clear CMOS You do not need to clear the RTC when the system hangs due...
... RAM data. For system failure due to pins 2-3. Remove the onboard battery. 3. Move the jumper cap from pins 1-2 (default) to overclocking, use the C.P.R. (CPU Parameter Recall) feature. A8V-E SE ® A8V-E SE Clear RTC RAM CLRTC 12 23 Normal (Default) Clear CMOS You do not need to clear the RTC when the system hangs due...

A8V-E SE User's Manual for English Edition
Page 33
... +5V to wake up the computer from S3 and S4 sleep modes (no power to CPU, DRAM in slow refresh, power supply in low power mode) using the connected USB devices. USBPW34 USBPW12 12 23 A8V-E SE ® A8V-E SE USB device wake-up +5V (Default) +5VSB USBPW78 USBPW56 2 1 +5V (Default) 3 2 +5VSB • The...up feature requires a power supply that can provide 500mA on the +5VSB lead for each USB port; otherwise, the system would not power up feature. A8V-E SE KBPWR 2 1 +5V (Default) 2 1 +5VSB ® A8V-E SE Keyboard power setting ASUS A8V-E SE 1-21 Refer of the 2 .
... +5V to wake up the computer from S3 and S4 sleep modes (no power to CPU, DRAM in slow refresh, power supply in low power mode) using the connected USB devices. USBPW34 USBPW12 12 23 A8V-E SE ® A8V-E SE USB device wake-up +5V (Default) +5VSB USBPW78 USBPW56 2 1 +5V (Default) 3 2 +5VSB • The...up feature requires a power supply that can provide 500mA on the +5VSB lead for each USB port; otherwise, the system would not power up feature. A8V-E SE KBPWR 2 1 +5V (Default) 2 1 +5VSB ® A8V-E SE Keyboard power setting ASUS A8V-E SE 1-21 Refer of the 2 .

A8V-E SE User's Manual for English Edition
Page 38
...input from sound sources such as a CD-ROM, TV-tuner, or MPEG card. 5 . CPU_FAN Rotation +12V GND Rotation +12V GND A8V-E SE ® A8V-E SE Fan connectors PWR_FAN CHA_FAN Rotation +12V GND 6 . CPU, Chassis, and Power fan connectors (3-pin CPU_FAN, 3-pin CHA_FAN1, 3-pin PWR_FAN) The fan connectors support cooling fans of 350mA~2000mA (...matches the ground pin of the connector. Right Audio Channel Ground Ground Left Audio Channel Right Audio Channel Ground Ground Left Audio Channel A8V-E SE ® AUX CD A8V-E SE Internal audio connectors 1-26 Chapter 1: Product introduction
...input from sound sources such as a CD-ROM, TV-tuner, or MPEG card. 5 . CPU_FAN Rotation +12V GND Rotation +12V GND A8V-E SE ® A8V-E SE Fan connectors PWR_FAN CHA_FAN Rotation +12V GND 6 . CPU, Chassis, and Power fan connectors (3-pin CPU_FAN, 3-pin CHA_FAN1, 3-pin PWR_FAN) The fan connectors support cooling fans of 350mA~2000mA (...matches the ground pin of the connector. Right Audio Channel Ground Ground Left Audio Channel Right Audio Channel Ground Ground Left Audio Channel A8V-E SE ® AUX CD A8V-E SE Internal audio connectors 1-26 Chapter 1: Product introduction

A8V-E SE User's Manual for English Edition
Page 61
...] 33.0 MHz [200MHz] Select Menu Item Specific Help ASUS A8V-E SE 2-19 Phoenix-Award BIOS CMOS Setup Utility Main Advanced Power Boot Exit JumperFree Configuration LAN Cable Status PEG Link Mode CPU Configuration Chipset PCIPnP Onboard Device Configuration USB Configuration Select Menu ... Save and Exit 2.4.1 JumperFree Configuration Advanced Phoenix-Award BIOS CMOS Setup Utility JumperFree Configuration Frequency Configuration CPU Multiplier Hammer Vid control Memory Voltage Adjustment CPU Vcore Offset [Auto] [Startup] [2.75 V] [+100 mv] Select Menu Item Specific Help Frequency ...
...] 33.0 MHz [200MHz] Select Menu Item Specific Help ASUS A8V-E SE 2-19 Phoenix-Award BIOS CMOS Setup Utility Main Advanced Power Boot Exit JumperFree Configuration LAN Cable Status PEG Link Mode CPU Configuration Chipset PCIPnP Onboard Device Configuration USB Configuration Select Menu ... Save and Exit 2.4.1 JumperFree Configuration Advanced Phoenix-Award BIOS CMOS Setup Utility JumperFree Configuration Frequency Configuration CPU Multiplier Hammer Vid control Memory Voltage Adjustment CPU Vcore Offset [Auto] [Startup] [2.75 V] [+100 mv] Select Menu Item Specific Help Frequency ...

A8V-E SE User's Manual for English Edition
Page 62
... [XXX] (value is set the PCI Express clock frequency. The BIOS detects the default value of this item. Selecting a very high CPU frequency may cause the system to the CPU. Configuration options: [Disabled] [Enabled] PCI Clock [XXX] (value is user-configurable only when the P C I E x c ...l o c k S y n c . The BIOS detects the default value of CPU installed. CPU Multiplier [Auto] Sets the CPU multiplier. Configuration options: [Auto] [x4] [x4.5] [x5] [x5.5] [x6] [x6.5] [x7] [x7.5] [x8] [x8.5] [x9] [x9.5] [x10] [x10...
... [XXX] (value is set the PCI Express clock frequency. The BIOS detects the default value of this item. Selecting a very high CPU frequency may cause the system to the CPU. Configuration options: [Disabled] [Enabled] PCI Clock [XXX] (value is user-configurable only when the P C I E x c ...l o c k S y n c . The BIOS detects the default value of CPU installed. CPU Multiplier [Auto] Sets the CPU multiplier. Configuration options: [Auto] [x4] [x4.5] [x5] [x5.5] [x6] [x6.5] [x7] [x7.5] [x8] [x8.5] [x9] [x9.5] [x10] [x10...

A8V-E SE User's Manual for English Edition
Page 63
... during the Power-On Self-Test (POST). Configuration options: [2.60 V] [2.65 V] [2.70 V] [2.75 V] [2.80 V] [2.85 V] [2.90 V] [2.95 V] [3.00 V] CPU VCore Offset [+100 mv] Sets the CPU Vcore offset voltage. Configuration options: [Disabled] [Enabled] ASUS A8V-E SE 2-21 Advanced Phoenix-Award BIOS CMOS Setup Utility LAN Cable Status POST Check LAN Cable [Disabled] Pair 1-2 3-6 4-5 7-8 Status Open...
... during the Power-On Self-Test (POST). Configuration options: [2.60 V] [2.65 V] [2.70 V] [2.75 V] [2.80 V] [2.85 V] [2.90 V] [2.95 V] [3.00 V] CPU VCore Offset [+100 mv] Sets the CPU Vcore offset voltage. Configuration options: [Disabled] [Enabled] ASUS A8V-E SE 2-21 Advanced Phoenix-Award BIOS CMOS Setup Utility LAN Cable Status POST Check LAN Cable [Disabled] Pair 1-2 3-6 4-5 7-8 Status Open...

A8V-E SE User's Manual for English Edition
Page 64
... with monitor chip. Configuration options: [Auto] [Disabled] [Normal] [Fast] [Faster] 2.4.4 CPU Configuration Advanced Phoenix-Award BIOS CMOS Setup Utility CPU Configuration CPU Type AMD Dual Core Processor 4200+ CPU Speed 2200MHz Cache RAM 512K x2 Current FSB Frequency 200 MHz AMD K8 Cool'n'Quiet control [Disabled... Menu Item Specific Help PEG Link Mode [Auto] Allows you purchased a separate heatsink and fan package, use the ASUS Q-Fan Technology feature to automatically adjust the CPU fan speed according to disable or set the AMD Cool 'n' Quiet!™ Technology feature.
... with monitor chip. Configuration options: [Auto] [Disabled] [Normal] [Fast] [Faster] 2.4.4 CPU Configuration Advanced Phoenix-Award BIOS CMOS Setup Utility CPU Configuration CPU Type AMD Dual Core Processor 4200+ CPU Speed 2200MHz Cache RAM 512K x2 Current FSB Frequency 200 MHz AMD K8 Cool'n'Quiet control [Disabled... Menu Item Specific Help PEG Link Mode [Auto] Allows you purchased a separate heatsink and fan package, use the ASUS Q-Fan Technology feature to automatically adjust the CPU fan speed according to disable or set the AMD Cool 'n' Quiet!™ Technology feature.

A8V-E SE User's Manual for English Edition
Page 74
... Value Enter: Select Sub-menu F5: Setup Defaults F10: Save and Exit M/B Temperature Current CPU Temperature The onboard hardware monitor automatically detects and displays the motherboard and CPU temperatures. Q-FAN Function [Disabled] Allows you to disable or enable the ASUS Q-Fan function. These items are not user-configurable. VCORE Voltage, +12V Voltage, 3.3V...
... Value Enter: Select Sub-menu F5: Setup Defaults F10: Save and Exit M/B Temperature Current CPU Temperature The onboard hardware monitor automatically detects and displays the motherboard and CPU temperatures. Q-FAN Function [Disabled] Allows you to disable or enable the ASUS Q-Fan function. These items are not user-configurable. VCORE Voltage, +12V Voltage, 3.3V...


