
K8 series Quick Setup Guide
Page 1
...the User Guide when using this Quick Setup Guide. English Getting Started This Quick Setup Guide will help you get your motherboard package for the following items. Motherboard 80-Conductor IDE signal cable ® 40-Conductor IDE signal cable Floppy disk signal cable Serial ATA signal cable Bag of... CD Quick Setup Guide User Guide SAFETY INFORMATION Computer components are extremely sensitive to electrostatic discharge (ESD). Check your motherboard up static electricity. 1 Before handling any components, be sure to wear an anti-static wrist strap (not included) and touch a...
...the User Guide when using this Quick Setup Guide. English Getting Started This Quick Setup Guide will help you get your motherboard package for the following items. Motherboard 80-Conductor IDE signal cable ® 40-Conductor IDE signal cable Floppy disk signal cable Serial ATA signal cable Bag of... CD Quick Setup Guide User Guide SAFETY INFORMATION Computer components are extremely sensitive to electrostatic discharge (ESD). Check your motherboard up static electricity. 1 Before handling any components, be sure to wear an anti-static wrist strap (not included) and touch a...

K8 series Quick Setup Guide
Page 3
The lever clicks on the motherboard. WARNING! When the CPU is in one orientation. Connect the CPU fan power cable to the CPU fan connector on the side tab to indicate ... Gold triangle 3 Position the CPU above the socket such that the CPU corner with the gold triangle matches the socket corner with fan and the motherboard user guide.) 6. DO NOT force the CPU into the socket until it fits in place. Install a heatsink with fan assembly. (Refer to the documentation that...
The lever clicks on the motherboard. WARNING! When the CPU is in one orientation. Connect the CPU fan power cable to the CPU fan connector on the side tab to indicate ... Gold triangle 3 Position the CPU above the socket such that the CPU corner with the gold triangle matches the socket corner with fan and the motherboard user guide.) 6. DO NOT force the CPU into the socket until it fits in place. Install a heatsink with fan assembly. (Refer to the documentation that...

K8 series Quick Setup Guide
Page 4
... openings for the keyboard and mouse ports are aligned to the top of your chassis into it. 1. Screws Mounting screws Standoffs Motherboard screw holes 4 Install the rear I /O shield. 5. Make sure that the underside of the I /O shield that came with screws. ...Position the I/O side of the motherboard towards the chassis rear panel, matching the I /O slot opening. 3. Screw the standoffs that came with your chassis to most standard chassis. Secure the motherboard with the motherboard package. Remove the temporary metal shield on the chassis. 2....
... openings for the keyboard and mouse ports are aligned to the top of your chassis into it. 1. Screws Mounting screws Standoffs Motherboard screw holes 4 Install the rear I /O shield. 5. Make sure that the underside of the I /O shield that came with screws. ...Position the I/O side of the motherboard towards the chassis rear panel, matching the I /O slot opening. 3. Screw the standoffs that came with your chassis to most standard chassis. Secure the motherboard with the motherboard package. Remove the temporary metal shield on the chassis. 2....

K8 series Quick Setup Guide
Page 7
Install your chassis, you wish to the panel connector on the motherboard. 7 Install expansion cards 1. Install other expansion cards using the same procedure. English 6 Connect the chassis LED and power switch cable On the front of your AGP graphics card in the proper slot. 3. LED and switch leads PCI card AGP card Wi-Fi card 7 Press the card firmly into the slot. 4. Connect these leads to install the expansion cards. 2. Secure the card with a screw. 5. Remove the slot covers from the chassis where you will find some LED and power switch leads.
Install your chassis, you wish to the panel connector on the motherboard. 7 Install expansion cards 1. Install other expansion cards using the same procedure. English 6 Connect the chassis LED and power switch cable On the front of your AGP graphics card in the proper slot. 3. LED and switch leads PCI card AGP card Wi-Fi card 7 Press the card firmly into the slot. 4. Connect these leads to install the expansion cards. 2. Secure the card with a screw. 5. Remove the slot covers from the chassis where you will find some LED and power switch leads.

K8 series Quick Setup Guide
Page 8
.... 2. Orient the 20-pin power plug such that your ATX 12V power supply can provide 8A on the +12V lead and at least 1A on motherboard power connector. Make sure that the plastic clip on the side matches the plastic tab on the +5-volt standby lead (+5VSB). English 8 Connect the power... or may not boot up if the power is inadequate. 20-pin connector 4-pin connector 8 IMPORTANT! Follow step 1 to fit the power connectors on the motherboard. 1.
.... 2. Orient the 20-pin power plug such that your ATX 12V power supply can provide 8A on the +12V lead and at least 1A on motherboard power connector. Make sure that the plastic clip on the side matches the plastic tab on the +5-volt standby lead (+5VSB). English 8 Connect the power... or may not boot up if the power is inadequate. 20-pin connector 4-pin connector 8 IMPORTANT! Follow step 1 to fit the power connectors on the motherboard. 1.

K8 series Quick Setup Guide
Page 10
...installed. • Enter BIOS setup and load default settings. • Make sure that the power cable is connected properly to the motherboard. • Make sure that the drive cables are using a tested and qualified memory module. Troubleshooting If you are connected properly. • Update... the motherboard BIOS. See User Guide for technical support. To restore all BIOS settings to the graphics port. • Check the brightness and ...
...installed. • Enter BIOS setup and load default settings. • Make sure that the power cable is connected properly to the motherboard. • Make sure that the drive cables are using a tested and qualified memory module. Troubleshooting If you are connected properly. • Update... the motherboard BIOS. See User Guide for technical support. To restore all BIOS settings to the graphics port. • Check the brightness and ...

A8V Deluxe User's Manual
Page 1
Motherboard A8V Deluxe User Guide
Motherboard A8V Deluxe User Guide

A8V Deluxe User's Manual
Page 3
... Where to find more information ix Conventions used in this guide x Typography x A8V Deluxe specifications summary xi Chapter 1: Product introduction 1.1 Welcome 1-1 1.2 Package contents 1-1 1.3 Special features 1-2 1.3.1 Product Highlights 1-2 1.3.2 Unique ASUS features 1-4 Chapter 2: Hardware information 2.1 Before you proceed 2-1 2.2 Motherboard overview 2-2 2.2.1 Placement direction 2-2 2.2.2 Screw holes 2-2 2.2.3 Motherboard layout 2-3 2.2.4 Layout Contents 2-4 2.3 Central Processing Unit (CPU 2-6 2.3.1 Overview 2-6 2.3.2 Installing the CPU 2-6 2.3.3 Installing...
... Where to find more information ix Conventions used in this guide x Typography x A8V Deluxe specifications summary xi Chapter 1: Product introduction 1.1 Welcome 1-1 1.2 Package contents 1-1 1.3 Special features 1-2 1.3.1 Product Highlights 1-2 1.3.2 Unique ASUS features 1-4 Chapter 2: Hardware information 2.1 Before you proceed 2-1 2.2 Motherboard overview 2-2 2.2.1 Placement direction 2-2 2.2.2 Screw holes 2-2 2.2.3 Motherboard layout 2-3 2.2.4 Layout Contents 2-4 2.3 Central Processing Unit (CPU 2-6 2.3.1 Overview 2-6 2.3.2 Installing the CPU 2-6 2.3.3 Installing...

A8V Deluxe User's Manual
Page 8
... on it by yourself. viii These devices could interrupt the grounding circuit. • Make sure that your retailer. Operation safety • Before installing the motherboard and adding devices on a stable surface. • If you add a device. • Before connecting or removing signal cables from the system, ensure... the power cable from the electrical outlet before relocating the system. • When adding or removing devices to or from the motherboard, ensure that all power cables are unplugged. • Seek professional assistance before using an adapter or extension cord.
... on it by yourself. viii These devices could interrupt the grounding circuit. • Make sure that your retailer. Operation safety • Before installing the motherboard and adding devices on a stable surface. • If you add a device. • Before connecting or removing signal cables from the system, ensure... the power cable from the electrical outlet before relocating the system. • When adding or removing devices to or from the motherboard, ensure that all power cables are unplugged. • Seek professional assistance before using an adapter or extension cord.

A8V Deluxe User's Manual
Page 9
... dealer. Where to find more information Refer to the following parts: • Chapter 1: Product introduction This chapter describes the motherboard features and the new technologies it supports. • Chapter 2: Hardware information This chapter lists the hardware setup procedures that may... of shutting down the system. • Chapter 4: BIOS setup This chapter tells how to the ASUS contact information. 2. ASUS websites The ASUS website provides updated information on the motherboard. • Chapter 3: Powering up This chapter describes the power up sequence, the vocal POST messages...
... dealer. Where to find more information Refer to the following parts: • Chapter 1: Product introduction This chapter describes the motherboard features and the new technologies it supports. • Chapter 2: Hardware information This chapter lists the hardware setup procedures that may... of shutting down the system. • Chapter 4: BIOS setup This chapter tells how to the ASUS contact information. 2. ASUS websites The ASUS website provides updated information on the motherboard. • Chapter 3: Powering up This chapter describes the power up sequence, the vocal POST messages...

A8V Deluxe User's Manual
Page 13
Product introduction Chapter 1 This chapter describes the motherboard features and the new technologies it supports.
Product introduction Chapter 1 This chapter describes the motherboard features and the new technologies it supports.

A8V Deluxe User's Manual
Page 14
Chapter summary 1.1 Welcome 1-1 1.2 Package contents 1-1 1.3 Special features 1-2 ASUS A8V Deluxe motherboard
Chapter summary 1.1 Welcome 1-1 1.2 Package contents 1-1 1.3 Special features 1-2 ASUS A8V Deluxe motherboard
A8V Deluxe User's Manual
Page 15
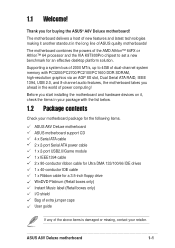
... a system bus of 2000 MT/s, up to 4GB of dual-channel system memory with the list below. 1.2 Package contents Check your motherboard package for the following items. ASUS A8V Deluxe motherboard ASUS motherboard support CD 4 x Serial ATA cable 2 x 2-port Serial ATA power cable 1 x 2-port USB2.0/Game module 1 x IEEE1394 cable 2 x 80-conductor ribbon cable for Ultra DMA 133...
... a system bus of 2000 MT/s, up to 4GB of dual-channel system memory with the list below. 1.2 Package contents Check your motherboard package for the following items. ASUS A8V Deluxe motherboard ASUS motherboard support CD 4 x Serial ATA cable 2 x 2-port Serial ATA power cable 1 x 2-port USB2.0/Game module 1 x IEEE1394 cable 2 x 80-conductor ribbon cable for Ultra DMA 133...

A8V Deluxe User's Manual
Page 16
... up to 4GB of the industry's first x86-64 technology. See page 2-6. AMD Cool 'n' Quiet!™ Technology The motherboard supports the AMD Cool 'n' Quiet!™ Technology that dynamically and automatically changes the CPU speed, voltage and amount of power ...in compatibility, performance, investment protection, and reduced total cost of the Parallel ATA storage interface. See page 2-11. Serial ATA solution The motherboard supports four interfaces compliant to 48 times faster than other existing technologies. The Serial ATA specification allows for the latest 3D graphics, multimedia, ...
... up to 4GB of the industry's first x86-64 technology. See page 2-6. AMD Cool 'n' Quiet!™ Technology The motherboard supports the AMD Cool 'n' Quiet!™ Technology that dynamically and automatically changes the CPU speed, voltage and amount of power ...in compatibility, performance, investment protection, and reduced total cost of the Parallel ATA storage interface. See page 2-11. Serial ATA solution The motherboard supports four interfaces compliant to 48 times faster than other existing technologies. The Serial ATA specification allows for the latest 3D graphics, multimedia, ...

A8V Deluxe User's Manual
Page 17
...scanners and printers, and fast storage units. supporting up to powerful speaker systems. See page 2-21. ASUS A8V Deluxe motherboard 1-3 Dual Serial ATA RAID The motherboard provides two high-performance Serial ATA RAID controllers that enables enhanced graphics performance with maximum bandwidth speed of up...2.0 allows connection of additional RAID cards. AGP 8X support AGP 8X (AGP 3.0) is backward compatible with USB 1.1. S/PDIF out The motherboard's S/PDIF out function turns your computer into a high-end entertainment system with RAID 0, RAID 1, RAID 0+1, and multiple RAID functions...
...scanners and printers, and fast storage units. supporting up to powerful speaker systems. See page 2-21. ASUS A8V Deluxe motherboard 1-3 Dual Serial ATA RAID The motherboard provides two high-performance Serial ATA RAID controllers that enables enhanced graphics performance with maximum bandwidth speed of up...2.0 allows connection of additional RAID cards. AGP 8X support AGP 8X (AGP 3.0) is backward compatible with USB 1.1. S/PDIF out The motherboard's S/PDIF out function turns your computer into a high-end entertainment system with RAID 0, RAID 1, RAID 0+1, and multiple RAID functions...

A8V Deluxe User's Manual
Page 18
... with 16-bit DAC, a stereo 16-bit ADC, and an AC97 2.3 compatible multi-channel audio designed for LAN on Motherboard (LOM) applications. AI BIOS solution The AI BIOS is a combination of three ASUS intelligent solutions: Q-Fan 2, POST Reporter™, and CrashFree BIOS 2. This feature helps maintain a more stable network connection. See page...
... with 16-bit DAC, a stereo 16-bit ADC, and an AC97 2.3 compatible multi-channel audio designed for LAN on Motherboard (LOM) applications. AI BIOS solution The AI BIOS is a combination of three ASUS intelligent solutions: Q-Fan 2, POST Reporter™, and CrashFree BIOS 2. This feature helps maintain a more stable network connection. See page...

A8V Deluxe User's Manual
Page 19
... Voice Editor software allows you to restore the previously saved settings. C.P.R. (CPU Parameter Recall) The C.P.R. eliminates the need to overclocking. ASUS A8V Deluxe motherboard 1-5 ASUS POST Reporter™ The motherboard offers an exciting feature called the ASUS POST Reporter™ to enhance system performance while maintaining system stability. See pages 3-3, 4-29 AI Overclocking This feature allows convenient...
... Voice Editor software allows you to restore the previously saved settings. C.P.R. (CPU Parameter Recall) The C.P.R. eliminates the need to overclocking. ASUS A8V Deluxe motherboard 1-5 ASUS POST Reporter™ The motherboard offers an exciting feature called the ASUS POST Reporter™ to enhance system performance while maintaining system stability. See pages 3-3, 4-29 AI Overclocking This feature allows convenient...

A8V Deluxe User's Manual
Page 21
Chapter 2 This chapter lists the hardware setup procedures that you have to perform when installing system components. Hardware information It includes description of the jumpers and connectors on the motherboard.
Chapter 2 This chapter lists the hardware setup procedures that you have to perform when installing system components. Hardware information It includes description of the jumpers and connectors on the motherboard.

A8V Deluxe User's Manual
Page 22
Chapter summary 2.1 Before you proceed 2-1 2.2 Motherboard overview 2-2 2.3 Central Processing Unit (CPU 2-6 2.4 System memory 2-11 2.5 Expansion slots 2-15 2.6 Jumpers 2-18 2.7 Connectors 2-20 ASUS A8V Deluxe motherboard
Chapter summary 2.1 Before you proceed 2-1 2.2 Motherboard overview 2-2 2.3 Central Processing Unit (CPU 2-6 2.4 System memory 2-11 2.5 Expansion slots 2-15 2.6 Jumpers 2-18 2.7 Connectors 2-20 ASUS A8V Deluxe motherboard

A8V Deluxe User's Manual
Page 23
...bag that came with a standby power LED. 2.1 Before you proceed Note of the onboard LED. ® A8V A8V Deluxe Onboard LED SB_PWR ON Standby Power OFF Powered Off ASUS A8V Deluxe motherboard 2-1 When lit, this green LED indicates that the system is detached from the wall socket before touching any component...power supply case, before handling components to avoid damaging them due to static electricity. • Hold components by the edges to the motherboard, peripherals, and/or components. Failure to do so may cause severe damage to avoid touching the ICs on them. • Whenever...
...bag that came with a standby power LED. 2.1 Before you proceed Note of the onboard LED. ® A8V A8V Deluxe Onboard LED SB_PWR ON Standby Power OFF Powered Off ASUS A8V Deluxe motherboard 2-1 When lit, this green LED indicates that the system is detached from the wall socket before touching any component...power supply case, before handling components to avoid damaging them due to static electricity. • Hold components by the edges to the motherboard, peripherals, and/or components. Failure to do so may cause severe damage to avoid touching the ICs on them. • Whenever...


