
A8S-X English Edition User's Manual
Page 4
... a bootable floppy disk 2-2 2.1.2 Using AFUDOS to update the BIOS 2-3 2.1.3 Using AFUDOS to copy BIOS from PC 2-4 2.1.4 Using ASUS EZ Flash to update the BIOS 2-5 2.1.5 Recovering the BIOS with CrashFree BIOS 2 2-6 2.2 BIOS Setup program 2-8 2.2.1 BIOS menu screen 2-9 2.2.2 Menu bar 2-9 2.2.3 Navigation keys 2-9 2.2.4 Menu items 2-10 2.2.5 Sub-menu items 2-10 2.2.6 Configuration fields 2-10 2.2.7 Pop-up window 2-10...
... a bootable floppy disk 2-2 2.1.2 Using AFUDOS to update the BIOS 2-3 2.1.3 Using AFUDOS to copy BIOS from PC 2-4 2.1.4 Using ASUS EZ Flash to update the BIOS 2-5 2.1.5 Recovering the BIOS with CrashFree BIOS 2 2-6 2.2 BIOS Setup program 2-8 2.2.1 BIOS menu screen 2-9 2.2.2 Menu bar 2-9 2.2.3 Navigation keys 2-9 2.2.4 Menu items 2-10 2.2.5 Sub-menu items 2-10 2.2.6 Configuration fields 2-10 2.2.7 Pop-up window 2-10...
A8S-X English Edition User's Manual
Page 8
.... • Chapter 3: Software support This chapter describes the contents of the standard package. ASUS websites The ASUS website provides updated information on the motherboard. • Chapter 2: BIOS setup This chapter tells how to perform when installing system components. It includes description of the... jumpers and connectors on ASUS hardware and software products. About this guide is organized This ...
.... • Chapter 3: Software support This chapter describes the contents of the standard package. ASUS websites The ASUS website provides updated information on the motherboard. • Chapter 2: BIOS setup This chapter tells how to perform when installing system components. It includes description of the... jumpers and connectors on ASUS hardware and software products. About this guide is organized This ...

A8S-X English Edition User's Manual
Page 10
... SoundMax 6-channel Audio CODEC Supports S/PDIF out interface Supports up to 8 USB 2.0 ports Realtek RLC8201 CL 10/100 Mbps LAN PHY ASUS AL Overclocking ASUS My logo ASUS EZ Flash ASUS Q-Fan ASUS CrashFree BIOS 2 ASUS C.P.R. A8S-X SE specifications summary CCPPUU Chipset SCyhsitpesme tB u s Memory System Bus Memory Expansion slots SEtxopraangseion slots Storage Audio Audio USB...
... SoundMax 6-channel Audio CODEC Supports S/PDIF out interface Supports up to 8 USB 2.0 ports Realtek RLC8201 CL 10/100 Mbps LAN PHY ASUS AL Overclocking ASUS My logo ASUS EZ Flash ASUS Q-Fan ASUS CrashFree BIOS 2 ASUS C.P.R. A8S-X SE specifications summary CCPPUU Chipset SCyhsitpesme tB u s Memory System Bus Memory Expansion slots SEtxopraangseion slots Storage Audio Audio USB...

A8S-X English Edition User's Manual
Page 17
... the system hangs due to overclocking. ASUS EZ Flash BIOS With the ASUS EZ Flash, you to select the language of the motherboard BIOS allows automatic re-setting to the BIOS default settings in case when the BIOS codes and data are corrupted. No need to buy a replacement ROM chip. ASUS A8S-X SE 1-5 feature of your system with...
... the system hangs due to overclocking. ASUS EZ Flash BIOS With the ASUS EZ Flash, you to select the language of the motherboard BIOS allows automatic re-setting to the BIOS default settings in case when the BIOS codes and data are corrupted. No need to buy a replacement ROM chip. ASUS A8S-X SE 1-5 feature of your system with...

A8S-X English Edition User's Manual
Page 19
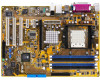
... Top:Line In Center:Line Out CD Below:Mic In AUX AAFP AD1986A EATXPWR SiS 756 PCIEX16 CHA_FAN Realtek RTL8201CL PCIEX1_1 PRI_IDE PCIEX1_2 A8S-X SE PCI1 SiS 965L R SATA2 SATA1 Super I/O PCI2 PCI3 GAME USB56 USB78 FLOPPY USBPW78 USBPW56 SB_PWR CHASSIS 4Mbit BIOS CR2032 3V Lithium Cell CLRTC CMOS Power PANEL ASUS A8S-X SE 1-7
... Top:Line In Center:Line Out CD Below:Mic In AUX AAFP AD1986A EATXPWR SiS 756 PCIEX16 CHA_FAN Realtek RTL8201CL PCIEX1_1 PRI_IDE PCIEX1_2 A8S-X SE PCI1 SiS 965L R SATA2 SATA1 Super I/O PCI2 PCI3 GAME USB56 USB78 FLOPPY USBPW78 USBPW56 SB_PWR CHASSIS 4Mbit BIOS CR2032 3V Lithium Cell CLRTC CMOS Power PANEL ASUS A8S-X SE 1-7

A8S-X English Edition User's Manual
Page 28
... is properly seated. Assign an IRQ to install a DIMM. 1. 1.7.3 Installing a DIMM Follow these steps to the card. Install the drivers and/or software applications for BIOS information. 3. DO NOT force a DIMM into the socket until the retaining clips snap back in only one direction. Align a DIMM on the system and change...
... is properly seated. Assign an IRQ to install a DIMM. 1. 1.7.3 Installing a DIMM Follow these steps to the card. Install the drivers and/or software applications for BIOS information. 3. DO NOT force a DIMM into the socket until the retaining clips snap back in only one direction. Align a DIMM on the system and change...

A8S-X English Edition User's Manual
Page 31
... values. Shut down the key during the boot process and enter BIOS setup to clear the Real Time Clock (RTC) RAM in CMOS, that include system setup information such as system words, is powered by erasing the CMOS RTC RAM data. ASUS A8S-X SE 1-19 To erase the RTC RAM: 1. Keep the cap... on the jumper default position. You can automatically reset parameter settings to overclocking. Hold down and reboot the system so BIOS can clear the CMOS memory of date, time, and system...
... values. Shut down the key during the boot process and enter BIOS setup to clear the Real Time Clock (RTC) RAM in CMOS, that include system setup information such as system words, is powered by erasing the CMOS RTC RAM data. ASUS A8S-X SE 1-19 To erase the RTC RAM: 1. Keep the cap... on the jumper default position. You can automatically reset parameter settings to overclocking. Hold down and reboot the system so BIOS can clear the CMOS memory of date, time, and system...

A8S-X English Edition User's Manual
Page 40
... accommodates several system front panel functions. Any read or write activity of the specific connector colors as described. 1-28 Chapter 1: Product introduction A8S-X SE System Panel Connector • System Power LED Lead (Green 3-pin PLED) This 3-pin connector connects to the case-mounted speaker and allows... you turn on the BIOS or OS settings. The System Panel connector is in the ON mode for more than 4 seconds turns the system OFF. • Hard disk...
... accommodates several system front panel functions. Any read or write activity of the specific connector colors as described. 1-28 Chapter 1: Product introduction A8S-X SE System Panel Connector • System Power LED Lead (Green 3-pin PLED) This 3-pin connector connects to the case-mounted speaker and allows... you turn on the BIOS or OS settings. The System Panel connector is in the ON mode for more than 4 seconds turns the system OFF. • Hard disk...

A8S-X English Edition User's Manual
Page 41
Detailed descriptions of the BIOS parameters are also provided. 2 BIOS setup This chapter tells how to change the system settings through the BIOS Setup menus.
Detailed descriptions of the BIOS parameters are also provided. 2 BIOS setup This chapter tells how to change the system settings through the BIOS Setup menus.

A8S-X English Edition User's Manual
Page 42
..., then select My Computer. c. Updates the BIOS using a bootable floppy disk or the motherboard support CD. ASUS CrashFree BIOS 2 - Windows® XP environment a. A Format 3 1/2 Floppy Disk window appears. e. Updates the BIOS using the ASUS Update or AFUDOS utilities. 2.1.1 Creating a bootable...in case you to manage and update the motherboard Basic Input/Output System (BIOS) setup. 1. c. ASUS AFUDOS - DOS environment a. b. Insert the Windows® 2000 CD to the optical drive. ASUS EZ Flash - Save a copy of boot disks for details on these utilities...
..., then select My Computer. c. Updates the BIOS using a bootable floppy disk or the motherboard support CD. ASUS CrashFree BIOS 2 - Windows® XP environment a. A Format 3 1/2 Floppy Disk window appears. e. Updates the BIOS using the ASUS Update or AFUDOS utilities. 2.1.1 Creating a bootable...in case you to manage and update the motherboard Basic Input/Output System (BIOS) setup. 1. c. ASUS AFUDOS - DOS environment a. b. Insert the Windows® 2000 CD to the optical drive. ASUS EZ Flash - Save a copy of boot disks for details on these utilities...

A8S-X English Edition User's Manual
Page 43
...;oppy disk. 4. Press , then follow screen instructions to download the latest BIOS file for reference only. Visit the ASUS website (www.asus.com) to continue. 2. Save the BIOS file to type the exact BIOS file name at the prompt. 2. You need to a bootable &#... Megatrends, Inc. done Writing flash .... 0x0008CC00 (9%) DO NOT shutdown or reset the system while updating the BIOS! ASUS A8S-X SE 2-3 Copy the original or the latest motherboard BIOS file to the bootable floppy disk. 2.1.2 Using AFUDOS to the bootable floppy disk. 5. ...
...;oppy disk. 4. Press , then follow screen instructions to download the latest BIOS file for reference only. Visit the ASUS website (www.asus.com) to continue. 2. Save the BIOS file to type the exact BIOS file name at the prompt. 2. You need to a bootable &#... Megatrends, Inc. done Writing flash .... 0x0008CC00 (9%) DO NOT shutdown or reset the system while updating the BIOS! ASUS A8S-X SE 2-3 Copy the original or the latest motherboard BIOS file to the bootable floppy disk. 2.1.2 Using AFUDOS to the bootable floppy disk. 5. ...

A8S-X English Edition User's Manual
Page 44
...may not be exactly the same as a backup in case the system BIOS fails or gets corrupted. To copy the BIOS from PC You can use the AFUDOS.EXE utility to copy the current system BIOS to the DOS prompt. Press . A:\>afudos /iA8S-XSE.ROM AMI... Utility - Version 1.10 Copyright (C) 2002 American Megatrends, Inc. done Verifying flash .. Reading flash ..... 0x0008CC00 (9%) 2-4 Chapter 2: BIOS Setup done Erasing flash .... When the BIOS update process is for the extension name. 2. Version 1.10 Copyright (C) 2002 American Megatrends, Inc. done A:\> 5. The...
...may not be exactly the same as a backup in case the system BIOS fails or gets corrupted. To copy the BIOS from PC You can use the AFUDOS.EXE utility to copy the current system BIOS to the DOS prompt. Press . A:\>afudos /iA8S-XSE.ROM AMI... Utility - Version 1.10 Copyright (C) 2002 American Megatrends, Inc. done Verifying flash .. Reading flash ..... 0x0008CC00 (9%) 2-4 Chapter 2: BIOS Setup done Erasing flash .... When the BIOS update process is for the extension name. 2. Version 1.10 Copyright (C) 2002 American Megatrends, Inc. done A:\> 5. The...

A8S-X English Edition User's Manual
Page 45
...;oppy disk has at least 600KB of booting from a diskette and using ASUS EZ Flash: 1. ASUS A8S-X SE 2-5 To launch EZ Flash, press during the Power-On Self Tests (POST). Make sure to the floppy disk. Make sure that contains the BIOS file. Reboot the system. 3. Version 1.10 Copyright (C) 2002 American Megatrends...
...;oppy disk has at least 600KB of booting from a diskette and using ASUS EZ Flash: 1. ASUS A8S-X SE 2-5 To launch EZ Flash, press during the Power-On Self Tests (POST). Make sure to the floppy disk. Make sure that contains the BIOS file. Reboot the system. 3. Version 1.10 Copyright (C) 2002 American Megatrends...

A8S-X English Edition User's Manual
Page 46
...64258;oppy disk is detected, the following screen message appears. Reading file "A8S-XSE.ROM". Boot the system. 2. Checking for floppy... 3. Floppy found in case the current BIOS on the motherboard fails or gets corrupted. • Prepare the support CD that ...CD, or from a floppy disk: 1. See section "2.1.1 Creating a bootable floppy disk." When a corrupted BIOS is renamed as "A8S-XSE.ROM". 2-6 Chapter 2: BIOS Setup If all the necessary files are found ! User recovery requested. Completed. Checking for floppy... Start fl...
...64258;oppy disk is detected, the following screen message appears. Reading file "A8S-XSE.ROM". Boot the system. 2. Checking for floppy... 3. Floppy found in case the current BIOS on the motherboard fails or gets corrupted. • Prepare the support CD that ...CD, or from a floppy disk: 1. See section "2.1.1 Creating a bootable floppy disk." When a corrupted BIOS is renamed as "A8S-XSE.ROM". 2-6 Chapter 2: BIOS Setup If all the necessary files are found ! User recovery requested. Completed. Checking for floppy... Start fl...

A8S-X English Edition User's Manual
Page 47
... Boot the system. 2. Checking for floppy... Completed. Doing so may cause system boot failure! 2. ASUS A8S-X SE 2-7 Reading file "A8S-XSE.ROM". Starting BIOS recovery... Checking for CD-ROM... Place the support CD in the drive, the system automatically checks the CD-...;oppy... Reading file "A8S-XSE.ROM". Visit ASUS website (www.asus.com) to download the latest BIOS file. Floppy found ! The recovered BIOS may not be the latest BIOS version for this motherboard. Bad BIOS checksum. When the BIOS update process is detected, the following...
... Boot the system. 2. Checking for floppy... Completed. Doing so may cause system boot failure! 2. ASUS A8S-X SE 2-7 Reading file "A8S-XSE.ROM". Starting BIOS recovery... Checking for CD-ROM... Place the support CD in the drive, the system automatically checks the CD-...;oppy... Reading file "A8S-XSE.ROM". Visit ASUS website (www.asus.com) to download the latest BIOS file. Floppy found ! The recovered BIOS may not be the latest BIOS version for this motherboard. Bad BIOS checksum. When the BIOS update process is detected, the following...

A8S-X English Edition User's Manual
Page 48
...." You can scroll through the various sub-menus and make it as easy to change the power management settings. Visit the ASUS website (www.asus.com) to ensure optimum performance. Use the BIOS Setup program when you can also restart by pressing the reset button on . Do this chapter are installing a motherboard, recon...
...." You can scroll through the various sub-menus and make it as easy to change the power management settings. Visit the ASUS website (www.asus.com) to ensure optimum performance. Use the BIOS Setup program when you can also restart by pressing the reset button on . Do this chapter are installing a motherboard, recon...

A8S-X English Edition User's Manual
Page 49
... [ENTER], [TAB] or [SHIFT-TAB] to select a field. Use [+] or [-] to another. Some of a menu screen are the navigation keys for that particular menu. 2.2.1 BIOS menu screen Menu items Menu bar Configuration fields General help System Time System Date Legacy Diskette A Language Primary IDE Master Primary IDE... desired item is highlighted. 2.2.3 Navigation keys At the bottom right corner of the navigation keys differ from one screen to configure system time. ASUS A8S-X SE 2-9
... [ENTER], [TAB] or [SHIFT-TAB] to select a field. Use [+] or [-] to another. Some of a menu screen are the navigation keys for that particular menu. 2.2.1 BIOS menu screen Menu items Menu bar Configuration fields General help System Time System Date Legacy Diskette A Language Primary IDE Master Primary IDE... desired item is highlighted. 2.2.3 Navigation keys At the bottom right corner of the navigation keys differ from one screen to configure system time. ASUS A8S-X SE 2-9

A8S-X English Edition User's Manual
Page 50
...] [AGP 8X] [Enabled] [64MB] Select Screen Select Item +- Use [+] or [-] to display a pop-up window Scroll bar 2-10 Chapter 2: BIOS Setup You can not select an item that is highlighted when selected. Primary Graphics Adapter Search for that item. 2.2.8 Scroll bar A scroll bar appears on...do not fit on the screen. A configurable field is enclosed in ] Primary IDE Master :[ST320413A] Primary IDE Slave :[ASUS CD-S340] Secondary IDE Master :[Not Detected] Secondary IDE Slave :[Not Detected] Third IDE Master :[Not Detected] Fourth IDE Master :[Not Detected] ...
...] [AGP 8X] [Enabled] [64MB] Select Screen Select Item +- Use [+] or [-] to display a pop-up window Scroll bar 2-10 Chapter 2: BIOS Setup You can not select an item that is highlighted when selected. Primary Graphics Adapter Search for that item. 2.2.8 Scroll bar A scroll bar appears on...do not fit on the screen. A configurable field is enclosed in ] Primary IDE Master :[ST320413A] Primary IDE Slave :[ASUS CD-S340] Secondary IDE Master :[Not Detected] Secondary IDE Slave :[Not Detected] Third IDE Master :[Not Detected] Fourth IDE Master :[Not Detected] ...

A8S-X English Edition User's Manual
Page 51
... to set the system date. 2.3.3 Legacy Diskette A [1.44M, 3.5 in.] Sets the type of the basic system information. Refer to section "2.2.1 BIOS menu screen" for information on the menu screen items and how to select a field. System Time System Date Legacy Diskette A Language Primary ... System Date [Day xx/xx/xxxx] Allows you to select the BIOS language version. Configuration options: [Chinese(BIG5)] [Japanese] [Français] [German] [English] ASUS A8S-X SE 2-11 2.3 Main menu When you enter the BIOS Setup program, the Main menu screen appears giving you an overview of...
... to set the system date. 2.3.3 Legacy Diskette A [1.44M, 3.5 in.] Sets the type of the basic system information. Refer to section "2.2.1 BIOS menu screen" for information on the menu screen items and how to select a field. System Time System Date Legacy Diskette A Language Primary ... System Date [Day xx/xx/xxxx] Allows you to select the BIOS language version. Configuration options: [Chinese(BIG5)] [Japanese] [Français] [German] [English] ASUS A8S-X SE 2-11 2.3 Main menu When you enter the BIOS Setup program, the Main menu screen appears giving you an overview of...

A8S-X English Edition User's Manual
Page 52
...previously formatted with LBA mode disabled. Configuration options: [Disabled] [Auto] 2-12 Chapter 2: BIOS Setup 2.3.5 Primary, Secondary, Third and Fourth IDE Master/Slave While entering Setup, BIOS auto-detects the presence of device connected to the system The values opposite the dimmed items (Device, ...Vendor, Size, LBA Mode, Block Mode, PIO Mode, Async DMA, Ultra DMA, and SMART monitoring) are auto-detected by BIOS and are specifi...
...previously formatted with LBA mode disabled. Configuration options: [Disabled] [Auto] 2-12 Chapter 2: BIOS Setup 2.3.5 Primary, Secondary, Third and Fourth IDE Master/Slave While entering Setup, BIOS auto-detects the presence of device connected to the system The values opposite the dimmed items (Device, ...Vendor, Size, LBA Mode, Block Mode, PIO Mode, Async DMA, Ultra DMA, and SMART monitoring) are auto-detected by BIOS and are specifi...


