

A8N5X User's Manual for English Edition
Page 8
... are not damaged. These devices could interrupt the grounding circuit. • Make sure that your power supply is broken, do not try to or from the system, ensure that all power cables from the existing system before the signal cables are using an adapter or extension cord. If ... • Before using the product, make sure all cables are correctly connected and the power cables are unplugged. • Seek professional assistance before using , contact your local power company. • If the power supply is set to the correct voltage in your dealer immediately. • To avoid short...
... are not damaged. These devices could interrupt the grounding circuit. • Make sure that your power supply is broken, do not try to or from the system, ensure that all power cables from the existing system before the signal cables are using an adapter or extension cord. If ... • Before using the product, make sure all cables are correctly connected and the power cables are unplugged. • Seek professional assistance before using , contact your local power company. • If the power supply is set to the correct voltage in your dealer immediately. • To avoid short...

A8N5X User's Manual for English Edition
Page 12
... port 1 x PS/2 mouse port 8-channel audio ports 4 Mb Flash ROM, Phoenix-Award BIOS, PnP, DMI2.0, WfM2.0, SM BIOS 2.3 ATX power supply (with external Marvell® PHY supports: - A8N5X specifications summary Internal connectors LAN AI Audio USB Rear panel BIOS features Power Requirement 1 x Floppy disk drive connector 2 x IDE connectors 4 x Serial ATA connectors 1 x CPU fan connector...
... port 1 x PS/2 mouse port 8-channel audio ports 4 Mb Flash ROM, Phoenix-Award BIOS, PnP, DMI2.0, WfM2.0, SM BIOS 2.3 ATX power supply (with external Marvell® PHY supports: - A8N5X specifications summary Internal connectors LAN AI Audio USB Rear panel BIOS features Power Requirement 1 x Floppy disk drive connector 2 x IDE connectors 4 x Serial ATA connectors 1 x CPU fan connector...
A8N5X User's Manual for English Edition
Page 21
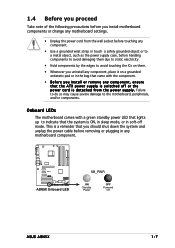
... from the wall socket before touching any component. • Use a grounded wrist strap or touch a safely grounded object or to a metal object, such as the power supply case, before removing or plugging in soft-off or the p o w e r c o r d i s d e t a c h e d f r o m t h e p o w e r s u p p l y . Onboard LEDs The motherboard... off mode. A8N5X ® A8N5X Onboard LED SB_PWR ON Standby Power OFF Powered Off ASUS A8N5X 1-7 Failure to do so may cause severe damage to indicate that the system is ON, in sleep mode, or in any component, ensure that the ATX power supply is a reminder...
... from the wall socket before touching any component. • Use a grounded wrist strap or touch a safely grounded object or to a metal object, such as the power supply case, before removing or plugging in soft-off or the p o w e r c o r d i s d e t a c h e d f r o m t h e p o w e r s u p p l y . Onboard LEDs The motherboard... off mode. A8N5X ® A8N5X Onboard LED SB_PWR ON Standby Power OFF Powered Off ASUS A8N5X 1-7 Failure to do so may cause severe damage to indicate that the system is ON, in sleep mode, or in any component, ensure that the ATX power supply is a reminder...
A8N5X User's Manual for English Edition
Page 29
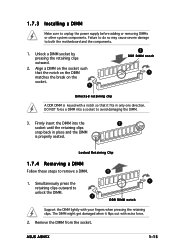
... pressing the retaining clips outward. 2. Firmly insert the DIMM into a socket to unplug the power supply before adding or removing DIMMs or other system components. Simultaneously press the retaining clips outward to both the motherboard and the components. 1. ASUS A8N5X 1-15 Failure to do so may cause severe damage to unlock the DIMM. 1 1 DDR...
... pressing the retaining clips outward. 2. Firmly insert the DIMM into a socket to unplug the power supply before adding or removing DIMMs or other system components. Simultaneously press the retaining clips outward to both the motherboard and the components. 1. ASUS A8N5X 1-15 Failure to do so may cause severe damage to unlock the DIMM. 1 1 DDR...
A8N5X User's Manual for English Edition
Page 40
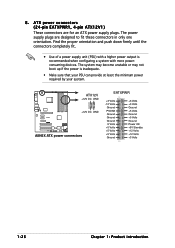
.... Find the proper orientation and push down firmly until the connectors completely fit. • Use of a power supply unit (PSU) with more powerconsuming devices. ATX12V +12V DC GND A8N5X ® +12V DC GND A8N5X ATX power connectors EATXPWR +3 Volts -12 Volts Ground PSON# Ground Ground Ground -5 Volts +5 Volts +5 Volts +5 Volts Ground +3 Volts +3 Volts Ground +5 Volts...
.... Find the proper orientation and push down firmly until the connectors completely fit. • Use of a power supply unit (PSU) with more powerconsuming devices. ATX12V +12V DC GND A8N5X ® +12V DC GND A8N5X ATX power connectors EATXPWR +3 Volts -12 Volts Ground PSON# Ground Ground Ground -5 Volts +5 Volts +5 Volts +5 Volts Ground +3 Volts +3 Volts Ground +5 Volts...

A8N5X User's Manual for English Edition
Page 43
... when the system is in SLEEP or SOFT-OFF mode depending on the BIOS settings. ASUS A8N5X 1-29 The sytem panel connector is for the chassis-mounted system warning speaker. Pressing the power button turns the system ON or puts the system in sleep mode. • Hard ...Yellow 2-pin PWRSW) This connector is for the system power LED. PLED SPEAKER PLED+ PLED+5V Ground Ground Speaker PANEL IDE_LED+ IDE_LED- PWR Ground Reset Ground A8N5X ® A8N5X System panel connector IDE_LED RESET PWRSW * Requires an ATX power supply. Connect the HDD Activity LED cable to the connector ...
... when the system is in SLEEP or SOFT-OFF mode depending on the BIOS settings. ASUS A8N5X 1-29 The sytem panel connector is for the chassis-mounted system warning speaker. Pressing the power button turns the system ON or puts the system in sleep mode. • Hard ...Yellow 2-pin PWRSW) This connector is for the system power LED. PLED SPEAKER PLED+ PLED+5V Ground Ground Speaker PANEL IDE_LED+ IDE_LED- PWR Ground Reset Ground A8N5X ® A8N5X System panel connector IDE_LED RESET PWRSW * Requires an ATX power supply. Connect the HDD Activity LED cable to the connector ...
A8N5X User's Manual for English Edition
Page 77
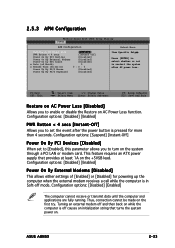
...-off causes an initialization string that provides at least 1A on the first try. ASUS A8N5X 2-33 This feature requires an ATX power supply that turns the system power on the system through a PCI LAN or modem card. Configuration options: [Disabled] [Enabled] Power On By External Modems [Disabled] This allows either settings of Month) x Resume Time...
...-off causes an initialization string that provides at least 1A on the first try. ASUS A8N5X 2-33 This feature requires an ATX power supply that turns the system power on the system through a PCI LAN or modem card. Configuration options: [Disabled] [Enabled] Power On By External Modems [Disabled] This allows either settings of Month) x Resume Time...

A8N5X User's Manual for English Edition
Page 78
... with set to [Enabled], this item is set the time of Month Alarm pop-up menu for the hour field. 2. This feature requires an ATX power supply that provides at least 1A on the +5VSB lead. When this parameter allows you to use the PS/2 mouse to turn on the system.... Power On By RTC Alarm [Disabled] Allows you to enable or disable RTC to the minutes field then press . 4. Key-in a value (Min=0, Max=59), then press . Press to move to display a pop-up menu. This feature requires an ATX power supply that provides at least 1A on...
... with set to [Enabled], this item is set the time of Month Alarm pop-up menu for the hour field. 2. This feature requires an ATX power supply that provides at least 1A on the +5VSB lead. When this parameter allows you to use the PS/2 mouse to turn on the system.... Power On By RTC Alarm [Disabled] Allows you to enable or disable RTC to the minutes field then press . 4. Key-in a value (Min=0, Max=59), then press . Press to move to display a pop-up menu. This feature requires an ATX power supply that provides at least 1A on...


