
A8N-SLI English edition user's manual, version E2068
Page 24
... firmly until the card is already installed in a chassis). 3. Remove the bracket opposite the slot that they support. Secure the card to install expansion cards. Assign an IRQ to unplug the power cord before adding or removing expansion cards. Remove the system unit cover (if your motherboard is completely seated on BIOS setup. 2. Turn on the next page. 3. Install the software drivers for the card. 2. Before installing the expansion card, read the documentation...
... firmly until the card is already installed in a chassis). 3. Remove the bracket opposite the slot that they support. Secure the card to install expansion cards. Assign an IRQ to unplug the power cord before adding or removing expansion cards. Remove the system unit cover (if your motherboard is completely seated on BIOS setup. 2. Turn on the next page. 3. Install the software drivers for the card. 2. Before installing the expansion card, read the documentation...

A8N-SLI English edition user's manual, version E2068
Page 41
... updated using the built-in Flash Memory Writer utility or using the bootable floppy disk you see on the support CD).BIN and save it to (BIOS file name on your optical drive. ASUS A8N-SLI 2-3 From the Open field, type D:\bootdisk\makeboot a: assuming that D: is your screen. Press , then follow screen instructions to the optical drive. Download the latest BIOS file from the Software folder of the support CD to avoid loading a wrong BIOS file. a. Insert a formatted, high...
... updated using the built-in Flash Memory Writer utility or using the bootable floppy disk you see on the support CD).BIN and save it to (BIOS file name on your optical drive. ASUS A8N-SLI 2-3 From the Open field, type D:\bootdisk\makeboot a: assuming that D: is your screen. Press , then follow screen instructions to the optical drive. Download the latest BIOS file from the Software folder of the support CD to avoid loading a wrong BIOS file. a. Insert a formatted, high...

A8N-SLI English edition user's manual, version E2068
Page 45
...8 N - ASUS A8N-SLI 2-7 R O M. Insert the floppy disk with the original or updated BIOS file to restore the BIOS file when it fails or gets corrupted during the updating process. Reading file "A8N-SLI.ROM". 2.1.3 ASUS CrashFree BIOS 2 utility The ASUS CrashFree BIOS is an auto recovery tool that you to the floppy disk drive. 3. Bad BIOS checksum. Completed. Start flashing... You can cause system boot failure! 4. Floppy found , the utility reads the BIOS file and starts flashing the corrupted BIOS file. When found ! Starting BIOS recovery... S L I . The utility displays the...
...8 N - ASUS A8N-SLI 2-7 R O M. Insert the floppy disk with the original or updated BIOS file to restore the BIOS file when it fails or gets corrupted during the updating process. Reading file "A8N-SLI.ROM". 2.1.3 ASUS CrashFree BIOS 2 utility The ASUS CrashFree BIOS is an auto recovery tool that you to the floppy disk drive. 3. Bad BIOS checksum. Completed. Start flashing... You can cause system boot failure! 4. Floppy found , the utility reads the BIOS file and starts flashing the corrupted BIOS file. When found ! Starting BIOS recovery... S L I . The utility displays the...

A8N-SLI English edition user's manual, version E2068
Page 56
... Memory Timing 2T Bottom of 32-bit [31:24] IO DRAM Over 4G Remapping [Disabled] MTRR mapping mode [Continuous] 200Mhz 8T 4T [E0] Select Menu Item Specific Help to select DRAM configuration. [Auto] is recommended. [Manual] allows you to display a pop-up menu with the configuration options. 2.4.2 Chipset configuration The items in this menu show the DRAM-related information that the BIOS auto-detects. Chipset DRAM Configuration Errata 94 Enhanced [Press Enter] [Enabled] Select Menu Item Specific Help DRAM...
... Memory Timing 2T Bottom of 32-bit [31:24] IO DRAM Over 4G Remapping [Disabled] MTRR mapping mode [Continuous] 200Mhz 8T 4T [E0] Select Menu Item Specific Help to select DRAM configuration. [Auto] is recommended. [Manual] allows you to display a pop-up menu with the configuration options. 2.4.2 Chipset configuration The items in this menu show the DRAM-related information that the BIOS auto-detects. Chipset DRAM Configuration Errata 94 Enhanced [Press Enter] [Enabled] Select Menu Item Specific Help DRAM...

A8N-SLI English edition user's manual, version E2068
Page 59
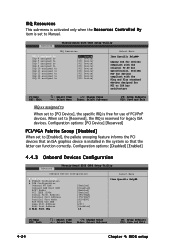
... and is not configurable. Configuration options: [PCI Device] [Reserved] PCI/VGA Palette Snoop [Disabled] Some non-standard VGA cards, like graphics accelerators or MPEG video cards, may not show colors properly. When the item Resources Controlled By is set to Manual. When set to [Reserved], the IRQ is free for PCI or ISA bus architecture. Setting this field to IRQ Resources [PCI Device] [PCI Device] [PCI Device] [PCI Device] [PCI Device] [PCI Device] [PCI Device] [PCI Device] [PCI Device] [PCI Device] Select Menu Item Specific Help Legacy ISA for devices compliant with the...
... and is not configurable. Configuration options: [PCI Device] [Reserved] PCI/VGA Palette Snoop [Disabled] Some non-standard VGA cards, like graphics accelerators or MPEG video cards, may not show colors properly. When the item Resources Controlled By is set to Manual. When set to [Reserved], the IRQ is free for PCI or ISA bus architecture. Setting this field to IRQ Resources [PCI Device] [PCI Device] [PCI Device] [PCI Device] [PCI Device] [PCI Device] [PCI Device] [PCI Device] [PCI Device] [PCI Device] Select Menu Item Specific Help Legacy ISA for devices compliant with the...

A8N-SLI English edition user's manual, version E2068
Page 64
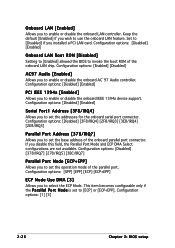
... controller. Configuration options: [Disabled] [Enabled] Serial Port1 Address [3F8/IRQ4] Allows you to enable or disable the onboard LAN controller. Configuration options: [1] [3] 2-26 Chapter 2: BIOS setup Onboard LAN [Enabled] Allows you to set the addresses for the onboard serial port connector. Configuration options: [Disabled] [Enabled] Onboard LAN Boot ROM [Disabled] Setting to [Enabled] allowed the BIOS to select the ECP Mode. Keep the default [Enabled] if you to invoke the boot ROM of the parallel port. Configuration options: [SPP] [EPP] [ECP] [ECP+EPP] ECP Mode Use...
... controller. Configuration options: [Disabled] [Enabled] Serial Port1 Address [3F8/IRQ4] Allows you to enable or disable the onboard LAN controller. Configuration options: [1] [3] 2-26 Chapter 2: BIOS setup Onboard LAN [Enabled] Allows you to set the addresses for the onboard serial port connector. Configuration options: [Disabled] [Enabled] Onboard LAN Boot ROM [Disabled] Setting to [Enabled] allowed the BIOS to select the ECP Mode. Keep the default [Enabled] if you to invoke the boot ROM of the parallel port. Configuration options: [SPP] [EPP] [ECP] [ECP+EPP] ECP Mode Use...

A8N-SLI English edition user's manual, version E2068
Page 86
To enable the multi-GPU feature: 1. Click the N V I D I ™ t e c h n o l o g y s u p p o r t Download the latest driver from the NVIDIA website (www.nvidia.com). 3.2.4 Enabling the multi-GPU feature in Windows® After installing your graphics card package to install the device drivers. From the pop-up menu, select nView Desktop Manager then click n V i e w P r o p e r t i e s. 3.2.3 Installing the device drivers Refer to the documentation that your PCI Express graphics card driver supports the NVIDIA SLI technology. NVIDIA Settings icon 3-10 C h a p t e r 3 : N V I D I ...
To enable the multi-GPU feature: 1. Click the N V I D I ™ t e c h n o l o g y s u p p o r t Download the latest driver from the NVIDIA website (www.nvidia.com). 3.2.4 Enabling the multi-GPU feature in Windows® After installing your graphics card package to install the device drivers. From the pop-up menu, select nView Desktop Manager then click n V i e w P r o p e r t i e s. 3.2.3 Installing the device drivers Refer to the documentation that your PCI Express graphics card driver supports the NVIDIA SLI technology. NVIDIA Settings icon 3-10 C h a p t e r 3 : N V I D I ...
A8N-SLI English edition user's manual, version E2024
Page 62
...installed a PCI LAN card. Configuration options: [SPP] [EPP] [ECP] [ECP+EPP] ECP Mode Use DMA [3] Allows you to enable or disable the onboard LAN controller. Onboard LAN [Enabled] Allows you to select the ECP Mode. Configuration options: [Disabled] [Enabled] Onboard LAN Boot ROM [Disabled] Setting to [Enabled] allowed the BIOS to set the base address of the onboard LAN chip. Configuration options: [Enabled] [Disabled] AC97 Audio [Enabled] Allows you wish to enable or disable the onboard AC`97 Audio controller. Keep the default [Enabled] if you to use the onboard LAN feature. Set...
...installed a PCI LAN card. Configuration options: [SPP] [EPP] [ECP] [ECP+EPP] ECP Mode Use DMA [3] Allows you to enable or disable the onboard LAN controller. Onboard LAN [Enabled] Allows you to select the ECP Mode. Configuration options: [Disabled] [Enabled] Onboard LAN Boot ROM [Disabled] Setting to [Enabled] allowed the BIOS to set the base address of the onboard LAN chip. Configuration options: [Enabled] [Disabled] AC97 Audio [Enabled] Allows you wish to enable or disable the onboard AC`97 Audio controller. Keep the default [Enabled] if you to use the onboard LAN feature. Set...

A8N-SLI English edition user's manual, version E1947
Page 6
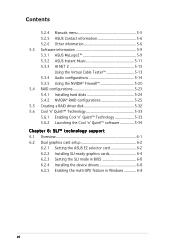
... Quiet!™ software 5-34 5.7 Using the NVIDIA® nTune™ utility 5-35 5.7.1 Managing your nForce™ system 5-35 5.7.2 Clock control 5-36 5.7.3 Voltage/Fan control 5-36 5.7.4 Information 5-37 5.7.5 Other options 5-37 Chapter 6: SLI™ technology support 6.1 Overview 6-1 6.1.1 Requirements 6-1 6.1.2 ASUS Certified SLI Graphics cards 6-1 6.2 Dual graphics card setup 6-3 6.2.1 Setting the ASUS EZ selector card 6-3 6.2.2 Installing SLI-ready graphics cards 6-5 6.2.3 Setting the SLI mode in BIOS 6-9 6.2.4 Installing the device drivers 6-9 6.2.5 Enabling the multi...
... Quiet!™ software 5-34 5.7 Using the NVIDIA® nTune™ utility 5-35 5.7.1 Managing your nForce™ system 5-35 5.7.2 Clock control 5-36 5.7.3 Voltage/Fan control 5-36 5.7.4 Information 5-37 5.7.5 Other options 5-37 Chapter 6: SLI™ technology support 6.1 Overview 6-1 6.1.1 Requirements 6-1 6.1.2 ASUS Certified SLI Graphics cards 6-1 6.2 Dual graphics card setup 6-3 6.2.1 Setting the ASUS EZ selector card 6-3 6.2.2 Installing SLI-ready graphics cards 6-5 6.2.3 Setting the SLI mode in BIOS 6-9 6.2.4 Installing the device drivers 6-9 6.2.5 Enabling the multi...
A8N-SLI English edition user's manual, version E1947
Page 22
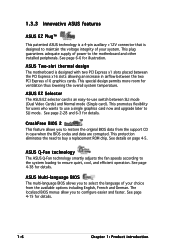
... patented ASUS technology is a 4-pin auxiliary +12V connector that is an easy-to-use a single graphics card now and upgrade later to SLI mode. This protection eliminates the need to use switch between the PCI Express x16 slots allowing an increase in case when the BIOS codes and data are corrupted. ASUS Two-slot thermal design The motherboard is designed with two PCI Express x1 slots placed between SLI mode (Dual Video Cards) and Normal mode (Single card). This plug guarantees adequate supply...
... patented ASUS technology is a 4-pin auxiliary +12V connector that is an easy-to-use a single graphics card now and upgrade later to SLI mode. This protection eliminates the need to use switch between the PCI Express x16 slots allowing an increase in case when the BIOS codes and data are corrupted. ASUS Two-slot thermal design The motherboard is designed with two PCI Express x1 slots placed between SLI mode (Dual Video Cards) and Normal mode (Single card). This plug guarantees adequate supply...
A8N-SLI English edition user's manual, version E1947
Page 41
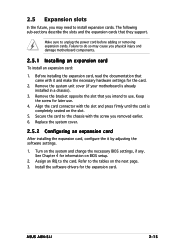
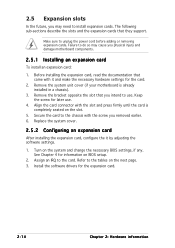
... they support. Remove the system unit cover (if your motherboard is completely seated on the system and change the necessary BIOS settings, if any. ASUS A8N-SLI 2-15 Make sure to use . 4. 2.5 Expansion slots In the future, you may cause you physical injury and damage motherboard components. 2.5.1 Installing an expansion card To install an expansion card: 1. See Chapter 4 for later use . Replace the system cover. 2.5.2 Configuring an expansion card After installing...
... they support. Remove the system unit cover (if your motherboard is completely seated on the system and change the necessary BIOS settings, if any. ASUS A8N-SLI 2-15 Make sure to use . 4. 2.5 Expansion slots In the future, you may cause you physical injury and damage motherboard components. 2.5.1 Installing an expansion card To install an expansion card: 1. See Chapter 4 for later use . Replace the system cover. 2.5.2 Configuring an expansion card After installing...
A8N-SLI English edition user's manual, version E1947
Page 82
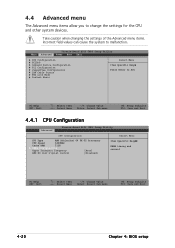
... CPU Type AMD Athlon(tm) 64 FX-55 Processor CPU Speed 3400MHz Cache RAM 512K DRAM Configuration Hyper Transport Frequency [Auto] AMD K8 Cool'n'Quiet control [Disabled] Select Menu Item Specific Help DRAM timing and control F1:Help ESC: Exit ↑↓ : Select Item →←: Select Menu -/+: Change Value Enter: Select Sub-menu F5: Setup Defaults F10: Save and Exit 4-20 Chapter 4: BIOS setup Phoenix-Award BIOS CMOS Setup Utility Main Advanced Power Boot Exit CPU Configuration PCIPnP Onboard Device Configuration SLI Configuration JumperFree Configuration LAN Cable...
... CPU Type AMD Athlon(tm) 64 FX-55 Processor CPU Speed 3400MHz Cache RAM 512K DRAM Configuration Hyper Transport Frequency [Auto] AMD K8 Cool'n'Quiet control [Disabled] Select Menu Item Specific Help DRAM timing and control F1:Help ESC: Exit ↑↓ : Select Item →←: Select Menu -/+: Change Value Enter: Select Sub-menu F5: Setup Defaults F10: Save and Exit 4-20 Chapter 4: BIOS setup Phoenix-Award BIOS CMOS Setup Utility Main Advanced Power Boot Exit CPU Configuration PCIPnP Onboard Device Configuration SLI Configuration JumperFree Configuration LAN Cable...

A8N-SLI English edition user's manual, version E1947
Page 86
... Phoenix-Award BIOS CMOS Setup Utility Onboard Device Configuration IDE Function Setup NVRAID Configuration USB Configuration Onboard NV LAN Onboard LAN Boot ROM AC97 Audio PCI IEEE 1394a Serial Port1 Address Parallel Port Address Parallel Port Mode ECP MOde Use DMA Game Port Address Midi Port Address x Midi Port IRQ [Enabled] [Disabled] [Enabled] [Enabled] [3F8/IRQ4] [378/IRQ7] [ECP+EPP] [3] [201] [Disabled] 10 Select Menu Item Specific Help F1:Help ESC: Exit ↑↓ : Select Item →←: Select Menu -/+: Change Value Enter: Select Sub-menu F5: Setup Defaults F10...
... Phoenix-Award BIOS CMOS Setup Utility Onboard Device Configuration IDE Function Setup NVRAID Configuration USB Configuration Onboard NV LAN Onboard LAN Boot ROM AC97 Audio PCI IEEE 1394a Serial Port1 Address Parallel Port Address Parallel Port Mode ECP MOde Use DMA Game Port Address Midi Port Address x Midi Port IRQ [Enabled] [Disabled] [Enabled] [Enabled] [3F8/IRQ4] [378/IRQ7] [ECP+EPP] [3] [201] [Disabled] 10 Select Menu Item Specific Help F1:Help ESC: Exit ↑↓ : Select Item →←: Select Menu -/+: Change Value Enter: Select Sub-menu F5: Setup Defaults F10...
A8N-SLI English edition user's manual, version E1947
Page 142
... a RAID driver disk A floppy disk with RAID driver into the CD-ROM drive. 2. Refer to chipset limitaion, this motherboard does not support Serial ATA Optical Disk Drives (ODD) under Disk Operating System (DOS). • You cannot create NVIDIA RAID driver disks from SATA ODDs under DOS. • Use an IDE ODD device when creating NVIDIA RAID driver disks in a RAID set. • Due to section "5.2.2 Drivers menu" for the NVIDIA® RAID driver disk utility. Press then insert the floppy disk with the RAID driver is required when installing Windows...
... a RAID driver disk A floppy disk with RAID driver into the CD-ROM drive. 2. Refer to chipset limitaion, this motherboard does not support Serial ATA Optical Disk Drives (ODD) under Disk Operating System (DOS). • You cannot create NVIDIA RAID driver disks from SATA ODDs under DOS. • Use an IDE ODD device when creating NVIDIA RAID driver disks in a RAID set. • Due to section "5.2.2 Drivers menu" for the NVIDIA® RAID driver disk utility. Press then insert the floppy disk with the RAID driver is required when installing Windows...
A8N-SLI English edition user's manual, version E1947
Page 159
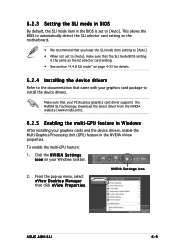
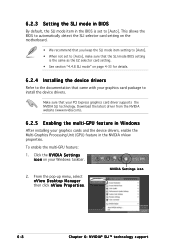
... in Windows After installing your graphics cards and the device drivers, enable the Multi-Graphics Processing Unit (GPU) feature in the BIOS is the same as the EZ selector card setting. • See section "4.4.8 SLI mode" on page 4-33 for details. 6.2.4 Installing the device drivers Refer to install the device drivers. This allows the BIOS to automatically detect the SLI selector card setting on your graphics card package to the documentation that your PCI Express graphics card driver supports the NVIDIA SLI technology...
... in Windows After installing your graphics cards and the device drivers, enable the Multi-Graphics Processing Unit (GPU) feature in the BIOS is the same as the EZ selector card setting. • See section "4.4.8 SLI mode" on page 4-33 for details. 6.2.4 Installing the device drivers Refer to install the device drivers. This allows the BIOS to automatically detect the SLI selector card setting on your graphics card package to the documentation that your PCI Express graphics card driver supports the NVIDIA SLI technology...
A8N-SLI English edition user's manual, version E1815b
Page 6
...5.3.4 Audio configurations 5-14 5.3.5 Using the NVIDIA® Firewall 5-20 5.4 RAID configurations 5-23 5.4.1 Installing hard disks 5-24 5.4.2 NVIDIA® RAID configurations 5-25 5.5 Creating a RAID driver disk 5-32 5.6 Cool 'n' Quiet!™ Technology 5-33 5.6.1 Enabling Cool 'n' Quiet!™ Technology 5-33 5.6.2 Launching the Cool 'n' Quiet!™ software 5-34 Chapter 6: SLI™ technology support 6.1 Overview 6-1 6.2 Dual graphics card setup 6-2 6.2.1 Setting the ASUS EZ selector card 6-2 6.2.2 Installing SLI-ready graphics cards 6-4 6.2.3 Setting the SLI mode in BIOS...
...5.3.4 Audio configurations 5-14 5.3.5 Using the NVIDIA® Firewall 5-20 5.4 RAID configurations 5-23 5.4.1 Installing hard disks 5-24 5.4.2 NVIDIA® RAID configurations 5-25 5.5 Creating a RAID driver disk 5-32 5.6 Cool 'n' Quiet!™ Technology 5-33 5.6.1 Enabling Cool 'n' Quiet!™ Technology 5-33 5.6.2 Launching the Cool 'n' Quiet!™ software 5-34 Chapter 6: SLI™ technology support 6.1 Overview 6-1 6.2 Dual graphics card setup 6-2 6.2.1 Setting the ASUS EZ selector card 6-2 6.2.2 Installing SLI-ready graphics cards 6-4 6.2.3 Setting the SLI mode in BIOS...
A8N-SLI English edition user's manual, version E1815b
Page 40
... and change the necessary BIOS settings, if any. Install the software drivers for information on the slot. 5. Make sure to the card. Turn on the next page. 3. 2.5 Expansion slots In the future, you removed earlier. 6. Remove the bracket opposite the slot that they support. Replace the system cover. 2.5.2 Configuring an expansion card After installing the expansion card, configure the it and make the necessary hardware settings for later use . Refer to the chassis...
... and change the necessary BIOS settings, if any. Install the software drivers for information on the slot. 5. Make sure to the card. Turn on the next page. 3. 2.5 Expansion slots In the future, you removed earlier. 6. Remove the bracket opposite the slot that they support. Replace the system cover. 2.5.2 Configuring an expansion card After installing the expansion card, configure the it and make the necessary hardware settings for later use . Refer to the chassis...
A8N-SLI English edition user's manual, version E1815b
Page 84
... Phoenix-Award BIOS CMOS Setup Utility Onboard Device Configuration IDE Function Setup NVRAID Configuration USB Configuration Onboard NV LAN Onboard LAN Boot ROM AC97 Audio PCI IEEE 1394a Serial Port1 Address Parallel Port Address Parallel Port Mode ECP MOde Use DMA Game Port Address Midi Port Address x Midi Port IRQ [Enabled] [Disabled] [Enabled] [Enabled] [3F8/IRQ4] [378/IRQ7] [ECP+EPP] [3] [201] [Disabled] 10 Select Menu Item Specific Help F1:Help ESC: Exit ↑↓ : Select Item →←: Select Menu -/+: Change Value Enter: Select Sub-menu F5: Setup Defaults F10...
... Phoenix-Award BIOS CMOS Setup Utility Onboard Device Configuration IDE Function Setup NVRAID Configuration USB Configuration Onboard NV LAN Onboard LAN Boot ROM AC97 Audio PCI IEEE 1394a Serial Port1 Address Parallel Port Address Parallel Port Mode ECP MOde Use DMA Game Port Address Midi Port Address x Midi Port IRQ [Enabled] [Disabled] [Enabled] [Enabled] [3F8/IRQ4] [378/IRQ7] [ECP+EPP] [3] [201] [Disabled] 10 Select Menu Item Specific Help F1:Help ESC: Exit ↑↓ : Select Item →←: Select Menu -/+: Change Value Enter: Select Sub-menu F5: Setup Defaults F10...
A8N-SLI English edition user's manual, version E1815b
Page 138
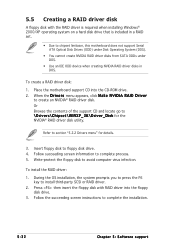
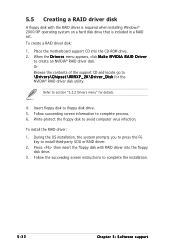
... Drivers menu" for the NVIDIA® RAID driver disk utility. 5.5 Creating a RAID driver disk A floppy disk with RAID driver into the CD-ROM drive. 2. Refer to avoid computer virus infection. Follow the succeeding screen instructions to floppy disk drive. 5. Insert floppy disk to complete the installation. 5-32 Chapter 5: Software support To install the RAID driver: 1. Press then insert the floppy disk with the RAID driver is required when installing Windows® 2000/XP operating system on a hard disk drive that is included in a RAID set. To create a RAID driver disk...
... Drivers menu" for the NVIDIA® RAID driver disk utility. 5.5 Creating a RAID driver disk A floppy disk with RAID driver into the CD-ROM drive. 2. Refer to avoid computer virus infection. Follow the succeeding screen instructions to floppy disk drive. 5. Insert floppy disk to complete the installation. 5-32 Chapter 5: Software support To install the RAID driver: 1. Press then insert the floppy disk with the RAID driver is required when installing Windows® 2000/XP operating system on a hard disk drive that is included in a RAID set. To create a RAID driver disk...
A8N-SLI English edition user's manual, version E1815b
Page 150
... feature in Windows After installing your graphics cards and the device drivers, enable the Multi-Graphics Processing Unit (GPU) feature in the BIOS is set to [Auto], make sure that the SLI mode BIOS setting is the same as the EZ selector card setting. • See section "4.4.8 SLI mode" on page 4-33 for details. 6.2.4 Installing the device drivers Refer to the documentation that your PCI Express graphics card driver supports the NVIDIA SLI technology. NVIDIA Settings icon 6-8 C h a p t e r 6 : N V I D I A® S L I A S e t t i n g s i c o n on the motherboard. •...
... feature in Windows After installing your graphics cards and the device drivers, enable the Multi-Graphics Processing Unit (GPU) feature in the BIOS is set to [Auto], make sure that the SLI mode BIOS setting is the same as the EZ selector card setting. • See section "4.4.8 SLI mode" on page 4-33 for details. 6.2.4 Installing the device drivers Refer to the documentation that your PCI Express graphics card driver supports the NVIDIA SLI technology. NVIDIA Settings icon 6-8 C h a p t e r 6 : N V I D I A® S L I A S e t t i n g s i c o n on the motherboard. •...


