A7V8X-X User Manual
Page 39
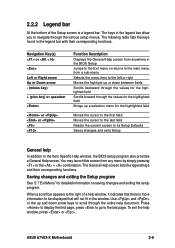
...display the first page, press to go to be displayed that there is a legend bar. The following table lists the keys found in the window. ASUS A7V8X-X Motherboard 2-9 Saving changes and exiting the Setup program See "2.7 Exit Menu" for the highlighted field Moves the cursor to the first field Moves... the cursor to the last field Resets the current screen to its Setup Defaults Saves changes and exits Setup General help window, it indicates that will not fit in the legend bar with their corresponding functions. Navigation Key(s) or Left or Right arrow Up or...
...display the first page, press to go to be displayed that there is a legend bar. The following table lists the keys found in the window. ASUS A7V8X-X Motherboard 2-9 Saving changes and exiting the Setup program See "2.7 Exit Menu" for the highlighted field Moves the cursor to the first field Moves... the cursor to the last field Resets the current screen to its Setup Defaults Saves changes and exits Setup General help window, it indicates that will not fit in the legend bar with their corresponding functions. Navigation Key(s) or Left or Right arrow Up or...

A7V8X-X User Manual
Page 40
Practice navigating through the Setup program, note that explanations appear in the Item Specific Help window located to the right of the fields, use the set default hot key to field within a sub-menu as shown on the left of certain ... the time that you specify (usually the current time). If you would within a menu. While moving around through the various menus and sub-menus. This window displays the help text for a field parameter. This pointer indicates that you enter the Setup program, the following screen appears. Take some time to 59...
Practice navigating through the Setup program, note that explanations appear in the Item Specific Help window located to the right of the fields, use the set default hot key to field within a sub-menu as shown on the left of certain ... the time that you specify (usually the current time). If you would within a menu. While moving around through the various menus and sub-menus. This window displays the help text for a field parameter. This pointer indicates that you enter the Setup program, the following screen appears. Take some time to 59...
A7V8X-X User Manual
Page 52
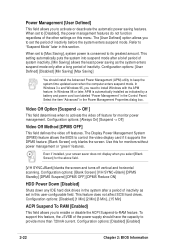
... and power cord icon labeled "Power Management" in this section. Configuration options: [Disabled] [Enabled] 2-22 Chapter 2: BIOS Information In Windows 3.x and Windows 95, you need to activate or deactivate the automatic power saving features. Power Management [User Defined] This field allows you to install...system power is automatically installed as the system enters suspend mode only after a period of inactivity as set the period of inactivity. In Windows 98 or later, APM is conserved to control the video display card if it supports the DPMS feature. [Blank Screen] only blanks ...
... and power cord icon labeled "Power Management" in this section. Configuration options: [Disabled] [Enabled] 2-22 Chapter 2: BIOS Information In Windows 3.x and Windows 95, you need to activate or deactivate the automatic power saving features. Power Management [User Defined] This field allows you to install...system power is automatically installed as the system enters suspend mode only after a period of inactivity as set the period of inactivity. In Windows 98 or later, APM is conserved to control the video display card if it supports the DPMS feature. [Blank Screen] only blanks ...

A7V8X-X User Manual
Page 57
...exit. Pressing saves the changes while exiting. Load Setup Defaults This option allows you want to save your selections, choose this option, a confirmation window appears. Discard Changes This option allows you to load the default values for a confirmation before exiting. Save Changes This option saves your selections ...legend bar to the non-volatile RAM. Pressing does not immediately exit this option, a confirmation appears. Select [Yes] to load default values. ASUS A7V8X-X Motherboard 2-27 When you made to fields other changes before exiting.
...exit. Pressing saves the changes while exiting. Load Setup Defaults This option allows you want to save your selections, choose this option, a confirmation window appears. Discard Changes This option allows you to load the default values for a confirmation before exiting. Save Changes This option saves your selections ...legend bar to the non-volatile RAM. Pressing does not immediately exit this option, a confirmation appears. Select [Yes] to load default values. ASUS A7V8X-X Motherboard 2-27 When you made to fields other changes before exiting.

A7V8X-X User Manual
Page 60
... in your CD-ROM drive. Always install the latest OS version and corresponding updates so you can maximize the features of your computer. Visit the ASUS website for more information If Autorun is enabled in this chapter for general reference only. Click an item to install Click an icon to change... file ASSETUP.EXE from the BIN folder. The contents of the support CD to run the CD. 3-2 Chapter 3: Starting-Up 3.1 Install an operating system The A7V8X-X motherboard supports Windows ME/NT/2000/XP operating systems (OS).
... in your CD-ROM drive. Always install the latest OS version and corresponding updates so you can maximize the features of your computer. Visit the ASUS website for more information If Autorun is enabled in this chapter for general reference only. Click an item to install Click an icon to change... file ASSETUP.EXE from the BIN folder. The contents of the support CD to run the CD. 3-2 Chapter 3: Starting-Up 3.1 Install an operating system The A7V8X-X motherboard supports Windows ME/NT/2000/XP operating systems (OS).
A7V8X-X User Manual
Page 63
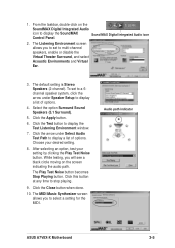
...channel). Select the option Surround Sound Speakers (5.1 Surround). 5. The MIDI Music Synthesizer screen allows you to display the Test Listening Environment window. 7. Sound MAX Digital Integrated Audio icon 2. Click the Apply button. 6. While testing, you to set to a 6channel speaker ... Choose your setting by clicking the Play Test Noise button. After selecting an option, test your desired setting. 8. Audio path indicator ASUS A7V8X-X Motherboard 3-5 From the taskbar, double-click on the screen indicating the audio path. The Play Test Noise button becomes Stop Playing ...
...channel). Select the option Surround Sound Speakers (5.1 Surround). 5. The MIDI Music Synthesizer screen allows you to display the Test Listening Environment window. 7. Sound MAX Digital Integrated Audio icon 2. Click the Apply button. 6. While testing, you to set to a 6channel speaker ... Choose your setting by clicking the Play Test Noise button. After selecting an option, test your desired setting. 8. Audio path indicator ASUS A7V8X-X Motherboard 3-5 From the taskbar, double-click on the screen indicating the audio path. The Play Test Noise button becomes Stop Playing ...

A7V8X-X User Manual
Page 64
... the system, click on the volume control icon on the Microphone Advanced button to display the Advanced Controls for Volume Control window appears. Check the box opposite Mic2 Select to display a list of your desired setting. 12. The Advanced Controls for Microphone... microphone settings 1. Click the arrow under Synthesizer Default Set to enable the front panel microphone, if you installed a front panel audio device such as the ASUS iPanel. 3. Click Apply, then click OK when done. Only one microphone port works at a time. 3-6 Chapter 3: Starting-Up To achieve 6-channel...
... the system, click on the volume control icon on the Microphone Advanced button to display the Advanced Controls for Volume Control window appears. Check the box opposite Mic2 Select to display a list of your desired setting. 12. The Advanced Controls for Microphone... microphone settings 1. Click the arrow under Synthesizer Default Set to enable the front panel microphone, if you installed a front panel audio device such as the ASUS iPanel. 3. Click Apply, then click OK when done. Only one microphone port works at a time. 3-6 Chapter 3: Starting-Up To achieve 6-channel...


