
A7V8X-MX SE User's Manual
Page 6
... humidity, and temperature extremes. If you encounter technical problems with the package. • Before using the product, make sure all the manuals that the power cables for the devices are unplugged before the signal cables are unplugged. • Seek professional assistance before using , contact ... the system, ensure that came with the product, contact a qualified service technician or your retailer. Operation safety • Before installing the motherboard and adding devices on a stable surface. • If you detect any area where it may become wet. • Place the product...
... humidity, and temperature extremes. If you encounter technical problems with the package. • Before using the product, make sure all the manuals that the power cables for the devices are unplugged before the signal cables are unplugged. • Seek professional assistance before using , contact ... the system, ensure that came with the product, contact a qualified service technician or your retailer. Operation safety • Before installing the motherboard and adding devices on a stable surface. • If you detect any area where it may become wet. • Place the product...

A7V8X-MX SE User's Manual
Page 41
... and sectors per track for drives with your selections on this field, set the IDE Primary Master field to [Manual] and the Access Mode to the Main menu. ASUS A7V8X-MX SE motherboard user guide 2-11 This is necessary so that LBA Mode is used without regard for this field.... [Manual] & [CHS] Settings IDE Primary Master IDE HDD Auto-Detection [Press Enter] IDE Primary Master Access Mode [Manual] [CHS] Capacity 40020 MB Cylinder...
... and sectors per track for drives with your selections on this field, set the IDE Primary Master field to [Manual] and the Access Mode to the Main menu. ASUS A7V8X-MX SE motherboard user guide 2-11 This is necessary so that LBA Mode is used without regard for this field.... [Manual] & [CHS] Settings IDE Primary Master IDE HDD Auto-Detection [Press Enter] IDE Primary Master Access Mode [Manual] [CHS] Capacity 40020 MB Cylinder...

A7V8X-MX SE User's Manual
Page 44
...AGP interface only provides a peak data throughput of mapped memory for AGP graphic data. Press to AGP 1X video card. Configuration options: [Auto] [Manual] AGP Driving Value [DA] This item is backward-compatible to assign a hexadecimal AGP Driving Value. If you install an AGP 8X card, an... [8X] option appears in the configuration options. When set the AGP Driving Control to automatically select or manually assign the AGP Driving Value. This motherboard also supports the AGP 8X interface. AGP & P2P Bridge Control AGP & P2P Bridge Control AGP Aperture Size AGP Mode...
...AGP interface only provides a peak data throughput of mapped memory for AGP graphic data. Press to AGP 1X video card. Configuration options: [Auto] [Manual] AGP Driving Value [DA] This item is backward-compatible to assign a hexadecimal AGP Driving Value. If you install an AGP 8X card, an... [8X] option appears in the configuration options. When set the AGP Driving Control to automatically select or manually assign the AGP Driving Value. This motherboard also supports the AGP 8X interface. AGP & P2P Bridge Control AGP & P2P Bridge Control AGP Aperture Size AGP Mode...
A7V8X-MX SE User's Manual
Page 45
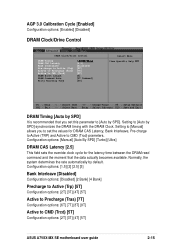
Setting to [Manual] allows you set the values for the latency time between the DRAM read command and the moment that you to set this parameter to [Auto ... data actually becomes available. Configuration options: [Manual] [Auto By SPD] [Turbo] [Ultra] DRAM CAS Latency [2.5] This field sets the override clock cycle for DRAM CAS Latency, Bank Interleave, Pre-charge to Active (TRP) and Active to CMD (Trcd) [5T] Configuration options: [2T] [3T] [4T] [5T] ASUS A7V8X-MX SE motherboard user guide 2-15 Configuration options: [1.5] [2] [2.5] [3] Bank...
Setting to [Manual] allows you set the values for the latency time between the DRAM read command and the moment that you to set this parameter to [Auto ... data actually becomes available. Configuration options: [Manual] [Auto By SPD] [Turbo] [Ultra] DRAM CAS Latency [2.5] This field sets the override clock cycle for DRAM CAS Latency, Bank Interleave, Pre-charge to Active (TRP) and Active to CMD (Trcd) [5T] Configuration options: [2T] [3T] [4T] [5T] ASUS A7V8X-MX SE motherboard user guide 2-15 Configuration options: [1.5] [2] [2.5] [3] Bank...

A7V8X-MX SE User's Manual
Page 51
...Device] [PCI Device] Select Menu Item Specific Help Where resources are controlled manually, assign each system interrupt a type, depending on the type of device using the interrupt. Configuration options: [PCI Devices] [Reserved] ASUS A7V8X-MX SE motherboard user guide 2-21 IRQ Resources IRQ Resources IRQ 3 assigned to IRQ 4... to IRQ 14 assigned to IRQ 15 assigned to [Reserved] reserves the IRQ address. Select [PCI Device] to assign an IRQ address to [Manual]. F1 : Help ↑↓ : Select Item -/+ : Change Value F5 : Setup Defaults ESC : Exit →← : Select Menu...
...Device] [PCI Device] Select Menu Item Specific Help Where resources are controlled manually, assign each system interrupt a type, depending on the type of device using the interrupt. Configuration options: [PCI Devices] [Reserved] ASUS A7V8X-MX SE motherboard user guide 2-21 IRQ Resources IRQ Resources IRQ 3 assigned to IRQ 4... to IRQ 14 assigned to IRQ 15 assigned to [Reserved] reserves the IRQ address. Select [PCI Device] to assign an IRQ address to [Manual]. F1 : Help ↑↓ : Select Item -/+ : Change Value F5 : Setup Defaults ESC : Exit →← : Select Menu...

A7V8X-MX SE User's Manual
Page 61
... activate the devices. 3.2.2 Drivers menu The drivers menu displays the available device drivers for the onboard VGA. USB 2.0 Driver This item installs the USB 2.0 driver. ASUS A7V8X-MX motherboard user manual 3-3 Install the necessary drivers to install the KM400 display driver for this...
... activate the devices. 3.2.2 Drivers menu The drivers menu displays the available device drivers for the onboard VGA. USB 2.0 Driver This item installs the USB 2.0 driver. ASUS A7V8X-MX motherboard user manual 3-3 Install the necessary drivers to install the KM400 display driver for this...

A7V8X-MX SE User's Manual
Page 63
Screen display and driver options may not be the same for other operating system versions. ASUS A7V8X-MX motherboard user manual 3-5 3.2.4 ASUS contact information Click the Contact tab to display ASUS contact information.
Screen display and driver options may not be the same for other operating system versions. ASUS A7V8X-MX motherboard user manual 3-5 3.2.4 ASUS contact information Click the Contact tab to display ASUS contact information.


