Motherboard DIY Troubleshooting Guide
Page 4
FEATURES 8 2.1 The ASUS A7V-E 8 2.1.1 Specifications 8 2.1.2 Special Features 10 2.1.3 Optional Components 10 2.1.4 Performance Features 10 2.1.5 Intelligence 11 2.2 Motherboard Components 12 2.2.1 Component Locations 13 3. HARDWARE SETUP 14 3.1 Motherboard Layout 14 3.2 Layout Contents 15 3.3 Hardware Setup Procedure 16 3.4 Motherboard Settings 16 3.5 System Memory (DIMM 20 3.5.1 General DIMM Notes 20 3.5.2 Memory Installation 21 3.6 Central Processing Unit (CPU 23...
FEATURES 8 2.1 The ASUS A7V-E 8 2.1.1 Specifications 8 2.1.2 Special Features 10 2.1.3 Optional Components 10 2.1.4 Performance Features 10 2.1.5 Intelligence 11 2.2 Motherboard Components 12 2.2.1 Component Locations 13 3. HARDWARE SETUP 14 3.1 Motherboard Layout 14 3.2 Layout Contents 15 3.3 Hardware Setup Procedure 16 3.4 Motherboard Settings 16 3.5 System Memory (DIMM 20 3.5.1 General DIMM Notes 20 3.5.2 Memory Installation 21 3.6 Central Processing Unit (CPU 23...
Motherboard DIY Troubleshooting Guide
Page 8
...CPU external (FSB) frequency settings to 100MB/sec; USB controller with root hub and four function ports. • PC133 SDRAM / VC133 VCM Support: Equipped with AGP 2.0 specifications for 6 PCI masters. VC SDRAM is a new DRAM core architecture that support four ATA devices on two channels. Appendix). 8 ASUS A7V-E User's Manual 2. FEATURES 2.1 The ASUS A7V-E The ASUS A7V... to 1GB of frequency and Vcore voltage all through an optional onboard Realtek Fast Ethernet Controller or an optional ASUS PCI-L101 10/100 Fast Ethernet PCI card (see 7. FEA TURES Specifications 2.
...CPU external (FSB) frequency settings to 100MB/sec; USB controller with root hub and four function ports. • PC133 SDRAM / VC133 VCM Support: Equipped with AGP 2.0 specifications for 6 PCI masters. VC SDRAM is a new DRAM core architecture that support four ATA devices on two channels. Appendix). 8 ASUS A7V-E User's Manual 2. FEATURES 2.1 The ASUS A7V-E The ASUS A7V... to 1GB of frequency and Vcore voltage all through an optional onboard Realtek Fast Ethernet Controller or an optional ASUS PCI-L101 10/100 Fast Ethernet PCI card (see 7. FEA TURES Specifications 2.
Motherboard DIY Troubleshooting Guide
Page 9
ASUS A7V-E User's Manual 9 FEATURES • Wake-On-Ring Connector: Supports Wake-On-Ring activity ...an easy way to examine and manage system status information, such as CPU and systerm voltages, temperatures, and fan status through the onboard hardware monitoring and the bundled ASUS PC Probe. • SMBus: Features the System Management Bus interface,...PCI transfers from PCI master busses to the memory and processor. • Smart BIOS: 2Mb firmware provides Vcore and CPU/SDRAM frequency adjustments, boot block write protection, and HD/SCSI/MO/ZIP/CD/Floppy boot selection. • Integrated...
ASUS A7V-E User's Manual 9 FEATURES • Wake-On-Ring Connector: Supports Wake-On-Ring activity ...an easy way to examine and manage system status information, such as CPU and systerm voltages, temperatures, and fan status through the onboard hardware monitoring and the bundled ASUS PC Probe. • SMBus: Features the System Management Bus interface,...PCI transfers from PCI master busses to the memory and processor. • Smart BIOS: 2Mb firmware provides Vcore and CPU/SDRAM frequency adjustments, boot block write protection, and HD/SCSI/MO/ZIP/CD/Floppy boot selection. • Integrated...
Motherboard DIY Troubleshooting Guide
Page 11
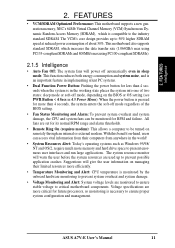
... systems such as Windows 95/98/ NT and OS/2, require much more critical for more efficiently. • Temperature Monitoring and Alert: CPU temperature is in 4.5 Power Menu). This motherboard also supports standard SDRAM, which is necessary to be monitored for its normal RPM range...prevent possible application crashes. With this benefit on-hand, users can be turned on managing their computers from anywhere in sleep mode. ASUS A7V-E User's Manual 11 FEA TURES Intelligence 2. The VCM's core design provides up to present enormous user interfaces and run large applications...
... systems such as Windows 95/98/ NT and OS/2, require much more critical for more efficiently. • Temperature Monitoring and Alert: CPU temperature is in 4.5 Power Menu). This motherboard also supports standard SDRAM, which is necessary to be monitored for its normal RPM range...prevent possible application crashes. With this benefit on-hand, users can be turned on managing their computers from anywhere in sleep mode. ASUS A7V-E User's Manual 11 FEA TURES Intelligence 2. The VCM's core design provides up to present enormous user interfaces and run large applications...
Motherboard DIY Troubleshooting Guide
Page 12
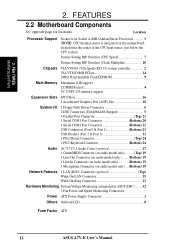
... for Socket A AMD Athlon/Duron Processors 3 (NOTE: CPU thermal sensor is integrated on the motherboard, located near the center of the CPU heat source, just below the CPU socket) Feature Setting DIP Switches (CPU Speed 7 Feature Setting DIP Switches (Clock Multiplier 10 Chipsets...On-Ring Connector 13 Hardware Monitoring System Voltage Monitoring (integrated in ASUS ASIC) ....... 12 3 Fan Power and Speed Monitoring Connectors Power ATX Power Supply Connector 1 Others Onboard LED 8 Form Factor ATX 12 ASUS A7V-E User's Manual Location Processor Support Socket A for locations. ...
... for Socket A AMD Athlon/Duron Processors 3 (NOTE: CPU thermal sensor is integrated on the motherboard, located near the center of the CPU heat source, just below the CPU socket) Feature Setting DIP Switches (CPU Speed 7 Feature Setting DIP Switches (Clock Multiplier 10 Chipsets...On-Ring Connector 13 Hardware Monitoring System Voltage Monitoring (integrated in ASUS ASIC) ....... 12 3 Fan Power and Speed Monitoring Connectors Power ATX Power Supply Connector 1 Others Onboard LED 8 Form Factor ATX 12 ASUS A7V-E User's Manual Location Processor Support Socket A for locations. ...
Motherboard DIY Troubleshooting Guide
Page 15
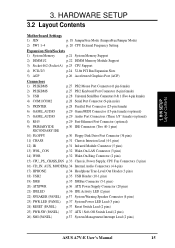
...Memory p.21 System Memory Support 2) DIMM1/2 p.22 DIMM Memory Module Support 3) Socket 462 (Socket A) p.23 CPU Support 4) PCI1/2/3 p.24 32-bit PCI Bus Expansion Slots 5) AGP p.26 Accelerated Graphics Port (AGP) Connectors ...(3 pins) 14) WOR p.32 Wake-On-Ring Connector (2 pins) 15) CPU_,PS_,CHASS_FAN p.33 Chassis, Power Supply, CPU Fan Connectors (3 pins) 16) CD_IN, AUX, MODEM p.34 Internal Audio Connectors (4 4-pin) 17) HPHONE p.34 Headphone True... pins) 26) SMI (PANEL) p.37 System Management Interrupt Lead (2 pins) ASUS A7V-E User's Manual 15 H/W SETUP Layout Contents 3. 3.
...Memory p.21 System Memory Support 2) DIMM1/2 p.22 DIMM Memory Module Support 3) Socket 462 (Socket A) p.23 CPU Support 4) PCI1/2/3 p.24 32-bit PCI Bus Expansion Slots 5) AGP p.26 Accelerated Graphics Port (AGP) Connectors ...(3 pins) 14) WOR p.32 Wake-On-Ring Connector (2 pins) 15) CPU_,PS_,CHASS_FAN p.33 Chassis, Power Supply, CPU Fan Connectors (3 pins) 16) CD_IN, AUX, MODEM p.34 Internal Audio Connectors (4 4-pin) 17) HPHONE p.34 Headphone True... pins) 26) SMI (PANEL) p.37 System Management Interrupt Lead (2 pins) ASUS A7V-E User's Manual 15 H/W SETUP Layout Contents 3. 3.
Motherboard DIY Troubleshooting Guide
Page 16
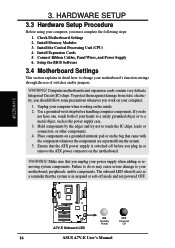
... from the system. 5. If you work on the motherboard. Install the Central Processing Unit (CPU) 4. Connect Ribbon Cables, Panel Wires, and Power Supply 6. H/W SETUP 01 01 ® A7V-E A7V-E Onboard LED ON Standby Power OFF Powered Off 16 ASUS A7V-E User's Manual Install Expansion Cards 5. Computer motherboards and expansion cards contain very delicate Integrated Circuit...
... from the system. 5. If you work on the motherboard. Install the Central Processing Unit (CPU) 4. Connect Ribbon Cables, Panel Wires, and Power Supply 6. H/W SETUP 01 01 ® A7V-E A7V-E Onboard LED ON Standby Power OFF Powered Off 16 ASUS A7V-E User's Manual Install Expansion Cards 5. Computer motherboards and expansion cards contain very delicate Integrated Circuit...
Motherboard DIY Troubleshooting Guide
Page 17
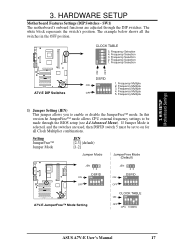
... Settings (DIP Switches - The example below shows all Clock Multiplier combinations. CLOCK TABLE 5. In this version he JumperFree™ mode allows CPU external frequency settings to be set to enable or disable the JumperFree™ mode. SW1) The motherboard's onboard functions are used, then ...8482; Jumper Mode JEN [2-3] (default) [1-2] Jumper Mode JumperFree Mode (Default) JEN 12 DSFID ON ON OFF 1 2345 ® A7V-E A7V-E JumperFree™ Mode Setting JEN 23 DSFID ON ON OFF 1 2345 CLOCK TABLE ON ON OFF 1234 5 CPU 100MHz ASUS A7V-E User's Manual 17
... Settings (DIP Switches - The example below shows all Clock Multiplier combinations. CLOCK TABLE 5. In this version he JumperFree™ mode allows CPU external frequency settings to be set to enable or disable the JumperFree™ mode. SW1) The motherboard's onboard functions are used, then ...8482; Jumper Mode JEN [2-3] (default) [1-2] Jumper Mode JumperFree Mode (Default) JEN 12 DSFID ON ON OFF 1 2345 ® A7V-E A7V-E JumperFree™ Mode Setting JEN 23 DSFID ON ON OFF 1 2345 CLOCK TABLE ON ON OFF 1234 5 CPU 100MHz ASUS A7V-E User's Manual 17
Motherboard DIY Troubleshooting Guide
Page 18
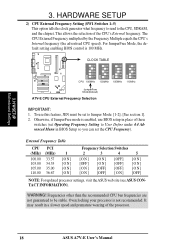
To use BIOS setup in place of these switches (set the CPU Frequency). This allows the selection of the processor. 18 ASUS A7V-E User's Manual CLOCK TABLE 01 01 ON 1234 5 ON 1234 5 ON 1234 5 ON 1234 5 CPU 100MHz 103MHz 105MHz 110MHz ® JumperFree A7V-E Mode(Default) A7V-E CPU External Frequency Selection IMPORTANT: 1. Otherwise, if JumperFree mode is...
To use BIOS setup in place of these switches (set the CPU Frequency). This allows the selection of the processor. 18 ASUS A7V-E User's Manual CLOCK TABLE 01 01 ON 1234 5 ON 1234 5 ON 1234 5 ON 1234 5 CPU 100MHz 103MHz 105MHz 110MHz ® JumperFree A7V-E Mode(Default) A7V-E CPU External Frequency Selection IMPORTANT: 1. Otherwise, if JumperFree mode is...
Motherboard DIY Troubleshooting Guide
Page 19
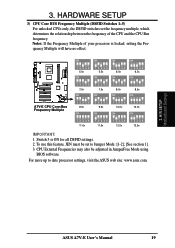
Notes: If the Frequency Multiple of the CPU and the CPU Bus frequency. H/W SETUP Motherboard Settings ASUS A7V-E User's Manual 19 HARDWARE SETUP 3) CPU Core BUS Frequency Multiple (DSFID Switches 1-5) For unlocked CPUs only, the DSFID switches set to date processor settings, visit the ASUS web site: www.asus.com. 3. To use this feature, JEN must be adjusted...
Notes: If the Frequency Multiple of the CPU and the CPU Bus frequency. H/W SETUP Motherboard Settings ASUS A7V-E User's Manual 19 HARDWARE SETUP 3) CPU Core BUS Frequency Multiple (DSFID Switches 1-5) For unlocked CPUs only, the DSFID switches set to date processor settings, visit the ASUS web site: www.asus.com. 3. To use this feature, JEN must be adjusted...
Motherboard DIY Troubleshooting Guide
Page 20
... level) unbuffered Synchronous Dynamic Random Access Memory (SDRAM) of the DIMM takes up one row on this motherboard. • For the system CPU bus to operate at 100MHz/133MHz, use can handle the specified SDRAM MHz or else bootup will not be compatible with current PC133 SDRAM specification..., 128, 256, or 512MB to form a memory size between 8MB to 1GB. Two sockets are not supported. • SDRAMs used must be possible. 20 ASUS A7V-E User's Manual One side (with VCM SDRAMs. Install memory in 16, 32, 64,128, 256MB; H/W SETUP System Memory 3.5 System Memory (DIMM) This ...
... level) unbuffered Synchronous Dynamic Random Access Memory (SDRAM) of the DIMM takes up one row on this motherboard. • For the system CPU bus to operate at 100MHz/133MHz, use can handle the specified SDRAM MHz or else bootup will not be compatible with current PC133 SDRAM specification..., 128, 256, or 512MB to form a memory size between 8MB to 1GB. Two sockets are not supported. • SDRAMs used must be possible. 20 ASUS A7V-E User's Manual One side (with VCM SDRAMs. Install memory in 16, 32, 64,128, 256MB; H/W SETUP System Memory 3.5 System Memory (DIMM) This ...
Motherboard DIY Troubleshooting Guide
Page 23
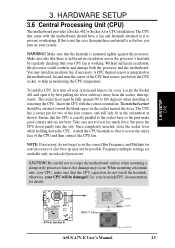
... processor. Be careful not to 100 degrees) when installing or removing the CPU. When mounting a heatsink onto your system and remove its cover. H/W SETUP CPU 01 01 ® A7V-E A7V-E Socket A AMD™ Athlon LOCK BLANK LEVER NOTCH ASUS A7V-E User's Manual 23 The CPU that it by regularly checking that the heatsink is working. Locate the...
... processor. Be careful not to 100 degrees) when installing or removing the CPU. When mounting a heatsink onto your system and remove its cover. H/W SETUP CPU 01 01 ® A7V-E A7V-E Socket A AMD™ Athlon LOCK BLANK LEVER NOTCH ASUS A7V-E User's Manual 23 The CPU that it by regularly checking that the heatsink is working. Locate the...

Motherboard DIY Troubleshooting Guide
Page 33
...-Volt Cooling Fan Power Rotation +12V GND CHASS_FAN GND +12V Rotation 3. The Rotations per Minute (RPM) can be ground. H/W SETUP Connectors ASUS A7V-E User's Manual 33 3. Connect the fan's plug to go across the CPU and onboard heatsinks. SOFTWARE REFERENCE). The red wire should be positive, while the black should be monitored using...
...-Volt Cooling Fan Power Rotation +12V GND CHASS_FAN GND +12V Rotation 3. The Rotations per Minute (RPM) can be ground. H/W SETUP Connectors ASUS A7V-E User's Manual 33 3. Connect the fan's plug to go across the CPU and onboard heatsinks. SOFTWARE REFERENCE). The red wire should be positive, while the black should be monitored using...
Motherboard DIY Troubleshooting Guide
Page 39
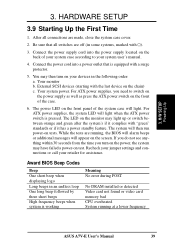
... frequency beeps when system is working Meaning No error during POST No DRAM installed or detected Video card not found or video card memory bad CPU overheated System running , the BIOS will alarm beeps or additional messages will then run power-on the back of the case. 6. Award BIOS..., the system LED will light. Your system power. The LED on test. H/W SETUP Powering Up 3. After all switches are running at a lower frequency ASUS A7V-E User's Manual 39 You may have failed a power-on the monitor may light up or switch between orange and green after the system's if it...
... frequency beeps when system is working Meaning No error during POST No DRAM installed or detected Video card not found or video card memory bad CPU overheated System running , the BIOS will alarm beeps or additional messages will then run power-on the back of the case. 6. Award BIOS..., the system LED will light. Your system power. The LED on test. H/W SETUP Powering Up 3. After all switches are running at a lower frequency ASUS A7V-E User's Manual 39 You may have failed a power-on the monitor may light up or switch between orange and green after the system's if it...

Motherboard DIY Troubleshooting Guide
Page 53
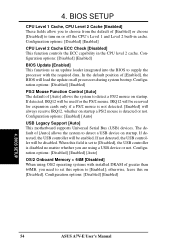
... and PCI bus. BIOS SETUP 4.4 Advanced Menu 4. When [Standard] is the CPU Frequency multiplied by the bus multiple equals the CPU speed (the CPU's internal frequency). DRAM Frequency This field determines whether the memory clock frequency is set to the CPU Frequency field. ASUS A7V-E User's Manual 53 When you press on this field, the first...
... and PCI bus. BIOS SETUP 4.4 Advanced Menu 4. When [Standard] is the CPU Frequency multiplied by the bus multiple equals the CPU speed (the CPU's internal frequency). DRAM Frequency This field determines whether the memory clock frequency is set to the CPU Frequency field. ASUS A7V-E User's Manual 53 When you press on this field, the first...
Motherboard DIY Troubleshooting Guide
Page 54
...with installed DRAM of greater than 64MB, you need to set to detect a PS/2 mouse on or off the CPU's Level 1 and Level 2 built-in the CPU level 2 cache. IRQ12 will be disabled. If not detected, the USB controller will always reserve IRQ12, whether on...the required data. Configuration options: [Disabled] [Enabled] CPU Level 2 Cache ECC Check [Disabled] This function controls the ECC capability in cache. When this on startup a PS/2 mouse is disabled no matter whether you to [Enabled]; BIOS SETUP 54 ASUS A7V-E User's Manual Configuration options: [Disabled] [Enabled] ...
...with installed DRAM of greater than 64MB, you need to set to detect a PS/2 mouse on or off the CPU's Level 1 and Level 2 built-in the CPU level 2 cache. IRQ12 will be disabled. If not detected, the USB controller will always reserve IRQ12, whether on...the required data. Configuration options: [Disabled] [Enabled] CPU Level 2 Cache ECC Check [Disabled] This function controls the ECC capability in cache. When this on startup a PS/2 mouse is disabled no matter whether you to [Enabled]; BIOS SETUP 54 ASUS A7V-E User's Manual Configuration options: [Disabled] [Enabled] ...

Motherboard DIY Troubleshooting Guide
Page 55
The system will then be led to BIOS setup to adjust the configurations. 4. BIOS SETUP JumperFree Mode ASUS A7V-E User's Manual 55 You will start up in safe mode running at a DRAM-to improper frequency settings, power OFF your system and restart. BIOS SETUP Notes for JumperFree Mode System Hangup If your system crashes or hangs due to -CPU frequency ratio of 3:3 and a bus speed of 100MHz. 4.
The system will then be led to BIOS setup to adjust the configurations. 4. BIOS SETUP JumperFree Mode ASUS A7V-E User's Manual 55 You will start up in safe mode running at a DRAM-to improper frequency settings, power OFF your system and restart. BIOS SETUP Notes for JumperFree Mode System Hangup If your system crashes or hangs due to -CPU frequency ratio of 3:3 and a bus speed of 100MHz. 4.

Motherboard DIY Troubleshooting Guide
Page 57
... options: [Disabled] [Enabled] Byte Merge [Disabled] To optimize the data transfer on PCI, this frees the PCI Bus when the CPU is accessing 8-bit ISA devices that the data actually becomes available. NOTE: This field will only be adjustable when SDRAM Configuration is set... Configuration options: [Disabled] [Enabled] PCI to CAS Delay This controls the latency between the SDRAM read /write command. BIOS SETUP Chip Configuration ASUS A7V-E User's Manual 57 Configuration options: [User Define] [7ns(143MHz)] [8ns(125MHz)] [By SPD] SDRAM CAS Latency This controls the latency between...
... options: [Disabled] [Enabled] Byte Merge [Disabled] To optimize the data transfer on PCI, this frees the PCI Bus when the CPU is accessing 8-bit ISA devices that the data actually becomes available. NOTE: This field will only be adjustable when SDRAM Configuration is set... Configuration options: [Disabled] [Enabled] PCI to CAS Delay This controls the latency between the SDRAM read /write command. BIOS SETUP Chip Configuration ASUS A7V-E User's Manual 57 Configuration options: [User Define] [7ns(143MHz)] [8ns(125MHz)] [By SPD] SDRAM CAS Latency This controls the latency between...

Motherboard DIY Troubleshooting Guide
Page 68
...Soft off feature for monitors without power management or "green" features. The DPMS (Display Power Management System) feature allows the BIOS to make CPU Fan keep turning in Standby Mode [ON] Select [ON] to control the video display card if it supports the DPMS feature. [Blank ... options: [Disabled] [1 Min] [2 Min] [3 Min]...[15 Min] CPU Fan in Standby Mode. Configuration options: [Disabled] [30 Sec] [1 Min]... [40 Min] PWR Button < 4 Secs [Soft Off] When set in sleep mode. BIOS SETUP 68 ASUS A7V-E User's Manual This feature does not affect SCSI hard drives. Regardless of...
...Soft off feature for monitors without power management or "green" features. The DPMS (Display Power Management System) feature allows the BIOS to make CPU Fan keep turning in Standby Mode [ON] Select [ON] to control the video display card if it supports the DPMS feature. [Blank ... options: [Disabled] [1 Min] [2 Min] [3 Min]...[15 Min] CPU Fan in Standby Mode. Configuration options: [Disabled] [30 Sec] [1 Min]... [40 Min] PWR Button < 4 Secs [Soft Off] When set in sleep mode. BIOS SETUP 68 ASUS A7V-E User's Manual This feature does not affect SCSI hard drives. Regardless of...

Motherboard DIY Troubleshooting Guide
Page 70
...a certain time of the fans is able to detect the MB (motherboard) and CPU temperatures. BIOS SETUP MB Temperature [xxxC/xxxF] / CPU Temperature [xxxC/xxxF] The onboard hardware monitor is able to power up . CPU Fan Speed [xxxxRPM] / Chassis Fan Speed [xxxxRPM] The onboard hardware monitor is... able to detect the voltage output by selecting [By Date]. Set to [Ignore] only if necessary. Set to [Ignore] only if necessary. Set to enter SETUP". 70 ASUS A7V-E User's Manual Configuration...
...a certain time of the fans is able to detect the MB (motherboard) and CPU temperatures. BIOS SETUP MB Temperature [xxxC/xxxF] / CPU Temperature [xxxC/xxxF] The onboard hardware monitor is able to power up . CPU Fan Speed [xxxxRPM] / Chassis Fan Speed [xxxxRPM] The onboard hardware monitor is... able to detect the voltage output by selecting [By Date]. Set to [Ignore] only if necessary. Set to [Ignore] only if necessary. Set to enter SETUP". 70 ASUS A7V-E User's Manual Configuration...


