User manual for A7S8X-MX
Page 2
SPECIFICATIONS AND INFORMATION CONTAINED IN THIS MANUAL ARE FURNISHED FOR INFORMATIONAL USE ONLY, AND ARE SUBJECT TO CHANGE AT ANY TIME WITHOUT NOTICE, AND SHOULD NOT BE CONSTRUED AS A COMMITMENT BY ASUS. E1766 First Edition V1 September 2004 Copyright © 2004 ASUSTeK COMPUTER INC. All Rights...manual may or may be reproduced, transmitted, transcribed, stored in a retrieval system, or translated into any means, except documentation kept by ASUS; ASUS PROVIDES THIS MANUAL "AS IS" WITHOUT WARRANTY OF ANY KIND, EITHER EXPRESS OR IMPLIED, INCLUDING BUT NOT LIMITED TO THE IMPLIED WARRANTIES...
SPECIFICATIONS AND INFORMATION CONTAINED IN THIS MANUAL ARE FURNISHED FOR INFORMATIONAL USE ONLY, AND ARE SUBJECT TO CHANGE AT ANY TIME WITHOUT NOTICE, AND SHOULD NOT BE CONSTRUED AS A COMMITMENT BY ASUS. E1766 First Edition V1 September 2004 Copyright © 2004 ASUSTeK COMPUTER INC. All Rights...manual may or may be reproduced, transmitted, transcribed, stored in a retrieval system, or translated into any means, except documentation kept by ASUS; ASUS PROVIDES THIS MANUAL "AS IS" WITHOUT WARRANTY OF ANY KIND, EITHER EXPRESS OR IMPLIED, INCLUDING BUT NOT LIMITED TO THE IMPLIED WARRANTIES...
User manual for A7S8X-MX
Page 3
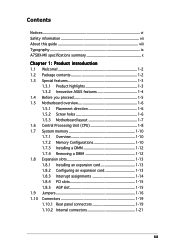
Contents Notices vi Safety information vii About this guide viii Typography ix A7S8X-MX specifications summary x Chapter 1: Product introduction 1.1 Welcome 1-2 1.2 Package contents 1-2 1.3 Special features 1-3 1.3.1 Product highlights 1-3 1.3.2 Innovative ASUS features 1-4 1.4 Before you proceed 1-5 1.5 Motherboard overview 1-6 1.5.1 Placement direction 1-6 1.5.2 Screw holes 1-6 1.5.3 Motherboard layout 1-7 1.6 Central Processing Unit (CPU 1-8 1.7 System memory 1-10 1.7.1 Overview 1-10 1.7.2 Memory Configurations 1-10 1.7.3 Installing a ...
Contents Notices vi Safety information vii About this guide viii Typography ix A7S8X-MX specifications summary x Chapter 1: Product introduction 1.1 Welcome 1-2 1.2 Package contents 1-2 1.3 Special features 1-3 1.3.1 Product highlights 1-3 1.3.2 Innovative ASUS features 1-4 1.4 Before you proceed 1-5 1.5 Motherboard overview 1-6 1.5.1 Placement direction 1-6 1.5.2 Screw holes 1-6 1.5.3 Motherboard layout 1-7 1.6 Central Processing Unit (CPU 1-8 1.7 System memory 1-10 1.7.1 Overview 1-10 1.7.2 Memory Configurations 1-10 1.7.3 Installing a ...
User manual for A7S8X-MX
Page 10
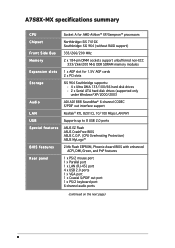
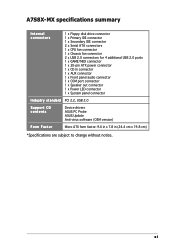
A7S8X-MX specifications summary CPU Chipset Front Side Bus Memory Expansion slots Storage Audio LAN USB Special features BIOS features Rear panel Socket A for AMD Athlon™ XP/... SoundMax® 6-channel CODEC S/PDIF out interface support Realtek® RTL 8201CL 10/100 Mbps LAN PHY Supports up to 8 USB 2.0 ports ASUS EZ Flash ASUS CrashFree BIOS ASUS C.O.P. (CPU Overheating Protection) ASUS MyLogo™ 2 Mb Flash EEPROM, Phoenix-Award BIOS with enhanced ACPI, DMI, Green, and PnP features 1 x PS/2 mouse port 1 x Parallel port...
A7S8X-MX specifications summary CPU Chipset Front Side Bus Memory Expansion slots Storage Audio LAN USB Special features BIOS features Rear panel Socket A for AMD Athlon™ XP/... SoundMax® 6-channel CODEC S/PDIF out interface support Realtek® RTL 8201CL 10/100 Mbps LAN PHY Supports up to 8 USB 2.0 ports ASUS EZ Flash ASUS CrashFree BIOS ASUS C.O.P. (CPU Overheating Protection) ASUS MyLogo™ 2 Mb Flash EEPROM, Phoenix-Award BIOS with enhanced ACPI, DMI, Green, and PnP features 1 x PS/2 mouse port 1 x Parallel port...
User manual for A7S8X-MX
Page 11
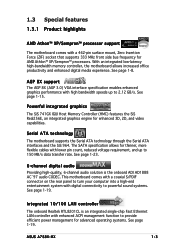
xi A7S8X-MX specifications summary Internal connectors 1 x Floppy disk drive connector 1 x Primary IDE connector 1 x Secondary IDE connector 2 x Serial ATA connectors 1 x CPU fan connector 1 x Chassis fan connector 2 x USB 2.0 ... 1 x COM port connector 1 x Speaker out connector 1 x Power LED connector 1 x System panel connector I n d ustry standard PCI 2.2, USB 2.0 Support CD contents Device drivers ASUS PC Probe ASUS Update Anti-virus software (OEM version) Form Factor Micro ATX form factor: 9.6 in x 7.8 in (24.4 cm x 19.8 cm) *Specifications are subject to change without notice.
xi A7S8X-MX specifications summary Internal connectors 1 x Floppy disk drive connector 1 x Primary IDE connector 1 x Secondary IDE connector 2 x Serial ATA connectors 1 x CPU fan connector 1 x Chassis fan connector 2 x USB 2.0 ... 1 x COM port connector 1 x Speaker out connector 1 x Power LED connector 1 x System panel connector I n d ustry standard PCI 2.2, USB 2.0 Support CD contents Device drivers ASUS PC Probe ASUS Update Anti-virus software (OEM version) Form Factor Micro ATX form factor: 9.6 in x 7.8 in (24.4 cm x 19.8 cm) *Specifications are subject to change without notice.
User manual for A7S8X-MX
Page 15
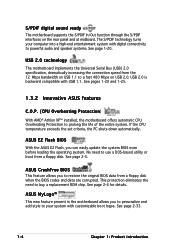
The SATA specification allows for advanced operating systems. See page 1-19. Integrated 10/100 LAN controller The onboard Realtek RTL8201CL is the onboard ADI AD1888 AC`97 audio CODEC. ASUS A7S8X-MX 1-3 See page 1-8. Serial ATA technology The motherboard supports the Serial ATA technology ...the motherboard allows increased office productivity and enhanced digital media experience. AGP 8X support The AGP 8X (AGP 3.0) VGA interface specification enables enhanced graphics performance with a 462-pin surface mount, Zero Insertion Force (ZIF) socket that supports 333 MHz front side...
The SATA specification allows for advanced operating systems. See page 1-19. Integrated 10/100 LAN controller The onboard Realtek RTL8201CL is the onboard ADI AD1888 AC`97 audio CODEC. ASUS A7S8X-MX 1-3 See page 1-8. Serial ATA technology The motherboard supports the Serial ATA technology ...the motherboard allows increased office productivity and enhanced digital media experience. AGP 8X support The AGP 8X (AGP 3.0) VGA interface specification enables enhanced graphics performance with a 462-pin surface mount, Zero Insertion Force (ZIF) socket that supports 333 MHz front side...
User manual for A7S8X-MX
Page 16
...motherboard implements the Universal Serial Bus (USB) 2.0 specification, dramatically increasing the connection speed from the 12 Mbps bandwidth on USB 1.1 to powerful audio and speaker systems. See page 1-20. See page 2-6 for details. ASUS MyLogo™ This new feature present in the motherboard... motherboard supports the S/PDIF In/Out function through the S/PDIF interfaces on USB 2.0. See pages 1-20 and 1-25. 1.3.2 Innovative ASUS features C.O.P. (CPU Overheating Protection) With AMD® Athlon XP™ installed, the motherboard offers automatic CPU Overheating Protection to restore ...
...motherboard implements the Universal Serial Bus (USB) 2.0 specification, dramatically increasing the connection speed from the 12 Mbps bandwidth on USB 1.1 to powerful audio and speaker systems. See page 1-20. See page 2-6 for details. ASUS MyLogo™ This new feature present in the motherboard... motherboard supports the S/PDIF In/Out function through the S/PDIF interfaces on USB 2.0. See pages 1-20 and 1-25. 1.3.2 Innovative ASUS features C.O.P. (CPU Overheating Protection) With AMD® Athlon XP™ installed, the motherboard offers automatic CPU Overheating Protection to restore ...
User manual for A7S8X-MX
Page 20
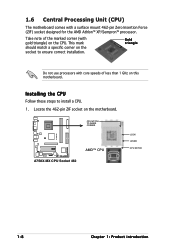
... CPU Follow these steps to ensure correct installation. Locate the 462-pin ZIF socket on the socket to install a CPU. 1. CPU NOTCH TO INNER CORNER A7S8X-MX ® A7S8X-MX CPU Socket 462 AMD™ CPU LOCK LEVER CPU NOTCH 1-8 Chapter 1: Product introduction 1.6 Central Processing Unit (CPU) The motherboard comes with gold triangle) on... corner (with a surface mount 462-pin Zero Insertion Force (ZIF) socket designed for the AMD Athlon™ XP/Sempron™ processor. This mark should match a specific corner on the motherboard.
... CPU Follow these steps to ensure correct installation. Locate the 462-pin ZIF socket on the socket to install a CPU. 1. CPU NOTCH TO INNER CORNER A7S8X-MX ® A7S8X-MX CPU Socket 462 AMD™ CPU LOCK LEVER CPU NOTCH 1-8 Chapter 1: Product introduction 1.6 Central Processing Unit (CPU) The motherboard comes with gold triangle) on... corner (with a surface mount 462-pin Zero Insertion Force (ZIF) socket designed for the AMD Athlon™ XP/Sempron™ processor. This mark should match a specific corner on the motherboard.

User manual for A7S8X-MX
Page 27
The figure shows a LAN card installed on this motherboard! When you ask for 1.5v A7S8X-MX Accelerated Graphics Port (AGP1) Install only 1.5V AGP cards on a PCI slot. 1.8.5 AGP slot This motherboard has an Accelerated Graphics Port (AGP) slot that supports +1..... Note the notches on the card golden fingers to ensure that they fit the AGP slot on your motherboard. ® Keyed for one with PCI specifications. A7S8X-MX ASUS A7S8X-MX 1-15 The PCI slots support cards such as a LAN card, SCSI card, USB card, and other cards that you buy an AGP card, make sure...
The figure shows a LAN card installed on this motherboard! When you ask for 1.5v A7S8X-MX Accelerated Graphics Port (AGP1) Install only 1.5V AGP cards on a PCI slot. 1.8.5 AGP slot This motherboard has an Accelerated Graphics Port (AGP) slot that supports +1..... Note the notches on the card golden fingers to ensure that they fit the AGP slot on your motherboard. ® Keyed for one with PCI specifications. A7S8X-MX ASUS A7S8X-MX 1-15 The PCI slots support cards such as a LAN card, SCSI card, USB card, and other cards that you buy an AGP card, make sure...
User manual for A7S8X-MX
Page 37
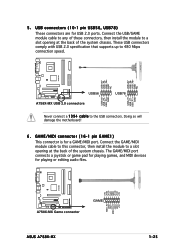
... the module to a slot opening at the back of the system chassis. A7S8X-MX +5V J1B2 J1CY GND GND J1CX J1B1 +5V ® A7S8X-MX Game connector GAME ASUS A7S8X-MX MIDI_IN J2B2 J2CY MIDI_OUT J2CX J2B1 +5V 1-25 These USB connectors comply with USB 2.0 specification that supports up to the USB connectors. GAME/MIDI connector (16-1 pin...
... the module to a slot opening at the back of the system chassis. A7S8X-MX +5V J1B2 J1CY GND GND J1CX J1B1 +5V ® A7S8X-MX Game connector GAME ASUS A7S8X-MX MIDI_IN J2B2 J2CY MIDI_OUT J2CX J2B1 +5V 1-25 These USB connectors comply with USB 2.0 specification that supports up to the USB connectors. GAME/MIDI connector (16-1 pin...
User manual for A7S8X-MX
Page 54
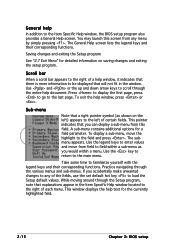
...display a sub-menu, move from field to the main menu. While moving around through the Setup program, note that will not fit in the Item Specific Help window located to the left ) appears to the right of the fields, use the set default hot key to familiarize yourself with the legend... last page. If you can display a sub-menu from any of each menu. Use and or the up and down arrow keys to the Item Specific Help window, the BIOS setup program also provides a General Help screen. A sub-menu contains additional options for a field parameter. Sub-menu Note that you ...
...display a sub-menu, move from field to the main menu. While moving around through the Setup program, note that will not fit in the Item Specific Help window located to the left ) appears to the right of the fields, use the set default hot key to familiarize yourself with the legend... last page. If you can display a sub-menu from any of each menu. Use and or the up and down arrow keys to the Item Specific Help window, the BIOS setup program also provides a General Help screen. A sub-menu contains additional options for a field parameter. Sub-menu Note that you ...
User manual for A7S8X-MX
Page 55
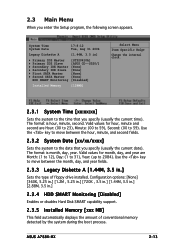
..., the following screen appears. Valid values for hour, minute and second are Month: (1 to 12), Day: (1 to 31), Year: (up to 59). ASUS A7S8X-MX 2-13 Valid values for month, day, and year are Hour: (00 to 23), Minute: (00 to 59), Second: (00 to 2084). The format ...Slave Secondary IDE Master Secondary IDE Slave First SATA Master Second SATA Master HDD SMART Monitoring [ST320410A] [ASUS CD--S520/] [None] [None] [None] [None] [Disabled] Installed Memory [128MB] Select Menu Item Specific Help Change the internal clock. 2.3.1 System Time [xx:xx:xx] Sets the system to the date...
..., the following screen appears. Valid values for hour, minute and second are Month: (1 to 12), Day: (1 to 31), Year: (up to 59). ASUS A7S8X-MX 2-13 Valid values for month, day, and year are Hour: (00 to 23), Minute: (00 to 59), Second: (00 to 2084). The format ...Slave Secondary IDE Master Secondary IDE Slave First SATA Master Second SATA Master HDD SMART Monitoring [ST320410A] [ASUS CD--S520/] [None] [None] [None] [None] [Disabled] Installed Memory [128MB] Select Menu Item Specific Help Change the internal clock. 2.3.1 System Time [xx:xx:xx] Sets the system to the date...

User manual for A7S8X-MX
Page 56
... Access Mode Capacity Cylinder Head Sector PIO Mode UDMA Mode Transfer Mode [Auto] [Auto] 20021 MB 38792 16 63 [Auto] [Auto] None Select Menu Item Specific Help Press [Enter] to recognize the installed hard disk. If automatic detection is too old or too new. Refer to the next section for the...
... Access Mode Capacity Cylinder Head Sector PIO Mode UDMA Mode Transfer Mode [Auto] [Auto] 20021 MB 38792 16 63 [Auto] [Auto] None Select Menu Item Specific Help Press [Enter] to recognize the installed hard disk. If automatic detection is too old or too new. Refer to the next section for the...

User manual for A7S8X-MX
Page 57
... and Second SATA Master Primary IDE Master Extended IDE Drive Access Mode Capacity Cylinder Head Precomp Landing Zone Sector [Auto] [Auto] 0 MB 0 0 0 0 0 Select Menu Item Specific Help Selects the type of the different modes. Refer to the previous page for the remaining fields on this sub-menu. Set to [Disabled] to... 0] [Mode 1] [Mode 2] [Mode 3] [Mode 4] UDMA Mode [Auto] Ultra DMA capability allows improved transfer speeds and data integrity for the IDE device. Configuration options: [Large] [Auto] ASUS A7S8X-MX 2-15
... and Second SATA Master Primary IDE Master Extended IDE Drive Access Mode Capacity Cylinder Head Precomp Landing Zone Sector [Auto] [Auto] 0 MB 0 0 0 0 0 Select Menu Item Specific Help Selects the type of the different modes. Refer to the previous page for the remaining fields on this sub-menu. Set to [Disabled] to... 0] [Mode 1] [Mode 2] [Mode 3] [Mode 4] UDMA Mode [Auto] Ultra DMA capability allows improved transfer speeds and data integrity for the IDE device. Configuration options: [Large] [Auto] ASUS A7S8X-MX 2-15

User manual for A7S8X-MX
Page 58
CPU Configuration Chipset PCIPnP Onboard Device Configuration USB Configuration Select Menu Item Specific Help Press Enter to malfunction. Take caution when changing the settings of the Advanced menu items. Incorrect field values may cause the system to Set. 2-16 Chapter 2: BIOS setup 2.4 Advanced Menu The Advanced menu items allow you to change the settings for the CPU and other system devices.
CPU Configuration Chipset PCIPnP Onboard Device Configuration USB Configuration Select Menu Item Specific Help Press Enter to malfunction. Take caution when changing the settings of the Advanced menu items. Incorrect field values may cause the system to Set. 2-16 Chapter 2: BIOS setup 2.4 Advanced Menu The Advanced menu items allow you to change the settings for the CPU and other system devices.

User manual for A7S8X-MX
Page 59
CPU Configuration CPU Type CPU Speed Cache RAM AMD Sempron(tm) 1500 MHz 256 K Select Menu Item Specific Help ASUS A7S8X-MX 2-17 2.4.1 CPU configuration The items in this menu show the CPU-related information auto-detected by the BIOS.
CPU Configuration CPU Type CPU Speed Cache RAM AMD Sempron(tm) 1500 MHz 256 K Select Menu Item Specific Help ASUS A7S8X-MX 2-17 2.4.1 CPU configuration The items in this menu show the CPU-related information auto-detected by the BIOS.

User manual for A7S8X-MX
Page 60
Chipset AGP Bridge Configuration Frequency Control Init Display First [AGP slot] Select Menu Item Specific Help Press Enter to display a pop-up menu with the configuration options. AGP Bridge Configuration AGP Bridge Configuration Graphics Aperture Size AGP ...Fast Write Support AGP Data Transfer Rate Dual Display Support Onboard Shared Memory [64MB] [Disabled] [Auto] [Disabled] [32 MB] Select Menu Item Specific Help Select AGP aperture size. 2-18 Chapter 2: BIOS setup 2.4.2 Chipset configuration The items in this menu show the chipset configuration settings. Select an item ...
Chipset AGP Bridge Configuration Frequency Control Init Display First [AGP slot] Select Menu Item Specific Help Press Enter to display a pop-up menu with the configuration options. AGP Bridge Configuration AGP Bridge Configuration Graphics Aperture Size AGP ...Fast Write Support AGP Data Transfer Rate Dual Display Support Onboard Shared Memory [64MB] [Disabled] [Auto] [Disabled] [32 MB] Select Menu Item Specific Help Select AGP aperture size. 2-18 Chapter 2: BIOS setup 2.4.2 Chipset configuration The items in this menu show the chipset configuration settings. Select an item ...

User manual for A7S8X-MX
Page 62
Frequency Control Frequency Voltage Control CPU: DRAM Frequency Ratio DRAM Frequency CPU Frequency [SPD] 133 MHz [166] Select Menu Item Specific Help Select AGP aperture size. The BIOS auto-detects the value of this item. The BIOS auto-detects the value of this item. Configuration options: [...
Frequency Control Frequency Voltage Control CPU: DRAM Frequency Ratio DRAM Frequency CPU Frequency [SPD] 133 MHz [166] Select Menu Item Specific Help Select AGP aperture size. The BIOS auto-detects the value of this item. The BIOS auto-detects the value of this item. Configuration options: [...
User manual for A7S8X-MX
Page 63
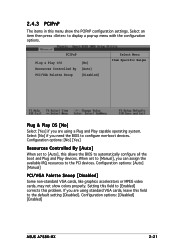
Select an item then press to configure non-boot devices. Configuration options: [Disabled] [Enabled] ASUS A7S8X-MX 2-21 If you are using a Plug and Play capable operating system. Setting this field to [Enabled] corrects this field to the default setting [Disabled... all the boot and Plug and Play devices. PCIPnP Plug & Play O/S Resources Controlled By PCI/VGA Palette Snoop [No] [Auto] [Disabled] Select Menu Item Specific Help Plug & Play OS [No] Select [Yes] if you are using standard VGA cards, leave this problem. Configuration options: [No] [Yes] Resources Controlled ...
Select an item then press to configure non-boot devices. Configuration options: [Disabled] [Enabled] ASUS A7S8X-MX 2-21 If you are using a Plug and Play capable operating system. Setting this field to [Enabled] corrects this field to the default setting [Disabled... all the boot and Plug and Play devices. PCIPnP Plug & Play O/S Resources Controlled By PCI/VGA Palette Snoop [No] [Auto] [Disabled] Select Menu Item Specific Help Plug & Play OS [No] Select [Yes] if you are using standard VGA cards, leave this problem. Configuration options: [No] [Yes] Resources Controlled ...
User manual for A7S8X-MX
Page 64
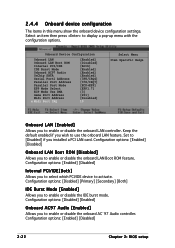
... Midi Port Address x Midi Port IRQ [Enabled] [Disabled] [Both] [Enabled] [Enabled] [Enabled] [3F8/IRQ4] [378/IRQ7] [ECP+EPP] [EPP1.7] [3] [201] [Disabled] 10 Select Menu Item Specific Help Onboard LAN [Enabled] Allows you wish to enable or disable the onboard LAN controller. Keep the default enabled if you to use the onboard...
... Midi Port Address x Midi Port IRQ [Enabled] [Disabled] [Both] [Enabled] [Enabled] [Enabled] [3F8/IRQ4] [378/IRQ7] [ECP+EPP] [EPP1.7] [3] [201] [Disabled] 10 Select Menu Item Specific Help Onboard LAN [Enabled] Allows you wish to enable or disable the onboard LAN controller. Keep the default enabled if you to use the onboard...
User manual for A7S8X-MX
Page 66
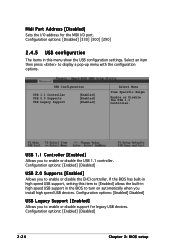
... press to enable or disable support for the MIDI I/O port. USB Configuration USB 1.1 Controller USB 2.0 Supports USB Legacy Support [Enabled] [Enabled] [Enabled] Select Menu Item Specific Help Enable or Disable the USB 1.1 Controller. If the BIOS has built-in high speed USB support, setting this item to turn on automatically when...
... press to enable or disable support for the MIDI I/O port. USB Configuration USB 1.1 Controller USB 2.0 Supports USB Legacy Support [Enabled] [Enabled] [Enabled] Select Menu Item Specific Help Enable or Disable the USB 1.1 Controller. If the BIOS has built-in high speed USB support, setting this item to turn on automatically when...
